Bài 35-Truy cập NodeJS RESTful Web Services với thư viện Volley và Retrofit (FINAL)

Đây là bài học cuối cùng, kết thúc chuỗi series bài học về NodeJS- MongoDB. Toàn bộ bài học được tổng hợp trong trang này.

Có rất nhiều kỹ thuật để truy cập các WEB API, tùy vào nhu cầu của lập trình viên mà ta lựa chọn các thư viện khác nhau. Ở đây dân chúng hay bàn luận về Volley Retrofit cũng như so sánh phân vân nên chọn cái nào? mấy câu hỏi này bạn tự Google search nha. Bạn chỉ cần biết là ta có thêm 2 thư viện Volley Retrofit để truy cập WEB API là đủ rồi, còn cụ thể như thế nào thì cứ hỏi bác Google là OK á.

Trong bài này Tui chỉ giới thiệu sơ Volley để lấy danh sách Product thôi nha (chi tiết bạn xem trên Blog của Alif’s Blog để áp dụng cho các Web API còn lại, nó vô cùng đơn giản nhưng Tui busy quá không quá trình bày tất tần tật được), Retrofit bạn tự search.

Bước 1:

Tạo một Android Kotlin Project tên VolleyToNodeJS.

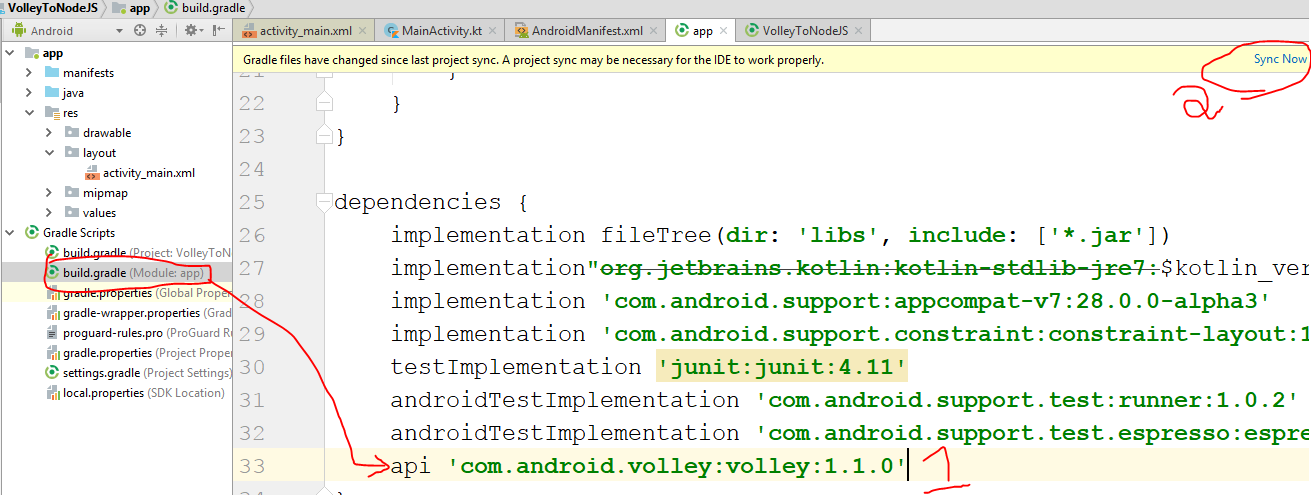
thêm lệnh api ‘com.android.volley:volley:1.1.0’ trong build.gradle của app level

Sau khi gõ lệnh xong thì nhớ bấm mục số 2 (Sync now)==>Lúc này thư viện volley sẽ được đưa vào ứng dụng và ta sử dụng nó một cách dễ dàng, đơn giản nhất.

Bước 2:

Thêm một ListView cho màn hình chính MainActivity như sau:

[code language=”xml”]

<?xml version=”1.0″ encoding=”utf-8″?>
<LinearLayout xmlns:android=”http://schemas.android.com/apk/res/android”
xmlns:app=”http://schemas.android.com/apk/res-auto”
xmlns:tools=”http://schemas.android.com/tools”
android:layout_width=”match_parent”
android:layout_height=”match_parent”
android:orientation=”vertical”
tools:context=”.MainActivity”>

<ListView
android:id=”@+id/lvProduct”
android:layout_width=”match_parent”
android:layout_height=”match_parent” />
</LinearLayout>

[/code]

Bước 3:

Coding sử dụng Volley để triệu gọi Web API lấy danh sách Product đơn giản như sau:

[code language=”java”]

fun TaiDanhSachProduct_Volley()
{
var url=”http://192.168.1.137/nodejsapi/products”
val queue = Volley.newRequestQueue(this)

val getRequest = JsonArrayRequest(Request.Method.GET, url, null,
object : Response.Listener<JSONArray> {
override fun onResponse(response: JSONArray) {
//response là 1 JSonArray chưa danh sách Product->ta phân tích để lấy dữ liệu trong này ra là ok
}
},
object : Response.ErrorListener {
override fun onErrorResponse(error: VolleyError) {
Log.d(“Error.Response”, error.toString())
}
}
)
queue.add(getRequest)
}

[/code]

Tổng thể ta có coding cuối cùng cho MainActivity như sau:

[code language=”java”]

package com.communityuni.volleytonodejs

import android.support.v7.app.AppCompatActivity
import android.os.Bundle
import android.util.Log
import android.widget.ArrayAdapter
import android.widget.ListView
import com.android.volley.Request
import com.android.volley.toolbox.Volley
import com.android.volley.RequestQueue
import com.android.volley.Response
import com.android.volley.VolleyError
import com.android.volley.toolbox.JsonArrayRequest
import org.json.JSONObject
import com.android.volley.toolbox.JsonObjectRequest
import org.json.JSONArray

class MainActivity : AppCompatActivity() {

lateinit var lvProduct:ListView
lateinit var adapter: ArrayAdapter<String>
override fun onCreate(savedInstanceState: Bundle?) {
super.onCreate(savedInstanceState)
setContentView(R.layout.activity_main)
addControls()
}
private fun addControls() {
lvProduct=findViewById(R.id.lvProduct)
adapter= ArrayAdapter(this,android.R.layout.simple_list_item_1)
lvProduct.adapter=adapter
}

override fun onResume() {
super.onResume()
TaiDanhSachProduct_Volley()
}
fun TaiDanhSachProduct_Volley()
{
var url=”http://192.168.1.137/nodejsapi/products”
val queue = Volley.newRequestQueue(this)

val getRequest = JsonArrayRequest(Request.Method.GET, url, null,
object : Response.Listener<JSONArray> {
override fun onResponse(response: JSONArray) {
//response là 1 JSonArray chưa danh sách Product
adapter.clear()
for (i in 0 until response.length())
{
var jsonObject=response.getJSONObject(i)
var line=jsonObject.getString(“Ma”)+
“\n”+jsonObject.getString(“Ten”)+
“\n”+jsonObject.getDouble(“DonGia”)
adapter.add(line)
}
}
},
object : Response.ErrorListener {
override fun onErrorResponse(error: VolleyError) {
Log.d(“Error.Response”, error.toString())
}
}
)
queue.add(getRequest)
}
}

[/code]

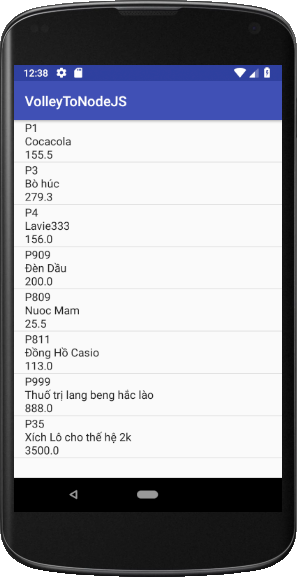
Chạy lên ta có kết quả:

Còn các API khác (POST, PUT, DELETE, GET chi tiết Product) các bạn cố gắng tự mày mò nha.Vì Volley là một trong những thư viện vô cùng đơn giản, dễ sử dụng và rất hiệu quả, nếu không làm được thì có thể add Facebook http://facebook.com/duythanhcse , Tui sẽ support khi rảnh

Coding của bài này tải ở đây

Chúc các bạn thành công!

Bài 34-Truy cập NodeJS RESTful Web Services bằng Android Kotlin-HTTPPOST

Chúc mừng các bạn đã lết được tới Web API cuối cùng, đó là triệu gọi HTTPPOST để thêm mới Product. Tiếp tục mở lại project AndroidKotlinToNodeJS bài 33.

Trong bài này các bạn bổ sung 1 Menu “Thêm Product”, nhấn vào menu này sẽ hiển thị ra màn hình Thêm mới để cho phép người dùng nhập mới Product, bấm lưu để thêm Product vào MongoDB bằng cách triệu gọi Web API http://192.168.1.137/nodejsapi/addProduct (dĩ nhiên máy bạn cấu hình sao thì lấy theo vậy, copy y xì Tui là đạp xích lô đó nha).
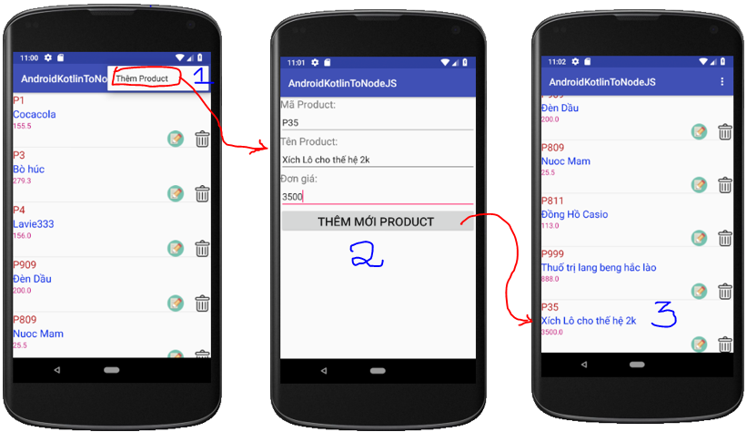
Chi tiết các bước coding như sau:

Bước 1: Tạo 1 Option Menu cho ứng dụng, Option menu này chứa 1 MenuItem là Thêm Product
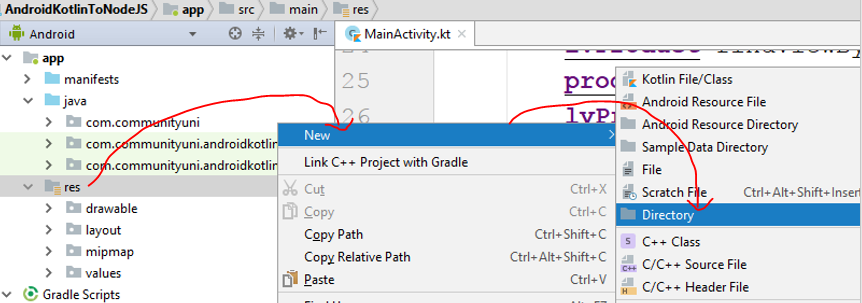
Bấm chuộc phải vào thư mục res/ chọn New/ chọn Directory:

Đặt tên là menu rồi bấm OK

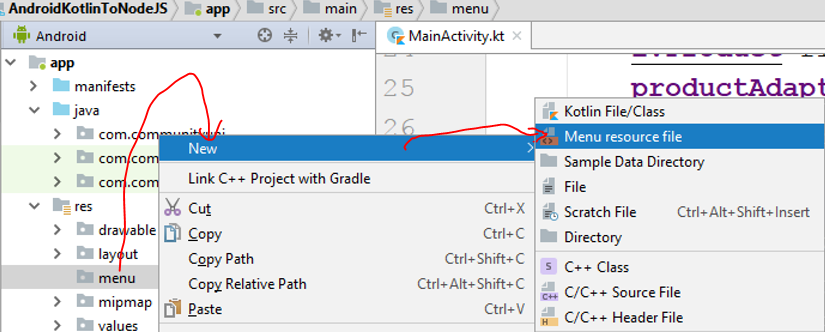
Khi thư mục menu được tạo ra, ta bấm chuột phải vào nó/ chọn New/ chọn Menu Resource file:
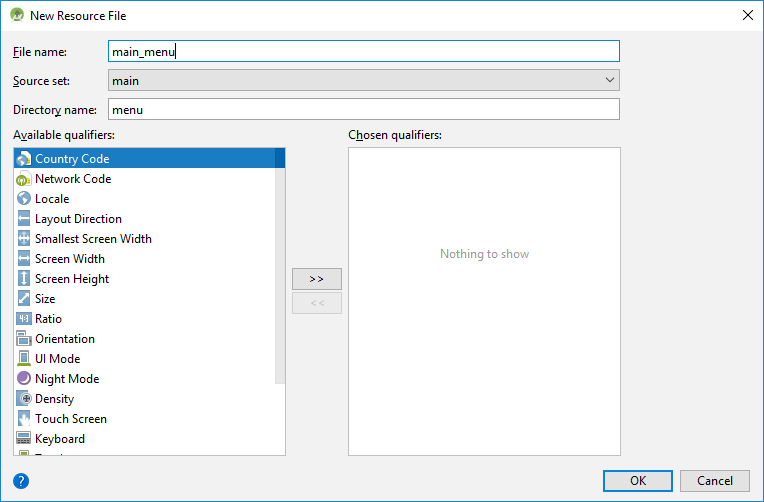
Đặt tên main_menu rồi bấm OK

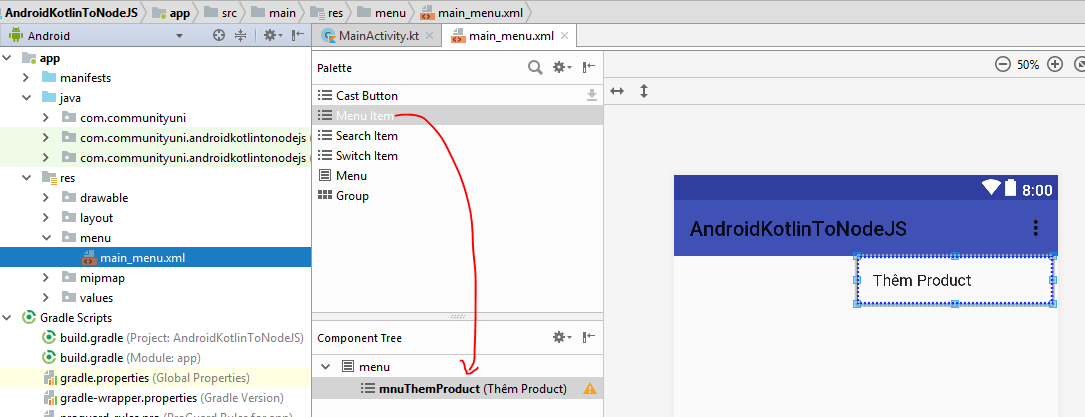
Ta kéo một Menu Item vào trong menu, đặt id là mnuThemProduct, nhãn là “Thêm Product”

cấu trúc XML của main_menu.xml như sau:

[code language=”xml”]

<?xml version=”1.0″ encoding=”utf-8″?>
<menu xmlns:android=”http://schemas.android.com/apk/res/android”>

<item
android:id=”@+id/mnuThemProduct”
android:title=”Thêm Product” />
</menu>

[/code]

Nạp Menu này vào cho màn hình chính (MainActivity) bằng cách override 2 hàm sau:

[code language=”java”]

override fun onCreateOptionsMenu(menu: Menu?): Boolean {
menuInflater.inflate(R.menu.main_menu,menu)
return super.onCreateOptionsMenu(menu)
}
override fun onOptionsItemSelected(item: MenuItem?): Boolean {
if(item!!.itemId==R.id.mnuThemProduct)
{
var intent=Intent(this,ThemProductActivity::class.java)
startActivity(intent)
}
return super.onOptionsItemSelected(item)
}

[/code]

Chú ý ở trên Tui có xử lý sự kiện khi người dùng nhấn vào menu Thêm Product thì mở màn hình ThemProductActivity (xem bước 2)

Bước 2: Tạo một màn hình mới tên là ThemProductActivity
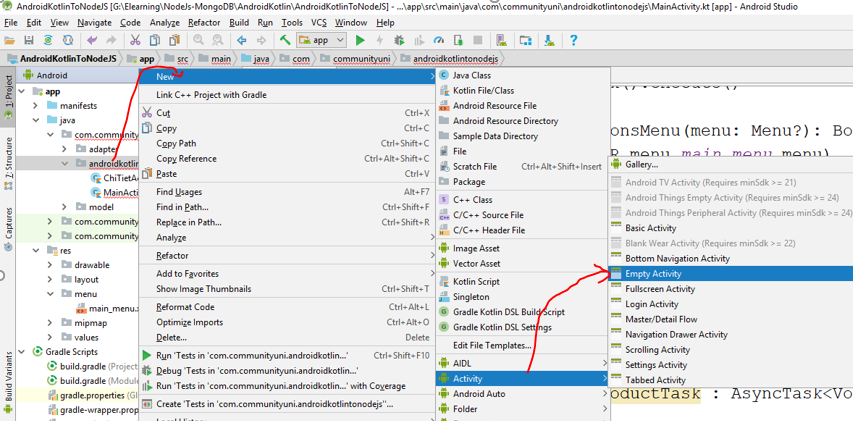
Tương tự như tạo màn hình ChiTietActivity, ta cũng Bấm chuột phải vào Package chứa MainActivity rồi chọn New/ chọn Activity/ chọn Empty Activity
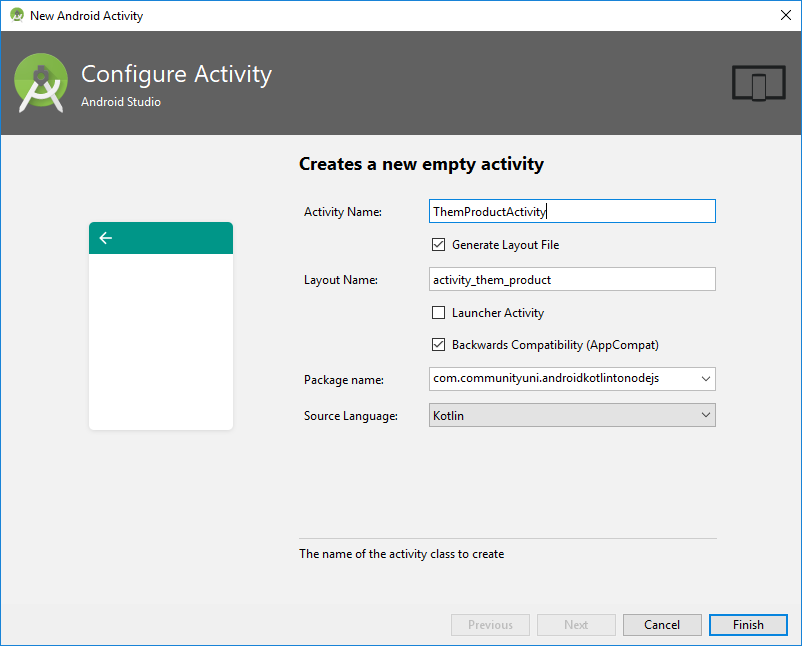
đặt tên ThemProductActivity và cấu hình như trên rồi bấm Finish

tiến hành thiết kế giao diện cho màn hình Thêm Product (chỉnh layout cho activity_them_product.xml), màn hình này phải cung cấp ô nhập: Mã, Tên, Đơn giá:

[code language=”xml”]

<?xml version=”1.0″ encoding=”utf-8″?>
<LinearLayout xmlns:android=”http://schemas.android.com/apk/res/android”
xmlns:app=”http://schemas.android.com/apk/res-auto”
xmlns:tools=”http://schemas.android.com/tools”
android:layout_width=”match_parent”
android:layout_height=”match_parent”
android:orientation=”vertical”
tools:context=”.ThemProductActivity”>
<TextView
android:id=”@+id/textView2″
android:layout_width=”match_parent”
android:layout_height=”wrap_content”
android:text=”Mã Product:”
android:textSize=”20sp” />

<EditText
android:id=”@+id/edtMa”
android:layout_width=”match_parent”
android:layout_height=”wrap_content”
android:ems=”10″
android:inputType=”textPersonName” />

<TextView
android:id=”@+id/textView”
android:layout_width=”match_parent”
android:layout_height=”wrap_content”
android:text=”Tên Product:”
android:textSize=”20sp” />

<EditText
android:id=”@+id/edtTen”
android:layout_width=”match_parent”
android:layout_height=”wrap_content”
android:ems=”10″
android:inputType=”textPersonName” />
<TextView
android:id=”@+id/textView3″
android:layout_width=”match_parent”
android:layout_height=”wrap_content”
android:text=”Đơn giá:”
android:textSize=”20sp” />

<EditText
android:id=”@+id/edtDonGia”
android:layout_width=”match_parent”
android:layout_height=”wrap_content”
android:ems=”10″
android:inputType=”numberDecimal” />

<Button
android:onClick=”xuLyThemMoiProduct”
android:id=”@+id/btnLuu”
android:layout_width=”match_parent”
android:layout_height=”wrap_content”
android:text=”Thêm mới Product”
android:textSize=”20sp” />

</LinearLayout>

[/code]

Giao diện bên GUI sẽ như sau:

Bước 3: Coding cho ThemProductActivity

Coding khởi tạo các biến control để truy suất tới các ô nhập liệu như Mã, Tên, đơn giá:

[code language=”java”]

package com.communityuni.androidkotlintonodejs

import android.os.AsyncTask
import android.support.v7.app.AppCompatActivity
import android.os.Bundle
import android.util.Log
import android.view.View
import android.widget.EditText
import android.widget.Toast
import com.communityuni.model.Product
import java.io.BufferedWriter
import java.io.OutputStreamWriter
import java.net.HttpURLConnection
import java.net.URL

class ThemProductActivity : AppCompatActivity() {
lateinit var edtMa: EditText
lateinit var edtTen: EditText
lateinit var edtDonGia: EditText
override fun onCreate(savedInstanceState: Bundle?) {
super.onCreate(savedInstanceState)
setContentView(R.layout.activity_them_product)
addControls()
}
private fun addControls() {
edtMa=findViewById(R.id.edtMa)
edtTen=findViewById(R.id.edtTen)
edtDonGia=findViewById(R.id.edtDonGia)
}
fun xuLyThemMoiProduct(v:View)
{

}
private fun thongBao(result: Boolean?) {
if(result==true)
{
Toast.makeText(applicationContext,”Thêm mới Product thành công”, Toast.LENGTH_LONG).show()
finish()
}
else
{
Toast.makeText(applicationContext,”Thêm mới Product thất bại”, Toast.LENGTH_LONG).show()
}
}
}

[/code]

Tiếp tục bổ sung thêm đa tiến trình HTTPPOSTProductTask trong màn hình ThemProductActivity để triệu gọi API thêm mới Product (http://192.168.1.137/nodejsapi/addProduct)

[code language=”java”]

inner class HTTPPOSTProductTask : AsyncTask<Product, Void, Boolean>()
{
override fun doInBackground(vararg p0: Product?): Boolean {
var p:Product?=p0[0]
try
{
var api=”http://192.168.1.137/nodejsapi/addProduct”
var url=URL(api)
var urlConnection= url.openConnection() as HttpURLConnection
urlConnection.requestMethod=”POST”
urlConnection.doOutput=true
urlConnection.doInput=true
urlConnection.addRequestProperty(“Content-Type”,
“application/x-www-form-urlencoded; charset=UTF-8”);
val outputStream = urlConnection.getOutputStream()
val bufferedWriter = BufferedWriter(OutputStreamWriter(outputStream, “UTF-8”))
val put_data = p!!.parameters()
bufferedWriter.write(put_data)
bufferedWriter.flush()
bufferedWriter.close()
outputStream.close()
var result =urlConnection.inputStream.bufferedReader().readText()
urlConnection.disconnect()
return result.equals(“true”)
}
catch (ex:Exception)
{
Log.e(“LOI”,ex.toString())
}
return false
}
override fun onPostExecute(result: Boolean?) {
super.onPostExecute(result)
thongBao(result)
}
}

[/code]

Bổ sung thêm coding cho sự kiện xuLyThemMoiProduct:

[code language=”java”]

fun xuLyThemMoiProduct(v:View)
{
var Ma=edtMa.text.toString()
var Ten=edtTen.text.toString()
var DonGia=edtDonGia.text.toString().toDouble()
var p=Product(Ma,Ten,DonGia)
HTTPPOSTProductTask().execute(p)
}

[/code]

Cuối cùng cho có Coding toàn bộ của màn hình ThemProductActivity như sau:

[code language=”java”]

package com.communityuni.androidkotlintonodejs

import android.os.AsyncTask
import android.support.v7.app.AppCompatActivity
import android.os.Bundle
import android.util.Log
import android.view.View
import android.widget.EditText
import android.widget.Toast
import com.communityuni.model.Product
import java.io.BufferedWriter
import java.io.OutputStreamWriter
import java.net.HttpURLConnection
import java.net.URL

class ThemProductActivity : AppCompatActivity() {
lateinit var edtMa: EditText
lateinit var edtTen: EditText
lateinit var edtDonGia: EditText
override fun onCreate(savedInstanceState: Bundle?) {
super.onCreate(savedInstanceState)
setContentView(R.layout.activity_them_product)
addControls()
}
private fun addControls() {
edtMa=findViewById(R.id.edtMa)
edtTen=findViewById(R.id.edtTen)
edtDonGia=findViewById(R.id.edtDonGia)
}
fun xuLyThemMoiProduct(v:View)
{
var Ma=edtMa.text.toString()
var Ten=edtTen.text.toString()
var DonGia=edtDonGia.text.toString().toDouble()
var p=Product(Ma,Ten,DonGia)
HTTPPOSTProductTask().execute(p)
}
private fun thongBao(result: Boolean?) {
if(result==true)
{
Toast.makeText(applicationContext,”Thêm mới Product thành công”, Toast.LENGTH_LONG).show()
finish()
}
else
{
Toast.makeText(applicationContext,”Thêm mới Product thất bại”, Toast.LENGTH_LONG).show()
}
}
inner class HTTPPOSTProductTask : AsyncTask<Product, Void, Boolean>()
{
override fun doInBackground(vararg p0: Product?): Boolean {
var p:Product?=p0[0]
try
{
var api=”http://192.168.1.137/nodejsapi/addProduct”
var url=URL(api)
var urlConnection= url.openConnection() as HttpURLConnection
urlConnection.requestMethod=”POST”
urlConnection.doOutput=true
urlConnection.doInput=true
urlConnection.addRequestProperty(“Content-Type”,
“application/x-www-form-urlencoded; charset=UTF-8”);
val outputStream = urlConnection.getOutputStream()
val bufferedWriter = BufferedWriter(OutputStreamWriter(outputStream, “UTF-8”))
val put_data = p!!.parameters()
bufferedWriter.write(put_data)
bufferedWriter.flush()
bufferedWriter.close()
outputStream.close()
var result =urlConnection.inputStream.bufferedReader().readText()
urlConnection.disconnect()
return result.equals(“true”)
}
catch (ex:Exception)
{
Log.e(“LOI”,ex.toString())
}
return false
}
override fun onPostExecute(result: Boolean?) {
super.onPostExecute(result)
thongBao(result)
}
}
}

[/code]

Chạy phần mềm lên ta sẽ có được kết quả như mong muốn : Mở được màn hình thêm mới Product, triệu gọi API thêm mới thành công. Như vậy ta đã hoàn thành xong bài triệu gọi Web API HTTPPOST để thêm mới 1 Product.

Source code Triệu gọi Web API thêm mới Product tải ở đây.

Bài sau Tui sẽ giới thiệu cho các Thím một số thư viện Third Party để truy suất RESTful Webservice, như Volley, Retrofit… các Bạn tranh thủ theo dõi để đọc nhé Các khóa học online khác, bạn có thể tham khảo tại đây: https://unica.vn/?aff=11929

Chúc các bạn thành công!
Bài 33-Truy cập NodeJS RESTful Web Services bằng Android Kotlin-HTTPDELETE

Như vậy các bạn đã triệu gọi thành công được 3 RESTful Web API trong ví dụ (lấy danh sách Product, xem chi tiết Product và chỉnh sửa thông tin Product). Bài này ta sẽ coding để Xóa Product khỏi MongoDB thông qua việc triệu gọi API HTTPDELETE.
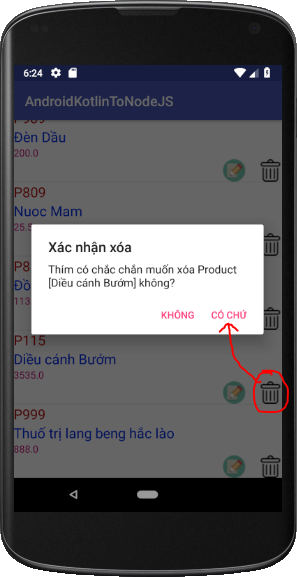
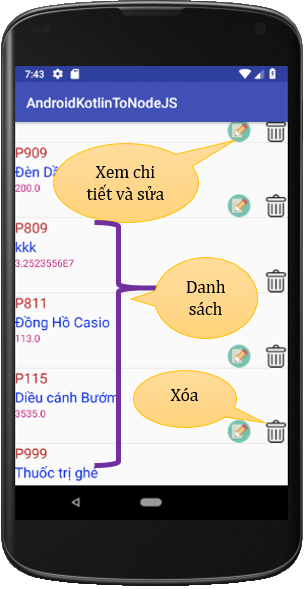
Cụ thể, trong màn hình đầu tiên hiển thị danh sách Product, ta nhấn vào biểu tượng sọt rác, Chương trình sẽ hiển thị cửa sổ hỏi có muốn Xóa hay không (AlertDialog). Nếu chọn Không thì trở về màn hình ban đâu, nếu chọn Có Chứ thì sẽ Xóa Product đó đồng thời gọi lại API hiển thị Danh sách Product để tại lại và hiển thị lên Listview với danh sách mới sau khi xóa.

Vậy ta coding như sau:

Bước 1:

Trong lớp ProductAdapter, bổ sung thêm inner class để xử lý đa tiến trình tên là HTTPDELETEProductTask triệu gọi API xóa Product, coding:

[code language=”java”]

inner class HTTPDELETEProductTask : AsyncTask<Product, Void, Boolean>()
{
override fun doInBackground(vararg p0: Product?): Boolean {
var p:Product?=p0[0]
try
{
var api=”http://192.168.1.137/nodejsapi/deleteProduct”
var url= URL(api)
var urlConnection= url.openConnection() as HttpURLConnection
urlConnection.requestMethod=”DELETE”
urlConnection.doOutput=true
urlConnection.doInput=true
urlConnection.addRequestProperty(“Content-Type”,
“application/x-www-form-urlencoded; charset=UTF-8”);
val outputStream = urlConnection.getOutputStream()
val bufferedWriter = BufferedWriter(OutputStreamWriter(outputStream, “UTF-8”))
val put_data = “Ma=”+p!!.Ma
bufferedWriter.write(put_data)
bufferedWriter.flush()
bufferedWriter.close()
outputStream.close()
var result =urlConnection.inputStream.bufferedReader().readText()
urlConnection.disconnect()
return result.equals(“true”)
}
catch (ex:Exception)
{
Log.e(“LOI”,ex.toString())
}
return false
}
override fun onPostExecute(result: Boolean?) {
super.onPostExecute(result)
if(result==true)
{
(context as MainActivity).HTTPGetListProductTask().execute()
}
}
}

[/code]

Đầu vào là 1 Product (Product này được lấy ra khi ta nhấn vào nút Xóa)

Vì muốn Xóa thì chỉ cần gửi Ma lên mà thôi, nên trong coding Tui viết luôn: val put_data = “Ma=”+p!!.Ma

Bước 2:

Trong hàm getView của ProductAdapter, ta bổ sung khai báo biến và gán sự kiện cho nút Xóa như sau:

[code language=”java”]

var imgDelete=custom.findViewById<ImageView>(R.id.imgDelete)
imgDelete.setOnClickListener{xuLyDelete(p)}

[/code]

hàm xuLyDelete được viết như sau:

[code language=”java”]

private fun xuLyDelete(p: Product?) {
var builder=AlertDialog.Builder(context)
builder.setTitle(“Xác nhận xóa”)
builder.setMessage(“Thím có chắc chắn muốn xóa Product [“+p!!.Ten+”] không?”)
builder.setNegativeButton(“Không”,
DialogInterface.OnClickListener
{ dialogInterface, i -> dialogInterface.dismiss()})
builder.setPositiveButton(“Có chứ”, DialogInterface.OnClickListener
{ dialogInterface, i ->
HTTPDELETEProductTask().execute(p)
})
builder.create().show()
}

[/code]

Vậy cuối cùng ta có coding đầy đủ của lớp ProductAdapter như dưới đây:

[code language=”java”]
package com.communityuni.adapter

import android.app.Activity
import android.app.AlertDialog
import android.content.Context
import android.content.DialogInterface
import android.content.Intent
import android.os.AsyncTask
import android.util.Log
import android.view.View
import android.view.ViewGroup
import android.widget.ArrayAdapter
import android.widget.ImageView
import android.widget.TextView
import com.communityuni.androidkotlintonodejs.ChiTietActivity
import com.communityuni.androidkotlintonodejs.MainActivity
import com.communityuni.androidkotlintonodejs.R
import com.communityuni.model.Product
import java.io.BufferedWriter
import java.io.OutputStreamWriter
import java.net.HttpURLConnection
import java.net.URL

class ProductAdapter(internal var context: Activity, internal var resource: Int) : ArrayAdapter<Product>(context, resource) {

override fun getView(position: Int, convertView: View?, parent: ViewGroup): View {
var custom = context.layoutInflater.inflate(resource, null)
var txtMa = custom.findViewById<TextView>(R.id.txtMa)
var txtTen = custom.findViewById<TextView>(R.id.txtTen)
var txtDonGia = custom.findViewById<TextView>(R.id.txtDonGia)
var p = getItem(position)
txtMa.text = p!!.Ma
txtTen.text = p.Ten
txtDonGia.text = p.DonGia.toString()
var img=custom.findViewById<ImageView>(R.id.imgEdit)
img.setOnClickListener { xuLyEdit(p) }
var imgDelete=custom.findViewById<ImageView>(R.id.imgDelete)
imgDelete.setOnClickListener{xuLyDelete(p)}
return custom
}
private fun xuLyEdit(p: Product?) {
var i=Intent(context,ChiTietActivity::class.java)
i.putExtra(“Ma”,p!!.Ma)
context.startActivity(i)
}
private fun xuLyDelete(p: Product?) {
var builder=AlertDialog.Builder(context)
builder.setTitle(“Xác nhận xóa”)
builder.setMessage(“Thím có chắc chắn muốn xóa Product [“+p!!.Ten+”] không?”)
builder.setNegativeButton(“Không”,
DialogInterface.OnClickListener
{ dialogInterface, i -> dialogInterface.dismiss()})
builder.setPositiveButton(“Có chứ”, DialogInterface.OnClickListener
{ dialogInterface, i ->
HTTPDELETEProductTask().execute(p)
})
builder.create().show()
}
inner class HTTPDELETEProductTask : AsyncTask<Product, Void, Boolean>()
{
override fun doInBackground(vararg p0: Product?): Boolean {
var p:Product?=p0[0]
try
{
var api=”http://192.168.1.137/nodejsapi/deleteProduct”
var url= URL(api)
var urlConnection= url.openConnection() as HttpURLConnection
urlConnection.requestMethod=”DELETE”
urlConnection.doOutput=true
urlConnection.doInput=true
urlConnection.addRequestProperty(“Content-Type”,
“application/x-www-form-urlencoded; charset=UTF-8”);
val outputStream = urlConnection.getOutputStream()
val bufferedWriter = BufferedWriter(OutputStreamWriter(outputStream, “UTF-8”))
val put_data = “Ma=”+p!!.Ma
bufferedWriter.write(put_data)
bufferedWriter.flush()
bufferedWriter.close()
outputStream.close()
var result =urlConnection.inputStream.bufferedReader().readText()
urlConnection.disconnect()
return result.equals(“true”)
}
catch (ex:Exception)
{
Log.e(“LOI”,ex.toString())
}
return false
}
override fun onPostExecute(result: Boolean?) {
super.onPostExecute(result)
if(result==true)
{
(context as MainActivity).HTTPGetListProductTask().execute()
}
}
}
}

[/code]

Chạy phần mềm lên và thao tác Xóa sẽ thành công như Tui hướng dẫn nha.

Như vậy ta đã hoàn thành xong bài triệu gọi Web API HttpDelete để xóa 1 Product.

Source code Triệu gọi Web API xóa Product tải ở đây.

Bài sau Tui sẽ hướng dẫn các Thím cách dùng Android Kotlin để  truy cập API RESTful Thêm mới Product như thế nào. Các bạn chú ý theo dõi nhé (vẫn dùng lại Project này)

Các khóa học online khác, bạn có thể tham khảo tại đây:

https://unica.vn/?aff=11929

Chúc các bạn thành công!

Bài 32-Truy cập NodeJS RESTful Web Services bằng Android Kotlin-HTTPPUT

Tiếp tục mở lại Project AndroidKotlinToNodeJS trong bài 31. Bài học này Tui sẽ hướng dẫn các bạn cách triệu gọi API với HTTPPUT Method (để chỉnh sửa dữ liệu của một Product).

Lưu ý là IISNode của toàn bộ API này được deploy trong bài 28. Và API Edit Product được trình bày chi tiết trong bài 26. Nếu nếu các Thím có quên thì coi lại những bài này (tốt nhất là đừng quên, cứ làm theo tuần tự từ bài 1->bài cuối cùng thì chắc chắn không bao giờ quên. Đừng tỏ vẻ nguy hiểm nhảy cóc sẽ mất thời gian, vì các bài học Tui đã chủ ý thiết kế từ cơ bản đến nâng cao mà bài sau kế thừa bài trước).

Nhắc lại ở bài 31 ta đã triệu gọi API HTTPGET để lấy chi tiết thông tin của một Product hiển thị lên 1 màn hình mới rồi, giờ cũng trong màn hình hiển thị chi tiết đó ta chỉnh sửa thông tin của TÊN + ĐƠN GIÁ rồi bấm lưu thay đổi–>triệu gọi API HTTPPUT để thay đổi.

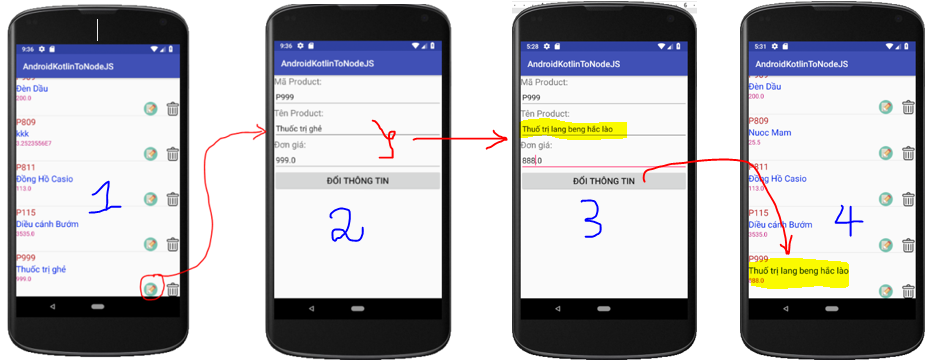
Xem giao diện minh họa dưới đây:

Bước 1: Trong màn hình chính hiển thị danh sách Product, nhấn vào nút Edit

Bước 2: Thông tin chi tiết được hiển thị lên màn hình chi tiết

Bước 3: Trong màn hình chi tiết ta sửa tên và đơn giá rồi bấm nút “Đổi thông tin”

Bước 4: Chương trình tải lại và ta thấy kết quả thay đổi.

Chi tiết các bước lập trình để triệu gọi API HTTPUT chỉnh sửa thông tin Product như sau (trong bài học Tui hướng dẫn thì API này là: http://192.168.1.137/nodejsapi/editProduct (của bạn cấu hình thế nào thì lấy thế đó nha, copy y xì như của Tui là đi đạp xích lô đó nha).

Xem lại hình thử nghiệm trong bài 28:

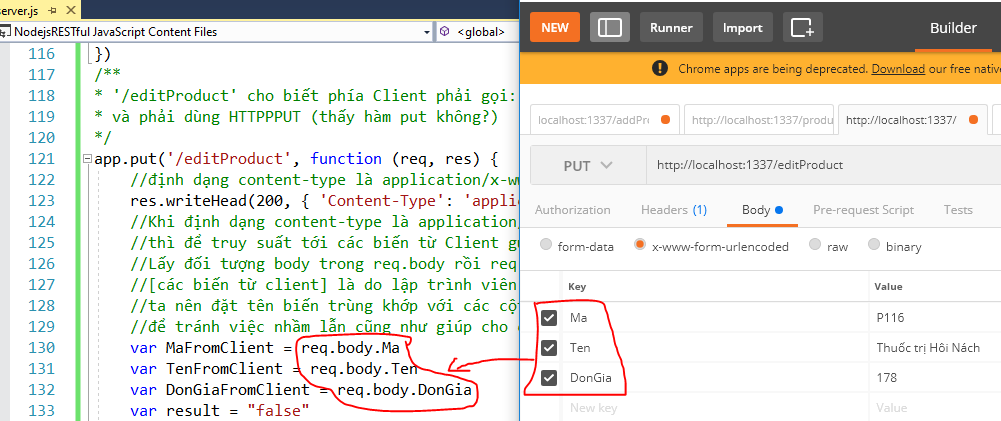
Ở trên ta thấy cần phải truyền 3 Parameter (Ma, Ten, DonGia) từ Android lên cho NodeJS xử lý. Vậy truyền như thế nào? Lưu ý có nhiều thư viện như volley, retrofit… để hỗ trợ tương tác dịch vụ Web. Tuy nhiên các thư viện này Tui chưa sài, nếu có Tui sẽ hướng dẫn thêm ở những bài khác. Bây giờ hãy làm theo chuẩn HttpURLConnection trước.

OK, action nha.

Trong Project AndroidKotlinToNodeJS  các bạn làm theo bước sau:

Bước 1: Chỉnh sửa lớp Product.kt để tạo Parameter gửi lên Server NodeJS

[code language=”java”]

package com.communityuni.model

import java.net.URLEncoder

class Product {
lateinit var _id:Any
lateinit var Ma:String
lateinit var Ten:String
var DonGia:Double=0.0
constructor(ma:String,ten:String,donGia:Double)
{
Ma=ma
Ten=ten
DonGia=donGia
}
override fun toString(): String {
return Ma+”\n”+Ten+”\n”+DonGia+”VNĐ”
}
public fun parameters(): String
{
return “Ma=”+Ma+”&Ten=”+URLEncoder.encode(Ten,”UTF-8”)+”&DonGia=”+DonGia
}
}

[/code]

bạn thấy hàm parameters() ở trên không? Tui coding cho nó trả về 1 chuỗi có cú pháp, đây chính là các nội dung ta gửi lên Server NodeJS để xử lý. Những chuỗi nào liên quan Unicode thì ta phải dùng URLEncoder như trên để mã hóa nó nha, nếu quên sẽ bị failed. Các đối số cách nhau bởi dấu & nha, bạn thay dấu & bằng dấu khác cũng được nhưng mà sai.

Bước 2:

Xử lý coding nhấn vào nút Thay đổi thông tin.

Trong lớp ChiTietActivity.kt bổ sung thêm 1 inner class HTTPPUTProductTask nhiệm vụ của nó là triệu gọi API HTTPUT (http://192.168.1.137/nodejsapi/editProduct) và gửi dữ liệu lên NodeJS Server(dữ liệu được coding trong hàm parameter() của lớp Product.kt. (Bổ sung thêm coding tức là phải giữ nguyên coding cũ, coding cũ Tui không có đưa vào đây nha)

[code language=”java”]

inner class HTTPPUTProductTask : AsyncTask<Product, Void, Boolean>()
{
override fun doInBackground(vararg p0: Product?): Boolean {
var p:Product?=p0[0]
try
{
var api=”http://192.168.1.137/nodejsapi/editProduct”
var url=URL(api)
var urlConnection= url.openConnection() as HttpURLConnection
urlConnection.requestMethod=”PUT”
urlConnection.doOutput=true
urlConnection.doInput=true
urlConnection.addRequestProperty(“Content-Type”,
“application/x-www-form-urlencoded; charset=UTF-8”);
val outputStream = urlConnection.getOutputStream()
val bufferedWriter = BufferedWriter(OutputStreamWriter(outputStream, “UTF-8”))
val put_data = p!!.parameters()
bufferedWriter.write(put_data)
bufferedWriter.flush()
bufferedWriter.close()
outputStream.close()
var result =urlConnection.inputStream.bufferedReader().readText()
urlConnection.disconnect()
return result.equals(“true”)
}
catch (ex:Exception)
{
Log.e(“LOI”,ex.toString())
}
return false
}
override fun onPostExecute(result: Boolean?) {
super.onPostExecute(result)
thongBao(result)
}
}

[/code]

Bước 3: Viết sự kiện cho nút Thay đổi thông tin để gọi đa tiến trình ở bước 2 (Sự kiện các bạn dùng onclick XML nha, nên Tui không chụp lại XML layout nữa vì nó chỉ có 1 thay  đổi nhỏ):

[code language=”java”]

fun xuLyCapNhat(v:View)
{
var Ma=edtMa.text.toString()
var Ten=edtTen.text.toString()
var DonGia=edtDonGia.text.toString().toDouble()
var p=Product(Ma,Ten,DonGia)
HTTPPUTProductTask().execute(p)
}
private fun thongBao(result: Boolean?) {
if(result==true)
{
Toast.makeText(applicationContext,”Cập nhật thành công”,Toast.LENGTH_LONG).show()
finish()
}
else
{
Toast.makeText(applicationContext,”Cập nhật thất bại”,Toast.LENGTH_LONG).show()
}
}

[/code]

OK, vậy là ngon lành cành đạo như cơm mẹ nấu rồi đó, chạy lên ta sẽ có kết quả như mong muốn

Như vậy ta đã hoàn thành xong bài triệu gọi Web API HttpPUT để chỉnh sửa thông tin của 1 Product.

Source code Triệu gọi Web API thay đổi thông tin Product tải ở đây.

Bài sau Tui sẽ hướng dẫn các Thím cách dùng Android Kotlin để  truy cập API RESTful Xóa Product như thế nào. Các bạn chú ý theo dõi nhé (vẫn dùng lại Project này)

Các khóa học online khác, bạn có thể tham khảo tại đây:

https://unica.vn/?aff=11929

Chúc các bạn thành công!

Bài 31-Truy cập NodeJS RESTful Web Services bằng Android Kotlin-HTTPGET

Như vậy các Thím đã biết cách truy cập API lấy toàn bộ Product bằng HTTPGET trong Android Kotlin. Bài này ta tiếp tục truy cập API dùng method HTTP GET để lấy thông tin chi tiết của một Product.

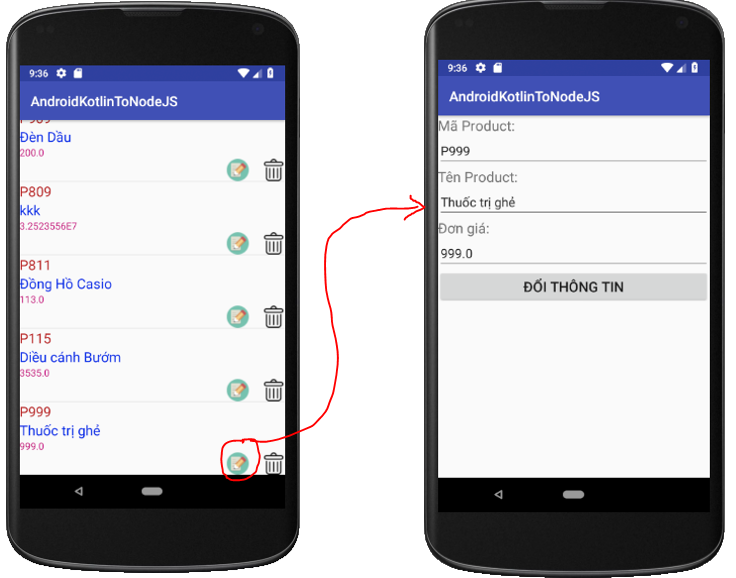
Tiếp tục mở lại Project AndroidKotlinToNodeJS trong bài 30. Trong bài này ta đã có Custom layout có nút Edit. Bây giờ ta xử lý nhấn vào nút Edit đó thì mở màn hình thông tin chi tiết lên (lấy Mã của Product đang chọn rồi truy cập API lấy thông tin chi tiết Product, ví dụ lấy Product có mã P999: http://192.168.1.137/nodejsapi/products/P999

cụ thể, ta có hình sau:

Chi tiết các bước làm như sau:

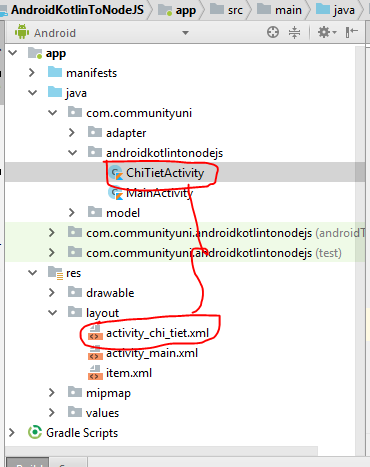
Tạo một Activity mới tên là ChiTietActivity:

Layout XML của activity_chi_tiet.xml:

[code language=”xml”]
<?xml version=”1.0″ encoding=”utf-8″?>
<LinearLayout xmlns:android=”http://schemas.android.com/apk/res/android”
xmlns:app=”http://schemas.android.com/apk/res-auto”
xmlns:tools=”http://schemas.android.com/tools”
android:layout_width=”match_parent”
android:layout_height=”match_parent”
android:orientation=”vertical”
tools:context=”.ChiTietActivity”>

<TextView
android:id=”@+id/textView2″
android:layout_width=”match_parent”
android:layout_height=”wrap_content”
android:text=”Mã Product:”
android:textSize=”20sp” />

<EditText
android:id=”@+id/edtMa”
android:layout_width=”match_parent”
android:layout_height=”wrap_content”
android:ems=”10″
android:inputType=”textPersonName” />

<TextView
android:id=”@+id/textView”
android:layout_width=”match_parent”
android:layout_height=”wrap_content”
android:text=”Tên Product:”
android:textSize=”20sp” />

<EditText
android:id=”@+id/edtTen”
android:layout_width=”match_parent”
android:layout_height=”wrap_content”
android:ems=”10″
android:inputType=”textPersonName” />
<TextView
android:id=”@+id/textView3″
android:layout_width=”match_parent”
android:layout_height=”wrap_content”
android:text=”Đơn giá:”
android:textSize=”20sp” />

<EditText
android:id=”@+id/edtDonGia”
android:layout_width=”match_parent”
android:layout_height=”wrap_content”
android:ems=”10″
android:inputType=”numberDecimal” />

<Button

android:id=”@+id/btnLuu”
android:layout_width=”match_parent”
android:layout_height=”wrap_content”
android:text=”Đổi thông tin”
android:textSize=”20sp” />

</LinearLayout>
[/code]

Tiến hành sửa Coding ProductAdapter:

[code language=”java”]
package com.communityuni.adapter

import android.app.Activity
import android.content.Context
import android.content.Intent
import android.os.AsyncTask
import android.util.Log
import android.view.View
import android.view.ViewGroup
import android.widget.ArrayAdapter
import android.widget.ImageView
import android.widget.TextView
import com.communityuni.androidkotlintonodejs.ChiTietActivity
import com.communityuni.androidkotlintonodejs.R
import com.communityuni.model.Product

class ProductAdapter(internal var context: Activity, internal var resource: Int) : ArrayAdapter<Product>(context, resource) {

override fun getView(position: Int, convertView: View?, parent: ViewGroup): View {
var custom = context.layoutInflater.inflate(resource, null)
var txtMa = custom.findViewById<TextView>(R.id.txtMa)
var txtTen = custom.findViewById<TextView>(R.id.txtTen)
var txtDonGia = custom.findViewById<TextView>(R.id.txtDonGia)
var p = getItem(position)
txtMa.text = p!!.Ma
txtTen.text = p.Ten
txtDonGia.text = p.DonGia.toString()
var img=custom.findViewById<ImageView>(R.id.imgEdit)
img.setOnClickListener { xuLyEdit(p) }
return custom
}

private fun xuLyEdit(p: Product?) {
var i=Intent(context,ChiTietActivity::class.java)
i.putExtra(“Ma”,p!!.Ma)
context.startActivity(i)
}
}
[/code]

Coding ở trên ta bổ sung sự kiện cho ImageView, ta truyền Mã Product được chọn qua màn hình ChiTietActivity.

Bên màn hình ChiTietActivity sẽ nhận được Mã Product này mà truy cập API xem chi tiết Product là xong, Xem coding của lớp ChiTietActivity:

[code language=”java”]
package com.communityuni.androidkotlintonodejs

import android.os.AsyncTask
import android.support.v7.app.AppCompatActivity
import android.os.Bundle
import android.util.Log
import android.widget.EditText
import com.communityuni.model.Product
import org.json.JSONObject
import java.net.URL

class ChiTietActivity : AppCompatActivity() {
lateinit var edtMa:EditText
lateinit var edtTen:EditText
lateinit var edtDonGia:EditText
override fun onCreate(savedInstanceState: Bundle?) {
super.onCreate(savedInstanceState)
setContentView(R.layout.activity_chi_tiet)
addControls()
}

private fun addControls() {
edtMa=findViewById(R.id.edtMa)
edtTen=findViewById(R.id.edtTen)
edtDonGia=findViewById(R.id.edtDonGia)
}

override fun onResume() {
super.onResume()
var ma=intent.getStringExtra(“Ma”)
HTTPGetProductDetailTask().execute(ma)
}
inner class HTTPGetProductDetailTask : AsyncTask<String, Void, Product?>()
{
override fun doInBackground(vararg p0: String?): Product? {
var p:Product?=null
var ma=p0[0]
try
{
var url=URL(“http://192.168.1.137/nodejsapi/products/”+ma)
var urlConnection=url.openConnection()
var data = urlConnection.inputStream.bufferedReader().readText()
var jsonObject=JSONObject(data)
var Ma=jsonObject.getString(“Ma”)
var Ten=jsonObject.getString(“Ten”)
var DonGia=jsonObject.getDouble(“DonGia”)
p=Product(Ma,Ten,DonGia)
}
catch (ex:Exception)
{
Log.e(“LOI”,ex.toString())
}
return p
}
override fun onPostExecute(result: Product?) {
super.onPostExecute(result)
if(result!=null)
{
edtMa.setText(result.Ma)
edtTen.setText(result.Ten)
edtDonGia.setText(result.DonGia.toString())
}
}
}
}
[/code]

bài 30 ta đã biết cách triệu gọi danh sách Product rồi, trong bài 31 này lại đơn giản hơn, nó chỉ trả về duy nhất 1 Product nên ta không cần vòng lặp. Mà lấy luôn từ JSonObject.

Chỗ coding này đã quen thuộc nên Tui sẽ không giải thích kỹ lại nữa vì bạn đã hiểu trong bài 30 rồi.

Như vậy ta đã hoàn thành xong bài triệu gọi Web API lấy Chi Tiết Product được viết bằng NodeJS và Deploy trên IISNode WebServer.

Source code Triệu gọi Web API lấy thông tin chi tiết Product tải ở đây.

Bài sau Tui sẽ hướng dẫn các Thím cách dùng Android Kotlin để  truy cập API RESTful Chỉnh Sửa Product như thế nào. Các bạn chú ý theo dõi nhé (vẫn dùng lại Project này)

Các khóa học online khác, bạn có thể tham khảo tại đây:

https://unica.vn/?aff=11929

Chúc các bạn thành công!

Bài 30-Truy cập NodeJS RESTful Web Services bằng Android Kotlin-HTTPGET

bài 29 Tui đã nói sơ qua các chức năng bạn phải hoàn thành để truy cập mọi Web API được deploy trong bài 28.

Bài này Ta sẽ truy cập Web API lấy toàn bộ danh sách product (với Laptop của Tui thì URI là: http://192.168.1.137/nodejsapi/products , còn của bạn như thế nào thì tự thay đổi nha, copy y xì của Tui là đi bụi đó nha).

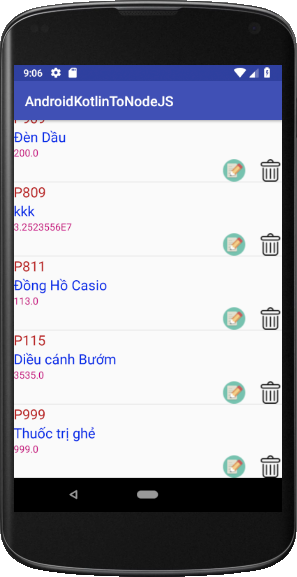
Bây giờ bạn tạo Project tên “AndroidKotlinToNodeJS“, Project này có nhiệm vụ gọi API http://192.168.1.137/nodejsapi/products để hiển thị lên giao diện mobile như sau:

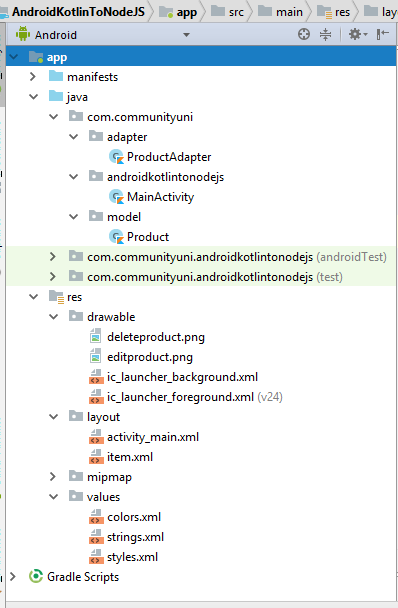
Để thực hiện được bài này ta tiến hành làm các bước sau (Tui bỏ qua bước cách tạo Project nha, đi thẳng vào cấu trúc Project):

Bước 1:

Lên http://iconfinder.com/ tìm 2 hình đại diện cho nút Edit và Delete  như hình mô tả

Tạo 1 file layout item.xml để làm giao diện Custom layout cho ListView, nó sẽ được sử dụng trong lớp ProductAdapter, XML layout của file này như sau:

[code language=”xml”]
<?xml version=”1.0″ encoding=”utf-8″?>
<LinearLayout xmlns:app=”http://schemas.android.com/apk/res-auto”
xmlns:tools=”http://schemas.android.com/tools”
android:orientation=”vertical”
xmlns:android=”http://schemas.android.com/apk/res/android” android:layout_width=”match_parent”
android:layout_height=”match_parent”>

<TextView
android:id=”@+id/txtMa”
android:layout_width=”match_parent”
android:layout_height=”wrap_content”
android:text=”TextView”
android:textColor=”@color/mauchuma”
android:textSize=”20sp” />

<TextView
android:id=”@+id/txtTen”
android:layout_width=”match_parent”
android:layout_height=”wrap_content”
android:text=”TextView”
android:textColor=”@color/mauchuten”
android:textSize=”20sp” />

<TextView
android:id=”@+id/txtDonGia”
android:layout_width=”match_parent”
android:layout_height=”wrap_content”
android:text=”TextView”
android:textColor=”@color/mauchudongia” />

<LinearLayout
android:layout_width=”match_parent”
android:layout_height=”wrap_content”
android:gravity=”right”
android:orientation=”horizontal”>

<ImageView
android:id=”@+id/imgEdit”
android:layout_width=”wrap_content”
android:layout_height=”wrap_content”
android:layout_marginRight=”20dp”
app:srcCompat=”@drawable/editproduct” />

<ImageView
android:id=”@+id/imgDelete”
android:layout_width=”wrap_content”
android:layout_height=”wrap_content”
app:srcCompat=”@drawable/deleteproduct” />
</LinearLayout>

</LinearLayout>
[/code]

Định nghĩa màu trong colors.xml:

[code language=”xml”]
<?xml version=”1.0″ encoding=”utf-8″?>
<resources>
<color name=”colorPrimary”>#3F51B5</color>
<color name=”colorPrimaryDark”>#303F9F</color>
<color name=”colorAccent”>#FF4081</color>

<color name=”maunentieude”>#179a2f</color>
<color name=”mauchutieude”>#fcfbfb</color>
<color name=”mauchuma”>#b92222</color>
<color name=”mauchuten”>#0829e7</color>
<color name=”mauchudongia”>#c50d7c</color>
</resources>
[/code]

Bước 2:

Tạo lớp mô hình Product để sử dụng trong ProductApdater cũng như trong Đa tiến trình truy cấp API

[code language=”java”]
package com.communityuni.model

class Product {
lateinit var _id:Any
lateinit var Ma:String
lateinit var Ten:String
var DonGia:Double=0.0
constructor(ma:String,ten:String,donGia:Double)
{
Ma=ma
Ten=ten
DonGia=donGia
}
override fun toString(): String {
return Ma+”\n”+Ten+”\n”+DonGia+”VNĐ”
}
}

[/code]

Bước 3:

Tạo lớp mô hình ProductAdapter để vẽ giao diện Customlayout lên List cho nó đẹp:

[code language=”java”]
package com.communityuni.adapter

import android.app.Activity
import android.content.Context
import android.os.AsyncTask
import android.util.Log
import android.view.View
import android.view.ViewGroup
import android.widget.ArrayAdapter
import android.widget.ImageView
import android.widget.TextView
import com.communityuni.androidkotlintonodejs.R
import com.communityuni.model.Product

class ProductAdapter(internal var context: Activity, internal var resource: Int) : ArrayAdapter<Product>(context, resource) {

override fun getView(position: Int, convertView: View?, parent: ViewGroup): View {
var custom = context.layoutInflater.inflate(resource, null)
var txtMa = custom.findViewById<TextView>(R.id.txtMa)
var txtTen = custom.findViewById<TextView>(R.id.txtTen)
var txtDonGia = custom.findViewById<TextView>(R.id.txtDonGia)
var p = getItem(position)
txtMa.text = p!!.Ma
txtTen.text = p.Ten
txtDonGia.text = p.DonGia.toString()

return custom
}
}

[/code]

Bước 4:

Coding cho lớp MainActivity để triệu gọi Web API http://192.168.1.137/nodejsapi/products

[code language=”java”]
package com.communityuni.androidkotlintonodejs

import android.os.AsyncTask
import android.support.v7.app.AppCompatActivity
import android.os.Bundle
import android.util.Log
import android.widget.ListView
import com.communityuni.adapter.ProductAdapter
import com.communityuni.model.Product
import org.json.JSONArray
import java.net.URL
import java.util.ArrayList

class MainActivity : AppCompatActivity() {
lateinit var lvProduct: ListView
lateinit var productAdapter: ProductAdapter
override fun onCreate(savedInstanceState: Bundle?) {
super.onCreate(savedInstanceState)
setContentView(R.layout.activity_main)
addControls()
}
private fun addControls() {
lvProduct=findViewById<ListView>(R.id.lvProduct)
productAdapter= ProductAdapter(this,R.layout.item)
lvProduct.adapter=productAdapter
}

override fun onResume() {
super.onResume()
HTTPGetListProductTask().execute()
}
inner class HTTPGetListProductTask : AsyncTask<Void,Void,List<Product>>()
{
override fun onPreExecute() {
super.onPreExecute()
productAdapter.clear()
}
override fun doInBackground(vararg p0: Void?): List<Product> {
var arrayListProduct=ArrayList<Product>()
try
{
var url=URL(“http://192.168.1.137/nodejsapi/products”)
var urlConnection=url.openConnection()
var data = urlConnection.inputStream.bufferedReader().readText()
var jsonArray=JSONArray(data)
for (i in 0 until jsonArray.length())
{
var jsonObject=jsonArray.getJSONObject(i)
var Ma=jsonObject.getString(“Ma”)
var Ten=jsonObject.getString(“Ten”)
var DonGia=jsonObject.getDouble(“DonGia”)
var product=Product(Ma,Ten,DonGia)
arrayListProduct.add(product)
}
}
catch (ex:Exception)
{
Log.e(“LOI”,ex.toString())
}
return arrayListProduct
}
override fun onPostExecute(result: List<Product>?) {
super.onPostExecute(result)
if(result!=null)
{
productAdapter.addAll(result)
}
}
}
}

[/code]

Lưu ý Tui không có giải thích chi tiết coding ở trong đó bởi vì mọi thứ đã được giải thích rất kỹ ở các bài sau:

  • Hướng dẫn hiểu cơ chế hoạt động của vòng For trong Kotlin: https://duythanhcse.wordpress.com/2017/05/26/bai-12-vong-lap-for-trong-kotlin/
  • Hướng dẫn hiểu về JSon trong Kotlin (đặc biệt có dùng Gson nếu các bạn muốn thì lấy nó thay thế cho coding kinh điển JSonObject và JSonArray ở trên):
    • https://duythanhcse.wordpress.com/2017/06/03/bai-32-xu-ly-json-trong-kotlin/
    • https://duythanhcse.wordpress.com/2017/06/03/bai-33-xu-ly-json-trong-kotlin-bai-2/
    • https://duythanhcse.wordpress.com/2017/06/03/bai-34-doc-json-ti-gia-hoi-doai-cua-ngan-hang-dong-a-trong-kotlin-bai-3/

Bước 5 :

Bước cuối cùng rất quan trọng nó liên quan tới cấu hình Manifest. Bình thường chỉ cần cấp quyền truy cập internet là đủ, nhưng vì Tui đang sài bản Android mới nhất tính tới thời điểm này (24/06/2018) là bạn 8.0 nên cần khai báo thêm

android:usesCleartextTraffic="true"

Nếu mà quên thì sẽ bị lỗi sau (version cũ không bị):

java.io.IOException: Cleartext HTTP traffic not permitted

Cụ thể chi tiết cho AndroidManifest:

[code language=”xml”]
<?xml version=”1.0″ encoding=”utf-8″?>
<manifest xmlns:android=”http://schemas.android.com/apk/res/android”
package=”com.communityuni.androidkotlintonodejs”>
<uses-permission android:name=”android.permission.INTERNET” />

<application
android:usesCleartextTraffic=”true”
android:allowBackup=”true”
android:icon=”@mipmap/ic_launcher”
android:label=”@string/app_name”
android:roundIcon=”@mipmap/ic_launcher_round”
android:supportsRtl=”true”
android:theme=”@style/AppTheme”>
<activity android:name=”.MainActivity”>
<intent-filter>
<action android:name=”android.intent.action.MAIN” />

<category android:name=”android.intent.category.LAUNCHER” />
</intent-filter>
</activity>
</application>

</manifest>
[/code]

Như vậy ta đã hoàn thành xong bài triệu gọi Web API lấy danh sách Product được viết bằng NodeJS và Deploy trên IISNode WebServer.

Source code Triệu gọi Web API lấy danh sách Product tải ở đây.

Bài sau Tui sẽ hướng dẫn các Thím cách dùng Android Kotlin để  truy cập API RESTful lấy Chi Tiết Product như thế nào. Các bạn chú ý theo dõi nhé

Các khóa học online khác, bạn có thể tham khảo tại đây:

https://unica.vn/?aff=11929

Chúc các bạn thành công!

Bài 29-Truy cập NodeJS RESTful Web Services bằng Android Kotlin

Như vậy các bạn đã hoàn thành 100% xây dựng RESTful Webservice bằng Nodejs. Nó đã được cấu hình trong bài 28 chạy trên IISNode Webserver.

Để cho sang miệng thì Tui gọi các Web API được cấu hình trong bài 28Back End, Bài này thiết kế phần mềm Android để triệu gọi sử dụng các API đó nên nó được gọi là Front End. Còn Thím nào vừa biết làm đồng thời bài 28 và vừa viết ứng dụng để triệu gọi các Web API này thì Thím đó được gọi là Full Stack.

Font End là cái bản mặt của các Thím, Back End là tâm tính của các Thím. Full Stack bao gồm bản mặt và tâm tính của các Thím. Hiện nay rất nhiều công ty tuyển dụng nhân sự muốn cả Bản mặt lẫn tâm tính. Do đó các Thím liệu hồn mà làm tốt Full Stack nha. ahahaha không đùa đâu, đói móp mỏ đó.

Nhiệm vụ của bạn trong bài này là truy cập và sử dụng toàn bộ các API đã được deploy trong bài 28 , cụ thể các API sau (Dĩ nhiên máy tính của bạn cấu hình chạy ra như thế nào thì sử dụng như vậy chứ không phải lấy y xì như của Tui nha các Thím):

  • HTTPGET – http://192.168.1.137/nodejsapi/products (API lấy toàn bộ Product trong MongoDB)
  • HTTPGET – http://192.168.1.137/nodejsapi/products/P1 (API lấy chi tiết 1 Product theo Mã trong MongoDB)
  • HTTPPOST– http://192.168.1.137/nodejsapi/addProduct (API thêm mới 1 Product vào MongoDB)
  • HTTPPUT -http://192.168.1.137/nodejsapi/editProduct (API chỉnh sửa Product trong MongoDB)
  • HTTPDELETE http://192.168.1.137/nodejsapi/deleteProduct (API xóa Product khỏi MongoDB)
Và bạn phải tự trả lời câu hỏi của Tui như sau: Tại sao trong các bài 13, bài 14, bài 15, bài 16, bài 17, ta đã dùng Android để kết nối và tương tác CSDL MongoDB được rồi thì mắc mớ gì mà phải xây dựng RESTful Webservice NodeJs để làm cái gì? vì các WEB API suy cho cùng nó cũng chỉ cung cấp các kênh để Android có thể tương tác CSDL MongoDB thôi mà? làm chi mà phức tạp rứa?… hahahaha…. phải tự trả lời được nha.

Đây là kết quả chương trình Android Kotlin bắt buộc các bạn phải hoàn thành:

  • Đầu tiên khởi động chương trình lên sẽ triệu gọi API http://192.168.1.137/nodejsapi/products để hiển thị danh sách Product dạng Custom layout như trên
  • Nhấn vào nút edit : Đầu tiên sẽ hiển thị chi tiết của Product thông qua API http://192.168.1.137/nodejsapi/products/P1
  • Sau đó trong màn hình xem chi tiết sẽ cho phép chỉnh sửa bằng cách gọi API http://192.168.1.137/nodejsapi/editProduct
  • Nhấn vào nút Xóa có biểu tượng sọt rác sẽ triệu gọi API http://192.168.1.137/nodejsapi/deleteProduct
  • Trong chương trình có Menu Thêm mới để triệu gọi API http://192.168.1.137/nodejsapi/addProduct

Cụ thể các chức năng đó được viết chi tiết trong các bài học dưới đây, các bấm Thím vào học nha:

  • HTTPGET – http://192.168.1.137/nodejsapi/products (API lấy toàn bộ Product trong MongoDB)->Xem bài 30
  • HTTPGET – http://192.168.1.137/nodejsapi/products/P1 (API lấy chi tiết 1 Product theo Mã trong MongoDB)->Xem bài 31
  • HTTPPUT -http://192.168.1.137/nodejsapi/editProduct (API chỉnh sửa Product trong MongoDB)->Xem bài 32
  • HTTPDELETE http://192.168.1.137/nodejsapi/deleteProduct (API xóa Product khỏi MongoDB)->Xem bài 33
  • HTTPPOST– http://192.168.1.137/nodejsapi/addProduct (API thêm mới 1 Product vào MongoDB)->Xem bài 34

Các Thím chú ý theo dõi nha.

Các khóa học online khác, bạn có thể tham khảo tại đây:

https://unica.vn/?aff=11929

Chúc các bạn thành công!

Bài 28-NodeJS RESTful Web Services – Cấu hình IISNode

bài 21 Ta đã biết cách cấu hình IISNode rồi nha (và bắt buộc phải làm được thì mới tiếp tục với bài 28 này được).

Nhiệm vụ của Ta bây giờ là cấu hình bài 27 chạy 24/7(Bài đã hoàn thành đầy đủ 4 Method: HTTPPOST, HTTPGET, HTTPPUT, HTTPDELETE). Ở đây có sự khác biệt khó khăn hơn nữa là ta dùng thư viện express, dùng mongodb, dùng Web API. Bây giờ làm sao để cấu hình nó chạy trên Web Server đây ta?

Bây giờ mở bài 27 lên cấu hình IISNode, vì ta có liên quan tới iisnode+express nên cần có thêm một số cấu hình (lưu ý là phải hoàn thành bài 21 trước thì mới tiếp tục bài này):

Bước 1:  Làm bài 21

Bước 2:

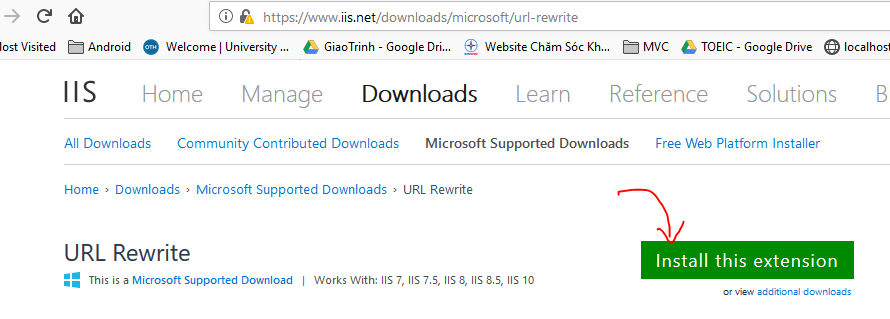
Tải và cài đặt url-rewrite: https://www.iis.net/downloads/microsoft/url-rewrite

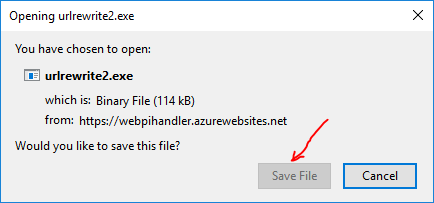
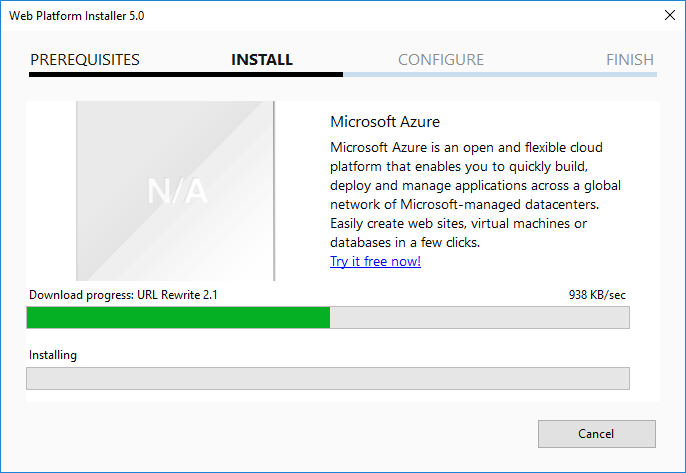
Bấm vào Install this extension để tải rồi cài vào máy, nó ra màn hình bên dưới bấm nút Save File:

Double click vào file tải về để cài:

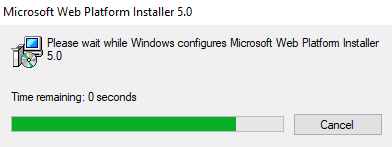
bấm vào rồi chờ nhà:

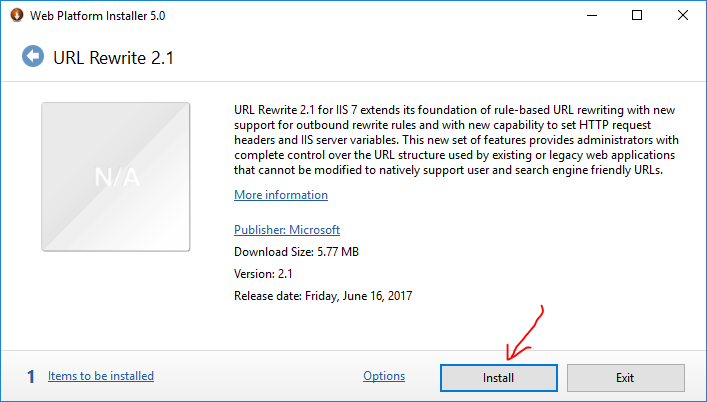
Chờ nó chạy để ra màn hình Web Platform Installer như bên dưới:

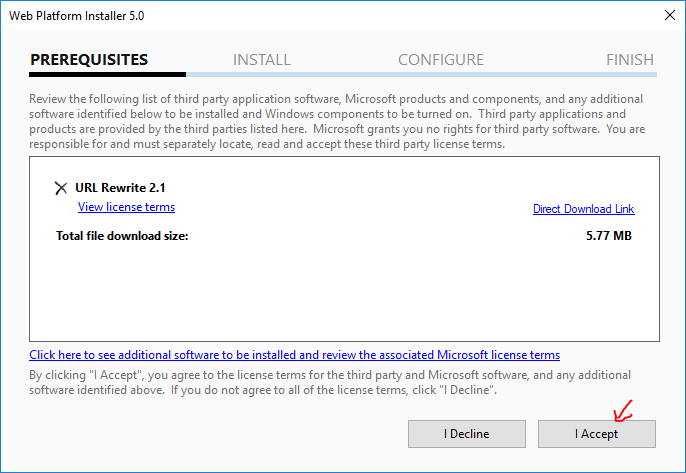
Bấm Install để cài đặt, nó ra màn hình hỏi lung tung về URL Rewrite bên dưới:

Bấm I Accept nhé.

rồi rung đùi chờ nó tải và cài đặt

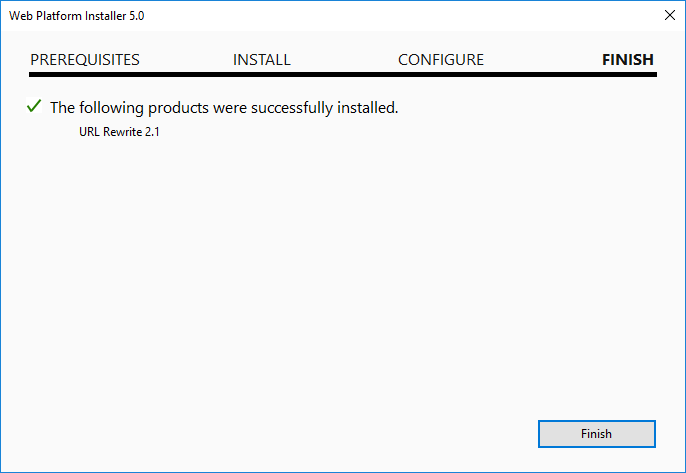
Rung đùi cho tới khi nào cài xong:

Tới đây là ngon lành cành đào nha. Bấm FINISH để kết thúc

Bước 3:

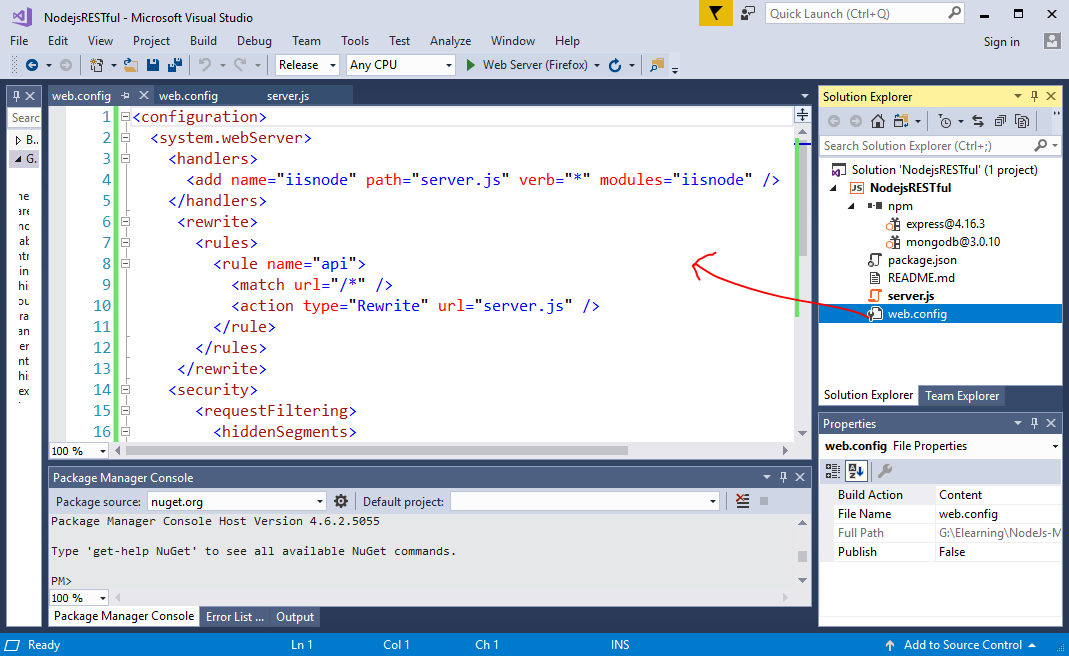
Thêm file cấu hình web.config cho Project NodejsRESTful bài 27. Cách file web.config đã hướng dẫn ở bài 21 rồi

[code language=”xml”]

<configuration>
<system.webServer>
<handlers>
<add name=”iisnode” path=”server.js” verb=”*” modules=”iisnode” />
</handlers>
<rewrite>
<rules>
<rule name=”api”>
<match url=”/*” />
<action type=”Rewrite” url=”server.js” />
</rule>
</rules>
</rewrite>
<security>
<requestFiltering>
<hiddenSegments>
<add segment=”node_modules” />
</hiddenSegments>
</requestFiltering>
</security>
</system.webServer>
</configuration>

[/code]

Xem hình:

Như vậy ta đã thêm thành công file web.config rồi

Bước 4:

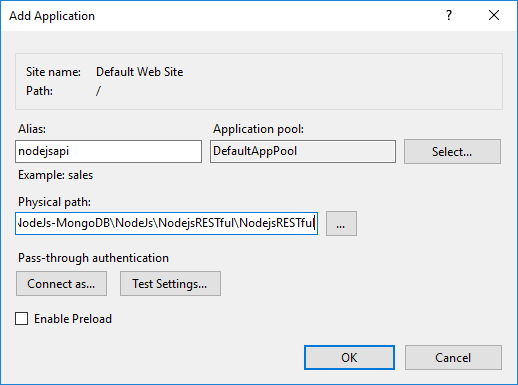
Cấu hình Web Service cho Project để chạy 24/7 trên IIS (cái này bạn tùy thích đặt tên):

Ví dụ: Tui đặt alias là nodejsapi. Physical path trỏ tới đường dẫn lưu server.js. Cách tạo, đặt như thế nào đã nói rất rõ trong bài 21 tự coi lại nha

Bấm OK để tạo

Bước 5: Kiểm thử

Mở PostMan hoặc các phần mềm tương đương khác lên để kiểm thử:

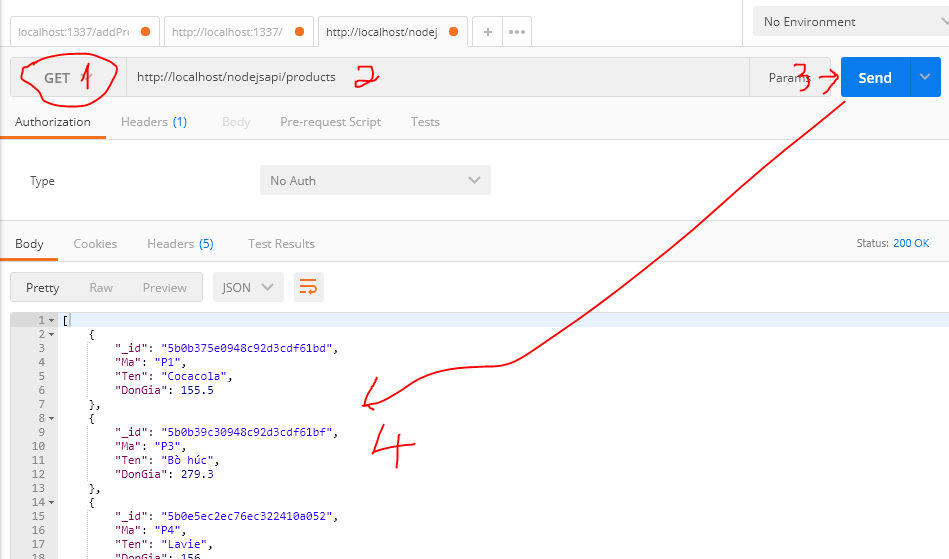
Ở trên Tui test API http://localhost/nodejsapi/products

Các bạn tự test các API còn lại như:

http://localhost/nodejsapi/products/P1

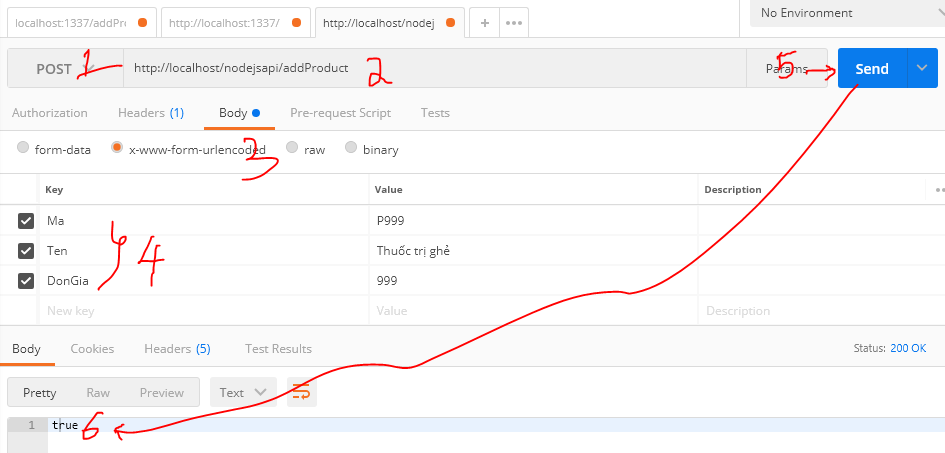
Hay kiểm thử API thêm Product:

http://localhost/nodejsapi/addProduct

http://localhost/nodejsapi/editProduct

http://localhost/nodejsapi/deleteProduct

Như vậy các bạn đã biết toàn bộ các method: HTTPPOST, HTTPGET, HTTPUT, HTTPDELETE. Và đồng thời biết cách cấu hình IISNode cho WEB API chạy 24/7 rồi. Bài học sau Tui sẽ hướng dẫn các bạn cách thức dùng Android Kotlin để triệu gọi toàn bộ các Web API này.

Lưu ý khi các thiết bị (ứng dụng khác) muốn tương tác tới các WEB API này thì các Thím phải đưa về Địa chỉ IP hoặc đẩy lên 1 hosting nào đó để dùng. Ví dụ như trường hợp này thì ta lấy địa chỉ IP của máy Tui chẳng hạn, test API lấy danh sách Product (nếu để localhost sẽ sài vì thiết bị khác nếu nó có OS nó tưởng localhost là của nó):

Các bạn chú ý theo dõi nhé

Source code cho phần cấu hình này tải ở đây

Các khóa học online khác, bạn có thể tham khảo tại đây:

https://unica.vn/?aff=11929

Chúc các bạn thành công!

Bài 27-NodeJS RESTful Web Services – Phần 6

Như vậy là các Thím đã làm được HTTPGET (bài 23, bài 24) và HTTPPOST (bài 25), HTTPPUT(bài 26). Bây giờ ta qua Method phổ biến cuối cùng đó là HTTPDELETE dùng để viết các API xóa.

HTTPDELETE Tui cũng dùng content-type là application/x-www-form-urlencoded. Nên nó cũng rất quen thuộc với các bạn rồi, do ta đã làm các bài trước.

Tiếp tục mở Project ở bài 26 lên. Bổ sung coding cho HTTPDELETE như sau:

[code language=”javascript”]

/**
* ‘/deleteProduct’ cho biết phía Client phải gọi: http://localhost:1337/deleteProduct
* và phải dùng HTTPDELETE (thấy hàm put không?)
*/
app.delete(‘*/deleteProduct’, function (req, res) {
//định dạng content-type là application/x-www-form-urlencoded
res.writeHead(200, { ‘Content-Type’: ‘application/x-www-form-urlencoded;charset=utf-8’ });
//Khi định dạng content-type là application/x – www – form – urlencoded
//thì để truy suất tới các biến từ Client gửi lên ta làm như sau:
//Lấy đối tượng body trong req.body rồi req.body.[các biến từ client]
//[các biến từ client] là do lập trình viên quy định
//ta nên đặt tên biến trùng khớp với các cột trong các Bảng mà ta muốn thêm mới
//để tránh việc nhầm lẫn cũng như giúp cho các lập trình viên khác và ta dễ đọc
var MaFromClient = req.body.Ma
var result = “false”
MongoClient.connect(url, function (err, db) {
if (err) {
result = “false”
throw err;
}
//Kết nối cơ sở dữ liệu QuanLySanPham
var dbo = db.db(“QuanLySanPham”);
//tạo điều kiện lọc chỉ lấy Product có Ma là MaFromClient
var myquery = { Ma: MaFromClient };
//gọi phương thức deleteOne để xóa
dbo.collection(“Product”).deleteOne(myquery, function (err, obj) {
if (err) {
result = “false”
throw err;
}
console.log(“1 document deleted”);
//đóng kết nối CSDL khi session kết thúc
db.close();
//kiểm tra có xóa thành công hay không, nếu obj.result.n > 0 thành công
if (obj.result.n > 0)
result = “true”
//xuất thông báo cho client biết true (thành công) false(thất bại)
res.end(result)
});
});
})

[/code]

Ta có coding tổng hợp cuối cùng của server.js như sau:

[code language=”javascript”]
//gọi thư viện express
var express = require(‘express’);
//tạo đối tượng có kiểu express()
var app = express();
//gọi thư viện fs
var fs = require(“fs”);
//khai báo PORT mặc định khi chạy(từ hệ thống, nó có PORT nào thì lấy PORT đó)
var port = process.env.PORT;
//chuỗi kết nối tới Cơ sở dữ liệu MongoDB
var url = “mongodb://localhost:27017/”;
//Gọi thư viện mongoDB và khởi tạo đối tượng cho nó
var MongoClient = require(‘mongodb’).MongoClient;
var bodyParser = require(‘body-parser’);
app.use(bodyParser.json()); // support json encoded bodies
app.use(bodyParser.urlencoded({ extended: true })); // support encoded bodies
/**
* Coding tạo HTTPGET lấy toàn bộ danh sách sản phẩm
* ‘/products’ có nghĩa là URI để lấy toàn bộ sản phẩm
* ta thích đặt gì cũng được, tuy nhiên vì danh sách nên có số nhiều là s (hoặc có chữ list cho dễ phân biệt)
* chẳng hạn như: http://localhost:1337/products
*/
app.get(‘*/products’, function (req, res) {
//thiết lập lấy dữ liệu với UTF-8
res.writeHead(200, { ‘Content-Type’: ‘text/json; charset=utf-8’ });
MongoClient.connect(url, function (err, db) {
if (err) throw err;
//kết nối Cơ sở dữ liệu MongoDB tên là QuanLySanPham
var dbo = db.db(“QuanLySanPham”);
//truy vấn toàn bộ dữ liệu trong bảng Product:
dbo.collection(“Product”).find({}).toArray(function (err, result) {
if (err) throw err;
console.log(result);
//đưa về JSON
var s = JSON.stringify(result);
//xuất ra Client:
res.end(s);
//đóng kết nối CSDL khi xong session
db.close();
});
});
})
/**
*
* coding tạo API lấy chi tiết Product
* Cú pháp: ‘/products/:id’
* =>URI khi chạy: http://localhost:1337/products/P1 để lấy Product có mã là P1
* Ngoài ra bạn có thể ‘/:id’
* =>URI khi chạy: http://localhost:1337/P1
* Tuy nhiên ta nên cho phân cấp như trong ví dụ này để biết rằng nó thuộc nhóm products
* http://localhost:1337/products/P1 sẽ dễ hiểu hơn
*/
app.get(‘*/products/:id’, function (req, res) {
//lấy được giá trị truyền vào từ URI:
var MaTim = req.params.id
res.writeHead(200, { ‘Content-Type’: ‘text/json; charset=utf-8’ });
MongoClient.connect(url, function (err, db) {
if (err) throw err;
//tạo điều kiện lọc theo Mã
//nó có cú pháp là 1 Json { Ma: MaTim } thì Ma là tên cột, MaTim là giá trị ta muốn lọc
//MaTim lâsy từ req.params.id
var query = { Ma: MaTim }
//Kết nối Cơ sở dữ liệu QuanLySanPham
var dbo = db.db(“QuanLySanPham”);
//truy vấn dữ liệu từ bảng Product và lọc theo MaTim
dbo.collection(“Product”).findOne(query, function (err, result) {
if (err) throw err;
console.log(result);
//đưa dữ liệu lấy được về JSON
var s = JSON.stringify(result);
//xuất ra client
res.end(s);
//xong session thì đóng kết nối
db.close();
});
});
})
/**
* ‘/addProduct’ cho biết phía Client phải gọi: http://localhost:1337/addProduct
* và phải dùng HTTPPOST (thấy hàm post không?)
*/
app.post(‘*/addProduct’, function (req, res) {
//định dạng content-type là application/x-www-form-urlencoded
res.writeHead(200, { ‘Content-Type’: ‘application/x-www-form-urlencoded;charset=utf-8’ });
//Khi định dạng content-type là application/x-www-form-urlencoded
//thì để truy suất tới các biến từ Client gửi lên ta làm như sau:
//Lấy đối tượng body trong req.body rồi req.body.[các biến từ client]
//[các biến từ client] là do lập trình viên quy định
//ta nên đặt tên biến trùng khớp với các cột trong các Bảng mà ta muốn thêm mới
//để tránh việc nhầm lẫn cũng như giúp cho các lập trình viên khác và ta dễ đọc
var MaFromClient = req.body.Ma
var TenFromClient = req.body.Ten
var DonGiaFromClient = req.body.DonGia
var result = “false”
MongoClient.connect(url, function (err, db) {
if (err) throw err;
//kết nối cơ sở dữ liệu QuanLySanpham
var dbo = db.db(“QuanLySanPham”);
//Tạo 1 JsonObject để lưu mới, cú pháp: { Ma: MaFromClient, Ten: TenFromClient, DonGia: DonGiaFromClient }
//Lưu ý Ma, Ten, DonGia ở bên trái dấu hai chấm (:) phải chính xác với tên cột được khái báo trong bảng
var newProduct = { Ma: MaFromClient, Ten: TenFromClient, DonGia: DonGiaFromClient };
//Gọi hàm insertOne để thêm mới 1 Product
dbo.collection(“Product”).insertOne(newProduct, function (err, obj) {
if (err) throw err;
console.log(“1 document inserted”);
//kết thúc session thì đóng kết nối CSDL
db.close();
//Kiểm tra xem obj.result.n ta sẽ biết bao nhiêu Record được thêm mới
//rõ ràng nếu >0 tức là có record được thêm mới
if (obj.result.n > 0)
result = “true”
//xuất ra cho Client biết là true hay false, dựa vào kết quả này mà Client sẽ
//hiển thị thêm mới Product thành công hay thất bại
res.end(result)
});
});
})
/**
* ‘/editProduct’ cho biết phía Client phải gọi: http://localhost:1337/editProduct
* và phải dùng HTTPPUT (thấy hàm put không?)
*/
app.put(‘*/editProduct’, function (req, res) {
//định dạng content-type là application/x-www-form-urlencoded
res.writeHead(200, { ‘Content-Type’: ‘application/x-www-form-urlencoded;charset=utf-8’ });
//Khi định dạng content-type là application/x-www-form-urlencoded
//thì để truy suất tới các biến từ Client gửi lên ta làm như sau:
//Lấy đối tượng body trong req.body rồi req.body.[các biến từ client]
//[các biến từ client] là do lập trình viên quy định
//ta nên đặt tên biến trùng khớp với các cột trong các Bảng mà ta muốn thêm mới
//để tránh việc nhầm lẫn cũng như giúp cho các lập trình viên khác và ta dễ đọc
var MaFromClient = req.body.Ma
var TenFromClient = req.body.Ten
var DonGiaFromClient = req.body.DonGia
var result = “false”
MongoClient.connect(url, function (err, db) {
if (err) throw err;
//kết nối cơ sở dữ liệu QuanLySanpham
var dbo = db.db(“QuanLySanPham”);
//Tạo điều kiện chỉ tương tác trên Product có Ma là MaFromClient
var condition = { Ma: MaFromClient };
//Tạo đối tượng JSON đánh dấu chỉnh sửa thông qua từ khóa $set:
//(chỉnh sửa Tên, đơn giá) của Product có mã là MaFromClient
var editProduct = { $set: { Ten: TenFromClient, DonGia: DonGiaFromClient } };
//gọi lệnh updateOne để cập nhật
dbo.collection(“Product”).updateOne(condition, editProduct, function (err, obj) {
if (err) throw err;
console.log(“1 document edited”);
//kết thúc session thì đóng kết nối CSDL
db.close();
//kiểm tra xem cập nhật thành công hay không obj.result.n >0 là thành công
if (obj.result.n > 0)
result = “true”
//xuất thông báo cho Client biết là true(thành công), false(thất bại)
res.end(result)
});
});
})
/**
* ‘/deleteProduct’ cho biết phía Client phải gọi: http://localhost:1337/deleteProduct
* và phải dùng HTTPDELETE (thấy hàm put không?)
*/
app.delete(‘*/deleteProduct’, function (req, res) {
//định dạng content-type là application/x-www-form-urlencoded
res.writeHead(200, { ‘Content-Type’: ‘application/x-www-form-urlencoded;charset=utf-8’ });
//Khi định dạng content-type là application/x – www – form – urlencoded
//thì để truy suất tới các biến từ Client gửi lên ta làm như sau:
//Lấy đối tượng body trong req.body rồi req.body.[các biến từ client]
//[các biến từ client] là do lập trình viên quy định
//ta nên đặt tên biến trùng khớp với các cột trong các Bảng mà ta muốn thêm mới
//để tránh việc nhầm lẫn cũng như giúp cho các lập trình viên khác và ta dễ đọc
var MaFromClient = req.body.Ma
var result = “false”
MongoClient.connect(url, function (err, db) {
if (err) {
result = “false”
throw err;
}
//Kết nối cơ sở dữ liệu QuanLySanPham
var dbo = db.db(“QuanLySanPham”);
//tạo điều kiện lọc chỉ lấy Product có Ma là MaFromClient
var myquery = { Ma: MaFromClient };
//gọi phương thức deleteOne để xóa
dbo.collection(“Product”).deleteOne(myquery, function (err, obj) {
if (err) {
result = “false”
throw err;
}
console.log(“1 document deleted”);
//đóng kết nối CSDL khi session kết thúc
db.close();
//kiểm tra có xóa thành công hay không, nếu obj.result.n > 0 thành công
if (obj.result.n > 0)
result = “true”
//xuất thông báo cho client biết true (thành công) false(thất bại)
res.end(result)
});
});
})

/**
* Chạy Server
*/
var server = app.listen(port, function () {

var host = server.address().address
var port = server.address().port

console.log(“Example app listening at http://%s:%s”, host, port)

})

[/code]

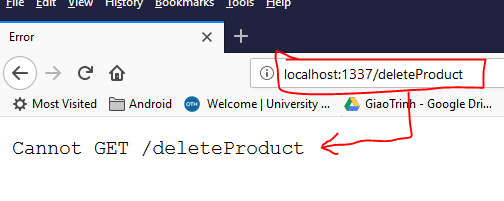
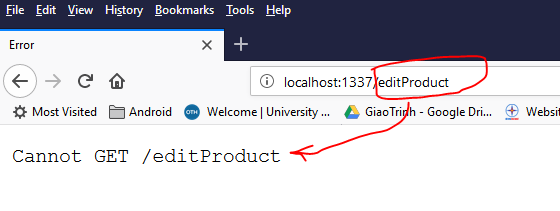
Nhấn F5 chạy lên, nếu cố gắng dùng trình duyệt để truy cập API deleteProduct http://localhost:1337/deleteProduct ta sẽ thấy lỗi như thế này:

dĩ nhiên là lỗi rồi, vì cách chạy trình duyệt đó chỉ thường áp dụng cho các HTTPGET mà thôi. Trong khi deleteProduct mình dùng HTTPDELETE.

Vậy làm sao để chạy nó ta? đó là dùng các công cụ REST client như PostMan (Chrome), HTTP Requester (Firefox), WCF client Test (Microsoft). Lưu ý các công cụ này ta vẫn Debug được NodeJS một cách trực tiếp trong Visual nha (xem lại bài này để biết cách  Debug->Kéo xuống cuối bài hướng dẫn sẽ thấy).

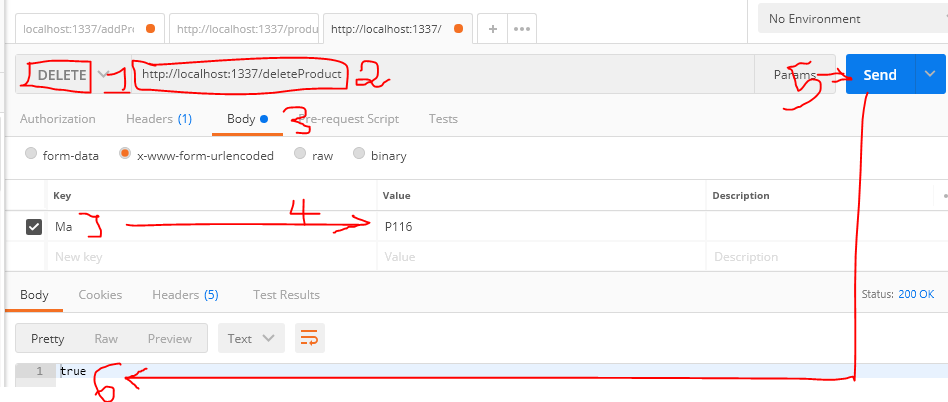
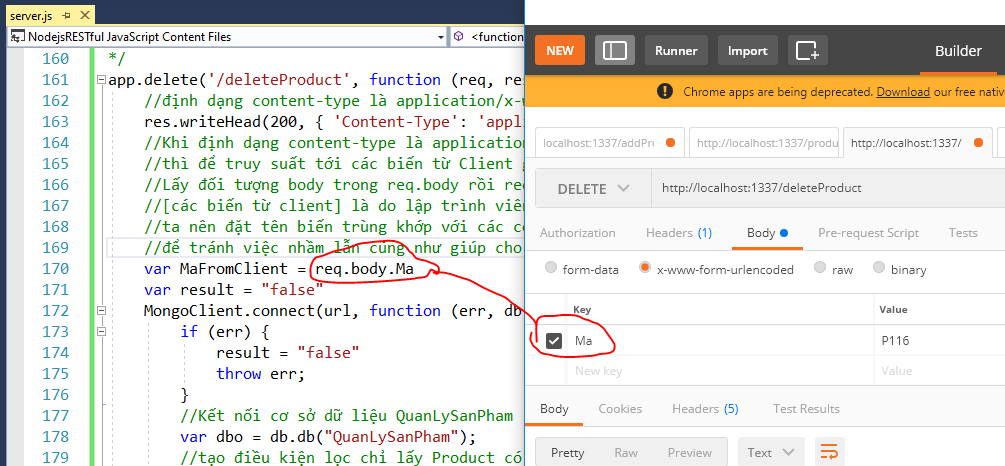
OK, bây giờ Thím mở PostMan lên, chọn 1 Product đó để xóa:

Mục 1: Chọn DELETE(vì deleteProduct viết theo method DELETE)

Mục 2: Nhập URI http://localhost:1337/editProduct

Mục 3: Chọn body và checked vào x-www-form-urlencoded

Mục 4: Nhập các Parameter trong body cho API. Lưu ý nhập chính xác tên biến khớp tới Cột trong bảng CSDL nha (trường hợp này ta chỉ có mỗi 1 Ma thôi). Tui chụp hình dưới đây để các bạn hiểu về sự so khớp từ Client -> API

Mục 5: Bấm SEND

Mục 6: Kết quả cho biết là true hay false (true thành công, false thất bại).

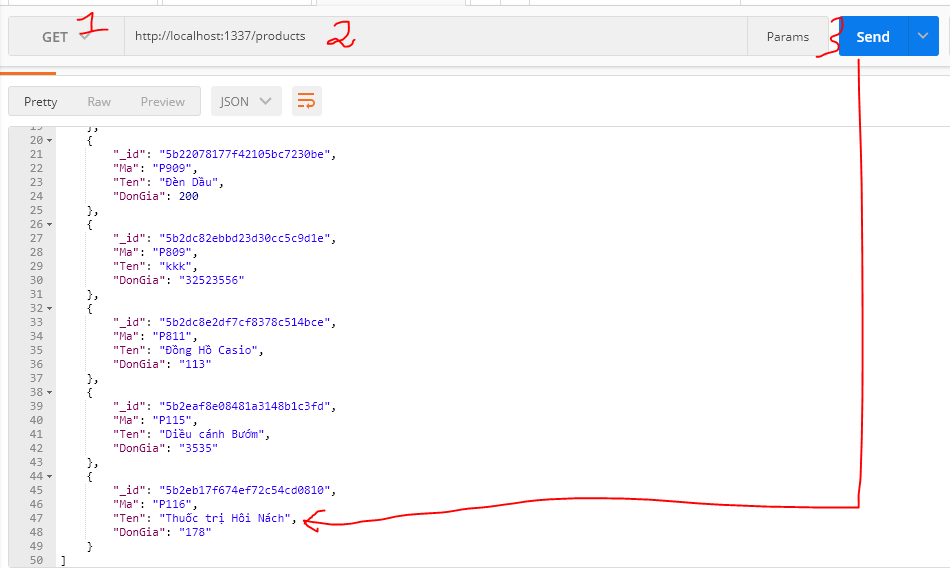
Bây giờ ta có thể chạy lại API http://localhost:1337/products để xem được kết quả có thêm thành công hay chưa:

Rõ ràng Product có Ma=P116 không còn nữa do nó bị xóa rồi.

Như vậy các bạn đã biết cách viết HTTPDELETE để xóa dữ liệu Product khỏi MongoDB như thế nào rồi nha.

Lưu ý muốn Debug để gỡ lỗi từng bước thì xem lại bài 23, kéo xuống dưới cùng có hướng dẫn

Source code HTTPDELETE xóa Product tải ở đây.

Bài sau Tui sẽ hướng dẫn các Thím cách dùng Android Kotlin để  truy cập các API RESTful này như thế nào. Các bạn chú ý theo dõi nhé

Các khóa học online khác, bạn có thể tham khảo tại đây:

https://unica.vn/?aff=11929

Chúc các bạn thành công!

Bài 26-NodeJS RESTful Web Services – Phần 5

Như vậy là các Thím đã làm được HTTPGET (bài 23, bài 24) và HTTPPOST (bài 25). Tiếp tục WEB API cho NodeJS nha, ta mở lại Project ở bài 25 Để làm HTTPPUT. Cụ thể là viết API cho phép client gửi thông tin của một Product lên Server để CHỈNH SỬA Cơ sở dữ liệu MongoDB.

Để làm tốt HTTPPUT thì bắt buộc bạn phải hiểu HTTPPOST, vì cách thức lấy dữ liệu từ client lên Server là giống nhau, chỉ khác nhau ở chỗ tương tác Cơ sở dữ liệu, HTTPOST thì thêm mới còn HTTPPUT thì chỉnh sửa. Do đó Tui không giải thích thêm về cách thức lấy các biến trong bài này nữa nha, có gì coi lại bài HTTPPOST. Giờ Tui nhào luôn vào Coding nha:

[code language=”javascript”]

/**
* ‘/editProduct’ cho biết phía Client phải gọi: http://localhost:1337/editProduct
* và phải dùng HTTPPPUT (thấy hàm put không?)
*/
app.put(‘*/editProduct’, function (req, res) {
//định dạng content-type là application/x-www-form-urlencoded
res.writeHead(200, { ‘Content-Type’: ‘application/x-www-form-urlencoded;charset=utf-8’ });
//Khi định dạng content-type là application/x-www-form-urlencoded
//thì để truy suất tới các biến từ Client gửi lên ta làm như sau:
//Lấy đối tượng body trong req.body rồi req.body.[các biến từ client]
//[các biến từ client] là do lập trình viên quy định
//ta nên đặt tên biến trùng khớp với các cột trong các Bảng mà ta muốn thêm mới
//để tránh việc nhầm lẫn cũng như giúp cho các lập trình viên khác và ta dễ đọc
var MaFromClient = req.body.Ma
var TenFromClient = req.body.Ten
var DonGiaFromClient = req.body.DonGia
var result = “false”
MongoClient.connect(url, function (err, db) {
if (err) throw err;
//kết nối cơ sở dữ liệu QuanLySanpham
var dbo = db.db(“QuanLySanPham”);
//Tạo điều kiện chỉ tương tác trên Product có Ma là MaFromClient
var condition = { Ma: MaFromClient };
//Tạo đối tượng JSON đánh dấu chỉnh sửa thông qua từ khóa $set:
//(chỉnh sửa Tên, đơn giá) của Product có mã là MaFromClient
var editProduct = { $set: { Ten: TenFromClient, DonGia: DonGiaFromClient } };
//gọi lệnh updateOne để cập nhật
dbo.collection(“Product”).updateOne(condition, editProduct, function (err, obj) {
if (err) throw err;
console.log(“1 document edited”);
//kết thúc session thì đóng kết nối CSDL
db.close();
//kiểm tra xem cập nhật thành công hay không obj.result.n >0 là thành công
if (obj.result.n > 0)
result = “true”
//xuất thông báo cho Client biết là true(thành công), false(thất bại)
res.end(result)
});
});
})

[/code]

Cuối cùng ta có coding của server.js tổng hợp như sau:

[code language=”javascript”]

//gọi thư viện express
var express = require(‘express’);
//tạo đối tượng có kiểu express()
var app = express();
//gọi thư viện fs
var fs = require(“fs”);
//khai báo PORT mặc định khi chạy(từ hệ thống, nó có PORT nào thì lấy PORT đó)
var port = process.env.PORT;
//chuỗi kết nối tới Cơ sở dữ liệu MongoDB
var url = “mongodb://localhost:27017/”;
//Gọi thư viện mongoDB và khởi tạo đối tượng cho nó
var MongoClient = require(‘mongodb’).MongoClient;
var bodyParser = require(‘body-parser’);
app.use(bodyParser.json()); // support json encoded bodies
app.use(bodyParser.urlencoded({ extended: true })); // support encoded bodies
/**
* Coding tạo HTTPGET lấy toàn bộ danh sách sản phẩm
* ‘/products’ có nghĩa là URI để lấy toàn bộ sản phẩm
* ta thích đặt gì cũng được, tuy nhiên vì danh sách nên có số nhiều là s (hoặc có chữ list cho dễ phân biệt)
* chẳng hạn như: http://localhost:1337/products
*/
app.get(‘*/products’, function (req, res) {
//thiết lập lấy dữ liệu với UTF-8
res.writeHead(200, { ‘Content-Type’: ‘text/json; charset=utf-8’ });
MongoClient.connect(url, function (err, db) {
if (err) throw err;
//kết nối Cơ sở dữ liệu MongoDB tên là QuanLySanPham
var dbo = db.db(“QuanLySanPham”);
//truy vấn toàn bộ dữ liệu trong bảng Product:
dbo.collection(“Product”).find({}).toArray(function (err, result) {
if (err) throw err;
console.log(result);
//đưa về JSON
var s = JSON.stringify(result);
//xuất ra Client:
res.end(s);
//đóng kết nối CSDL khi xong session
db.close();
});
});
})
/**
*
* coding tạo API lấy chi tiết Product
* Cú pháp: ‘/products/:id’
* =>URI khi chạy: http://localhost:1337/products/P1 để lấy Product có mã là P1
* Ngoài ra bạn có thể ‘/:id’
* =>URI khi chạy: http://localhost:1337/P1
* Tuy nhiên ta nên cho phân cấp như trong ví dụ này để biết rằng nó thuộc nhóm products
* http://localhost:1337/products/P1 sẽ dễ hiểu hơn
*/
app.get(‘*/products/:id’, function (req, res) {
//lấy được giá trị truyền vào từ URI:
var MaTim = req.params.id
res.writeHead(200, { ‘Content-Type’: ‘text/json; charset=utf-8’ });
MongoClient.connect(url, function (err, db) {
if (err) throw err;
//tạo điều kiện lọc theo Mã
//nó có cú pháp là 1 Json { Ma: MaTim } thì Ma là tên cột, MaTim là giá trị ta muốn lọc
//MaTim lâsy từ req.params.id
var query = { Ma: MaTim }
//Kết nối Cơ sở dữ liệu QuanLySanPham
var dbo = db.db(“QuanLySanPham”);
//truy vấn dữ liệu từ bảng Product và lọc theo MaTim
dbo.collection(“Product”).findOne(query, function (err, result) {
if (err) throw err;
console.log(result);
//đưa dữ liệu lấy được về JSON
var s = JSON.stringify(result);
//xuất ra client
res.end(s);
//xong session thì đóng kết nối
db.close();
});
});
})
/**
* ‘/addProduct’ cho biết phía Client phải gọi: http://localhost:1337/addProduct
* và phải dùng HTTPPOST (thấy hàm post không?)
*/
app.post(‘*/addProduct’, function (req, res) {
//định dạng content-type là application/x-www-form-urlencoded
res.writeHead(200, { ‘Content-Type’: ‘application/x-www-form-urlencoded;charset=utf-8’ });
//Khi định dạng content-type là application/x-www-form-urlencoded
//thì để truy suất tới các biến từ Client gửi lên ta làm như sau:
//Lấy đối tượng body trong req.body rồi req.body.[các biến từ client]
//[các biến từ client] là do lập trình viên quy định
//ta nên đặt tên biến trùng khớp với các cột trong các Bảng mà ta muốn thêm mới
//để tránh việc nhầm lẫn cũng như giúp cho các lập trình viên khác và ta dễ đọc
var MaFromClient = req.body.Ma
var TenFromClient = req.body.Ten
var DonGiaFromClient = req.body.DonGia
var result = “false”
MongoClient.connect(url, function (err, db) {
if (err) throw err;
//kết nối cơ sở dữ liệu QuanLySanpham
var dbo = db.db(“QuanLySanPham”);
//Tạo 1 JsonObject để lưu mới, cú pháp: { Ma: MaFromClient, Ten: TenFromClient, DonGia: DonGiaFromClient }
//Lưu ý Ma, Ten, DonGia ở bên trái dấu hai chấm (:) phải chính xác với tên cột được khái báo trong bảng
var newProduct = { Ma: MaFromClient, Ten: TenFromClient, DonGia: DonGiaFromClient };
//Gọi hàm insertOne để thêm mới 1 Product
dbo.collection(“Product”).insertOne(newProduct, function (err, obj) {
if (err) throw err;
console.log(“1 document inserted”);
//kết thúc session thì đóng kết nối CSDL
db.close();
//Kiểm tra xem obj.result.n ta sẽ biết bao nhiêu Record được thêm mới
//rõ ràng nếu >0 tức là có record được thêm mới
if (obj.result.n > 0)
result = “true”
//xuất ra cho Client biết là true hay false, dựa vào kết quả này mà Client sẽ
//hiển thị thêm mới Product thành công hay thất bại
res.end(result)
});
});
})
/**
* ‘/editProduct’ cho biết phía Client phải gọi: http://localhost:1337/editProduct
* và phải dùng HTTPPPUT (thấy hàm put không?)
*/
app.put(‘*/editProduct’, function (req, res) {
//định dạng content-type là application/x-www-form-urlencoded
res.writeHead(200, { ‘Content-Type’: ‘application/x-www-form-urlencoded;charset=utf-8’ });
//Khi định dạng content-type là application/x-www-form-urlencoded
//thì để truy suất tới các biến từ Client gửi lên ta làm như sau:
//Lấy đối tượng body trong req.body rồi req.body.[các biến từ client]
//[các biến từ client] là do lập trình viên quy định
//ta nên đặt tên biến trùng khớp với các cột trong các Bảng mà ta muốn thêm mới
//để tránh việc nhầm lẫn cũng như giúp cho các lập trình viên khác và ta dễ đọc
var MaFromClient = req.body.Ma
var TenFromClient = req.body.Ten
var DonGiaFromClient = req.body.DonGia
var result = “false”
MongoClient.connect(url, function (err, db) {
if (err) throw err;
//kết nối cơ sở dữ liệu QuanLySanpham
var dbo = db.db(“QuanLySanPham”);
//Tạo điều kiện chỉ tương tác trên Product có Ma là MaFromClient
var condition = { Ma: MaFromClient };
//Tạo đối tượng JSON đánh dấu chỉnh sửa thông qua từ khóa $set:
//(chỉnh sửa Tên, đơn giá) của Product có mã là MaFromClient
var editProduct = { $set: { Ten: TenFromClient, DonGia: DonGiaFromClient } };
//gọi lệnh updateOne để cập nhật
dbo.collection(“Product”).updateOne(condition, editProduct, function (err, obj) {
if (err) throw err;
console.log(“1 document edited”);
//kết thúc session thì đóng kết nối CSDL
db.close();
//kiểm tra xem cập nhật thành công hay không obj.result.n >0 là thành công
if (obj.result.n > 0)
result = “true”
//xuất thông báo cho Client biết là true(thành công), false(thất bại)
res.end(result)
});
});
})
/**
* Chạy Server
*/
var server = app.listen(port, function () {

var host = server.address().address
var port = server.address().port

console.log(“Example app listening at http://%s:%s”, host, port)

})

[/code]

Nhấn F5 chạy lên, nếu cố gắng dùng trình duyệt để truy cập API editProduct http://localhost:1337/editProduct ta sẽ thấy lỗi như thế này:

dĩ nhiên là lỗi rồi, vì cách chạy trình duyệt đó chỉ thường áp dụng cho các HTTPGET mà thôi. Trong khi editProduct mình dùng HTTPPUT.

Vậy làm sao để chạy nó ta? đó là dùng các công cụ REST client như PostMan (Chrome), HTTP Requester (Firefox), WCF client Test (Microsoft). Lưu ý các công cụ này ta vẫn Debug được NodeJS một cách trực tiếp trong Visual nha (xem lại bài này để biết cách  Debug->Kéo xuống cuối bài hướng dẫn sẽ thấy).

OK, bây giờ Thím mở PostMan lên, chỉnh sửa lại Product có mã là P116 mà Tui cố tình nhập dữ liệu nó trùng với P115 ở bài 25:

Mục 1: Chọn PUT(vì editProduct viết theo method PUT)

Mục 2: Nhập URI http://localhost:1337/editProduct

Mục 3: Chọn body và checked vào x-www-form-urlencoded

Mục 4: Nhập các Parameter trong body cho API. Lưu ý nhập chính xác tên biến khớp tới Cột trong bảng CSDL nha. Tui chụp hình dưới đây để các bạn hiểu về sự so khớp từ Client -> API

Mục 5: Bấm SEND

Mục 6: Kết quả cho biết là true hay false (true thành công, false thất bại).

Bây giờ ta có thể chạy lại API http://localhost:1337/products để xem được kết quả có thêm thành công hay chưa:

Dĩ nhiên ta cũng có thể xem trong PostMan:

Bạn thấy đó, Product có mã P116 đã được cập nhật thông tin thành công rồi nha.

Như vậy các bạn đã biết cách viết HTTPPUT để cập nhật dữ liệu cho Product trong MongoDB như thế nào rồi nha.

Lưu ý muốn Debug để gỡ lỗi từng bước thì xem lại bài 23, kéo xuống dưới cùng có hướng dẫn

Source code HTTPPUT chỉnh sửa Product tải ở đây.

Bài sau Tui sẽ hướng dẫn các Thím cách viết HTTPDELETE để xóa Product khỏi MongoDB. Các bạn chú ý theo dõi nhé

Các khóa học online khác, bạn có thể tham khảo tại đây:

https://unica.vn/?aff=11929

Chúc các bạn thành công!