Ở bài 29 Tui đã nói sơ qua các chức năng bạn phải hoàn thành để truy cập mọi Web API được deploy trong bài 28.
Bài này Ta sẽ truy cập Web API lấy toàn bộ danh sách product (với Laptop của Tui thì URI là: http://192.168.1.137/nodejsapi/products , còn của bạn như thế nào thì tự thay đổi nha, copy y xì của Tui là đi bụi đó nha).
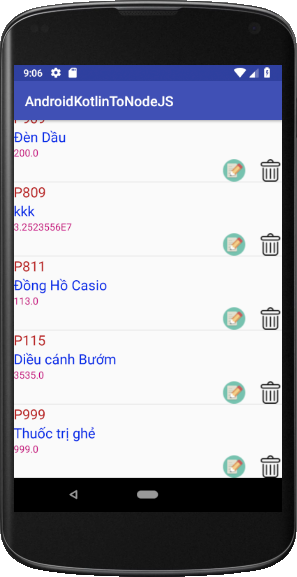
Bây giờ bạn tạo Project tên “AndroidKotlinToNodeJS“, Project này có nhiệm vụ gọi API http://192.168.1.137/nodejsapi/products để hiển thị lên giao diện mobile như sau:
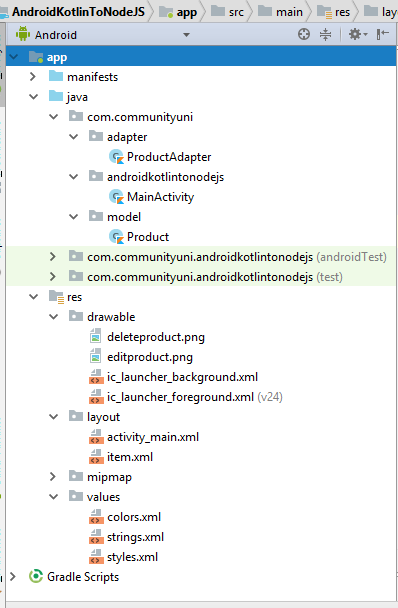
 Để thực hiện được bài này ta tiến hành làm các bước sau (Tui bỏ qua bước cách tạo Project nha, đi thẳng vào cấu trúc Project):
Lên http://iconfinder.com/ tìm 2 hình đại diện cho nút Edit và Delete như hình mô tả
Tạo 1 file layout item.xml để làm giao diện Custom layout cho ListView, nó sẽ được sử dụng trong lớp ProductAdapter, XML layout của file này như sau:
[code language=”xml”]
<?xml version=”1.0″ encoding=”utf-8″?>
<LinearLayout xmlns:app=”http://schemas.android.com/apk/res-auto”
xmlns:tools=”http://schemas.android.com/tools”
android:orientation=”vertical”
xmlns:android=”http://schemas.android.com/apk/res/android” android:layout_width=”match_parent”
android:layout_height=”match_parent”>
<TextView
android:id=”@+id/txtMa”
android:layout_width=”match_parent”
android:layout_height=”wrap_content”
android:text=”TextView”
android:textColor=”@color/mauchuma”
android:textSize=”20sp” />
<TextView
android:id=”@+id/txtTen”
android:layout_width=”match_parent”
android:layout_height=”wrap_content”
android:text=”TextView”
android:textColor=”@color/mauchuten”
android:textSize=”20sp” />
<TextView
android:id=”@+id/txtDonGia”
android:layout_width=”match_parent”
android:layout_height=”wrap_content”
android:text=”TextView”
android:textColor=”@color/mauchudongia” />
<LinearLayout
android:layout_width=”match_parent”
android:layout_height=”wrap_content”
android:gravity=”right”
android:orientation=”horizontal”>
<ImageView
android:id=”@+id/imgEdit”
android:layout_width=”wrap_content”
android:layout_height=”wrap_content”
android:layout_marginRight=”20dp”
app:srcCompat=”@drawable/editproduct” />
<ImageView
android:id=”@+id/imgDelete”
android:layout_width=”wrap_content”
android:layout_height=”wrap_content”
app:srcCompat=”@drawable/deleteproduct” />
</LinearLayout>
</LinearLayout>
[/code]
Định nghĩa màu trong colors.xml:
[code language=”xml”]
<?xml version=”1.0″ encoding=”utf-8″?>
<resources>
<color name=”colorPrimary”>#3F51B5</color>
<color name=”colorPrimaryDark”>#303F9F</color>
<color name=”colorAccent”>#FF4081</color>
<color name=”maunentieude”>#179a2f</color>
<color name=”mauchutieude”>#fcfbfb</color>
<color name=”mauchuma”>#b92222</color>
<color name=”mauchuten”>#0829e7</color>
<color name=”mauchudongia”>#c50d7c</color>
</resources>
[/code]
Bước 2:
Tạo lớp mô hình Product để sử dụng trong ProductApdater cũng như trong Đa tiến trình truy cấp API
[code language=”java”]
package com.communityuni.model
class Product {
lateinit var _id:Any
lateinit var Ma:String
lateinit var Ten:String
var DonGia:Double=0.0
constructor(ma:String,ten:String,donGia:Double)
{
Ma=ma
Ten=ten
DonGia=donGia
}
override fun toString(): String {
return Ma+”\n”+Ten+”\n”+DonGia+”VNĐ”
}
}
[/code]
Bước 3:
Tạo lớp mô hình ProductAdapter để vẽ giao diện Customlayout lên List cho nó đẹp:
[code language=”java”]
package com.communityuni.adapter
import android.app.Activity
import android.content.Context
import android.os.AsyncTask
import android.util.Log
import android.view.View
import android.view.ViewGroup
import android.widget.ArrayAdapter
import android.widget.ImageView
import android.widget.TextView
import com.communityuni.androidkotlintonodejs.R
import com.communityuni.model.Product
class ProductAdapter(internal var context: Activity, internal var resource: Int) : ArrayAdapter<Product>(context, resource) {
override fun getView(position: Int, convertView: View?, parent: ViewGroup): View {
var custom = context.layoutInflater.inflate(resource, null)
var txtMa = custom.findViewById<TextView>(R.id.txtMa)
var txtTen = custom.findViewById<TextView>(R.id.txtTen)
var txtDonGia = custom.findViewById<TextView>(R.id.txtDonGia)
var p = getItem(position)
txtMa.text = p!!.Ma
txtTen.text = p.Ten
txtDonGia.text = p.DonGia.toString()
return custom
}
}
[/code]
Bước 4:
Coding cho lớp MainActivity để triệu gọi Web API http://192.168.1.137/nodejsapi/products
[code language=”java”]
package com.communityuni.androidkotlintonodejs
import android.os.AsyncTask
import android.support.v7.app.AppCompatActivity
import android.os.Bundle
import android.util.Log
import android.widget.ListView
import com.communityuni.adapter.ProductAdapter
import com.communityuni.model.Product
import org.json.JSONArray
import java.net.URL
import java.util.ArrayList
class MainActivity : AppCompatActivity() {
lateinit var lvProduct: ListView
lateinit var productAdapter: ProductAdapter
override fun onCreate(savedInstanceState: Bundle?) {
super.onCreate(savedInstanceState)
setContentView(R.layout.activity_main)
addControls()
}
private fun addControls() {
lvProduct=findViewById<ListView>(R.id.lvProduct)
productAdapter= ProductAdapter(this,R.layout.item)
lvProduct.adapter=productAdapter
}
override fun onResume() {
super.onResume()
HTTPGetListProductTask().execute()
}
inner class HTTPGetListProductTask : AsyncTask<Void,Void,List<Product>>()
{
override fun onPreExecute() {
super.onPreExecute()
productAdapter.clear()
}
override fun doInBackground(vararg p0: Void?): List<Product> {
var arrayListProduct=ArrayList<Product>()
try
{
var url=URL(“http://192.168.1.137/nodejsapi/products”)
var urlConnection=url.openConnection()
var data = urlConnection.inputStream.bufferedReader().readText()
var jsonArray=JSONArray(data)
for (i in 0 until jsonArray.length())
{
var jsonObject=jsonArray.getJSONObject(i)
var Ma=jsonObject.getString(“Ma”)
var Ten=jsonObject.getString(“Ten”)
var DonGia=jsonObject.getDouble(“DonGia”)
var product=Product(Ma,Ten,DonGia)
arrayListProduct.add(product)
}
}
catch (ex:Exception)
{
Log.e(“LOI”,ex.toString())
}
return arrayListProduct
}
override fun onPostExecute(result: List<Product>?) {
super.onPostExecute(result)
if(result!=null)
{
productAdapter.addAll(result)
}
}
}
}
[/code]
Lưu ý Tui không có giải thích chi tiết coding ở trong đó bởi vì mọi thứ đã được giải thích rất kỹ ở các bài sau:
- Hướng dẫn hiểu cơ chế hoạt động của vòng For trong Kotlin: https://duythanhcse.wordpress.com/2017/05/26/bai-12-vong-lap-for-trong-kotlin/
- Hướng dẫn hiểu về JSon trong Kotlin (đặc biệt có dùng Gson nếu các bạn muốn thì lấy nó thay thế cho coding kinh điển JSonObject và JSonArray ở trên):
- https://duythanhcse.wordpress.com/2017/06/03/bai-32-xu-ly-json-trong-kotlin/
- https://duythanhcse.wordpress.com/2017/06/03/bai-33-xu-ly-json-trong-kotlin-bai-2/
- https://duythanhcse.wordpress.com/2017/06/03/bai-34-doc-json-ti-gia-hoi-doai-cua-ngan-hang-dong-a-trong-kotlin-bai-3/
Bước 5 :
Bước cuối cùng rất quan trọng nó liên quan tới cấu hình Manifest. Bình thường chỉ cần cấp quyền truy cập internet là đủ, nhưng vì Tui đang sài bản Android mới nhất tính tới thời điểm này (24/06/2018) là bạn 8.0 nên cần khai báo thêm
android:usesCleartextTraffic="true"
Nếu mà quên thì sẽ bị lỗi sau (version cũ không bị):
java.io.IOException: Cleartext HTTP traffic not permitted
Cụ thể chi tiết cho AndroidManifest:
[code language=”xml”]
<?xml version=”1.0″ encoding=”utf-8″?>
<manifest xmlns:android=”http://schemas.android.com/apk/res/android”
package=”com.communityuni.androidkotlintonodejs”>
<uses-permission android:name=”android.permission.INTERNET” />
<application
android:usesCleartextTraffic=”true”
android:allowBackup=”true”
android:icon=”@mipmap/ic_launcher”
android:label=”@string/app_name”
android:roundIcon=”@mipmap/ic_launcher_round”
android:supportsRtl=”true”
android:theme=”@style/AppTheme”>
<activity android:name=”.MainActivity”>
<intent-filter>
<action android:name=”android.intent.action.MAIN” />
<category android:name=”android.intent.category.LAUNCHER” />
</intent-filter>
</activity>
</application>
</manifest>
[/code]
Như vậy ta đã hoàn thành xong bài triệu gọi Web API lấy danh sách Product được viết bằng NodeJS và Deploy trên IISNode WebServer.
Source code Triệu gọi Web API lấy danh sách Product tải ở đây.
Bài sau Tui sẽ hướng dẫn các Thím cách dùng Android Kotlin để truy cập API RESTful lấy Chi Tiết Product như thế nào. Các bạn chú ý theo dõi nhé
Các khóa học online khác, bạn có thể tham khảo tại đây:
Chúc các bạn thành công!

2 thoughts on “Bài 30-Truy cập NodeJS RESTful Web Services bằng Android Kotlin-HTTPGET”