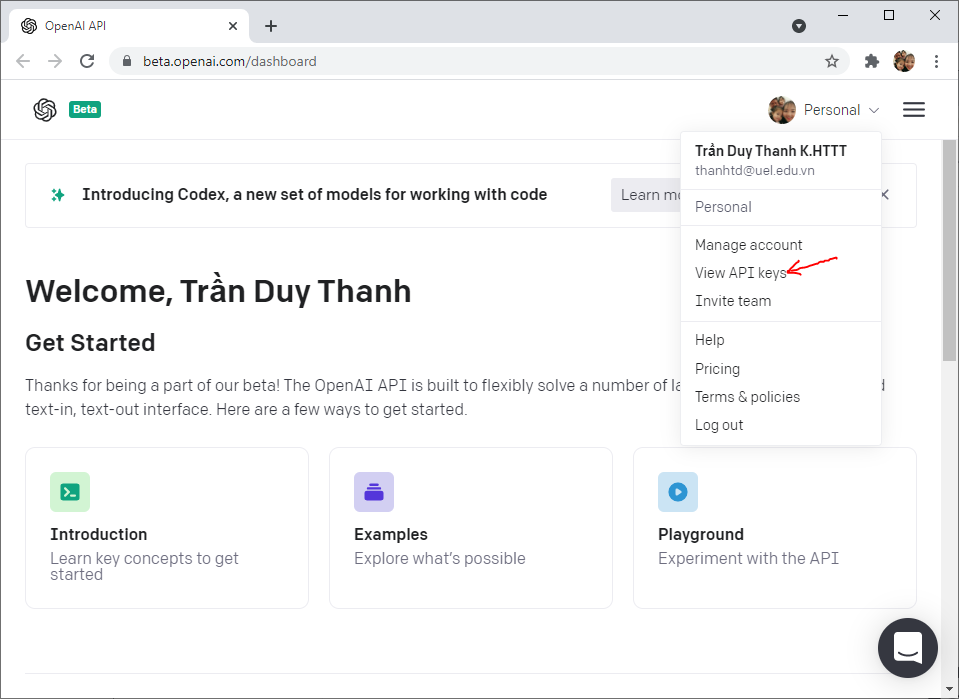
Ở bài “Cách đăng ký và sử dụng OpenAI” Tui đã hướng dẫn các bạn cách thức đăng ký, chờ email mời và cách sử dụng hệ thống online của OpenAI cũng như cách dùng PostMan làm công cụ test API của OpenAI với token lấy được từ hệ thống. Các bước xét duyệt khoảng 2 tuần nên bạn kiên nhẫn chờ đợi.
Bài này Tui sẽ hướng dẫn các bạn cách xây dựng 1 phần mềm Mobile ChatBot sử dụng OpenAI mà bạn đăng ký được. Tui sẽ để TOKEN của Tui ở trên này trong vòng 2 tuần, sau đó sẽ deactived nó đi. Mục đích giúp các bạn test được phần mềm ChatBot trước khi bạn nhận được thư mời của OpenAI.
Giao diện và tương tác như sau:

Các bước chi tiết làm như sau (lưu ý nếu chưa có tí kiến thức gì về Android thì đừng máu me làm bài này nha.). Một số bài Android 2020 Tui viết blog ở đây https://duythanhcse.wordpress.com/lap-trinh-di-dong/lap-trinh-android-2020/,
hoặc đăng ký học Android qua Video chi tiết từ cơ bản tới nâng cao ở đây: Android cơ bản + Android nâng cao.
Group FB hỗ trợ học: https://www.facebook.com/groups/communityuni/
Khởi động Android Studio:

Chọn nút “New Project” ở bên trên:
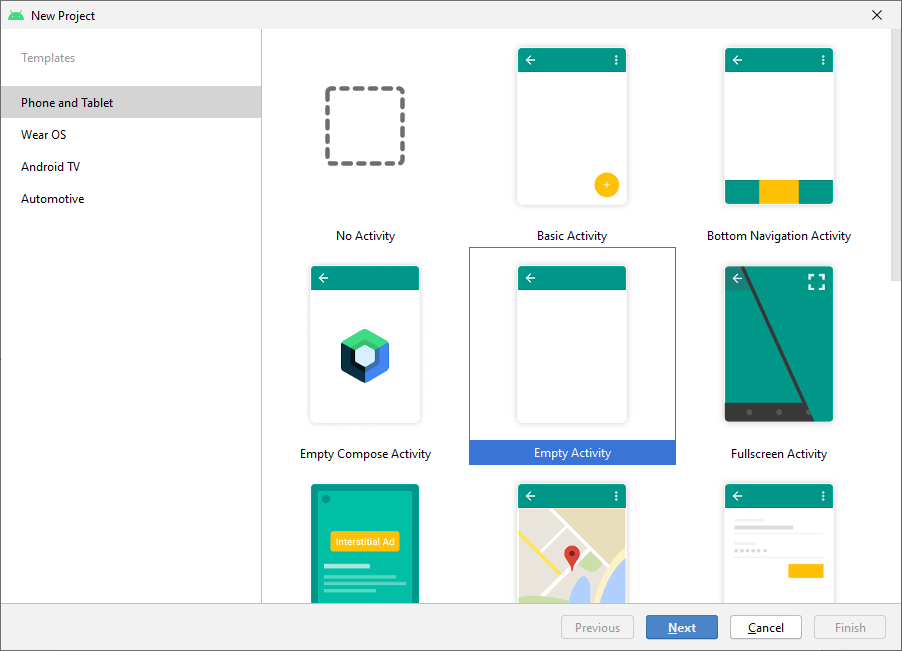
Trong nhóm Phone and Tablet chọn Empty Activity và bấm next.

Tên dự án: OpenAIChatBot
Package: tranduythanh.com.openaichatbot
Nơi lưu trữ: D:\OpenAI\OpenAIChatBot
Language: chọn java
Minimum SDK chọn API 26
Sau đó nhấn Finish để tạo Project.
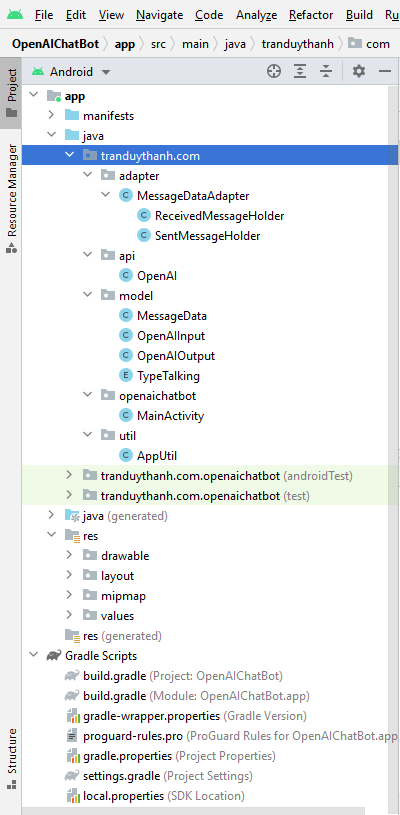
Chúng ta sẽ làm dự án này với các cấu trúc class như bên dưới (Tui sẽ hướng dẫn chi tiết từng phần):
Trước tiết ta sẽ thiết kế giao diện cho màn hình chính:
Ta thiết kế cho MainLayout.xml như sau:
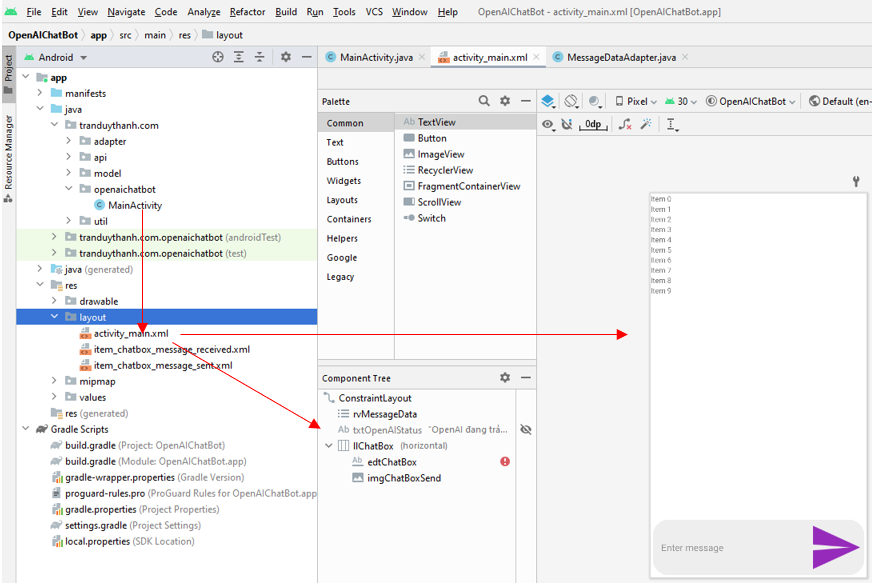
Bên trên giao diện là 1 RecyclerView, bên dưới là ô nhập dữ liệu chát và nút gửi.
Cấu trúc XML như sau:
<?xml version="1.0" encoding="utf-8"?>
<androidx.constraintlayout.widget.ConstraintLayout xmlns:android="http://schemas.android.com/apk/res/android"
    xmlns:app="http://schemas.android.com/apk/res-auto"
    xmlns:tools="http://schemas.android.com/tools"
    android:layout_width="match_parent"
    android:layout_height="match_parent"
    tools:context=".MainActivity">

    <androidx.recyclerview.widget.RecyclerView
        android:id="@+id/rvMessageData"
        android:layout_width="0dp"
        android:layout_height="0dp"
        android:layout_marginBottom="@dimen/margin_h4"
        app:layout_constraintBottom_toTopOf="@+id/llChatBox"
        app:layout_constraintLeft_toLeftOf="parent"
        app:layout_constraintRight_toRightOf="parent"
        app:layout_constraintTop_toTopOf="parent" />

    <TextView
        android:id="@+id/txtOpenAIStatus"
        android:layout_width="wrap_content"
        android:layout_height="wrap_content"
        android:layout_margin="@dimen/margin_h5"
        android:text="OpenAI đang trả lời..."
        android:textSize="@dimen/text_size_h5"
        android:textStyle="italic"
        android:visibility="invisible"
        app:layout_constraintBottom_toTopOf="@+id/llChatBox"
        app:layout_constraintLeft_toLeftOf="parent" />

    <LinearLayout
        android:id="@+id/llChatBox"
        android:layout_width="0dp"
        android:layout_height="wrap_content"
        android:layout_margin="@dimen/margin_h5"
        android:background="@drawable/rounded_rectangle_sent_message"
        android:gravity="center_vertical"
        android:minHeight="48dp"
        android:orientation="horizontal"
        app:layout_constraintBottom_toBottomOf="parent"
        app:layout_constraintLeft_toLeftOf="parent"
        app:layout_constraintRight_toRightOf="parent">

        <EditText
            android:id="@+id/edtChatBox"
            android:layout_width="0dp"
            android:layout_height="wrap_content"
            android:layout_gravity="center"
            android:layout_marginLeft="16dp"
            android:layout_marginRight="16dp"
            android:layout_weight="1"
            android:background="@android:color/transparent"
            android:hint="Enter message"
            android:maxLines="6" />

        <ImageView
            android:id="@+id/imgChatBoxSend"
            android:layout_width="@dimen/box_width"
            android:layout_height="@dimen/box_width"
            android:layout_gravity="center_vertical"
            android:layout_margin="@dimen/margin_h4"
            android:background="@drawable/ic_send"
            android:contentDescription="@string/description_image_view"
            android:gravity="center"
            android:scaleType="fitCenter"
            android:textAllCaps="false"
            android:textSize="@dimen/textsize_36"
            app:tint="@color/purple500" />

    </LinearLayout>
</androidx.constraintlayout.widget.ConstraintLayout>
Lưu ý cần bổ sung thêm 1 số cấu hình trong resource, cụ thể:
Hiệu chỉnh “colors.xml” như sau:
<?xml version="1.0" encoding="utf-8"?>
<resources>
    <color name="purple_200">#FFBB86FC</color>
    <color name="purple_500">#FF6200EE</color>
    <color name="purple_700">#FF3700B3</color>
    <color name="teal_200">#FF03DAC5</color>
    <color name="teal_700">#FF018786</color>
    <color name="black">#FF000000</color>
    <color name="white">#FFFFFFFF</color>
    <color name="purple500">#9C27B0</color>
    <color name="black200">#eeeeee</color>
</resources>
Hiệu chỉnh “dimens.xml” như sau:
<?xml version="1.0" encoding="utf-8"?>
<resources>
    <dimen name="box_width">90dp</dimen>
    <dimen name="textsize_36">36dp</dimen>
    <dimen name="margin_h0">24dp</dimen>
    <dimen name="margin_h1">20dp</dimen>
    <dimen name="margin_h2">16dp</dimen>
    <dimen name="margin_h3">12dp</dimen>
    <dimen name="margin_h4">8dp</dimen>
    <dimen name="margin_h5">4dp</dimen>
    <dimen name="text_size_h5">13sp</dimen>
</resources>
Hiệu chỉnh “strings.xml” như sau:
<resources>
    <string name="app_name">OpenAIChatBot</string>
    <string name="description_image_view">OpenAI Image Description</string>
</resources>
Trong drawble có cấu trúc:
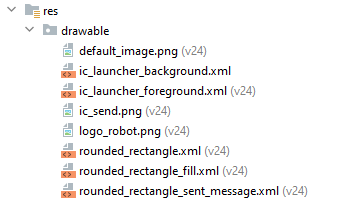
File default_image.png:

File ic_send.png:

File logo_robot.png:
File rounded_rectangle.xml:
<?xml version="1.0" encoding="utf-8"?>
<shape xmlns:android="http://schemas.android.com/apk/res/android"
    android:shape="rectangle" >
    <stroke android:width="0.5dp" android:color="@color/purple500"/>
    <corners
        android:radius="20dp">
    </corners>
</shape>
File rounded_rectangle_fill.xml:
<?xml version="1.0" encoding="utf-8"?>
<shape xmlns:android="http://schemas.android.com/apk/res/android"
    android:shape="rectangle" >

    <!-- View background color -->
    <solid
        android:color="@color/purple500" >
    </solid>

    <!-- The radius makes the corners rounded -->
    <corners
        android:radius="20dp">
    </corners>
</shape>
File rounded_rectangle_sent_message.xml:
<?xml version="1.0" encoding="utf-8"?>
<shape xmlns:android="http://schemas.android.com/apk/res/android"
    android:shape="rectangle">

    <!-- View background color -->
    <solid android:color="@color/black200"></solid>

    <!-- The radius makes the corners rounded -->
    <corners android:radius="30dp"></corners>
</shape>
Tiếp theo tạo package tranduythanh.com.api để lưu lớp OpenAI:
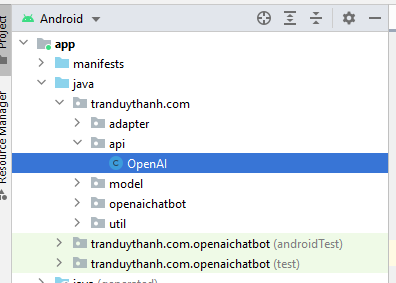
Nội dung của lớp OpenAI như sau:
package tranduythanh.com.api;

public class OpenAI {
    public static String API="https://api.openai.com/v1/engines/davinci/completions";
    public static String TOKEN="";
    public static String METHOD="POST";
    public static String CONTENT_TYPE="Application/json";
}
Ở trên Tui định nghĩa API là api của OpenAI cung cấp, TOKEN(bạn thay bằng cái của bạn khi đăng ký thành công, Tui để tạm đây 2 tuần cho bạn test sau đó Tui sẽ deactived nó), Method là POST theo đặc tả, và Content_Type là json.
Tiếp theo tạo package tranduythanh.com.util để lưu lớp AppUtil:
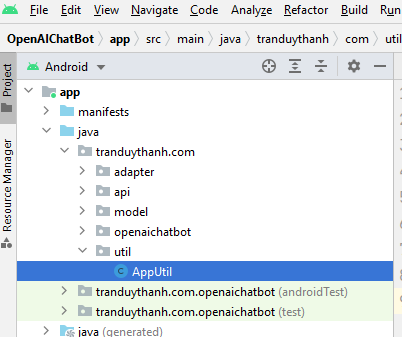
Cấu trúc lớp AppUtil như sau:
package tranduythanh.com.util;

import android.text.format.DateFormat;

import java.util.Calendar;
import java.util.Locale;

public class AppUtil {
    public static String getTimeFormat(long timeStamp) {
        try {
            Calendar cal = Calendar.getInstance(Locale.US);
            cal.setTimeInMillis(timeStamp);
            String date = DateFormat.format("HH:mm", cal).toString();
            return date;
        } catch (Exception e) {
        }
        return "";
    }

}
Lớp này có hàm getTimeFormat đề đưa time dạng long qua String để người dùng dễ nhìn.
Tiếp theo tạo package tranduythanh.com.model để lưu các lớp sau:

TypeTalking Ở đây là 1 Enum, Tui tạo ra để đánh dấu đâu là tin nhắn của người dùng, đâu là tin nhắn của OpenAI.
Nó có cấu trúc sau:
package tranduythanh.com.model;

public enum TypeTalking {
    OPENAI,
    HUMAN
}
MessageData, OpenAIInput, OpenAIOuput bắt buộc phải theo cấu trúc kết quả của hệ thống. Và có chỉnh sửa thêm chút đỉnh để hỗ trợ cho việc coding được nhanh chóng và dễ dàng.
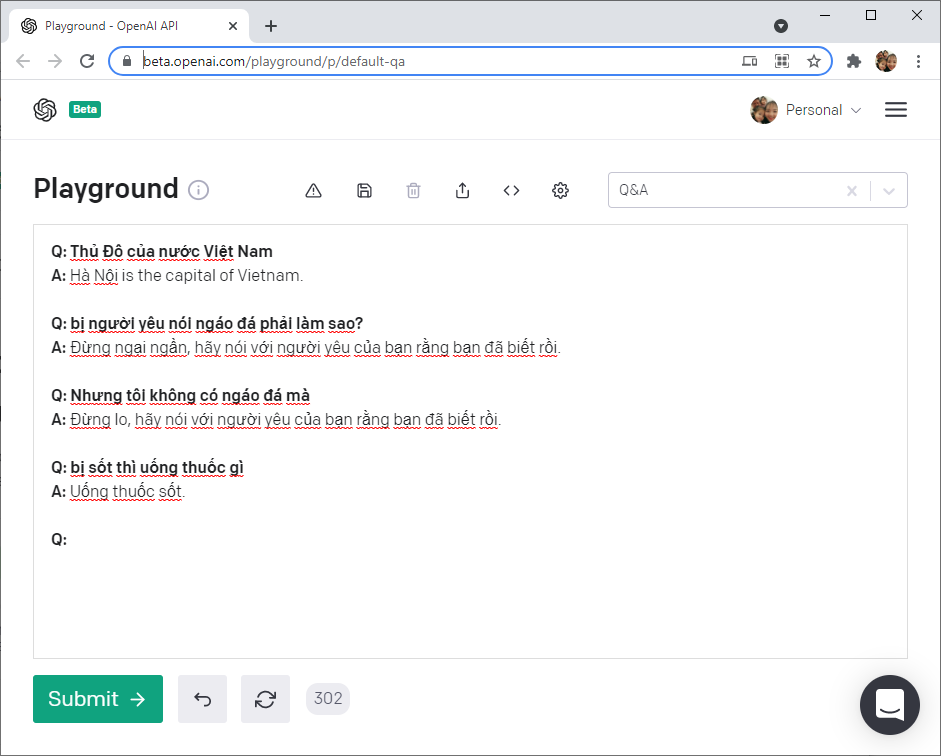
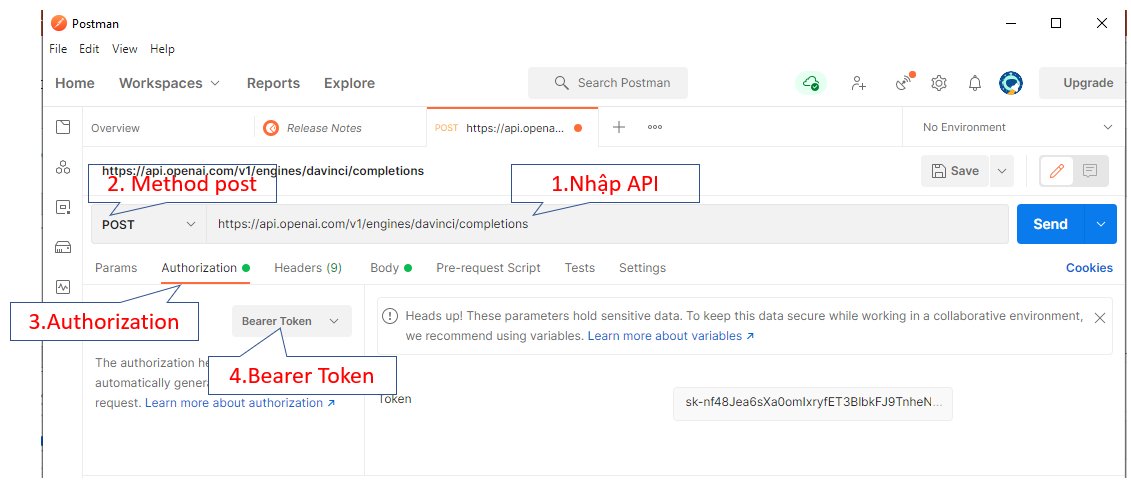
Ta quan sát lại cấu trúc của API lúc gọi mà ta thử nghiệm trong PostMan (bài trước):
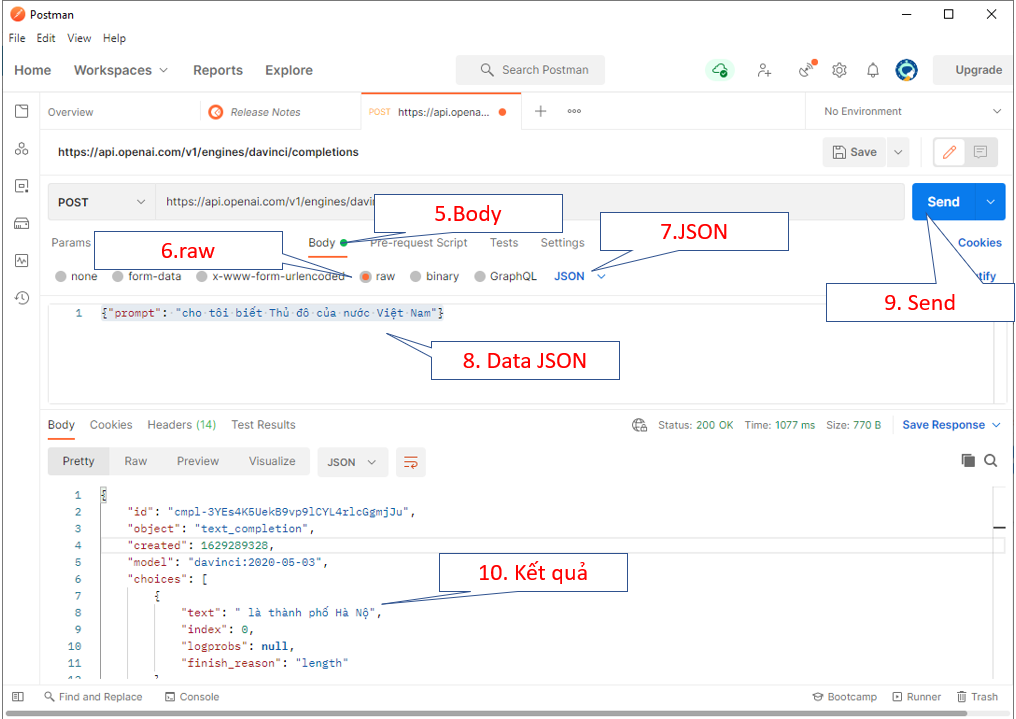
Mục 8. Data Json là phần Input đầu vào cho API, Tui tạo lớp OpenAIInput :
package tranduythanh.com.model;

import java.io.Serializable;

public class OpenAIInput implements Serializable {
    private String prompt;

    public OpenAIInput() {
    }

    public OpenAIInput(String prompt) {
        this.prompt = prompt;
    }

    public String getPrompt() {
        return prompt;
    }

    public void setPrompt(String prompt) {
        this.prompt = prompt;
    }
}
Mục 10. Kết quả nó có 2 thành phần:
cục bự ở ngoài là OpenAIOuput. Cục bên trong chỗ mảng choices là MessageData (Tui thiết kế để nó vừa dùng cho con OpenAI và cho người dùng lúc tương tác).
Xem cấu trúc của OpenAIOutput:
package tranduythanh.com.model;

import java.io.Serializable;
import java.util.ArrayList;

public class OpenAIOutput  implements Serializable {
    private String id;
    private String object;
    private long created;
    private String model;
    private ArrayList<MessageData> choices;

    public String getId() {
        return id;
    }

    public void setId(String id) {
        this.id = id;
    }

    public String getObject() {
        return object;
    }

    public void setObject(String object) {
        this.object = object;
    }

    public long getCreated() {
        return created;
    }

    public void setCreated(long created) {
        this.created = created;
    }

    public String getModel() {
        return model;
    }

    public void setModel(String model) {
        this.model = model;
    }

    public ArrayList<MessageData> getChoices() {
        return choices;
    }

    public void setChoices(ArrayList<MessageData> choices) {
        this.choices = choices;
    }
}
Mảng choices, Tui thiết kế từng phần tử của nó là MessageData. Mấy bài này là liên quan cấu trúc GSON mà các bạn được học:
Bài 61: Cách đưa định dạng JSon về Java class bằng GSon
Bài 62: Cách đưa định dạng JSon về Java class bằng GSon (tiếp 1)
Bài 63: Cách đưa định dạng JSon về Java class bằng GSon (tiếp 2)
Cấu trúc của MessageData:
package tranduythanh.com.model;

public class MessageData {
    private String text;
    private int index;
    private String logprobs;
    private String finish_reason;

    private TypeTalking typeTalking;
    private long created;
    private String userName;


    public String getText() {
        return text;
    }

    public void setText(String text) {
        this.text = text;
    }

    public int getIndex() {
        return index;
    }

    public void setIndex(int index) {
        this.index = index;
    }

    public String getLogprobs() {
        return logprobs;
    }

    public void setLogprobs(String logprobs) {
        this.logprobs = logprobs;
    }

    public String getFinish_reason() {
        return finish_reason;
    }

    public void setFinish_reason(String finish_reason) {
        this.finish_reason = finish_reason;
    }

    public TypeTalking getTypeTalking() {
        return typeTalking;
    }

    public void setTypeTalking(TypeTalking typeTalking) {
        this.typeTalking = typeTalking;
    }

    public long getCreated() {
        return created;
    }

    public void setCreated(long created) {
        this.created = created;
    }

    public String getUserName() {
        return userName;
    }

    public void setUserName(String userName) {
        this.userName = userName;
    }
}
Tiếp theo ta cần phần tích giao diện dành cho nội dung người gửi và nội dung của OpenAI trả về:
Đầu tiên là giao diện nội dung gửi đi của người dùng:

Cấu trúc của “item_chatbox_message_sent.xml” như sau:
<?xml version="1.0" encoding="utf-8"?>
<androidx.constraintlayout.widget.ConstraintLayout xmlns:android="http://schemas.android.com/apk/res/android"
    xmlns:app="http://schemas.android.com/apk/res-auto"
    xmlns:tools="http://schemas.android.com/tools"
    android:layout_width="match_parent"
    android:layout_height="wrap_content"
    android:paddingTop="8dp">

    <TextView
        android:id="@+id/txtPrompt"
        android:layout_width="wrap_content"
        android:layout_height="wrap_content"
        android:layout_marginEnd="8dp"
        android:background="@drawable/rounded_rectangle_fill"
        android:maxWidth="240dp"
        android:padding="8dp"
        android:text="hello, hello!"
        android:textColor="#ffffff"
        app:layout_constraintRight_toRightOf="parent"
        app:layout_constraintTop_toTopOf="parent" />

    <TextView
        android:id="@+id/txtSendTime"
        android:layout_width="wrap_content"
        android:layout_height="wrap_content"
        android:layout_marginEnd="4dp"
        android:text="11:40"
        android:textSize="10sp"
        app:layout_constraintBottom_toBottomOf="@+id/txtPrompt"
        app:layout_constraintRight_toLeftOf="@+id/txtPrompt" />

</androidx.constraintlayout.widget.ConstraintLayout>
Tiếp theo giao diện của con OpenAI trả về:
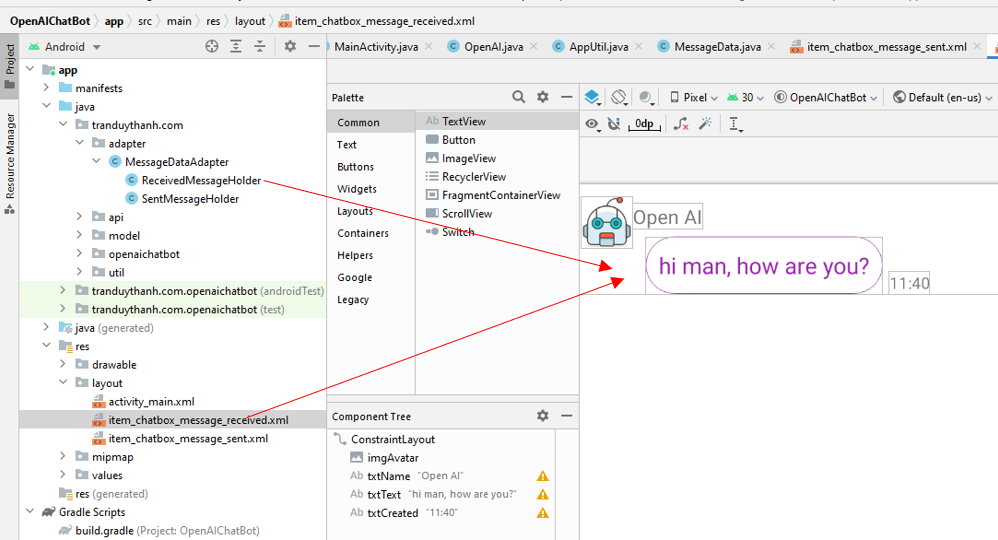
Cấu trúc của item_chatbox_message_received.xml như sau:
<?xml version="1.0" encoding="utf-8"?>
<androidx.constraintlayout.widget.ConstraintLayout xmlns:android="http://schemas.android.com/apk/res/android"
    xmlns:app="http://schemas.android.com/apk/res-auto"
    xmlns:tools="http://schemas.android.com/tools"
    android:layout_width="match_parent"
    android:layout_height="wrap_content"
    android:paddingTop="8dp">

    <ImageView
        android:id="@+id/imgAvatar"
        android:layout_width="32dp"
        android:layout_height="32dp"
        android:layout_marginStart="8dp"
        android:contentDescription="@string/description_image_view"
        android:src="@drawable/logo_robot"
        app:layout_constraintLeft_toLeftOf="parent"
        app:layout_constraintTop_toTopOf="parent" />

    <TextView
        android:id="@+id/txtName"
        android:layout_width="wrap_content"
        android:layout_height="wrap_content"
        android:layout_marginTop="4dp"
        android:text="Open AI"
        android:textSize="12sp"
        app:layout_constraintLeft_toRightOf="@+id/imgAvatar"
        app:layout_constraintTop_toTopOf="parent" />

    <TextView
        android:background="@drawable/rounded_rectangle"
        android:id="@+id/txtText"
        android:layout_width="wrap_content"
        android:layout_height="wrap_content"
        android:layout_marginStart="8dp"
        android:layout_marginTop="4dp"
        android:maxWidth="240dp"
        android:padding="8dp"
        android:text="hi man, how are you?"
        android:textColor="@color/purple500"
        app:layout_constraintLeft_toRightOf="@+id/imgAvatar"
        app:layout_constraintTop_toBottomOf="@+id/txtName" />

    <TextView
        android:id="@+id/txtCreated"
        android:layout_width="wrap_content"
        android:layout_height="wrap_content"
        android:layout_marginStart="4dp"
        android:text="11:40"
        android:textSize="10sp"
        app:layout_constraintBottom_toBottomOf="@+id/txtText"
        app:layout_constraintLeft_toRightOf="@+id/txtText" />

</androidx.constraintlayout.widget.ConstraintLayout>
Sau đó ta sẽ viêt Adapter cho các giao diện này như sau:
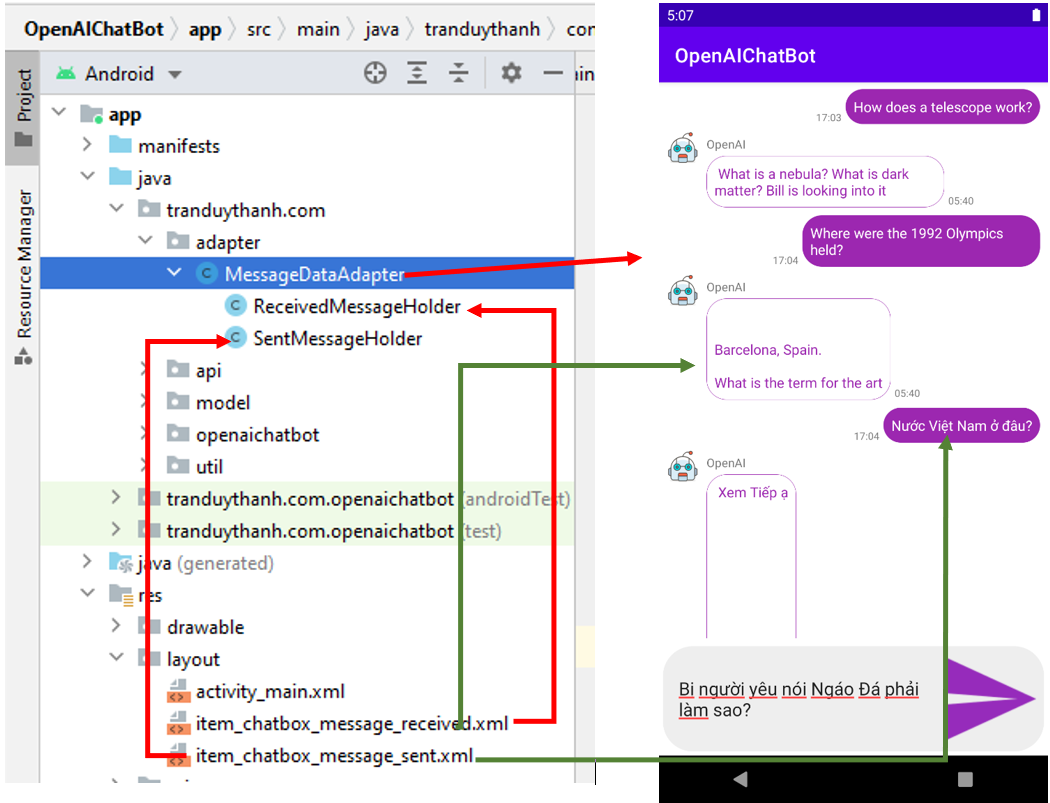
Bạn nhìn vào màu đỏ và màu xanh của các mũi tên để biết được chức năng và sự liên quan giữa Code, xml và giao diện khi chạy.
Coding của MessageDataAdapter như sau (Tui ko đủ thời gian để giải thích chi tiết từng hàm, các bạn dựa vào tên hàm mà suy luận, vì như Tui đã nói chưa có kiến thức gì về Android thì đừng máu me làm bài này):
package tranduythanh.com.adapter;

import android.content.Context;
import android.view.LayoutInflater;
import android.view.View;
import android.view.ViewGroup;
import android.widget.ImageView;
import android.widget.TextView;

import androidx.annotation.NonNull;
import androidx.recyclerview.widget.RecyclerView;


import java.util.List;

import tranduythanh.com.model.MessageData;
import tranduythanh.com.model.TypeTalking;
import tranduythanh.com.openaichatbot.R;
import tranduythanh.com.util.AppUtil;


public class MessageDataAdapter extends RecyclerView.Adapter {

    private static final int VIEW_TYPE_MESSAGE_SENT = 1;
    private static final int VIEW_TYPE_MESSAGE_RECEIVED = 2;

    private Context context;
    private List<MessageData> messageDataList;

    public MessageDataAdapter(Context context, List<MessageData> messageList) {
        this.context = context;
        this.messageDataList = messageList;
    }

    @NonNull
    @Override
    public RecyclerView.ViewHolder onCreateViewHolder(@NonNull ViewGroup parent, int viewType) {
        View view;

        if (viewType == VIEW_TYPE_MESSAGE_SENT) {
            view = LayoutInflater.from(parent.getContext())
                    .inflate(R.layout.item_chatbox_message_sent, parent, false);
            return new SentMessageHolder(view);
        } else if (viewType == VIEW_TYPE_MESSAGE_RECEIVED) {
            view = LayoutInflater.from(parent.getContext())
                    .inflate(R.layout.item_chatbox_message_received, parent, false);
            ImageView imageView=view.findViewById(R.id.imgAvatar);

            return new ReceivedMessageHolder(view);
        }

        return null;
    }

    @Override
    public void onBindViewHolder(@NonNull RecyclerView.ViewHolder holder, int position) {
        MessageData message = messageDataList.get(position);

        switch (holder.getItemViewType()) {
            case VIEW_TYPE_MESSAGE_SENT:
                ((SentMessageHolder) holder).bind(message);
                break;
            case VIEW_TYPE_MESSAGE_RECEIVED:
                ((ReceivedMessageHolder) holder).bind(message);
        }
    }

    @Override
    public int getItemCount() {
        return messageDataList != null ? messageDataList.size() : 0;
    }

    @Override
    public int getItemViewType(int position) {
        MessageData message =  messageDataList.get(position);

        if (message.getTypeTalking()== TypeTalking.HUMAN) {
            // If the current user is the sender of the message
            return VIEW_TYPE_MESSAGE_SENT;
        } else {
            // If some other user sent the message
            return VIEW_TYPE_MESSAGE_RECEIVED;
        }
    }
    //Lớp này dùng để hiển thị giao diện và dữ liệu do người dùng hỏi OpenAI
    class SentMessageHolder extends RecyclerView.ViewHolder {
        private View view;
        TextView txtPrompt;
        TextView txtSendTime;

        SentMessageHolder(@NonNull View itemView) {
            super(itemView);
            view = itemView;
            txtPrompt=view.findViewById(R.id.txtPrompt);
            txtSendTime=view.findViewById(R.id.txtSendTime);
        }

        void bind(MessageData message) {
            txtPrompt.setText(message.getText());

            // Format the stored timestamp into a readable String using method.
            txtSendTime.setText(AppUtil.getTimeFormat(message.getCreated()));
        }
    }
    //Lớp này dùng để hiển thị giao diện và dữ liệu khi nhận được kết quả trả về từ OpenAI
    class ReceivedMessageHolder extends RecyclerView.ViewHolder {
        private View view;
        TextView txtName;
        TextView txtText;
        TextView txtCreated;

        ReceivedMessageHolder(@NonNull View itemView) {
            super(itemView);
            view = itemView;
            txtName=view.findViewById(R.id.txtName);

            txtText=view.findViewById(R.id.txtText);

            txtCreated=view.findViewById(R.id.txtCreated);
        }

        void bind(MessageData message) {
            txtName.setText(message.getUserName());
            txtText.setText(message.getText());
            txtCreated.setText(AppUtil.getTimeFormat(message.getCreated()));
         }
    }
}
Tiếp theo tới coding cho MainActivity:
Trước khi code cho MainActivity thì cần bổ sung GSon cho nó. Trong buid.gradle thêm implementation ‘com.google.code.gson:gson:2.8.6’
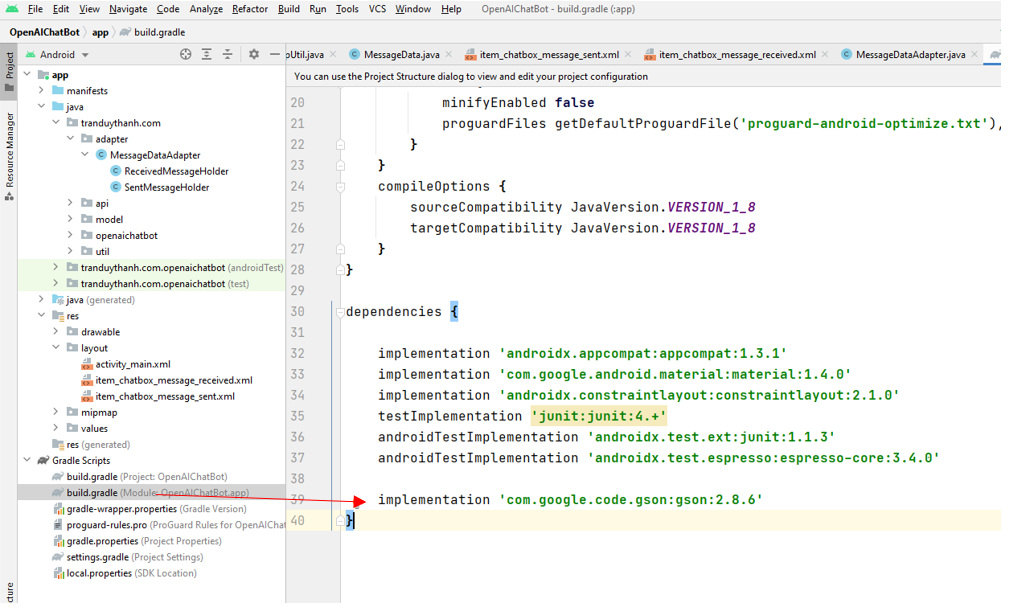
dependencies {

    implementation 'androidx.appcompat:appcompat:1.3.1'
    implementation 'com.google.android.material:material:1.4.0'
    implementation 'androidx.constraintlayout:constraintlayout:2.1.0'
    testImplementation 'junit:junit:4.+'
    androidTestImplementation 'androidx.test.ext:junit:1.1.3'
    androidTestImplementation 'androidx.test.espresso:espresso-core:3.4.0'

    implementation 'com.google.code.gson:gson:2.8.6'
}
Tiếp tục vào AndroidManifest cấp quyền internet, và 1 số cấu hình:
<?xml version="1.0" encoding="utf-8"?>
<manifest xmlns:android="http://schemas.android.com/apk/res/android"
    package="tranduythanh.com.openaichatbot">

    <uses-permission android:name="android.permission.ACCESS_NETWORK_STATE" />
    <uses-permission android:name="android.permission.INTERNET"/>
    <application
        android:usesCleartextTraffic="true"
        android:allowBackup="true"
        android:icon="@mipmap/ic_launcher"
        android:label="@string/app_name"
        android:roundIcon="@mipmap/ic_launcher_round"
        android:supportsRtl="true"
        android:theme="@style/Theme.OpenAIChatBot">
        <activity
            android:name=".MainActivity"
            android:exported="true">
            <intent-filter>
                <action android:name="android.intent.action.MAIN" />

                <category android:name="android.intent.category.LAUNCHER" />
            </intent-filter>
        </activity>
    </application>

</manifest>
Ok, bây giờ ta có thể quay lại MainActivity để coding chính:
package tranduythanh.com.openaichatbot;

import androidx.appcompat.app.AppCompatActivity;
import androidx.recyclerview.widget.LinearLayoutManager;
import androidx.recyclerview.widget.RecyclerView;

import android.os.AsyncTask;
import android.os.Bundle;
import android.util.Log;
import android.view.View;
import android.widget.EditText;
import android.widget.ImageView;
import android.widget.TextView;
import android.widget.Toast;

import com.google.gson.Gson;

import java.io.InputStream;
import java.io.InputStreamReader;
import java.net.HttpURLConnection;
import java.net.URL;
import java.nio.charset.StandardCharsets;
import java.util.ArrayList;
import java.util.List;

import tranduythanh.com.adapter.MessageDataAdapter;
import tranduythanh.com.api.OpenAI;
import tranduythanh.com.model.MessageData;
import tranduythanh.com.model.OpenAIInput;
import tranduythanh.com.model.OpenAIOutput;
import tranduythanh.com.model.TypeTalking;

public class MainActivity extends AppCompatActivity{
    private static final String TAG = MainActivity.class.getSimpleName();
    RecyclerView rvMessageData;
    EditText edtChatBox;
    TextView txtOpenAIStatus;
    ImageView imgChatBoxSend;

    private MessageDataAdapter messageDataAdapter;
    private List<MessageData> messageList;

    @Override
    protected void onCreate(Bundle savedInstanceState) {
        super.onCreate(savedInstanceState);
        setContentView(R.layout.activity_main);
        addControls();
        addEvents();
    }

    private void addControls() {
        edtChatBox=findViewById(R.id.edtChatBox);
        rvMessageData=findViewById(R.id.rvMessageData);
        txtOpenAIStatus=findViewById(R.id.txtOpenAIStatus);
        imgChatBoxSend=findViewById(R.id.imgChatBoxSend);

        messageList = new ArrayList<>();

        messageDataAdapter = new MessageDataAdapter(this, messageList);
        rvMessageData.setLayoutManager(new LinearLayoutManager(this));
        rvMessageData.setAdapter(messageDataAdapter);
    }

    private void addEvents() {
        imgChatBoxSend.setOnClickListener(new View.OnClickListener() {
            @Override
            public void onClick(View v) {
               processSendMessage();
            }
        });
    }

    private void processSendMessage() {
        String message = edtChatBox.getText().toString();
        if (message.isEmpty()) {
            Toast.makeText(this, "Nhập nội dung.", Toast.LENGTH_SHORT).show();
            return;
        }
        sendMessageByMe(message);
    }

    private void sendMessageByMe(String msg) {
        //Khi người dùng nhấn nút send
        //ta khởi tạo MessageData
        //và gán TypeTalking.HUMAN
        MessageData userMessage = new MessageData();
        userMessage.setUserName("Trần Duy Thanh");
        userMessage.setTypeTalking(TypeTalking.HUMAN);

        userMessage.setCreated(System.currentTimeMillis());
        userMessage.setText(msg);

        messageList.add(userMessage);
        //Cập nhật lại giao diện
        refreshMessageList();
        edtChatBox.setText("");
        //gửi thông tin này cho OpenAI
        getMessageByOpenAI(msg);
    }

    private void getMessageByOpenAI(String msg) {
        txtOpenAIStatus.setVisibility(View.VISIBLE);
        //dùng AsyncTask để tạo tiểu trình
        AsyncTask<OpenAIInput,Void, OpenAIOutput> task=new AsyncTask<OpenAIInput, Void, OpenAIOutput>() {
            @Override
            protected OpenAIOutput doInBackground(OpenAIInput... openAIInputs) {
                try {
                    //gọi HttpURLConnection
                    //và coding như bên dưới đây:
                    URL url = new URL(OpenAI.API);
                    HttpURLConnection conn =(HttpURLConnection) url.openConnection();
                    conn.setRequestProperty("Authorization","Bearer "+OpenAI.TOKEN);
                    conn.setRequestProperty("Content-Type",OpenAI.CONTENT_TYPE);
                    conn.setRequestMethod(OpenAI.METHOD);
                    conn.setDoOutput(true);
                    OpenAIInput aiInput=openAIInputs[0];
                    String myData=new Gson().toJson(aiInput);
                    conn.getOutputStream().write(myData.getBytes());
                    InputStream responseBody = conn.getInputStream();
                    InputStreamReader responseBodyReader =
                            new InputStreamReader(responseBody, StandardCharsets.UTF_8);
                    //lấy dữ liệu trả về là OpenAIOutput
                    OpenAIOutput data= new Gson().fromJson(responseBodyReader, OpenAIOutput.class);
                    return data;
                }
                catch (Exception ex)
                {
                    Log.e(TAG,ex.toString());
                }
                return null;
            }

            @Override
            protected void onPostExecute(OpenAIOutput openAIOutput) {
                super.onPostExecute(openAIOutput);
                if(openAIOutput!=null)
                {
                    if(openAIOutput.getChoices()!=null)
                    {
                        //nếu có dữ liệu, ta lấy phần tử đầu tiên trong mảng choices
                        MessageData openAIMessage=openAIOutput.getChoices().get(0);
                        //cập nhật lại tên
                        openAIMessage.setUserName("OpenAI");
                        //cập nhật lại loại OpenAI để show box cho đúng
                        openAIMessage.setTypeTalking(TypeTalking.OPENAI);
                        //cập nhật thời gian để show
                        openAIMessage.setCreated(openAIOutput.getCreated());
                        messageList.add(openAIMessage);
                        //cập nhật giao diện
                        refreshMessageList();

                        txtOpenAIStatus.setVisibility(View.INVISIBLE);
                    }
                }
            }
        };
        //Kích hoạt tiểu trình:
        OpenAIInput input=new OpenAIInput(msg);
        task.execute(input);
    }
    private void refreshMessageList() {
        messageDataAdapter.notifyDataSetChanged();

        rvMessageData.scrollToPosition(messageList.size() - 1);
    }

}
Như vậy là mọi thứ chúng ta đã coding xong.
Giờ chạy phần mềm để test. Ta có kết quả :

Coding các bạn có thể tải ở đây (tuy nhiên Các bạn nên cố gắng coding theo từng bước mà Tui đã hướng dẫn). bài này chạy hoàn chỉnh nên code cẩn thận là thành công thôi.
https://www.mediafire.com/file/qiqs13bm4nh1xoh/OpenAIChatBot.rar/file
Có câu hỏi nào thì vào group này hỏi: https://www.facebook.com/groups/communityuni/
Lưu ý group này người lớn nhiều, chuyên gia nhiều. Khi hỏi phải có đầu có đuôi, và lịch sự.
Chúc các bạn thành công.