Trong các dữ liệu, hầu hết chúng đều có liên quan tới ngày tháng, ví dụ như đối với Sản phẩm thì ta thường có các thuộc tính: Ngày nhập hàng, ngày xuất hàng, hạn sử dụng. Với Customer thì ta có ngày tháng năm sinh, ngày mua hàng, ngày thanh toán đơn hàng… Python/ PyQt cũng như các nền tảng khác đều hỗ trợ các widget/control cung cấp nhập liệu liên quan tới ngày tháng. Với PyQt6 thì có các widget như QDateEdit dùng để nhập liệu và hiển thị ngày tháng năm, QTimeEdit dùng để nhập liệu và hiển thị giờ – phút, QDateTimeEdit dùng để vừa hiển thị và nhập liệu ngày tháng năm – giờ phút. Tùy vào từng mục đích lưu trữ dữ liệu mà ta sẽ sử dụng các widget này một cách phù hợp để cung cấp giao diện nhập liệu cũng như hiển thị.
Bài học này Tui sẽ trình bày về QDateEdit, nó là widget dùng để nhập liệu và hiểu thị dữ liệu liên quan tới Ngày – Tháng – Năm. Trước khi vào coding ta xem một số thuộc tính, phương thức, signal thường dùng của widget này:
| Thuộc tính, phương thức, signal | Ý nghĩa chức năng |
|---|---|
| QDateEdit(self) | Constructor để tạo đối tượng QDateEdit. Nếu dùng constructor này thì người sử dụng sẽ dùng các phím mũi tên lên/xuống hay nhấn vào biểu tượng lên/xuống của widget để thay đổi ngày tháng năm. |
| QDateEdit(self,calendarPopup=True) | Constructor để tạo đối tượng QDateEdit. Nếu dùng constructor này thì người sử dụng sẽ dùng Calendar popup để lựa chọn |
| date() | Hàm trả về ngày tháng năm mà người sử dụng nhập trên giao diện, nó có kiểu QDate, do đó muốn chuyển về date trong python thuần túy thì ta gọi thêm hàm toPyDate() |
| setDate(date) | Hàm thiết lập Ngày – Tháng – Năm cho widget |
| minimumDate | Thuộc tính thiết lập ngày nhỏ nhất |
| maximumDate | Thuộc tính thiết lập ngày lớn nhất |
| setDisplayFormat() | Phương thức xác định cách thức hiện thị dữ liệu Ngày – Tháng – Năm lên giao diện |
| editingFinished | Signal để xử lý khi người dùng hoàn tất việc nhập liệu Ngày – Tháng – Năm (đã chọn và nhấn phím Enter) |
| dateChanged | Signal để xử lý khi người dùng chọn lựa Ngày – Tháng – Năm trên Widget |
Dưới đây là các bước khai báo và sử dụng QDateEdit:
Bước 1: Khai báo và khởi tạo đối tượng QDateEdit
self.date_edit = QDateEdit(self,calendarPopup=True)Bước 2: Thiết lập các giá trị cho các thuộc tính
today=date.today()
self.date_edit.setDate(today)
self.date_edit.setDisplayFormat("dd/MM/yyyy")
Mã lệnh ở trên thiết lập ngày hiện tại của máy tính cho QDateEdit thông qua hàm setDate. Và thiết lập cách thức hiển thị Ngày – Tháng- Năm cho QDateEdit. Ở ví dụ trên tui dùng cú pháp: dd/MM/yyyy
- dd: Ký hiệu d đại diện cho day, ta viết 2 ký tự dd thì những ngày nhỏ hơn 9 sẽ tự động được chèn thêm số 0 đằng trước. Ví dụ như 08, 07
- MM: Ký hiệu M đại hiện cho Month, ta viết 2 ký tự MM thì những tháng nhỏ hơn 9 sẽ tự động được chèn thêm số 0 đằng trước. Ví dụ tháng 01, tháng 02
- yyyy: Ký hiệu y đại diện cho Year, ta viết 4 ký tự yyyy để lấy đầy đủ năm với 4 ký số, ví dụ 2023, 2022…
Bước 3: Thiết lập signal cho QDateEdit khi người sử dụng lựa chọn xong Ngày Tháng Năm
self.date_edit.editingFinished.connect(self.SelectedDate)def SelectedDate(self):
value = self.date_edit.date()
print(type(value))
print(str(value.toPyDate()))Hàm date() sẽ trả về dữ liệu có kiểu QDate, nên muốn đưa về Python date thì ta gọi thêm hàm toPyDate()
Tuy nhiên editingFinished signal thì người dùng cần nhấn phím Enter để xác nhận. Do đó để tiện lại ta có thể dùng dateChanged signal, bất cứ khi nào người dùng lựa chọn ngày tháng năm trên giao diện thì ta sẽ lấy được dữ liệu này:
self.date_edit.dateChanged.connect(self.ChangingDate)def ChangingDate(self):
value = self.date_edit.date()
print(type(value))
print(str(value.toPyDate()))Chúng ta sẽ ứng dụng QDateEdit, QCheckBox và QListWidget để viết phần mềm Quản lý thực phẩm. Phần mềm này sẽ cung cấp giao diện nhập dữ liệu Thực phẩm (Sản phẩm) bao gồm: Mã sản phẩm, tên sản phẩm, đơn giá, hạn sử dụng; Sản phẩm thì có sản phẩm được miễn thuế hoặc không, dùng Icon để phân biệt 2 loại sản phẩm này. Đồng thời nếu hạn sử dụng mà trong khoảng 1 tuần tính tới thời điểm hiện tại thì tô màu đỏ cho (thực phẩm) sản phẩm này:
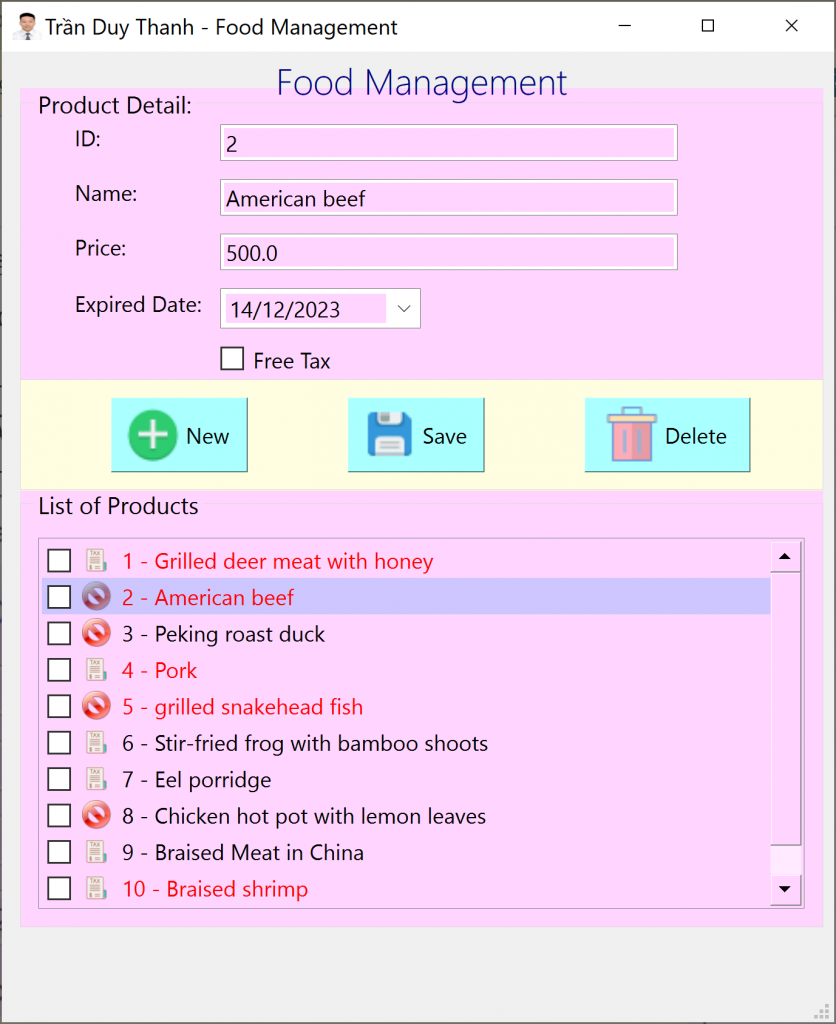
- Chương trình cung cấp chức năng “Save” Product có 2 nhiệm vụ: Thêm mới và Chỉnh sửa dữ liệu, nếu Product thêm vào mà trùng Id thì chương trình sẽ chỉnh sửa dữ liệu. Thao tác Save sẽ đồng thì lưu toàn bộ Product xuống ổ cứng với định dạng JSonArray
- Ngoài ra, nút “Delete” sẽ xác nhận xóa các Product được Checked trong QListWidget.
Các mã lệnh trong bài dự án này sẽ được tách ra thành các lớp riêng biệt để tái sử dụng.
Trước tiên ta tạo một dự án tên “LearnQDateEdit” với các cấu trúc và tập tin như dưới đây:
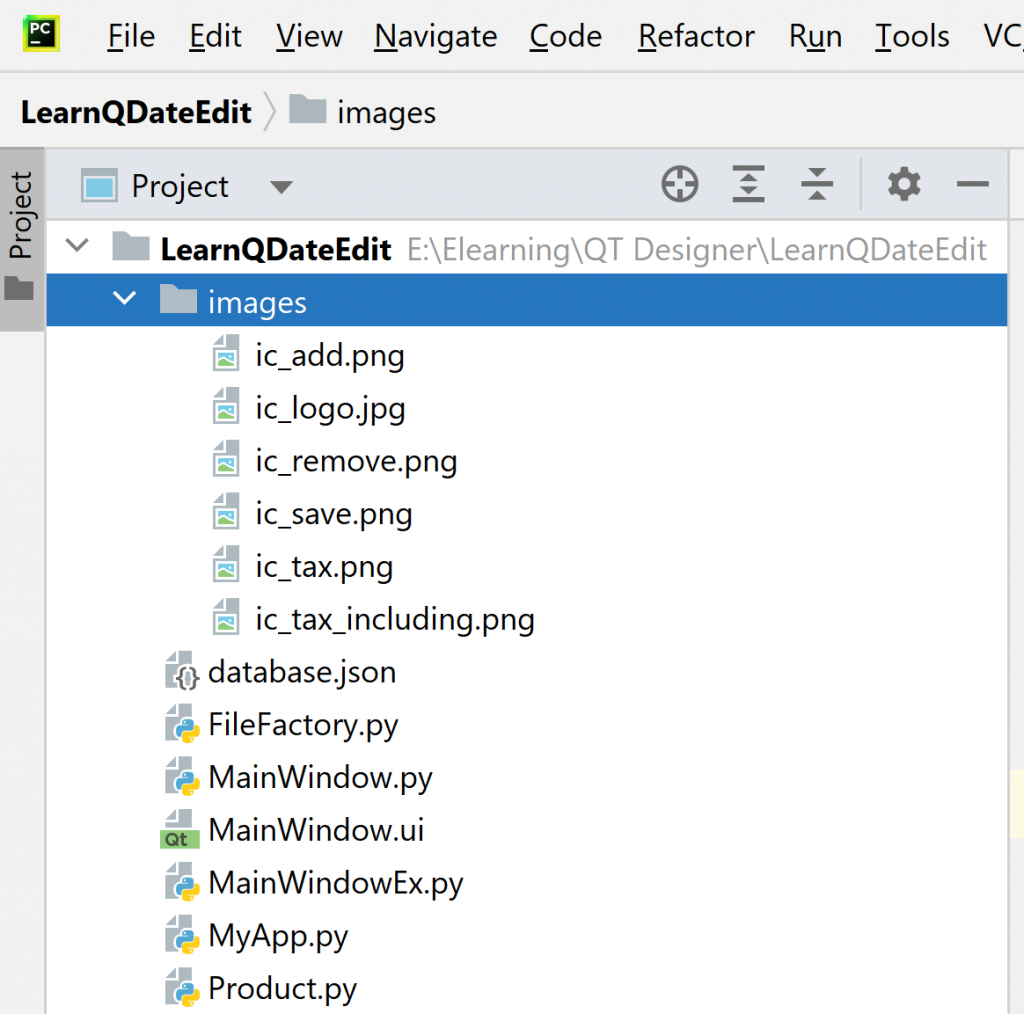
- “Product.py” là mã lệnh để tạo lớp đối tượng Product có các thuộc tính như Mã, tên, giá, ngày tháng(hạn dùng)
- “FileFactory.py” là mã lệnh dùng để ghi toàn bộ dữ liệu xuống ổ cứng với định dạng JSonArray, cũng như phục hồi và mô hình hóa lại dữ liệu hướng đối tượng
- “MainWindow.ui” là file thiết kế giao diện bằng Qt Designer
- “MainWindow.py” là file python code được generate tự động từ “MainWindow.ui”. Cách thiết kế và tích hợp công cụ tự động Generate đã được hướng dẫn rất chi tiết ở những bài học đầu tiên, các bạn cần xem lại
- “MainWindowEx.py” là mã lệnh ta bổ sung, kế thừ từ lớp được generate trong MainWindow.py để xử lý các sự kiện người dùng
- “MyApp.py” là mã lệnh để thực thi chương trình
- “database.json” là file JSonArray để lưu trữ các dữ liệu mà người dùng thao tác trên phần mềm.
Bước 1: Viết mã lệnh cho “Product.py”, mã lệnh được thể hiện như dưới đây:
class Product:
    def __init__(self,ProductId,ProductName,Price,ExpiredDate,FreeTax):
        self.ProductId=ProductId
        self.ProductName=ProductName
        self.Price=Price
        self.ExpiredDate=ExpiredDate
        self.FreeTax=FreeTax
    def __str__(self):
        return str(self.ProductId) +" - "+self.ProductName
Ta khai báo lớp Product cùng với constructor và các đối số chính xác như trên để việc serialize và deserialize JSon data được chính xác.
hàm __str__ dùng để hiển thị dữ liệu của đối tượng lên giao diện, ta muốn hiển thị các thuộc tính nào thì viết mã lệnh trong hàm này.
Bước 2: Viết mã lệnh cho “FileFactory.py“, class này dùng để serialize và deserialize dữ liệu với định dạng JSonArray:
import json
import os

class FileFactory:
    #path: path to serialize array of product
    #arrData: array of Product
    def writeData(self,path,arrData):
        jsonString = json.dumps([item.__dict__ for item in arrData],default=str)
        jsonFile = open(path, "w")
        jsonFile.write(jsonString)
        jsonFile.close()
    #path: path to deserialize array of Product
    #ClassName: Product
    def readData(self,path,ClassName):
        if os.path.isfile(path) == False:
            return []
        file = open(path, "r")
        # Reading from file
        self.arrData = json.loads(file.read(), object_hook=lambda d: ClassName(**d))
        file.close()
        return self.arrData
Chúng ta lưu ý rằng, Tui viết “FileFactory.py” ở trên nó sẽ hiểu bất kỳ kiểu dữ liệu danh sách nào. Ví dụ như bạn có thể Serialize và Deserialize danh sách Product, hoặc Nhân viên, hoặc Khách hàng…. lớp này đều hiểu hết. Nên các bài sau nếu có lưu danh sách dữ liệu dạng JSonArray thì các bạn có thể tái sử dụng luôn “FileFactory.py” mà không cần phải bổ sung thêm bất kỳ mã lệnh nào.
Bước 3: Dùng Qt Designer để thiết kế giao diện “MainWindow.ui” cho phần mềm.
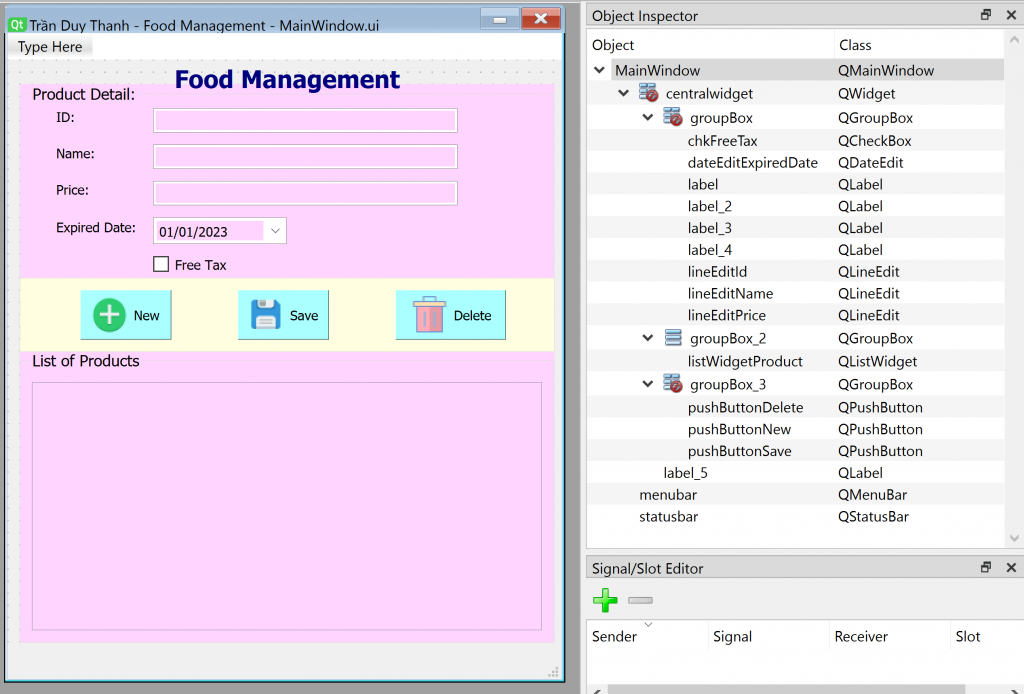
Các bạn kéo thả các Widget và đặt tên giống như hình minh họa ở trên.
Bước 4: Dùng công cụ để Generate Python code cho “MainWindow.ui” ta có file “MainWindow.py”:
# Form implementation generated from reading ui file 'MainWindow.ui'
#
# Created by: PyQt6 UI code generator 6.5.2
#
# WARNING: Any manual changes made to this file will be lost when pyuic6 is
# run again.  Do not edit this file unless you know what you are doing.


from PyQt6 import QtCore, QtGui, QtWidgets


class Ui_MainWindow(object):
    def setupUi(self, MainWindow):
        MainWindow.setObjectName("MainWindow")
        MainWindow.resize(457, 533)
        font = QtGui.QFont()
        font.setPointSize(10)
        MainWindow.setFont(font)
        icon = QtGui.QIcon()
        icon.addPixmap(QtGui.QPixmap("images/ic_logo.jpg"), QtGui.QIcon.Mode.Normal, QtGui.QIcon.State.Off)
        MainWindow.setWindowIcon(icon)
        self.centralwidget = QtWidgets.QWidget(parent=MainWindow)
        self.centralwidget.setObjectName("centralwidget")
        self.groupBox = QtWidgets.QGroupBox(parent=self.centralwidget)
        self.groupBox.setGeometry(QtCore.QRect(10, 20, 441, 161))
        self.groupBox.setStyleSheet("background-color: rgb(255, 213, 255);")
        self.groupBox.setFlat(False)
        self.groupBox.setCheckable(False)
        self.groupBox.setObjectName("groupBox")
        self.label = QtWidgets.QLabel(parent=self.groupBox)
        self.label.setGeometry(QtCore.QRect(30, 20, 47, 14))
        self.label.setObjectName("label")
        self.lineEditId = QtWidgets.QLineEdit(parent=self.groupBox)
        self.lineEditId.setGeometry(QtCore.QRect(110, 20, 251, 20))
        self.lineEditId.setObjectName("lineEditId")
        self.lineEditName = QtWidgets.QLineEdit(parent=self.groupBox)
        self.lineEditName.setGeometry(QtCore.QRect(110, 50, 251, 20))
        self.lineEditName.setObjectName("lineEditName")
        self.label_2 = QtWidgets.QLabel(parent=self.groupBox)
        self.label_2.setGeometry(QtCore.QRect(30, 50, 47, 14))
        self.label_2.setObjectName("label_2")
        self.lineEditPrice = QtWidgets.QLineEdit(parent=self.groupBox)
        self.lineEditPrice.setGeometry(QtCore.QRect(110, 80, 251, 20))
        self.lineEditPrice.setObjectName("lineEditPrice")
        self.label_3 = QtWidgets.QLabel(parent=self.groupBox)
        self.label_3.setGeometry(QtCore.QRect(30, 80, 47, 14))
        self.label_3.setObjectName("label_3")
        self.dateEditExpiredDate = QtWidgets.QDateEdit(parent=self.groupBox)
        self.dateEditExpiredDate.setGeometry(QtCore.QRect(110, 110, 110, 22))
        self.dateEditExpiredDate.setCalendarPopup(True)
        self.dateEditExpiredDate.setDate(QtCore.QDate(2023, 1, 1))
        self.dateEditExpiredDate.setObjectName("dateEditExpiredDate")
        self.label_4 = QtWidgets.QLabel(parent=self.groupBox)
        self.label_4.setGeometry(QtCore.QRect(30, 110, 71, 16))
        self.label_4.setObjectName("label_4")
        self.chkFreeTax = QtWidgets.QCheckBox(parent=self.groupBox)
        self.chkFreeTax.setGeometry(QtCore.QRect(110, 140, 151, 18))
        self.chkFreeTax.setObjectName("chkFreeTax")
        self.groupBox_2 = QtWidgets.QGroupBox(parent=self.centralwidget)
        self.groupBox_2.setGeometry(QtCore.QRect(10, 240, 441, 241))
        self.groupBox_2.setStyleSheet("background-color: rgb(255, 213, 255);")
        self.groupBox_2.setObjectName("groupBox_2")
        self.verticalLayout = QtWidgets.QVBoxLayout(self.groupBox_2)
        self.verticalLayout.setObjectName("verticalLayout")
        self.listWidgetProduct = QtWidgets.QListWidget(parent=self.groupBox_2)
        self.listWidgetProduct.setStyleSheet("")
        self.listWidgetProduct.setObjectName("listWidgetProduct")
        self.verticalLayout.addWidget(self.listWidgetProduct)
        self.label_5 = QtWidgets.QLabel(parent=self.centralwidget)
        self.label_5.setGeometry(QtCore.QRect(10, 0, 441, 31))
        font = QtGui.QFont()
        font.setPointSize(15)
        font.setBold(True)
        font.setWeight(75)
        self.label_5.setFont(font)
        self.label_5.setStyleSheet("color: rgb(0, 0, 127);")
        self.label_5.setAlignment(QtCore.Qt.AlignmentFlag.AlignCenter)
        self.label_5.setObjectName("label_5")
        self.groupBox_3 = QtWidgets.QGroupBox(parent=self.centralwidget)
        self.groupBox_3.setGeometry(QtCore.QRect(10, 180, 441, 61))
        self.groupBox_3.setStyleSheet("background-color: rgb(255, 254, 225);")
        self.groupBox_3.setTitle("")
        self.groupBox_3.setObjectName("groupBox_3")
        self.pushButtonNew = QtWidgets.QPushButton(parent=self.groupBox_3)
        self.pushButtonNew.setGeometry(QtCore.QRect(50, 10, 75, 41))
        self.pushButtonNew.setStyleSheet("background-color: rgb(170, 255, 255);")
        icon1 = QtGui.QIcon()
        icon1.addPixmap(QtGui.QPixmap("images/ic_add.png"), QtGui.QIcon.Mode.Normal, QtGui.QIcon.State.Off)
        self.pushButtonNew.setIcon(icon1)
        self.pushButtonNew.setIconSize(QtCore.QSize(32, 32))
        self.pushButtonNew.setObjectName("pushButtonNew")
        self.pushButtonSave = QtWidgets.QPushButton(parent=self.groupBox_3)
        self.pushButtonSave.setGeometry(QtCore.QRect(180, 10, 75, 41))
        self.pushButtonSave.setStyleSheet("background-color: rgb(170, 255, 255);")
        icon2 = QtGui.QIcon()
        icon2.addPixmap(QtGui.QPixmap("images/ic_save.png"), QtGui.QIcon.Mode.Normal, QtGui.QIcon.State.Off)
        self.pushButtonSave.setIcon(icon2)
        self.pushButtonSave.setIconSize(QtCore.QSize(32, 32))
        self.pushButtonSave.setObjectName("pushButtonSave")
        self.pushButtonDelete = QtWidgets.QPushButton(parent=self.groupBox_3)
        self.pushButtonDelete.setGeometry(QtCore.QRect(310, 10, 91, 41))
        self.pushButtonDelete.setStyleSheet("background-color: rgb(170, 255, 255);")
        icon3 = QtGui.QIcon()
        icon3.addPixmap(QtGui.QPixmap("images/ic_remove.png"), QtGui.QIcon.Mode.Normal, QtGui.QIcon.State.Off)
        self.pushButtonDelete.setIcon(icon3)
        self.pushButtonDelete.setIconSize(QtCore.QSize(32, 32))
        self.pushButtonDelete.setObjectName("pushButtonDelete")
        MainWindow.setCentralWidget(self.centralwidget)
        self.menubar = QtWidgets.QMenuBar(parent=MainWindow)
        self.menubar.setGeometry(QtCore.QRect(0, 0, 457, 22))
        self.menubar.setObjectName("menubar")
        MainWindow.setMenuBar(self.menubar)
        self.statusbar = QtWidgets.QStatusBar(parent=MainWindow)
        self.statusbar.setObjectName("statusbar")
        MainWindow.setStatusBar(self.statusbar)

        self.retranslateUi(MainWindow)
        QtCore.QMetaObject.connectSlotsByName(MainWindow)

    def retranslateUi(self, MainWindow):
        _translate = QtCore.QCoreApplication.translate
        MainWindow.setWindowTitle(_translate("MainWindow", "Trần Duy Thanh - Food Management"))
        self.groupBox.setTitle(_translate("MainWindow", "Product Detail:"))
        self.label.setText(_translate("MainWindow", "ID:"))
        self.label_2.setText(_translate("MainWindow", "Name:"))
        self.label_3.setText(_translate("MainWindow", "Price:"))
        self.label_4.setText(_translate("MainWindow", "Expired Date:"))
        self.chkFreeTax.setText(_translate("MainWindow", "Free Tax"))
        self.groupBox_2.setTitle(_translate("MainWindow", "List of Products"))
        self.label_5.setText(_translate("MainWindow", "Food Management"))
        self.pushButtonNew.setText(_translate("MainWindow", "New"))
        self.pushButtonSave.setText(_translate("MainWindow", "Save"))
        self.pushButtonDelete.setText(_translate("MainWindow", "Delete"))
Bước 5: Ta tạo file “MainWindowEx.py” kế thừa từ “MainWindow.py” và tiến hành viết các sự kiện người dùng tương tác:
import datetime

from PyQt6.QtCore import Qt
from PyQt6.QtGui import QIcon
from PyQt6.QtWidgets import QListWidgetItem, QMessageBox

from FileFactory import FileFactory
from MainWindow import Ui_MainWindow
from Product import Product

class MainWindowEx(Ui_MainWindow):
    def __init__(self):
        self.arrData=[]
        self.fileFactory=FileFactory()
Trong MainWindowEx ta bổ sung constructor để khởi tạo 2 biến:
- Biến arrData để lưu trữ danh sách hướng đối tượng các Product mà người sử dụng tương tác trên giao diện
- Biến fileFactory là biến dùng để gọi đối tượng FileFactory nhằm sử dụng Serialize và Deserialize dữ liệu với định dạng JSonArray.
Tiếp theo ta Override hàm setupUi để khởi tạo giao diện cũng như gán các signal và slot cho giao diện tương tác:
def setupUi(self, MainWindow):
    super().setupUi(MainWindow)
    self.MainWindow=MainWindow
    self.arrData = self.fileFactory.readData("database.json", Product)
    self.showProductIntoQListWidget()
    self.pushButtonNew.clicked.connect(self.processNew)
    self.pushButtonSave.clicked.connect(self.processSave)
    self.pushButtonDelete.clicked.connect(self.processDelete)
    self.listWidgetProduct.itemSelectionChanged.connect(self.processItemSelection)
Khi khởi động phần mềm, chương trình sẽ đọc dữ liệu (deserialize) “database.json” thành danh sách hướng đối tượng Product và biến arrayData sẽ lưu trữ danh sách dữ liệu này.
Sau đó hàm showProductIntoQListWidget() sẽ được triệu gọi để hiển thị toàn bộ Product trong arrData lên giao diện QListWidget:
def showProductIntoQListWidget(self):
    self.listWidgetProduct.clear()
    for product in self.arrData:
        item=QListWidgetItem()
        item.setData(Qt.ItemDataRole.UserRole, product)
        item.setText(str(product))
        item.setCheckState(Qt.CheckState.Unchecked)
        if product.FreeTax==True:
            item.setIcon(QIcon("images/ic_tax.png"))
        else:
            item.setIcon(QIcon("images/ic_tax_including.png"))
        if isinstance(product.ExpiredDate,str):
            product.ExpiredDate=datetime.date.fromisoformat(product.ExpiredDate)
        day=(product.ExpiredDate-datetime.date.today()).days
        if day<=7:
            item.setForeground(Qt.GlobalColor.red)
        self.listWidgetProduct.addItem(item)
Chương trình dùng vòng lặp để duyệt qua các Product trong arrData, sau đó sẽ tạo các đối tượng QListWidgetItem để hiển thị lên giao diện. Nếu Food nào là FreeTax thì dùng icon freetax.
Ngoài ra vì dữ liệu ngày tháng khi serialize xuống ổ cứng với định dạng JSon thì nó là chuỗi, nên ta dùng hàm isinstance để kiểm tra xem thuộc tính ExpiredDate có phải đang là chuỗi hay không, nếu là chuỗi thì ta ép kiểu qua kiểu Python Date bằng hàm: datetime.date.fromisoformat(product.ExpiredDate)
Sau đó ta dùng phép trừ của ngày hiện tại với ngày hết hạn để tìm ra số ngày, nếu day<=7 thì ta dùng chữ màu đỏ cho QListWidgetItem này bằng hàm item.setForeground(Qt.GlobalColor.red).
-Hàm processNew dùng để xóa các dữ liệu đang nhập trên giao diện và focus vào ô ID để người dùng nhập dữ liệu mới được nhanh chóng hơn:
def processNew(self):
    self.lineEditId.setText("")
    self.lineEditName.setText("")
    self.lineEditPrice.setText("")
    self.chkFreeTax.setCheckState(Qt.CheckState.Unchecked)
    self.lineEditId.setFocus()
-Hàm processSave dùng để lưu dữ liệu, nêu Id không trùng thì lưu mới, nếu Id trùng thì lưu cập nhật:
def processSave(self):
    id=self.lineEditId.text()
    name=self.lineEditName.text()
    price=float(self.lineEditPrice.text())
    date=self.dateEditExpiredDate.date().toPyDate()
    freeTax=self.chkFreeTax.isChecked()
    newItem = Product(id,name, price, date,freeTax)
    oldItem=self.checkDuplicate(id)
    if oldItem !=None:
        index = self.arrData.index(oldItem)
        self.arrData[index]=newItem
    else:
        self.arrData.append(newItem)
    self.showProductIntoQListWidget()
    self.fileFactory.writeData("database.json",self.arrData)
Để biết được id nào trùng hay không, Tui cung cấp hàm checkDuplicate dưới đây:
def checkDuplicate(self,id):
    items=[x for x in self.arrData if x.ProductId == id]
    if len(items)==0:
        return None
    return items[0]
Nếu không tìm thấy item nào có id trong danh sách thì chương trình trả về None. Còn nều tìm thấy thì trả về Item tìm thấy đó.
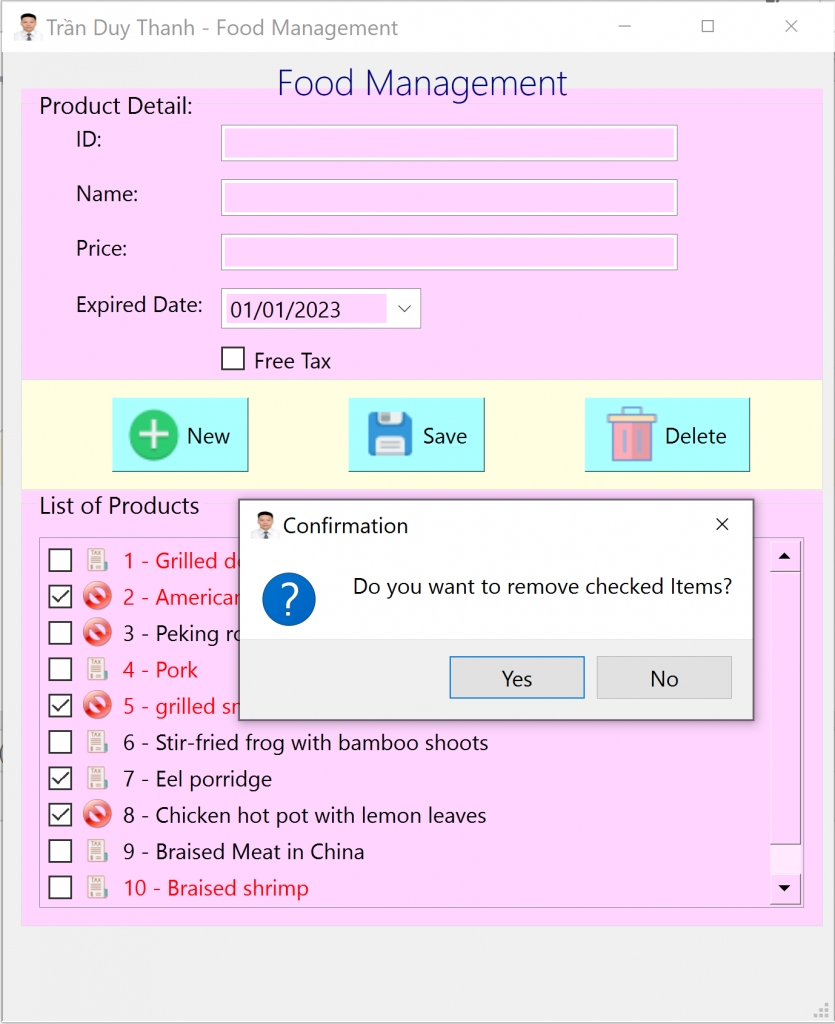
– Hàm processDelete dùng để xóa các QListWidgetItem được checked trên giao diện ra khỏi QListWidget:
def processDelete(self):
    answer = QMessageBox.question(
        self.MainWindow,
        'Confirmation',
        'Do you want to remove checked Items?',
        QMessageBox.StandardButton.Yes |
        QMessageBox.StandardButton.No
    )
    if answer == QMessageBox.StandardButton.No:
        return
    for index in range(self.listWidgetProduct.count()):
        item=self.listWidgetProduct.item(index)
        if item.checkState()==Qt.CheckState.Checked:
            product=item.data(Qt.ItemDataRole.UserRole)
            self.arrData.remove(product)
    self.showProductIntoQListWidget()
    self.fileFactory.writeData("database.json", self.arrData)
Chương trình sẽ hiển thị cửa sổ xác nhận có muốn xóa hay không, nếu đồng ý xóa thì chương trình sẽ xóa, sau đó sẽ lưu (serialize) lại dữ liệu xuống JSonArray cũng như hiển thị lại giao diện. Hình minh họa xóa:
-Cuối cùng là hàm/signal “processItemSelection“, hàm này sẽ lắng nghe người dùng đang chọn QListWidgetItem nào trên giao diện và hiển thị thông tin chi tiết lên các ô dữ liệu. Người dùng có thể dùng phím mũi tên di chuyển hoặc click chuột vào item bất kỳ:
def processItemSelection(self):
    row=self.listWidgetProduct.currentRow()
    item=self.listWidgetProduct.item(row)
    product=item.data(Qt.ItemDataRole.UserRole)
    self.lineEditId.setText(str(product.ProductId))
    self.lineEditName.setText(product.ProductName)
    self.lineEditPrice.setText(str(product.Price))
    if isinstance(product.ExpiredDate, str):
        product.ExpiredDate = datetime.date.fromisoformat(product.ExpiredDate)
    self.dateEditExpiredDate.setDate(product.ExpiredDate)
    if product.FreeTax:
        self.chkFreeTax.setCheckState(Qt.CheckState.Checked)
    else:
        self.chkFreeTax.setCheckState(Qt.CheckState.Unchecked)
Dưới đây là mã lệnh đầy đủ của MainWindowEx.py:
import datetime

from PyQt6.QtCore import Qt
from PyQt6.QtGui import QIcon
from PyQt6.QtWidgets import QListWidgetItem, QMessageBox

from FileFactory import FileFactory
from MainWindow import Ui_MainWindow
from Product import Product

class MainWindowEx(Ui_MainWindow):
    def __init__(self):
        self.arrData=[]
        self.fileFactory=FileFactory()
    def setupUi(self, MainWindow):
        super().setupUi(MainWindow)
        self.MainWindow=MainWindow
        self.arrData = self.fileFactory.readData("database.json", Product)
        self.showProductIntoQListWidget()
        self.pushButtonNew.clicked.connect(self.processNew)
        self.pushButtonSave.clicked.connect(self.processSave)
        self.pushButtonDelete.clicked.connect(self.processDelete)
        self.listWidgetProduct.itemSelectionChanged.connect(self.processItemSelection)
    def showProductIntoQListWidget(self):
        self.listWidgetProduct.clear()
        for product in self.arrData:
            item=QListWidgetItem()
            item.setData(Qt.ItemDataRole.UserRole, product)
            item.setText(str(product))
            item.setCheckState(Qt.CheckState.Unchecked)
            if product.FreeTax==True:
                item.setIcon(QIcon("images/ic_tax.png"))
            else:
                item.setIcon(QIcon("images/ic_tax_including.png"))
            if isinstance(product.ExpiredDate,str):
                product.ExpiredDate=datetime.date.fromisoformat(product.ExpiredDate)
            day=(product.ExpiredDate-datetime.date.today()).days
            if day<=7:
                item.setForeground(Qt.GlobalColor.red)
            self.listWidgetProduct.addItem(item)
    def processNew(self):
        self.lineEditId.setText("")
        self.lineEditName.setText("")
        self.lineEditPrice.setText("")
        self.chkFreeTax.setCheckState(Qt.CheckState.Unchecked)
        self.lineEditId.setFocus()
    def checkDuplicate(self,id):
        items=[x for x in self.arrData if x.ProductId == id]
        if len(items)==0:
            return None
        return items[0]
    def processSave(self):
        id=self.lineEditId.text()
        name=self.lineEditName.text()
        price=float(self.lineEditPrice.text())
        date=self.dateEditExpiredDate.date().toPyDate()
        freeTax=self.chkFreeTax.isChecked()
        newItem = Product(id,name, price, date,freeTax)
        oldItem=self.checkDuplicate(id)
        if oldItem !=None:
            index = self.arrData.index(oldItem)
            self.arrData[index]=newItem
        else:
            self.arrData.append(newItem)
        self.showProductIntoQListWidget()
        self.fileFactory.writeData("database.json",self.arrData)
    def processDelete(self):
        answer = QMessageBox.question(
            self.MainWindow,
            'Confirmation',
            'Do you want to remove checked Items?',
            QMessageBox.StandardButton.Yes |
            QMessageBox.StandardButton.No
        )
        if answer == QMessageBox.StandardButton.No:
            return
        for index in range(self.listWidgetProduct.count()):
            item=self.listWidgetProduct.item(index)
            if item.checkState()==Qt.CheckState.Checked:
                product=item.data(Qt.ItemDataRole.UserRole)
                self.arrData.remove(product)
        self.showProductIntoQListWidget()
        self.fileFactory.writeData("database.json", self.arrData)
    def processItemSelection(self):
        row=self.listWidgetProduct.currentRow()
        item=self.listWidgetProduct.item(row)
        product=item.data(Qt.ItemDataRole.UserRole)
        self.lineEditId.setText(str(product.ProductId))
        self.lineEditName.setText(product.ProductName)
        self.lineEditPrice.setText(str(product.Price))
        if isinstance(product.ExpiredDate, str):
            product.ExpiredDate = datetime.date.fromisoformat(product.ExpiredDate)
        self.dateEditExpiredDate.setDate(product.ExpiredDate)
        if product.FreeTax:
            self.chkFreeTax.setCheckState(Qt.CheckState.Checked)
        else:
            self.chkFreeTax.setCheckState(Qt.CheckState.Unchecked)
    def show(self):
        self.MainWindow.show()
– Bước 6: Cuối cùng ta tạo lớp “MyApp.py” và viết mã lệnh như dưới đây để khởi chạy chương trình:
from PyQt6.QtWidgets import QApplication, QMainWindow

from MainWindowEx import MainWindowEx

app=QApplication([])
myWindow=MainWindowEx()
myWindow.setupUi(QMainWindow())
myWindow.show()
app.exec()
Mã lệnh đầy đủ của dự án các bạn tải ở đây:
https://www.mediafire.com/file/y7urznpsswmhgcl/LearnQDateEdit.rar/file
Như vậy tới đây Tui đã trình bày xong lý thuyết cũng như kỹ thuật sử dụng QDateEdit và ứng dụng vào quản lý Food, củng cố lại các kiến thức liên quan tới lập trình hướng đối tượng, cách serialize và deserialize đối tượng ra JSonArray, củng cố lại kiến thức và kỹ thuật liên quan tới QListWidget để hiển thị và tương tác dữ liệu trên giao diện.
Các bạn cố gắng thực hành lại bài này nhiều lần vì độ khó nó đã được tăng lên do Tui đã tách ra các lớp độc lập để tái sử dụng.
Bài học sau Tui sẽ trình bày về QTimeEdit để tạo ra widget cho người dùng nhập Thời gian, nó cũng là một trong các Widget quan trọng và phổ biến, được sử dụng thường xuyên trong các phần mềm. Các bạn chú ý theo dõi
Chúc các bạn thành công.
2 thoughts on “Bài 19: QDateEdit – Basic Widgets – PyQt6”