Chúc mừng các bạn đã lết được tới Web API cuối cùng, đó là triệu gọi HTTPPOST để thêm mới Product. Tiếp tục mở lại project AndroidKotlinToNodeJS ở bài 33.
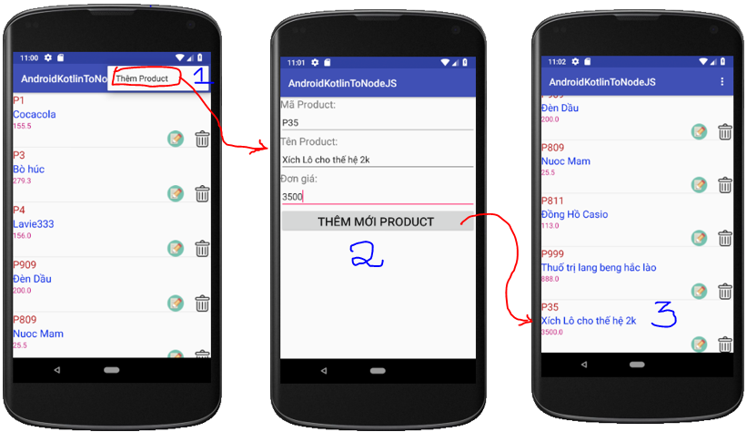
Trong bài này các bạn bổ sung 1 Menu “Thêm Product”, nhấn vào menu này sẽ hiển thị ra màn hình Thêm mới để cho phép người dùng nhập mới Product, bấm lưu để thêm Product vào MongoDB bằng cách triệu gọi Web API http://192.168.1.137/nodejsapi/addProduct (dĩ nhiên máy bạn cấu hình sao thì lấy theo vậy, copy y xì Tui là đạp xích lô đó nha).
Chi tiết các bước coding như sau:
Bước 1: Tạo 1 Option Menu cho ứng dụng, Option menu này chứa 1 MenuItem là Thêm Product
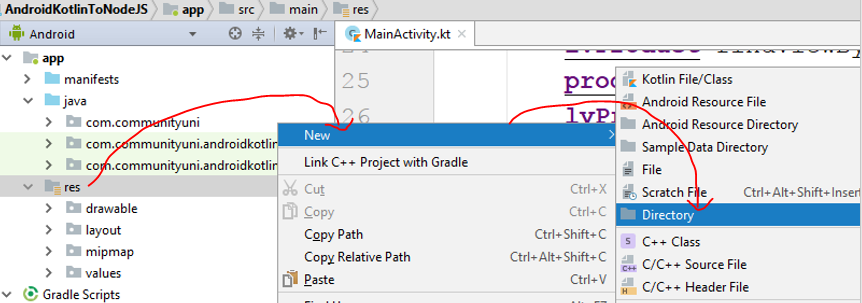 Bấm chuộc phải vào thư mục res/ chọn New/ chọn Directory:
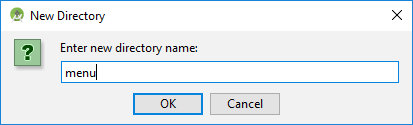 Đặt tên là menu rồi bấm OK
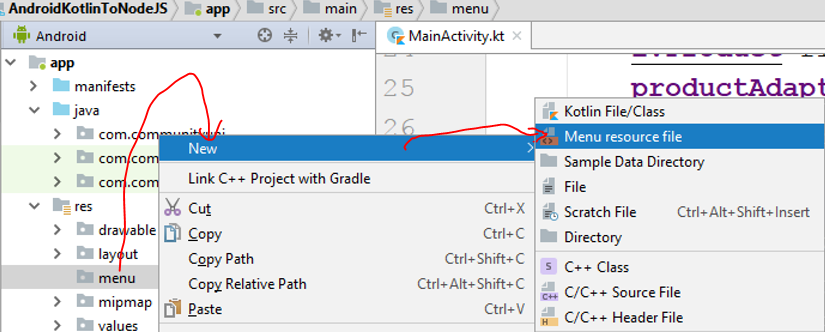 Khi thư mục menu được tạo ra, ta bấm chuột phải vào nó/ chọn New/ chọn Menu Resource file:
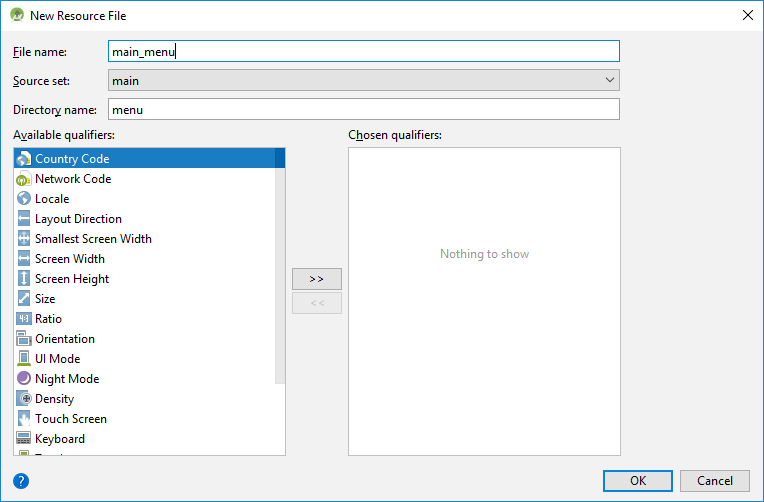 Đặt tên main_menu rồi bấm OK
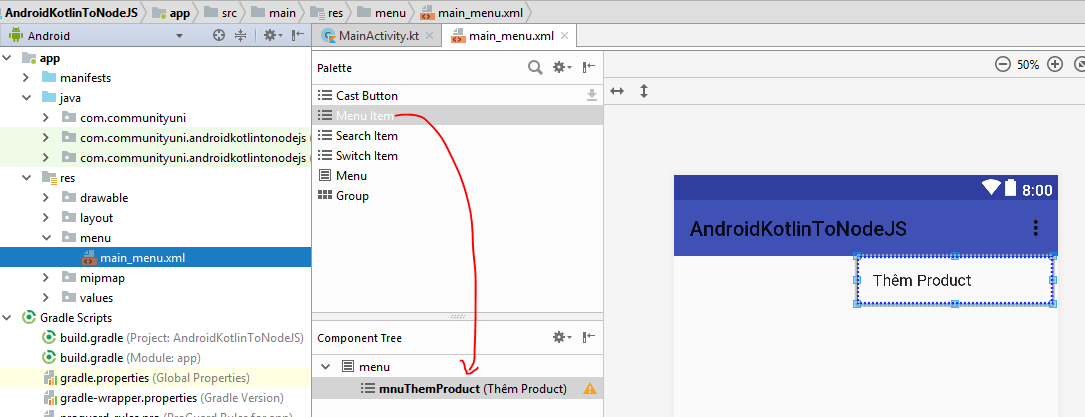 Ta kéo một Menu Item vào trong menu, đặt id là mnuThemProduct, nhãn là “Thêm Product”
cấu trúc XML của main_menu.xml như sau:
[code language=”xml”]
<?xml version=”1.0″ encoding=”utf-8″?>
<menu xmlns:android=”http://schemas.android.com/apk/res/android”>
<item
android:id=”@+id/mnuThemProduct”
android:title=”Thêm Product” />
</menu>
[/code]
Nạp Menu này vào cho màn hình chính (MainActivity) bằng cách override 2 hàm sau:
[code language=”java”]
override fun onCreateOptionsMenu(menu: Menu?): Boolean {
menuInflater.inflate(R.menu.main_menu,menu)
return super.onCreateOptionsMenu(menu)
}
override fun onOptionsItemSelected(item: MenuItem?): Boolean {
if(item!!.itemId==R.id.mnuThemProduct)
{
var intent=Intent(this,ThemProductActivity::class.java)
startActivity(intent)
}
return super.onOptionsItemSelected(item)
}
[/code]
Chú ý ở trên Tui có xử lý sự kiện khi người dùng nhấn vào menu Thêm Product thì mở màn hình ThemProductActivity (xem bước 2)
Bước 2: Tạo một màn hình mới tên là ThemProductActivity
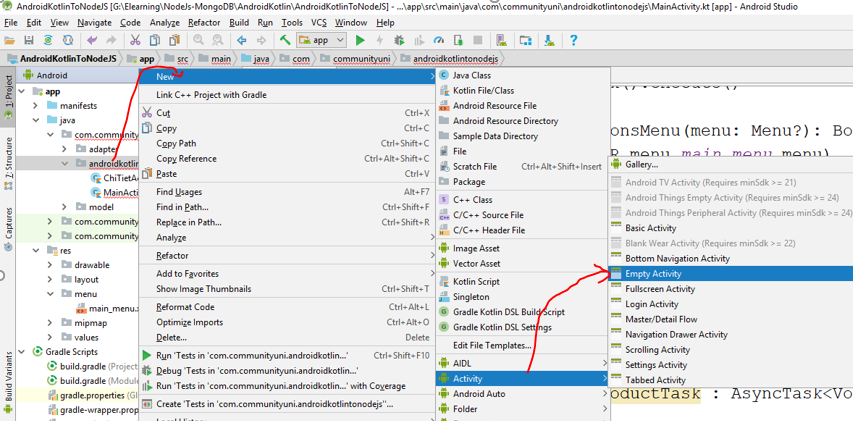
Tương tự như tạo màn hình ChiTietActivity, ta cũng Bấm chuột phải vào Package chứa MainActivity rồi chọn New/ chọn Activity/ chọn Empty Activity
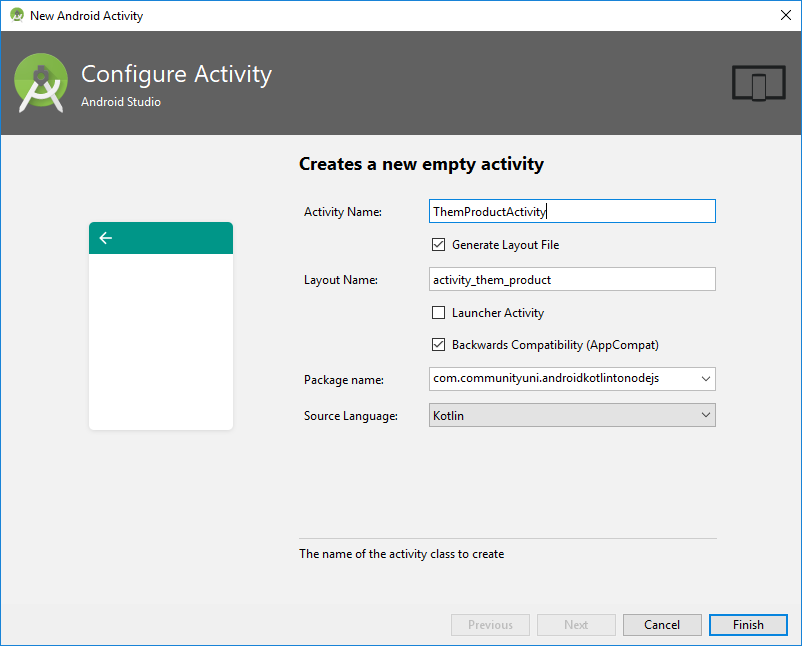
đặt tên ThemProductActivity và cấu hình như trên rồi bấm Finish
 tiến hành thiết kế giao diện cho màn hình Thêm Product (chỉnh layout cho activity_them_product.xml), màn hình này phải cung cấp ô nhập: Mã, Tên, Đơn giá:
[code language=”xml”]
<?xml version=”1.0″ encoding=”utf-8″?>
<LinearLayout xmlns:android=”http://schemas.android.com/apk/res/android”
xmlns:app=”http://schemas.android.com/apk/res-auto”
xmlns:tools=”http://schemas.android.com/tools”
android:layout_width=”match_parent”
android:layout_height=”match_parent”
android:orientation=”vertical”
tools:context=”.ThemProductActivity”>
<TextView
android:id=”@+id/textView2″
android:layout_width=”match_parent”
android:layout_height=”wrap_content”
android:text=”Mã Product:”
android:textSize=”20sp” />
<EditText
android:id=”@+id/edtMa”
android:layout_width=”match_parent”
android:layout_height=”wrap_content”
android:ems=”10″
android:inputType=”textPersonName” />
<TextView
android:id=”@+id/textView”
android:layout_width=”match_parent”
android:layout_height=”wrap_content”
android:text=”Tên Product:”
android:textSize=”20sp” />
<EditText
android:id=”@+id/edtTen”
android:layout_width=”match_parent”
android:layout_height=”wrap_content”
android:ems=”10″
android:inputType=”textPersonName” />
<TextView
android:id=”@+id/textView3″
android:layout_width=”match_parent”
android:layout_height=”wrap_content”
android:text=”Đơn giá:”
android:textSize=”20sp” />
<EditText
android:id=”@+id/edtDonGia”
android:layout_width=”match_parent”
android:layout_height=”wrap_content”
android:ems=”10″
android:inputType=”numberDecimal” />
<Button
android:onClick=”xuLyThemMoiProduct”
android:id=”@+id/btnLuu”
android:layout_width=”match_parent”
android:layout_height=”wrap_content”
android:text=”Thêm mới Product”
android:textSize=”20sp” />
</LinearLayout>
[/code]
Giao diện bên GUI sẽ như sau:
 Bước 3: Coding cho ThemProductActivity
Coding khởi tạo các biến control để truy suất tới các ô nhập liệu như Mã, Tên, đơn giá:
[code language=”java”]
package com.communityuni.androidkotlintonodejs
import android.os.AsyncTask
import android.support.v7.app.AppCompatActivity
import android.os.Bundle
import android.util.Log
import android.view.View
import android.widget.EditText
import android.widget.Toast
import com.communityuni.model.Product
import java.io.BufferedWriter
import java.io.OutputStreamWriter
import java.net.HttpURLConnection
import java.net.URL
class ThemProductActivity : AppCompatActivity() {
lateinit var edtMa: EditText
lateinit var edtTen: EditText
lateinit var edtDonGia: EditText
override fun onCreate(savedInstanceState: Bundle?) {
super.onCreate(savedInstanceState)
setContentView(R.layout.activity_them_product)
addControls()
}
private fun addControls() {
edtMa=findViewById(R.id.edtMa)
edtTen=findViewById(R.id.edtTen)
edtDonGia=findViewById(R.id.edtDonGia)
}
fun xuLyThemMoiProduct(v:View)
{
}
private fun thongBao(result: Boolean?) {
if(result==true)
{
Toast.makeText(applicationContext,”Thêm mới Product thành công”, Toast.LENGTH_LONG).show()
finish()
}
else
{
Toast.makeText(applicationContext,”Thêm mới Product thất bại”, Toast.LENGTH_LONG).show()
}
}
}
[/code]
Tiếp tục bổ sung thêm đa tiến trình HTTPPOSTProductTask trong màn hình ThemProductActivity để triệu gọi API thêm mới Product (http://192.168.1.137/nodejsapi/addProduct)
[code language=”java”]
inner class HTTPPOSTProductTask : AsyncTask<Product, Void, Boolean>()
{
override fun doInBackground(vararg p0: Product?): Boolean {
var p:Product?=p0[0]
try
{
var api=”http://192.168.1.137/nodejsapi/addProduct”
var url=URL(api)
var urlConnection= url.openConnection() as HttpURLConnection
urlConnection.requestMethod=”POST”
urlConnection.doOutput=true
urlConnection.doInput=true
urlConnection.addRequestProperty(“Content-Type”,
“application/x-www-form-urlencoded; charset=UTF-8”);
val outputStream = urlConnection.getOutputStream()
val bufferedWriter = BufferedWriter(OutputStreamWriter(outputStream, “UTF-8”))
val put_data = p!!.parameters()
bufferedWriter.write(put_data)
bufferedWriter.flush()
bufferedWriter.close()
outputStream.close()
var result =urlConnection.inputStream.bufferedReader().readText()
urlConnection.disconnect()
return result.equals(“true”)
}
catch (ex:Exception)
{
Log.e(“LOI”,ex.toString())
}
return false
}
override fun onPostExecute(result: Boolean?) {
super.onPostExecute(result)
thongBao(result)
}
}
[/code]
Bổ sung thêm coding cho sự kiện xuLyThemMoiProduct:
[code language=”java”]
fun xuLyThemMoiProduct(v:View)
{
var Ma=edtMa.text.toString()
var Ten=edtTen.text.toString()
var DonGia=edtDonGia.text.toString().toDouble()
var p=Product(Ma,Ten,DonGia)
HTTPPOSTProductTask().execute(p)
}
[/code]
Cuối cùng cho có Coding toàn bộ của màn hình ThemProductActivity như sau:
[code language=”java”]
package com.communityuni.androidkotlintonodejs
import android.os.AsyncTask
import android.support.v7.app.AppCompatActivity
import android.os.Bundle
import android.util.Log
import android.view.View
import android.widget.EditText
import android.widget.Toast
import com.communityuni.model.Product
import java.io.BufferedWriter
import java.io.OutputStreamWriter
import java.net.HttpURLConnection
import java.net.URL
class ThemProductActivity : AppCompatActivity() {
lateinit var edtMa: EditText
lateinit var edtTen: EditText
lateinit var edtDonGia: EditText
override fun onCreate(savedInstanceState: Bundle?) {
super.onCreate(savedInstanceState)
setContentView(R.layout.activity_them_product)
addControls()
}
private fun addControls() {
edtMa=findViewById(R.id.edtMa)
edtTen=findViewById(R.id.edtTen)
edtDonGia=findViewById(R.id.edtDonGia)
}
fun xuLyThemMoiProduct(v:View)
{
var Ma=edtMa.text.toString()
var Ten=edtTen.text.toString()
var DonGia=edtDonGia.text.toString().toDouble()
var p=Product(Ma,Ten,DonGia)
HTTPPOSTProductTask().execute(p)
}
private fun thongBao(result: Boolean?) {
if(result==true)
{
Toast.makeText(applicationContext,”Thêm mới Product thành công”, Toast.LENGTH_LONG).show()
finish()
}
else
{
Toast.makeText(applicationContext,”Thêm mới Product thất bại”, Toast.LENGTH_LONG).show()
}
}
inner class HTTPPOSTProductTask : AsyncTask<Product, Void, Boolean>()
{
override fun doInBackground(vararg p0: Product?): Boolean {
var p:Product?=p0[0]
try
{
var api=”http://192.168.1.137/nodejsapi/addProduct”
var url=URL(api)
var urlConnection= url.openConnection() as HttpURLConnection
urlConnection.requestMethod=”POST”
urlConnection.doOutput=true
urlConnection.doInput=true
urlConnection.addRequestProperty(“Content-Type”,
“application/x-www-form-urlencoded; charset=UTF-8”);
val outputStream = urlConnection.getOutputStream()
val bufferedWriter = BufferedWriter(OutputStreamWriter(outputStream, “UTF-8”))
val put_data = p!!.parameters()
bufferedWriter.write(put_data)
bufferedWriter.flush()
bufferedWriter.close()
outputStream.close()
var result =urlConnection.inputStream.bufferedReader().readText()
urlConnection.disconnect()
return result.equals(“true”)
}
catch (ex:Exception)
{
Log.e(“LOI”,ex.toString())
}
return false
}
override fun onPostExecute(result: Boolean?) {
super.onPostExecute(result)
thongBao(result)
}
}
}
[/code]
Chạy phần mềm lên ta sẽ có được kết quả như mong muốn : Mở được màn hình thêm mới Product, triệu gọi API thêm mới thành công. Như vậy ta đã hoàn thành xong bài triệu gọi Web API HTTPPOST để thêm mới 1 Product.
Source code Triệu gọi Web API thêm mới Product tải ở đây.
Bài sau Tui sẽ giới thiệu cho các Thím một số thư viện Third Party để truy suất RESTful Webservice, như Volley, Retrofit… các Bạn tranh thủ theo dõi để đọc nhé Các khóa học online khác, bạn có thể tham khảo tại đây: https://unica.vn/?aff=11929
Chúc các bạn thành công!
One thought on “Bài 34-Truy cập NodeJS RESTful Web Services bằng Android Kotlin-HTTPPOST”