Cách Debug Android Studio tới Android Box TV bằng Wifi

  1. Thiết bị Android Box TV
  2. Kết nối Wifi cho Android Box TV
  3. Bật chế độ Developer cho Android Box TV
  4. Cấu hình Enviroment cho ADB trên Laptop
  5. Lệnh kết nối và xem logcat tới Android Box TV
  6. Debug Android TV app từ Android Studio tới Android Box TV qua Wifi

Ta có nhiều cách kết nối và debug Android TV App từ Android Studio tới Android Box TV. Tuy nhiên, WIFI là lựa chọn tiện lợi nhất cho lập trình viên.

1. Thiết bị Android Box TV

Ờ ngoài chợ kia bán nhiều thiết bị Android Box TV lắm nha, giá nào cũng có. Hiện Tui sài device tàng tàng loại hơn 1 triệu 1 xíu. X 88 PRO 10. chạy Android 10. Hình Ảnh nó đây:

1 Hộp Android Box TV khi mua về gồm có:

  • Android TV Box
  • Cục Sạc để sạc cho Android TV Box
  • HDMI để kết nối tới Monitor
  • Remote để thao tác chương trình
  • Chuột không dây để thao tác chương trình

Hình trên chụp mặt bên ngoài của Android TV Box.

Hình trên chụp màn bên của Android Box TV, các lỗ theo thứ tự từ trái qua: Nơi sạc điện, HDMI, Cổng mạng, và Cắm Tai Nghe/Loa

Hình trên chụp mặt bên của Android Box TV có các cổng USB, SD Card.

Hình trên là kết nối tổng thể, chạy được Hệ điều hành Android và hiển thị lên Monitor.

Nhớ là kết nối cả chuột không dây để thao tác nha.

2.Kết nối Wifi cho Android Box TV

Ta cần kết nối Wifi cho Android Box TV.

Khi khởi động thành công ta có màn hình dưới đây, hoặc làm sao đó di chuyển tới các biểu tượng bên dưới:

Dùng chuột bấm chọn nút SETTINGS (xem màn hình trên):

Lúc này chương trình báo là chưa có kết nối mạng. Bấm vào “Mạng và internet”. Chương trình sẽ hiển thị danh sách các mạng Wifi bên dưới (lưu ý là muốn quay về màn hình trước đó thì bấm Chuột Phải, ko có nút back ở đây nha; hoặc dùng cái remote để back).

Ví dụ chọn Obama (là mạng nhà Tui, còn nhà bạn mạng nào thì chọn mạng đó thôi). nó hiển thị ra màn hình nhập mật khẩu:

Màn hình trên, ta dùng chuột không dây hoặc remote để nhập mật khẩu, sau đó nhấn vào nút màu xanh (góc phải của bàn phím). Chờ nó báo kết nối thành công như màn hình dưới đây:

Như vậy là bạn đã kết nối Wifi thành công cho Android Box TV. Bạn có thể vào Youtube hay Website để xem bình thường, nó là Smart TV mà. Xem y chang Phone vậy.

3. Bật chế độ Developer cho Android Box TV

Để lập trình, debug được phần mềm Android TV App trực tiếp từ Android Studio lên Android Box TV ta cần bật chế độ Developer lên. Từ đây có thể kết nối qua USB hoặc WIFI. Nhưng Ta nên kết nối qua WIFI cho tiện.

Cũng quay lại màn hình chọn lại nút SETTINGS. nó ra màn hình bên dưới đây:

Ta chọn “Tùy chọn Thiết bị”, nó ra 1 nùi dưới đây:

Ta chọn mục thứ 2 có tên là “Giới thiệu“, màn hình sau xuất hiện:

Ta kéo xuống dưới cùng, thấy mục “Bản Dựng”, Nếu là Tiếng Anh thì cứ chọn cái cuối cùng là OK (Build version). Ta bấm chuột liên tiếp vào “Bản Dựng”, khoảng >=5 lần để nó chuyển qua chế độ Developer. Khi nó đã báo chuyển qua Developer thì bấm chuột phải để quay lại màn hình trước đó, ta sẽ thấy mục “Tùy chọn nhà phát triển” xuất hiện:

Ta nhấn vào “Tùy chọn nhà phát triển”, màn hình sau xuất hiện:

Có 2 mục quan trọng cần phải check:

  • Gõ lỗi qua USB
  • Internet Adb

Bấm chọn xong thì bấm chuột phải nhiều lần để quay lại màn hình chính.

Tới đây thì Android Box TV của bạn có thể kết nối với Android Studio trên Laptop thông qua USB hoặc WIFI được rồi nhé.

4. Cấu hình Enviroment cho ADB trên Laptop

Trước tiên ta cần cấu hình Environment cho ADB trên Laptop để dùng các lệnh của nó nhằm kết nối với device.

thường Android SDK ta cài ở đâu thì tới đó lấy thư mục lưu trữ file adb.exe. Ví dụ của Tui thì cài trong:

“C:/Android/sdk/platform-tools”:

Bạn thấy adb.exe ở trên. Ta cần cấu hình Environment path cho nó:

Bấm chuột phải vào biểu tượng This PC/ chọn Properties:

Màn hình dưới đây xuất hiện, ta chọn Advanced System settings (nhìn vào góc phải cuối cùng của màn hình)

Sau đó màn hình System Properties sẽ xuất hiện:

Ta bấm chọn nút Environement Variables… màn hình này sẽ xuất hiện như dưới đây

Bạn quan sát biến Path, nó có ở cả 2 nơi: User variables và System varibles. Ta cấu hình cho cả 2 biến này luôn nhé (cách cấu hình giống nhau).

Ta chọn Path rồi nhấn vào Edit:

ta thêm giá trị vào cho nó. Giá trị là đường dẫn mà ta cài đặt, nơi có tập tin adb.exe. Cụ thể trong máy Tui cài đặt là C:/Android/sdk/platform-tools.

Sau đó bấm OK nhiều lần để đóng hẳn màn hình Properties.

mở Commandline gõ lệnh adb mà nó ra được 1 nùi như thế này là thành công:

Màn hình trên ta thấy được phiên bản cũng như hướng dẫn sử dụng adb.

5. Lệnh kết nối và xem logcat tới Android Box TV

Trước tiên ta phải đảm bảo Laptop và Android TV Box cùng sử dụng một mạng.

Ta cần kiểm tra địa chỉ IP của Android TV box bằng cách vào lại màn hình SETTINGS/ sau đó chọn mạng mà Android TV Box đang kết nối. Ví dụ đang kết nối OBAMA thì nhấn vào OBAM:

Ta thấy được địa chỉ IP như dưới đây:

Ở màn hình trên, bạn thấy địa chỉ IP là 192.168.1.83 . Của bạn sẽ có địa chỉ khác, nó ra địa chỉ nào thì ta lấy địa chỉ đó.

Bây giờ ta thử dùng lệnh ping từ laptop xem nó có kết nối tới Android TV Box không nhé:

Vậy là kết quả đã Ping thành công. Laptop có thể kết nối được với Android TV Box thông qua Wifi.

Bây giờ ta dùng lệnh adb của Android để kết nối, nhằm giúp Debug được Android TV App từ Android Studio tới Android Box TV qua Wifi:

Cú pháp đơn giản nhất (khỏi dùng Port nào cả):

adb connect <địa chỉ IP của Android TV box>

Hoặc có port:

adb connect <địa chỉ IP của Android TV box>:5555

Ta xem màn hình chụp kết quả kết nối thành công (mở commandline lên) gõ lệnh như dưới đây:

Ở trên ta thấy chương trình báo đã kết nối tới Android TV Box thành công.

Ta có thể xem chi tiết qua trình tương tác trong khi kết nối bằng lệnh:

adb logcat

Ở trên ta cũng dùng Command Line để gõ lệnh: adb logcat

Khi có kết nối tương tác các phần mềm, hệ thống sẽ hiển thị chi tiết thông tin trong màn hình commandline

6. Debug Android TV app từ Android Studio tới Android Box TV qua Wifi

Ở bước 5 ta đã kết nối được Laptop tới Android TV Box bằng WIFI rồi. đã dùng lệnh adb thành công

ở bước 6 ta tạo 1 Project Android Box TV :

Các bước tạo Project giống như cho Phone & Tablet bình thường.

Ta có cấu trúc dự án như bến dưới:

Ở trên là cấu trúc của dự án Android TV App. Nhìn vào chỗ kết nối ta sẽ thấy Device “Rockchip sailfish“, Vì Android TV Box này sử dụng Rockship Kernel nên nó có tên này:

Ta chọn Device là Rockchip sailfish để chạy phần mềm Android TV app (chú ý là nó đang kết nối với nhau hoàn toàn bằng WIFI nha, là Debug bằng WIFI), kết quả APK sẽ được cài lên Android TV Box và tự động chạy lên như màn hình dưới đây:

Ta bấm chuột phải để quay lại màn hình chính/ rồi chọn APPS:

Chọn APPS xong, kéo xuống tìm –> Kết quả thấy phần mềm tên là Mr Code dưới đây:

Như vậy tới đây Tui đã hướng dẫn xong cho các bạn rất chí tiết từ A->Z cách thức lắp đặt, cài đặt phần mềm, cấu hình WIFI, kết nối WIFI, Debug WIFI.

Các bạn cố gắng làm theo nhé. Chúc các bạn thành công!

Bài 72: Học Firebase Cloud Message(FCM)

Trong bài Bài 50: Cách sử dụng Google Cloud Message trong Android Tui đã hướng dẫn rất chi tiết về Google Cloud Message(GCM). Hiện nay Google đã ra phiên bản mới là Firebase Cloud Message (FCM) cực kỳ hiệu quả, vì vậy để giúp các Sinh Viên hiểu và triển khai được FCM Tui đã quay Video lại từng bước làm FCM (hơn 2 giờ xem Video). Các em có thể xem Video tại post này (Tui không đủ thời gian để làm trau chuốt cái Video, nên Tui đang để thô các bạn cứ việc xem nhé, có thể kéo qua những chỗ phải chờ lâu. Chú ý Video này hướng dẫn cách làm FCM đã chạy hoàn chỉnh ngon như cơm mẹ nấu, có một vài lần test không ra là do mạng chậm nên các em cứ coi như OK nhé).

Để học FCM các em cần biết về kiến trúc hoạt động của FCM:

b72_1

Ở hình trên Tui để 5 bước, các bạn cần hiểu kiến trúc hoạt động của FCM như sau:

Bước 1: Khi các thiết bị của khách hàng cài phần mềm của Ta vào thì nó sẽ gửi yêu cầu lên Firebase Cloud Server để xin  Token

Bước 2: Firebase Server sẽ trả về Token(không trùng nhau) cho thiết bị đó.

Bước 3: Nhiệm vụ của Ta phải lưu được Token mà Firebase trả về cho từng thiết bị để sử dụng lại lần sau. Phải xây dựng Webservice để để bắn Token này về Server riêng của ta

Bước 4: Là phần Admin để quản trị việc thông báo Push Message cho các khách hàng có sử dụng phần mềm của mình (không tốn phí, được gửi khoảng gần 1000 thiết bị), Bước này Ta phải gửi danh sách Token + Thông điệp muốn thông báo cho FireBase (Tức là ta không có trực tiếp gửi cho khách hàng được , mà phải gửi yêu cầu cho Firebase xử lý. Vì lúc này Firebase cũng đang quản lý Token)

Bước 5: Sau khi Firebase nhập được yêu cầu từ bước 4, nó sẽ tự động kiểm tra và gửi thông báo tới toàn bộ khách hàng đúng với Token mà bước 4 yêu cầu.

Trong phần hướng dẫn này, Tui yêu cầu các bạn làm theo (các bạn có thể dùng PHP):

1) Xây dựng Remote Server (Asp.net – C#, IIS Webserver)

– SQL Server

– RESTFul

– IIS Web Server

2)Tạo Project Android để có tương tác FCM

3) Sử dụng https://console.firebase.google.com

4) Test chức năng FCM

Chi tiết từng bước làm Tui trong Video này, các bạn xem ở đây (Youtube) – Khoảng hơn 2 Tiếng nhé(đang upload lại, do bị lệch khung hình với âm thanh):

[youtube https://www.youtube.com/watch?v=E1JMPpoHqHE]

Còn đây là source code:

Chúc các bạn thành công.

=================================

Nếu khó theo dõi bằng Video được thì bạn có thể theo dõi hướng dẫn bằng các giải thích dưới đây:

1) Xây dựng Remote Server (Asp.net – C#, IIS Webserver)

  • Tạo Cơ sở dữ liệu CSDLFirebase:

b72_2

hình Trên Tui tạo CSDL tên : CSDLFirebase, có 1 bảng tên là FCM với 2 cột (id-tự động tăng làm khóa chính, bạn để Identity Specification =YES ; Cột token kiểu chuỗi để lưu Token mà firebase gửi về cho từng thiết bị).

  • Viết Webservice (Restful – Web API) để Mobile tương tác được với CSDLFirebase:

Khởi động Visual Studio, tạo 1 Project đặt tên là FCMServer:

b72_3

Ở hình trên Tui chọn C#/ Web / chọn ASP.NET Application. Phần Name đặt là FCMServer rồi nhấn nút OK, lúc này Visual mở ra màn hình hỏi ta chọn Template tiếp theo, ở màn hình dưới này ta chọn Empty rồi nhấn nút OK:

b72_4

Sau khi nhấn nút OK, ta được Solution dưới đây:

b72_5

Ta tiến hành tạo thư mục Models (để tạo lớp FCM, ở đây bạn có thể dùng LinQ để tự phát sinh, nhưng đây là chủ ý của Tui, Tui muốn hướng dẫn các bạn cách dùng ADO.NET):

b72_6

Ở màn hình trên, bạn bấm chuột phải vào Project/ chọn Add/ chọn new folder, rồi đặt tên folder là Models:

b72_7

Ta cần tạo 1 lớp tên là FCM trong thư mục Models này, bằng cách: Bấm chuột phải vào Models/chọn New/ chọn Class:

b72_8

Một màn hình hiển thị lên, ta chọn Class, rồi đặt tên là FCM, nhấn Add để tạo:

b72_9

Ta tiến hành coding cho lớp FCM như sau:

b72_10

tương tự tạo 1 thư mục mới tên là Controllers:

b72_11

Bấm chuột phải vào Controllers/ chọn Add/ chọn Controller…:

b72_12

Một cửa sổ hiển thị lên, mặc định là DefaultController, bạn sửa lại thành FCMController:

b72_13Khi bạn bấm Add, ta có kết quả:

b72_14

Bạn quan sát lớp FCMController được sinh ra , kế thừa từ ApiController, đồng thời phát sinh thêm lớp WebApiConfig.cs:

b72_15

Tui có giải thích file config này ở đây (các bạn có thể đọc lại): https://duythanhcse.wordpress.com/2015/11/10/bai-69-xay-dung-web-service-dung-api-restful-servicephan-2/

Để lập trình con FCMController, trước tiên ta cần cấu hình chuỗi kết nối tới CSDL trước trong file Webconfig:

b72_16

Bạn để ý Tui bổ sung :

[code language=”xml”]

<appSettings>
<add key="strConnection" value="server=.;database=CSDLFirebase;user id=sa;pwd=@Hunggia113"/>
</appSettings>

[/code]

Tùy vào cấu hình SQL Server của bạn thì bạn cần đặt đúng user + mật khẩu nhé.

Giờ ta quay trở lại lập trình FCMController:

[code language=”csharp”]

using System;
using System.Collections.Generic;
using System.Linq;
using System.Net;
using System.Net.Http;
using System.Web.Http;

using System.Data;
using System.Data.SqlClient;
using FCMServer.Models;

namespace FCMServer.Controllers
{
public class FCMController : ApiController
{
///
<summary>
/// trả về FCM theo id
/// </summary>

/// <param name="id">id trong CSDL</param>
/// <returns></returns>
[HttpGet]
public FCM getFCM(int id)
{
try
{
string strConnection =
System.Configuration.ConfigurationManager.AppSettings["strConnection"];

SqlConnection conn = new SqlConnection(strConnection);
conn.Open();
string sql = "select * from FCM where id=@id";
SqlCommand command = new SqlCommand(sql, conn);
command.Parameters.Add("@id", SqlDbType.NVarChar).Value = id;
SqlDataReader reader = command.ExecuteReader();
FCM fcm = null;
while (reader.Read())//trong khi còn dữ liệu để đọc
{
fcm = new FCM();
fcm.Id = reader.GetInt32(0);
fcm.Token = reader.GetString(1);
}
conn.Close();
return fcm;
}
catch (Exception ex)
{
throw ex;
}
}
///
<summary>
/// Hàm trả về toàn bộ FCM để ta gửi Push Message cho toàn bộ device
/// </summary>

/// <returns></returns>
[HttpGet]
public List<FCM>getFCMS()
{
try
{
List<FCM> dsFcm = new List<FCM>();
string strConnection =
System.Configuration.ConfigurationManager.AppSettings["strConnection"];

SqlConnection conn = new SqlConnection(strConnection);
conn.Open();
string sql = "select * from FCM";
SqlCommand command = new SqlCommand(sql, conn);
SqlDataReader reader = command.ExecuteReader();
FCM fcm = null;
while (reader.Read())//trong khi còn dữ liệu để đọc
{
fcm = new FCM();
fcm.Id = reader.GetInt32(0);
fcm.Token = reader.GetString(1);
dsFcm.Add(fcm);
}
conn.Close();
return dsFcm;
}
catch (Exception ex)
{
throw ex;
}
}
///
<summary>
/// trả về FCM dựa vào 1 token
/// </summary>

/// <param name="token">token từ Firebase</param>
/// <returns>Nếu có trả về FCM, không có trả về null</returns>
[HttpGet]
public FCM getFCM(string token)
{
try
{
string strConnection =
System.Configuration.ConfigurationManager.AppSettings["strConnection"];

SqlConnection conn = new SqlConnection(strConnection);
conn.Open();
string sql = "select * from FCM where token=@token";
SqlCommand command = new SqlCommand(sql, conn);
command.Parameters.Add("@token", SqlDbType.NVarChar).Value = token;
SqlDataReader reader = command.ExecuteReader();
FCM fcm = null;
while (reader.Read())//trong khi còn dữ liệu để đọc
{
fcm = new FCM();
fcm.Id = reader.GetInt32(0);
fcm.Token = reader.GetString(1);
}
conn.Close();
return fcm;
}
catch (Exception ex)
{
throw ex;
}
}
///
<summary>
/// Dịch vụ này dùng để lưu token của Device vào cơ sở dữ liệu
/// </summary>

/// <param name="token">token do Firebase truyền về</param>
/// <returns>lưu thành công trả về true, thất bại flase</returns>
[HttpPost]
public bool saveToken(string token)
{
try
{
if (getFCM(token) != null) return false;

string strConnection =
System.Configuration.ConfigurationManager.AppSettings["strConnection"];

SqlConnection conn = new SqlConnection(strConnection);
conn.Open();
string sql = "insert into FCM(token) values(@token)";
SqlCommand command = new SqlCommand(sql, conn);
command.Parameters.Add("@token",SqlDbType.NVarChar).Value=token;
int kq = command.ExecuteNonQuery();//tiến hành insert
conn.Close();
return kq > 0;
}
catch(Exception ex)
{
throw ex;
}
}
}
}

[/code]

Bạn chú ý chép vào nhé, vì muốn hiểu nó bạn phải rành về Lập trình cơ sở dữ liệu với C#, tuy nhiên trong bài này ta coi như đã biết, ứng dụng vào hệ thống này cho tiện.

Tiếp theo tạo 1 thư mục Views:

b72_17

Từ thư mục Views/ nhấn chuột phải/chọn Add/ Webform:

b72_18

màn hình hiển thị lên ta đặt tên là Admin rồi nhấn OK:

b72_19

bạn thiết kế Admin.aspx như sau (mục đích của trang này là cho phép gửi Push Notification tới toàn bộ Thiết bị của khách hàng có cài phần mềm Mobile của ta):

b72_20

Dưới đây là coding HTML (Design, chép vào Source):

[code language=”html”]

<%@ Page Language="C#" AutoEventWireup="true" CodeBehind="Admin.aspx.cs" Inherits="FCMServer.Views.Admin" %>

<!DOCTYPE html>

<html xmlns="http://www.w3.org/1999/xhtml">
<head runat="server">
<title></title>
</head>
<body>

<form id="form1" runat="server">

<div>

Nhập tiêu đề muốn gửi thông báo:
<asp:TextBox ID="txtTieuDe" runat="server" Width="326px"></asp:TextBox>

Nhập nội dung muốn gửi thông báo:
<asp:TextBox ID="txtNoiDung" runat="server" Height="150px" TextMode="MultiLine" Width="358px"></asp:TextBox>

<asp:Button ID="btnGui" runat="server" OnClick="btnGui_Click" Text="Gửi thông báo tới toàn bộ khách hàng" />

kết quả sau khi gửi thông báo:
<asp:TextBox ID="txtKetQua" runat="server" Height="150px" TextMode="MultiLine" Width="358px"></asp:TextBox>

</div>

</form>

</body>
</html>

[/code]

Bên trên là phần giao diện, bây giờ ta xử lý phần Coding:

b72_21

Coding đầy đủ của màn hình trên:

[code language=”csharp”]

using System;
using System.Collections.Generic;
using System.IO;
using System.Linq;
using System.Net;
using System.Text;
using System.Web;
using System.Web.UI;
using System.Web.UI.WebControls;

namespace FCMServer.Views
{
public partial class Admin : System.Web.UI.Page
{
protected void Page_Load(object sender, EventArgs e)
{

}

protected void btnGui_Click(object sender, EventArgs e)
{
Controllers.FCMController fcmController = new Controllers.FCMController();
List<Models.FCM> dsFcm = fcmController.getFCMS();
WebRequest tRequest;
//thiết lập FCM send
tRequest = WebRequest.Create("https://fcm.googleapis.com/fcm/send");
tRequest.Method = "POST";
tRequest.UseDefaultCredentials = true;

tRequest.PreAuthenticate = true;

tRequest.Credentials = CredentialCache.DefaultNetworkCredentials;

//định dạng JSON
tRequest.ContentType = "application/json";
tRequest.Headers.Add(string.Format("Authorization: key={0}", "<Chép KEY trong Firebase của bạn>"));
tRequest.Headers.Add(string.Format("Sender: id={0}", "<Chép ID trong Firebase của bạn>"));

string[] arrRegid = dsFcm.Select(x => x.Token).ToArray();
string RegArr = string.Empty;
RegArr = string.Join("\",\"", arrRegid);

string postData = "{ \"registration_ids\": [ \"" + RegArr + "\" ],\"data\": {\"message\": \"" + txtNoiDung.Text + "\",\"body\": \"" + txtNoiDung.Text + "\",\"title\": \"" + txtTieuDe.Text + "\",\"collapse_key\":\"" + txtNoiDung.Text + "\"}}";

Byte[] byteArray = Encoding.UTF8.GetBytes(postData);
tRequest.ContentLength = byteArray.Length;

Stream dataStream = tRequest.GetRequestStream();
dataStream.Write(byteArray, 0, byteArray.Length);
dataStream.Close();

WebResponse tResponse = tRequest.GetResponse();

dataStream = tResponse.GetResponseStream();

StreamReader tReader = new StreamReader(dataStream);

String sResponseFromServer = tReader.ReadToEnd();

txtKetQua.Text = sResponseFromServer; //Lấy thông báo kết quả từ FCM server.
tReader.Close();
dataStream.Close();
tResponse.Close();
}
}
}

[/code]

Bạn để ý :

Dòng 36: <Chép KEY trong Firebase của bạn>

Dòng 37: <Chép ID trong Firebase của bạn>

==> Bạn chỉ cần sửa 2 dòng lệnh này là đủ rồi, đó chính là chỗ tạo Project trong Firebase(Sẽ hướng dẫn các bạn tạo Project Firebase và chép vào chỗ này sau, Tạo thời ta cứ cấu hình chạy IIS Webserver. Khi nào qua phần Firebase ta sẽ chép lại sau)

  • Cấu hình IIS WEB Server:

Vì Tui đã hướng dẫn rất kỹ phần cấu hình IIS WEB Server trong bài 71 https://duythanhcse.wordpress.com/2015/11/11/bai-71-xay-dung-web-service-dung-api-restful-servicephan-4/ rồi, nên các bạn tự xem lại, dưới đây tui chụp hình kết quả:

b72_22Kết quả chạy:

b72_23

Chú ý ở trên là local host, lúc tương tác Mobile nó hiểu nhầm, nên bạn phải lấy địa chỉ IP (Mở của sổ Command line, gõ ipconfig để lấy IP):

b72_24

Ở cửa sổ trên (gõ Tổ hợp phím Windows + R), ta nhập cmd rồi nhấn OK:

b72_25Gõ Ipconfig ta được địa chỉ IP như bên dưới, giờ xem website từ IIS:

b72_26Hay vào xem Admin.aspx:

b72_27==> Các Em chú ý địa chỉ IP là theo máy các em nhé, nếu đã có domain thì chả cần quan tâm cái này, Nhưng ta là lập trình viên, đang test nên phải biết vụ này. Từ Mobile sẽ tương tác dựa trên cái này.

2)Tạo Project Android để có tương tác FCM

Bây giờ cá em tiến hành tạo 1 Project Android Studio có tên FCMClient như hình chụp dưới đây:

b72_28

Em để ý Tui khoanh đỏ package nhé, nó được dùng để đăng ký trên firebase.

3) Sử dụng https://console.firebase.google.com

Các em vào trang trên, Nếu chưa có Project nào có thì có hình sau:

b72_29

Nếu đã có Project rồi, thì hệ thống liệt kê ra như dưới đây:

b72_30

Giờ em chọn Create New Project để tạo:

b72_31

Các em đặt tên Project, chọn Việt Nam rồi nhấn Create Project:

b72_32Các Em thấy Tui đánh dấu số 1, số 2. Số 1 là cấu hình Firebase vào ứng dụng Android FCMClient, số 2 là xem danh sách các Project khác (em nhấn vào số 2 sẽ thấy danh sách các Project Firebase khác).

Bây giờ các em nhấn vào số 1 (Add Firebase to your Android app):

b72_33

Ta tiến hành Copy Package bên Project Android FCMClient vào chỗ này:

b72_34

Sau khi copy xong, các em nhấn ADD App:

b72_35Em Thấy Google hướng dẫn, tại màn hình này sẽ có file google_services.json tải về, và yêu cầu ta lưu vào bên trong thư mục app:

b72_36

Hình trên em thấy Tui trỏ tới thư mục app và nhấn Save (có thể lưu sau nếu quên bước này). Sau đó nhấn Continue để tiếp tục:

b72_37

Em thấy Google hướng dẫn ta sao chép các cấu hình vào Project rồi nhấn Sync now:

Đầu tiên là chép

classpath 'com.google.gms:google-services:3.0.0'
b72_38
Bước tiếp theo là sao chép:
apply plugin: 'com.google.gms.google-services'
Đồng thời sao chép cả:
compile 'com.google.firebase:firebase-messaging:9.4.0'
b72_39Các em chép cho đúng rồi nhấn Sync Now, chỗ Thấy khoanh tròn.

Như vậy sau khi Sync Now hoàn tất, ta quay lại Console của Firebase rồi nhấn finish:

b72_37

màn hình trong console sẽ như sau:

b72_40

Các em thấy Tui khoanh đỏ góc phải bên trên của Project không, nhấn vào đó nhé:

b72_41Em chọn Manage:


b72_42

Em thấy màn hình trên có thông tin Project, file google-services.json để lưu lại nếu các em lúc nãy quên lưu.

Giờ em nhấn vào tab CLOUD MESSAGEING nhé:

b72_43

ở trên Tui khoanh: Server Key, Sender ID. Đây là 2 thông số quan trọng để chép vào Admin.aspx (bên trên Thầy có nói để dòng 36,37 nhớ không?

Dòng 36 chép Server Key vào

Dòng 37 chép Sender Id vào

b72_44

Em thấy đó, Mỗi 1 Project sẽ có Server Key, Sender ID khác nhau. Mỗi 1 Mobile App em nên tạo 1 Firebase app nhé. Dĩ nhiên miễn phí thì chỉ tối đa 10 app thì phải. Em nhớ chép cho đúng vào Admin.aspx của em.

  • Bây giờ ta tiến hành xây dựng Mobile App để nó có thể nhận được Token và Push Message từ Firebase:

b72_45

trước tiên ta tạo lớp đa tiến trình FireBaseIDTask để lưu token vào CSDL riêng của ta do Firebase gửi về cho từng thiết bị:

[code language=”java”]
<pre>package com.tranduythanh.fcmclient;

import android.os.AsyncTask;
import android.util.Log;

import java.io.BufferedReader;
import java.io.InputStream;
import java.io.InputStreamReader;
import java.net.HttpURLConnection;
import java.net.URL;

/**
* Created by cafe on 11/08/2016.
*/

public class FireBaseIDTask extends AsyncTask<String,Void,Boolean>
{
@Override
protected Boolean doInBackground(String… params) {
try
{
URL url=new URL("http://http://192.168.11.93/hocfcm/api/fcm/?token="+params[0]);
HttpURLConnection connection= (HttpURLConnection) url.openConnection();
connection.setRequestMethod("POST");
connection.setRequestProperty("Content-Type","application/xml;charset=UTF-8");
InputStream inputStream=connection.getInputStream();
InputStreamReader inputStreamReader=new InputStreamReader(inputStream,"UTF-8");
BufferedReader bufferedReader=new BufferedReader(inputStreamReader);
StringBuilder builder=new StringBuilder();
String line=bufferedReader.readLine();
while (line!=null)
{
builder.append(line);
line=bufferedReader.readLine();
}
boolean kt=builder.toString().contains("true");
return kt;
}
catch (Exception ex)
{
Log.e("LOI",ex.toString());
}
return null;
}

@Override
protected void onPostExecute(Boolean aBoolean) {
super.onPostExecute(aBoolean);
}
}</pre>
[/code]

Với Firebase ta phải có 2 Service để hoạt động: Serivice tự động lắng nghe Token cho từng thiết bị và Service tự động lắng nghe Push Message, cách làm như sau:

  • đầu tiên là Service tự động lắng nghe Token:

b72_46

Lớp này Thầy đặt tên là: MyFirebaseIDService kế thừa từ FirebaseInstanceIdService, chi tiết coding:

[code language=”java”]
<pre>package com.tranduythanh.fcmclient;

import com.google.firebase.iid.FirebaseInstanceId;
import com.google.firebase.iid.FirebaseInstanceIdService;

/**
* Created by cafe on 11/08/2016.
*/

public class MyFirebaseIDService extends FirebaseInstanceIdService {
@Override
public void onTokenRefresh() {
super.onTokenRefresh();
String token= FirebaseInstanceId.getInstance().getToken();
luuTokenVaoCSDLRieng(token);
}

private void luuTokenVaoCSDLRieng(String token) {
new FireBaseIDTask().execute(token);
}
}</pre>
[/code]

Các em để ý hàm onTokenRefresh thường chỉ chạy 1 lần, khi nào có sự thay đổi mới thì nó mới chạy tiếp(tự động). Nên nhiều lúc vì lý do gì đó lần đầu chạy lấy được token nhưng lại không lưu vào được CSDL riêng do ta xây dựng, nên có thể mất token của thiết bị này (Để nó chạy lại ta thường phải clear cache, clear data, uninstall ứng dụng này ra khỏi thiết bị. Nhưng chú ý máy của Khách hàng làm sao ta làm được thao tác này?). Do đó chút nữa chúng ta sẽ xử lý trường hợp này sau nhé.

  • Tiếp theo là Service tự động lắng nghe Push Message:

b72_47

Tui đặt lớp này là: MyFirebaseMessagingService kế thừa từ FirebaseMessagingService

Khi có Push Message nó sẽ tự động thông báo cho khách hàng. Chú ý rằng ở đây có 2 kênh gửi Push Message

b72_48

  • Kênh thứ 1: Gửi trực tiếp từ Console Firebase:

b72_49

Ta nhấn mục Notification mà Tui đánh dấu là số 1, nhìn góc phải bên trên Tui có đánh số 2 (New Message), Muốn gửi Push Message thì ta nhấn vào đây. Đồng thời nhìn danh sách phía bên dưới là Tui đã demo ứng dụng thành công hàng loạt các Push Message.

Khi nhấn vào New Message:

b72_50

Mục số 1: nhập nội dung thông báo

Mục số 2: Tiêu đề

Mục số 3: Nhấn vào chọn package để gửi thông báo.

Mục số 4: Nhân SEND MESSAGE

Khi nhấn SEND MESSAGE, hệ thống sẽ xử lý, và gửi thông tin tới toàn bộ các thiết bị được cung cấp token ứng với Package này.

Ngoài ra ta có thể chọn từng Token để gửi nhé (chọn Single Device)

  • Kênh thứ 2: Do Lập trình viên của ta định nghĩa, cụ thể là web: Admin.aspx mà ta đã lập trình bên trên:

b72_51

Dĩ nhiên là giờ cả 2 kênh chưa sử dụng được, vì Ta đã viết xong ứng xong FCMClient đâu.

Như vậy các em đã nắm được có 2 kênh gửi Push Message. Giờ ta tiến hành coding cho MyFirebaseMessagingService này nhé:

[code language=”java”]
<pre>package com.tranduythanh.fcmclient;

import android.app.NotificationManager;
import android.app.PendingIntent;
import android.content.Intent;
import android.media.RingtoneManager;
import android.net.Uri;
import android.support.v4.app.NotificationCompat;

import com.google.firebase.messaging.FirebaseMessagingService;
import com.google.firebase.messaging.RemoteMessage;

/**
* Created by cafe on 11/08/2016.
*/

public class MyFirebaseMessagingService extends FirebaseMessagingService {
@Override
public void onMessageReceived(RemoteMessage remoteMessage) {
super.onMessageReceived(remoteMessage);
if(remoteMessage.getNotification()!=null)
{
hienThiThongBao(remoteMessage.getNotification().getBody());
}
hienThiThongBao(remoteMessage.getData().get("body"),remoteMessage.getData().get("title"));
}
private void hienThiThongBao(String body,String title) {
Intent intent=new Intent(this,MainActivity.class);
intent.addFlags(Intent.FLAG_ACTIVITY_CLEAR_TOP);
PendingIntent pendingIntent=PendingIntent.getActivity(this,0,intent,PendingIntent.FLAG_ONE_SHOT);
Uri sound= RingtoneManager.getDefaultUri(RingtoneManager.TYPE_NOTIFICATION);
NotificationCompat.Builder builder=new NotificationCompat.Builder(this)
.setSmallIcon(android.R.drawable.ic_dialog_alert)
.setContentTitle(title)
.setContentText(body)
.setAutoCancel(true)
.setSound(sound)
.setContentIntent(pendingIntent);
NotificationManager manager= (NotificationManager) getSystemService(NOTIFICATION_SERVICE);
manager.notify(0,builder.build());
}
private void hienThiThongBao(String body) {
hienThiThongBao(body,"google");
}
}</pre>
[/code]

Như vậy là Ta đã coding xong cả 2 Service tự động lắng nghe nhận Token và nhận Push Message. Bây giờ ta cần cấu hình 2 Serivce này trong Manifest để nó có thể tự động lắng nghe được khi Khách hàng cài app của ta:

[code language=”xml”]
<pre><?xml version="1.0" encoding="utf-8"?>
<manifest xmlns:android="http://schemas.android.com/apk/res/android"
package="com.tranduythanh.fcmclient">
<uses-permission android:name="android.permission.INTERNET"/>
<application
android:allowBackup="true"
android:icon="@mipmap/ic_launcher"
android:label="@string/app_name"
android:supportsRtl="true"
android:theme="@style/AppTheme">
<activity android:name=".MainActivity">
<intent-filter>
<action android:name="android.intent.action.MAIN" />

<category android:name="android.intent.category.LAUNCHER" />
</intent-filter>
</activity>
<service android:name=".MyFirebaseMessagingService">
<intent-filter>
<action android:name="com.google.firebase.MESSAGING_EVENT"/>
</intent-filter>
</service>
<service android:name=".MyFirebaseIDService">
<intent-filter>
<action android:name="com.google.firebase.INSTANCE_ID_EVENT"/>
</intent-filter>
</service>
</application>

</manifest></pre>
[/code]

Để ý Manifest có cấp phép sử dụng Internet, có 2 Service lắng nghe token và push message

  • Cuối cùng ta vào lớp MainActivity để xử lý lấy token (trường hợp mà Tui nó bị cái gì đó không lưu được)

[code language=”java”]
<pre>package com.tranduythanh.fcmclient;

import android.support.v7.app.AppCompatActivity;
import android.os.Bundle;

import com.google.firebase.iid.FirebaseInstanceId;
import com.google.firebase.messaging.FirebaseMessaging;

public class MainActivity extends AppCompatActivity {

@Override
protected void onCreate(Bundle savedInstanceState) {
super.onCreate(savedInstanceState);
setContentView(R.layout.activity_main);
FirebaseMessaging.getInstance().subscribeToTopic("testfcm");
String token= FirebaseInstanceId.getInstance().getToken();
new FireBaseIDTask().execute(token);
}
}</pre>
[/code]

ở coding trên, luôn luôn chạy khi App được mở lên, đa tiến trình của ta kiểm tra nó tồn tại hay không thì lưu vào CSDL (vì như Tui giải thích là onTokenRefresh chỉ chạy 1 lần (chạy lại khi có token mới). Nên nếu vì lý do gì đó không lưu được lần đầu, thì các lần sau vẫn lưu được.

==>Bây giờ các em chạy Ứng dụng FCMCLient này vào thiết bị, thì ta lưu được Token do Firebase gửi về như hình dưới đây:

b72_52

Vào admin.aspx để gửi thông báo tới toàn bộ thiết bị mà cài đặt phần mềm của ta:

b72_53Ở trên em thấy nó báo thành công 2, thất bại 5 không… Như vậy Token nào đúng thì nó sẽ gửi được em nhé

Tới đây em có thể test gửi Message trực tiếp từ console của firebase được rồi nhé.

Khi các em test OK thì sẽ có kết quả như sau:

b72_54

Như vậy là Tui đã hướng dẫn đầy đủ và chi tiết từ A-z cách xây dựng Firebase Cloud Message(FCM) rồi nhé. Các em nhớ làm lại nhiều lần. Có source code ở đầu bài này các em có thể lấy nó tham khảo.

Chúc các em thành công.

Bài 71: Xây dựng Web Service dùng API RESTful Service(phần 4)

Trong bài bài 68bài 69bài 70 các bạn đã hiểu được RESTful cũng như cách thức hoạt động của HttpPost, HttpGet, HttpPut và HttpDelete. Tuy nhiên để tương tác được với nó thì cần cấu hình lên Webserver, cụ thể là IIS, trước đây Tui có hướng dẫn các bạn cách tạo lên somee.com, các bạn có thể xem lại bài hướng dẫn này ở đây

Trong bài này Tui sẽ hướng dẫn các bạn từng bước cài đặt lên IIS Server ở máy local của các bạn, việc test trên máy local cũng khá quan trọng vì khi test hoàn chỉnh xong thì ta mới publish ra ngoài.

Dưới đây là chi tiết từng bước cách dựng IIS Server và cách triển khai FoodServer lên IIS này (Tui setup trên Win 10, 64 bit)

Bước 1: Vào Control panel chọn Programs and Features

h71-0Bước 2: Chọn Turn Windows features on or off:

h71-1Bước 3: Tiến hành lựa chọn để cài IIS Web Server theo màn hình dưới đây:

h71-2Sau khi lựa chọn giống như khung khoanh màu đỏ, nhấn OK để tiến hành cài đặt, tùy thuộc vào máy mà chương trình có thể cài từ 5-10 phút.

Bước 4: Sử dụng IIS Web Server:

Sau khi cài xong IIS Web Server, bạn quay lại màn hình Control panel, bạn sẽ thấy Administrative Tools:

h71-3Bạn click vào biểu tượng Administrative Tools, ta có giao diện tiếp theo:

h71-4Bạn chọn “Internet Information Services (IIS) Manager” như hình trên:

h71-5Trong màn hình quản trị bạn thấy có 2 vùng: Application Pools và Default Web site.

Bước 4.1 Cấu hình Application Pools:

Application Pool là gì?
Application Pool có thể chứa một hoặc nhiều ứng dụng và cho phép chúng ta cấu hình cấp độ giữa các ứng dụng web khác nhau. Ví dụ, nếu bạn muốn cô lập tất cả các ứng dụng web chạy trong cùng một máy, bạn có thể làm điều này bằng cách tạo ra Application Pool riêng biệt cho mỗi ứng dụng web và đặt chúng trong Application Pool tương ứng. Bởi vì mỗi Application Pool chạy trong quá trình làm việc riêng của mình, các lỗi trong Application Pool sẽ không ảnh hưởng đến các ứng dụng đang chạy trong Application Pool khác. Triển khai ứng dụng trong Application Pool là lợi thế chính của IIS trong quá trình làm việc ở chế độ cách ly bởi vì bạn có thể tùy chỉnh Application Pool để đạt được cấp độ tách biệt ứng dụng mà bạn cần.
Khi bạn cấu hình Application Pool để sẵn sàng tối ưu, bạn cũng nên xem xét làm thế nào để cấu hình Application Pool bảo mật ứng dụng. Ví dụ, bạn có thể cần phải tạo ra Application Pool riêng cho ứng dụng đòi hỏi mức độ bảo mật cao, trong khi cho phép các ứng dụng đòi hỏi một mức độ thấp hơn của bảo mật để chia sẻ cùng Application Pool.
Bạn bấm chuột phải vào màn hình Application Pools/ chọn Add Application Pool… như hình dưới đây:h71-6Màn hình tạo mới Application Pool hiển thị lên, ta nhập “FoodServer_Pool” rồi bấm OK:
h71-7Sau khi bấm OK, bạn quan sát:
h71-8Ở màn hình trên bạn tiếp tục chọn Advanced Settings.. cho FoodServer_Pool:
h71-9Bạn cần chỉnh ApplicationPoolIdentity qua LocalSystem.
Bước 4.2: Cấu hình WebService lên IIS Server
Bấm chuột phải vào Default Web Site / chọn Add Application
h71-10
Màn hình hiển thị Add Application:
h71-11Mục Alias (1): Đặt tên cho Service, ở đây ta đặt foodserver
Mục Application pool (2): Nhấn nút Select… và chọn đúng FoodServer_Pool
Mục Physical path (3): Trỏ tới đường dẫn chứa source code của project
Sau đó bấm OK để tạo.
Bạn quan sát kết quả:
h71-12http://localhost/foodserver/api/food chính là kết quả sau khi cấu hình xong. Tới đây hệ thống đã chạy 24/24.
Các bạn có thể dùng Postman và HttpRequester để test HttpPost, HttpGet, HttpPut và HttpDelete.
Các bạn chú ý rằng khi từ Mobile kết nối tới Web Service này thì không thể dùng localhost (vì nó lầm tưởng là của chính mobile), đo dó bạn cần đưa localhost về 1 địa chỉ IP để test.
Cách lấy địa chỉ IP của máy local của ta:
– Nhấn tổ hợp phím có biểu tượng Windows + R để mở cửa sổ Run:
h71-13– gõ lệnh cmd, màn hình command line hiển thị lên, tiếp tục gõ lệnh ipconfig
h71-14Ở trên máy local của Tui có địa chỉ IP: 192.168.100.3
Bây giờ Tui thay thế cho localhost:
h71-15Như vậy ta cũng có được kết quả mong muốn.
Các bạn cố gắng cấu hình để được kết quả như trên.
Bài sau Tui sẽ hướng dẫn cách tương tác từ Mobile Android lên RESTful WebService, các bạn chú ý theo dõi.
Chúc các bạn thành công!

Bài 70: Xây dựng Web Service dùng API RESTful Service(phần 3)

Trong bài này Tui hướng dẫn các bạn cách sử dụng 2 công cụ HttpRequester (firefox addon) và Postman (chrome addon) . Các bạn cần nắm rõ bài 68bài 69 để hiểu và triển khai được Web API RESTful.

  1. Cách sử dụng HttpRequester.

Bạn mở trình duyệt Firefox, vào google tìm từ khóa “httprequester addon” hoặc vào link: https://addons.mozilla.org/en-US/firefox/addon/httprequester/, bạn nhấn Add to Firefox:

h70-0Bạn tiến hành cài, cài xong khởi động lại trình duyệt Firefox, nhìn vào góc phải trên cùng trình duyệt:

h70-1Bạn bấm vào biểu tượng đó, chương trình HttpRequester sẽ xuất hiện như hình dưới đây:

h70-2Mục URL: Nhập URL Web API của bạn vào (http://localhost:8888/api/food). Bạn nhấn GET, chương trình sẽ lấy toàn bộ danh sách Food vào màn hình bên phải (bạn quan sát sẽ thấy).

Để Test lấy 1 Food theo mã nào đó bạn làm như sau:

h70-3Bạn vào tab Parameters, nhập tên biến + giá trị rồi nhấn Add. Sau đó bấm nút GET để lấy dữ liệu, như bạn quan sát đó Tui nhập id=15 thì chương trình lấy ra được Food “Hột mít vùi tro”.

-Test HTTP POST:

h70-4Đối với POST bạn cũng vào Parameters, nhập đủ parameters (phải giống như viết trong Web API), sau đó nhấn nút “POST”, bạn thấy kết quả trả về là true—> tức là thêm thành công. Bạn có thể test lại chức năng HTTP GET để xem lại kết quả thêm mới này.

Trường hợp PUT tương tự bạn tự làm.

Giờ Tui làm tiếp trường hợp Delete:

h70-5Trong combobox, bạn chọn DELETE, nhập Parameter rồi bấm Submit, thấy kết quả là true==> xóa thành công.

2.Cách sử dụng Postman.

Mở trình duyệt Chrome, tìm từ khóa “postman plugin”, hoặc https://chrome.google.com/webstore/detail/postman/fhbjgbiflinjbdggehcddcbncdddomop?hl=en tiến hành cài đặt, sau khi cài thành công:

h70-6Kích hoạt postman để sử dụng.

Để lấy toàn bộ dữ liệu (HttpGet) ta chọn Get như hình dưới đây:

h70-7Để lấy 1 Food theo mã ta làm theo các bước dưới đây (Ví dụ lấy Food có id=1):h70-8Để sử dụng HttpPost (tạo Food mới) ta làm theo các bước dưới đây:

h70-9Ở trên khi bấm Send, trả về true==> thêm Food thành công.

Để xóa một Food có mã bất kỳ:

h70-10Trên đây là cách sử dụng HttpRequesterPostman, 2 công cụ này rất hiệu quả giúp chúng ta kiểm tra quá trình thực hiện HttpPost,HttpGet,HttpPut,HttpDelete trước khi triển khai vào hệ thống thực.

Chúc các bạn thành công.

Bài 69: Xây dựng Web Service dùng API RESTful Service(phần 2)

Trong bài này Tui sẽ hướng dẫn chi tiết cách tạo Web API (lý thuyết ở đây), cách cấu hình IIS, cách sử dụng công cụ Postman(với những ai dùng chrome), cách sử dụng HttpRequester (với những ai dùng Firefox). PostmanHttpRequester là một trong những công cụ hiệu quả nhất để TEST coding của ta, nếu code của ta pass qua được công cụ này thì có thể kết luận rằng Webservice của ta chắc chắn hoạt động tốt.

Để cho có cảm giác Tui sẽ tạo một cơ sở dữ liệu SQL Server, WebAPI sẽ tương tác dữ liệu này bằng cách sử dụng LinQ to SQL:

Bước 1: Tạo cơ sở dữ liệu tên “dbFood”, có một bảng “Food” gồm 4 cột (id để auto) như dưới đây:

h69-0Các bạn có thể tải SQL Script ở đây để tạo CSDL cho lẹ: http://www.mediafire.com/download/48dkwoqka2e1w07/dbFood.sql

Bước 2: Tiến hành viết Web API

Để tạo Project sử dụng Web API có nhiều cách tạo, ở đây Tui sử dụng cách đơn giản nhất để các bạn bớt rối.

Từ Visual Studio 2013 vào menu File/chọn new/ chọn Project:

h69-1Sau khi chọn Project, màn hình sau xuất hiện:

h69-2Chọn các cấu hình như trên, đặt tên Project là “FoodServer” rồi nhấn OK.

Project mặc định ban đầu như sau:

h69-3Giờ ta tiến hành tạo LinQ to SQL cho CSDL dbFood để dễ xử lý như sau:

Bấm chuột phải vào Project/ chọn :

h69-4Màn hình tạo tên LINQ to SQL hiển thị lên, ta tạo tên rồi nhấn OK:

h69-5(chú ý đôi khi bạn sẽ không thấy LINQ to SQL Classes ở màn hình này), nếu không thấy thì chọn New Item:

h69-6Ta chọn các mục giống như bên dưới, tìm tới LINQ to SQL Classes rồi đặt tên DBFood tương tự như trên:

h69-7Cả 2 cách cuối cùng cũng trạo được DBFood LINQ như sau:

h69-8– Ta tiến hành cấu hình để kéo Cơ sở dữ liệu vào làm các lớp tương tác:

Bạ mở Server Explorer (vào menu View/Server Explorer), bấm chọn theo các bước như bên dưới (lệ thuộc vào Server của bạn mà chọn Server name, User đăng nhập cho phù hợp):

h69-9Khi khi bấm OK, bạn sẽ thấy Server Explorer có thêm mục sau:

h69-10Bạn kéo thả bảng Food vào mục bên phải như hình trên.

Tiếp theo bạn tạo 1 thư mục (tên gì cũng được), ở đây Tui đặt đại tên Controllers (bấm chuột phải vào Project/chọn Add/chọn New Folder):

h69-11Sau khi thư mục Controllers được tạo ra, bạn bấm chuột phải vào Thư Mục này rồi chọn Add/Controller..:

h69-12Sau khi bạn chọn Controller… màn hình sau xuất hiện:

h69-13Ta chọn Web API 2 Controller – Empty rồi bấm Add, Visual sẽ hiển thị màn hình đặt tên cho Controller:

h69-14Mặc định là chữ Default, bây giờ bạn đổi lại thành Food (thường ta làm API cho bảng nào thì lấy tên bảng đó), đó là lý do vì sao Tui đặt là Food:

h69-15Tập tin FoodController.cs sẽ được tạo ra, nhưng ta chỉ lấy Food(bỏ chữ Controller đằng sau đi) để tương tác (đây là cơ chế hoạt động). Ta xem cấu trúc Controller được tạo ra:

h69-16Cấu trúc có gì?

  • File WebApiConfig.cs được sinh ra trong thư mục App_Start, bạn để ý  routeTemplate: “api/{controller}/{id}”, tức là khi ta dùng thì viết: “api/food” để lấy toàn bộ danh sách, hay “api/food/3” để lấy chi tiết  1 Food có mã là 3.
  • File FoodController.cs kế thừa từ ApiController

Bây giờ ta tiến hành viết các chức năng (viết trong file FoodController.cs) :

  • HttpGet: Truy vấn thông tin
  • HttpPost: Thêm mới thông tin
  • HttpPut: Thay đổi thông tin
  • HttpDelete: Xóa thông tin

Trước tiên ta làm HttpGet:

[code language=”csharp”]

using System;
using System.Collections.Generic;
using System.Linq;
using System.Net;
using System.Net.Http;
using System.Web.Http;

namespace FoodServer.Controllers
{
public class FoodController : ApiController
{
///

<summary>
/// Dịch vụ lấy toàn bộ Food
/// </summary>

/// <returns></returns>
[HttpGet]
public List<Food> GetFoodLists()
{
DBFoodDataContext db = new DBFoodDataContext();
return db.Foods.ToList();
}
///

<summary>
/// Dịch vụ lấy 1 Food theo khóa chính nào đó
/// </summary>

/// <param name="id"></param>
/// <returns></returns>
[HttpGet]
public Food GetFood(int id)
{
DBFoodDataContext db = new DBFoodDataContext();
return db.Foods.FirstOrDefault(x => x.id == id);
}
}
}

[/code]

Chú ý là Web API nó không quan tâm tới tên phương thức (viết tên gì cũng được, nó tự động lấy chính xác Service yêu cầu), (không cho phép trùng tên biến). Ví dụ nếu bạn cố tình tạo thêm 1 hàm:

[code language=”csharp”]

[HttpGet]
public Food GetFood_test(int id)
{
DBFoodDataContext db = new DBFoodDataContext();
return db.Foods.FirstOrDefault(x => x.id == id);
}

[/code]

Khi chạy sẽ báo lỗi ngày (vì hệ thống không quan tâm tên hàm), nó thấy 2 biến id giống nhau ở trên 2 hàm nó sẽ không biết dùng cái nào (vì chúng cùng nhóm HttpGet). Cụ thể là lỗi sau:

Multiple actions were found that match the request:
GetFood on type FoodServer.Controllers.FoodController
GetFood_test on type FoodServer.Controllers.FoodController

Tiếp theo ta viết HttpPost (thêm mới):

[code language=”csharp”]

///

<summary>
/// Dịch vụ này để thêm mới 1 Food, các thông số gửi từ client lên
/// </summary>

/// <param name="name">tên </param>
/// <param name="type">loại-nhóm</param>
/// <param name="price">đơn giá</param>
/// <returns>true thành công, false thất bại</returns>
[HttpPost]
public bool InsertNewFood(string name,string type,int price)
{
try
{
DBFoodDataContext db = new DBFoodDataContext();
Food food = new Food();
food.name = name;
food.type = type;
food.price = price;
db.Foods.InsertOnSubmit(food);
db.SubmitChanges();
return true;
}
catch
{
return false;
}
}

[/code]

Để chỉnh sửa thông tin ta viết HttpPut:

[code language=”csharp”]

///

<summary>
/// Dịch vụ chỉnh sửa thông tin
/// </summary>

/// <param name="id">mã food muốn sửa</param>
/// <param name="name">tên mới</param>
/// <param name="type">loại mới</param>
/// <param name="price">giá mới</param>
/// <returns></returns>
[HttpPut]
public bool UpdateFood(int id,string name,string type,int price)
{
try
{
DBFoodDataContext db = new DBFoodDataContext();
//lấy food tồn tại ra
Food food = db.Foods.FirstOrDefault(x=>x.id==id);
if (food == null) return false;//không tồn tại false
food.name = name;
food.type = type;
food.price = price;
db.SubmitChanges();//xác nhận chỉnh sửa
return true;
}
catch
{
return false;
}
}

[/code]

Cuối cùng để xóa 1 Food ta viết HttpDelete như sau:

[code language=”csharp”]

///

<summary>
/// Dịch vụ dùng để xóa Food có id
/// </summary>

/// <param name="id">id muốn xóa</param>
/// <returns></returns>
[HttpDelete]
public bool DeleteFood(int id)
{
DBFoodDataContext db = new DBFoodDataContext();
//lấy food tồn tại ra
Food food = db.Foods.FirstOrDefault(x => x.id == id);
if (food == null) return false;
db.Foods.DeleteOnSubmit(food);
db.SubmitChanges();
return true;
}

[/code]

Sau cùng ta có coding tổng hợp của FoodController như sau:

[code language=”csharp”]

using System;
using System.Collections.Generic;
using System.Linq;
using System.Net;
using System.Net.Http;
using System.Web.Http;

namespace FoodServer.Controllers
{
public class FoodController : ApiController
{
///

<summary>
/// Dịch vụ lấy toàn bộ Food
/// </summary>

/// <returns></returns>
[HttpGet]
public List<Food> GetFoodLists()
{
DBFoodDataContext db = new DBFoodDataContext();
return db.Foods.ToList();
}
///

<summary>
/// Dịch vụ lấy 1 Food theo khóa chính nào đó
/// </summary>

/// <param name="id"></param>
/// <returns></returns>
[HttpGet]
public Food GetFood(int id)
{
DBFoodDataContext db = new DBFoodDataContext();
return db.Foods.FirstOrDefault(x => x.id == id);
}
///

<summary>
/// Dịch vụ này để thêm mới 1 Food, các thông số gửi từ client lên
/// </summary>

/// <param name="name">tên </param>
/// <param name="type">loại-nhóm</param>
/// <param name="price">đơn giá</param>
/// <returns>true thành công, false thất bại</returns>
[HttpPost]
public bool InsertNewFood(string name,string type,int price)
{
try
{
DBFoodDataContext db = new DBFoodDataContext();
Food food = new Food();
food.name = name;
food.type = type;
food.price = price;
db.Foods.InsertOnSubmit(food);
db.SubmitChanges();
return true;
}
catch
{
return false;
}
}
///

<summary>
/// Dịch vụ chỉnh sửa thông tin
/// </summary>

/// <param name="id">mã food muốn sửa</param>
/// <param name="name">tên mới</param>
/// <param name="type">loại mới</param>
/// <param name="price">giá mới</param>
/// <returns></returns>
[HttpPut]
public bool UpdateFood(int id,string name,string type,int price)
{
try
{
DBFoodDataContext db = new DBFoodDataContext();
//lấy food tồn tại ra
Food food = db.Foods.FirstOrDefault(x=>x.id==id);
if (food == null) return false;//không tồn tại false
food.name = name;
food.type = type;
food.price = price;
db.SubmitChanges();//xác nhận chỉnh sửa
return true;
}
catch
{
return false;
}
}
///

<summary>
/// Dịch vụ dùng để xóa Food có id
/// </summary>

/// <param name="id">id muốn xóa</param>
/// <returns></returns>
[HttpDelete]
public bool DeleteFood(int id)
{
DBFoodDataContext db = new DBFoodDataContext();
//lấy food tồn tại ra
Food food = db.Foods.FirstOrDefault(x => x.id == id);
if (food == null) return false;
db.Foods.DeleteOnSubmit(food);
db.SubmitChanges();
return true;
}
}
}

[/code]

Bây giờ ta tiến hành cấu hình Port để test trên IIS express hoặc bạn cấu hình IIS full. Trong bài này Tui hướng dẫn cách sử dụng IIS Express.

Bạn bấm chuột phải vào FoodServer Project/ chọn Properties:

h69-17Tại màn hình Properties / chọn mục Web:

h69-18Bạn cấu hình như trên, Port tui chỉnh là 8888, bạn chọn Port nào cũng được, nhưng thường là 4 chữ số.

Sau đó bấm Create Virtual Directory:

h69-19Nếu Visual thông báo màn hình trên coi như bạn thành công.

Bây giờ ta thử chức năng HttpGet để lấy toàn bộ Food và lấy 1 Food theo id bất kỳ:

F5 để chạy Project:

h69-20Bạn chỉnh lại: http://localhost:8888/api/food để lấy toàn bộ Food:

h69-21Để lấy 1 Food có mã bất kỳ:

Ví dụ: Lấy Food có mã id=15: http://localhost:8888/api/food/15

h69-22Hoặc: http://localhost:8888/api/food?id=15

h69-23Ta cần phải biết các công cụ để test HttpGet,HttpPost,HttpPutHttpDelete.

Bài kế tiếp Tui sẽ hướng dẫn cách dùng công cụ Postman và HttpRequester để xử lý 4 tác vụ trên.

Bây giờ các bạn hãy làm theo hướng dẫn này để có thể tạo được 1 Web API hoàn chỉnh, test trước phần HttpGet mà Tui đã trình bày ở trên trước.

Các bạn tải source code FoodServer ở đây: http://www.mediafire.com/download/c24sm4hg19v8grz/FoodServer.rar

Chúc các bạn thành công.

Bài 68: Xây dựng Web Service dùng API RESTful Service(phần 1)

Innovate Trading System (Kênh đầu tư lợi nhuận rất cao), các bạn nào quan tâm thì vào đây đầu tư nhé:


Nếu bạn nào muốn rèn luyện thêm lập trình Java, lập trình Android, lập trình Webservice với tổng thời lượng học >80 giờ thì có thể đăng ký học theo các link sau:

1) Lập trình java trong 4 tuần – 19 giờ(chỉ dành cho những ai CHƯA BIẾT GÌ VỀ LẬP TRÌNH hoặc đã biết lơ mơ về Java, lý thuyết và các bài tập phong phú tạo nền tảng lập trình Android và các hướng khác liên quan tới Java):
https://kyna.vn/lap-trinh-java-trong-4-tuan/325931
2) Lập trình Android cơ bản (>24 giờ học) – toàn bộ kiến thức về Android cơ bản:
https://kyna.vn/lap-trinh-android-co-ban/325931
3) Lập trình Android nâng cao (23 giờ học) – toàn bộ kiến thức về Android nâng cao:
https://kyna.vn/lap-trinh-android-nang-cao/325931
4) Lập trình Webservice cho Di Động – 14 giờ (dành cho những ai ĐÃ BIẾT ANDROID), những ai chưa biết Android tuyệt đối không đăng ký, khóa học hướng dẫn tỉ mỉ từ A->Z để có thể xây dựng được một phần mềm hoàn chỉnh tương tác client-server:
https://kyna.vn/lap-trinh-webservice-cho-di-dong/325931

Ở các bài trước (.Net Web Service & KSOAP API) Tui có trình bày về cách tạo và sử dụng Web Service bằng .asmx, nó có một số hạn chế nhất định. Trong bài này Tui sẽ trình bày cách tạo web service dùng API RESTful Service, một nền tảng mới được hỗ trợ từ .net version 4.0 trở lên. Những bạn lập trình về thiết bị di động cần phải hiểu được các khái niệm cũng như cơ chế vận hành sử dụng API RESTful, theo Tui thấy nó khá hay và rất tiện lợi trong việc triển khai các dự án liên quan tới tương tác dữ liệu trên Server.

Trước khi triển khai webservice, các bạn cần đọc và hiểu khái niệm qua 4 mục dưới đây:

  1. Giới thiệu về ASP.NET Web API
  2. Giới thiệu cơ bản về RESTful Service
  3. Các nguyên tắc cơ bản để tạo ra RESTful Service
  4. Xây dựng Web Service

1.Giới thiệu về ASP.NET Web API

ASP.NET Web API là ?

Là framework giúp chúng ta tạo ra các Web API API trên nền web (HTTP).

Web API là các dịch vụ Web (Web service) được xây dựng dựa trên HTTP sử dụng mô hình lập trình convention (như ASP.NET MVC).

h68-0Đặc điểm Web API (.NET 4.0 trở lên)

  • Giúp cho việc xây dựng các HTTP service rất đơn giản, nhanh chóng
  • Mã nguồn mở (Open Source) và có thể được sử dụng bởi bất kì client nào hỗ trợ XML, JSON.
  • Hỗ trợ đầy đủ các thành phần HTTP: URI, request/response headers, caching, versioning, content formats.
  • Có thể host trong ứng dụng hoặc trên IIS.
  • Kiến trúc lý tưởng cho các thiết bị có băng thông giới hạn như các thiết bị di động.
  • Định dạng dữ liệu có thể là JSON, XML hoặc một kiểu dữ liệu bất kỳ.
  • Làm mới và hiện đại hóa các mẫu dự án mặc định
  • Mẫu dự án trên điện thoại di động
  • Nhiều tính năng mới để hỗ trợ các ứng dụng di động
  • Tùy chỉnh sinh mã(code).
  • Tăng cường hỗ trợ cho các phương pháp bất đồng bộ
  • Đọc danh sách đầy đủ tính năng trong các ghi chú phát hành

Ưu điểm của Web API

  • Cấu hình đơn giản hơn nhiều so với WCF.
  • Hiệu suất(performance) cao.
  • Hỗ trợ RESTfull đầy đủ.
  • Hỗ trợ đầy đủ các thành phần MVC như: routing, controller, action result, filter, model binder, IoC container, dependency injection, unit test, …
  • Mã nguồn mở (Open source).

2. Giới thiệu cơ bản về RESTful Service

-Là một dịch vụ web đơn giản sử dụng HTTP và tính chất của REST.

-Nó tuân thủ theo 4 nguyên tắc thiết kế cơ bản sau:

  • Sử dụng các phương thức HTTP một cách rõ ràng
  • Phi trạng thái
  • Hiển thị cấu trúc thư mục như URls
  • Chuyển đổi linh hoạt JavaScript Object Notation (JSON) và XML hoặc cả hai.

3. Nguyên tắc cơ bản để tạo ra RESTful Service

4 nguyên tắc thiết kế cơ bản sau:

Nguyên tắc 1: Sử dụng các phương thức HTTP một cách rõ rng

Thiết lập một ánh xạ 1-1 giữa các hành động: tạo, đọc, cập nhật và xoá (CRUD) các quá trình vận hành và các phương thức HTTP:

  • POST (HttpPost) – Tạo một tài nguyên trên máy chủ
  • GET (HttpGet) – Truy xuất một tài nguyên
  • PUT (HttpPut) – Thay đổi trạng thái một tài nguyên hoặc để cập nhật nó
  • DELETE (HttpDelete) – Huỷ bỏ hoặc xoá một tài nguyên

Nguyên tắc 2: Phi trạng thái

Ta xem mô hình giữa trạng thái và phi trạng thái để dễ so sánh:

Mô hình phi trạng thái:

h68-2Mô hình trạng thái:

h68-1Nguyên tắc 3: Hiển thị cấu trúc thư mục như URls

Cấu trúc địa chỉ của RESTful service:

  • Giấu các đuôi tài liệu mở rộng của bản gốc trong máy chủ (.jsp, .php, .asp).
  • Để mọi thứ là chữ thường (thực ra là không phân biệt, nhưng cũng nên tuân thủ để khỏi phải nhớ HOA-thường lung tung).
  • Thay thế các khoảng trống bằng gạch chân hoặc gạch nối (một trong hai loại).
  • Tránh các chuỗi yêu cầu.
  • Thay vì sử dụng mã (404 Not Found) khi yêu cầu địa chỉ cho một phần đường dẫn thì luôn luôn cung cấp một trang mặc định hoặc tài nguyên như một phản hồi.

Nguyên tắc 4: Chuyển đổi JavaScript Object Notation (JSON) và XML hoặc cả hai.

  • Là một bản tóm tắt các thuộc tính của những thứ trong mô hình dữ liệu hệ thống.
  • Định dạng dữ liệu mà ứng dụng và trao đổi dịch vụ trong mức đáp ứng yêu cầu/ phản hồi hoặc trong phần thân của HTTP.
  • Các chủ thể trong mô hình dữ liệu có liên quan với nhau.
  • Cấu trúc dịch vụ sao cho nó tận dụng được phần đầu chấp nhận HTTP có sẵn bên trong – một loại MIME

4.Xây dựng Web Service

Tui liệt kê các bước tương đối (chi tiết sẽ trình bày trong bài kế tiếp):

Bước 1:

Khởi động Visual Studio → tạo một project ASP.NET Web Application và chọn template Web API.

Bước 2:

Tạo Data Model sử dụng Entity Framework để Web API service có thể tương tác CRUD (Create, Read, Update, Delete) dữ liệu được (không tạo cũng được).

Bước 3: Tạo ra các Web API

Nhấp chuột phải vào thư mục Controllers và chọn thêm controller.

  • Web API 2 Controller Empty: tự viết các phương thức từ đầu.
  • Web API 2 Controller with read/write actions: phát sinh các phương thức ví dụ để bạn có thể biết cách viết các service này.

Bước 4: Chạy thử và kiểm tra.


Bài kế tiếp Tui sẽ trình bày chi tiết cách tạo Web API service, cách cấu hình cũng như sử dụng Service.

Bài 67: Cài đặt Google Play Service cho máy ảo Genymotion

[polldaddy poll=9764234]

Trong quá trình viết các dự án liên quan tới Google Play Service (Google Map, Googe Cloud Message…) chạy trên máy ảo Genymotion nhiều bạn gặp vấn đề liên quan tới Google Play Service, ví dụ như hình dưới đây:

h67_0Vì vậy Tui viết hướng dẫn này giúp các bạn giải quyết vấn đề trên.

Bước 1: Tải gapps-lp-20141109-signed.zip (khoảng 155MB) tại trang https://www.androidfilehost.com/?fid=95784891001614559

Bước 2: Kéo thả gapps-lp-20141109-signed.zip vào máy ảo Genymotion:

h67_1Bước 3: Tiến hành cài đặt Genymotion, bước này các bạn cứ chờ cho hệ thống tự động cài đặt, nếu có hỏi gì thì cứ bấm Ok:

h67_2Bước 4: Tiến hành cài đặt/Update Google +

Chú ý ở bước 3 sau khi bạn khởi động lại máy ảo thì bạn sẽ gặp các thông báo lỗi đại loại như hình dưới đây:

h67_3Bạn cứ bấm OK (có thể phải bấm túi bụi mấy lần), để nó ra màn hình Reinstall Google + dưới đây:

h67_4Tới đây bạn bấm OK, hệ thống sẽ hiển thị màn hình đăng nhập Gmail :

h67_5Ở màn hình trên bạn nhập email rồi bấm Next, nó chuyển qua màn hình nhập mật khẩu, bạn nhập tiếp rồi bấm Next:

h67_6Khi đăng nhập thành công bạn sẽ thấy màn hình trên, bạn bấm Accept sau đó tiếp tục bấm Next để qua màn hình cài đặt / update Google +:

h67_7Ở màn hình trên bạn bấm nút Update trước, sau đó bấm nút Accept để tiến hành tải và cài đặt Google +. Bạn chờ cho hệ thống tự động cài đặt (khoảng vài ba phút gì đó), sau khi cài thành công bạn sẽ thấy màn hình dưới đây:

h67_8Tới đây bạn nhấn vào nút Open ở màn hình trên, để qua bước 5 (cài đặt update google play Service).

Bước 5: Cài đặt/Update Google Play Service:

Sau khi bạn bấm nút Open ở bước 4, bạn có thông báo sau:

h67_9Ở màn hình trên bạn bấm các nút Update để tiến hành cập nhật Google Play Service. Sau khi cài đặt thành công bạn sẽ thấy màn hình sau:

h67_10Đồng thời kiểm tra xem trong máy ảo Genymotion có bổ sung thêm mục “Google Setting” hay chưa?:

h67_11==> Đến đây bạn đã cài đặt Google Play Service thành công.

Bước 6: Bật On GPS trong máy ảo Genymotion.

Từ màn hình máy ảo Genymotion, bạn bấm vào nút có chữ GPS, rồi bật On như màn hình dưới đây:

h67_12Bây giờ bạn có thể chạy phần mềm nào có liên quan tới Google Play Service mà bạn đã viết, nó sẽ không còn báo lỗi như hình đầu tiên tui chụp, bạn sẽ được kết quả như sau:

h67_13

Bạn chú ý là sử dụng máy ảo Genymotion có phiên bản mới mới gần nhất giùm Tui nhé, những bản từ thời Lạc Long Quân tán Âu Cơ thì bỏ đi.

Chúc các bạn thành công.

Bài 66: Cách vẽ các loại biểu đồ trong Android bằng AChartEngine

[polldaddy poll=9764234]

Trong quá trình viết dự án nhiều khi chúng ta phải làm các chức năng thống kê, mà thống kê hay nhất theo Tui là dùng biểu đồ với những hình ảnh trực quan sinh động sẽ lột tả được ý nghĩa của dữ liệu thống kê. Vì vậy loạt bài sau Tui sẽ hướng dẫn các bạn cách sử dụng framework AChartEngine để thực hiện tính năng này, trên mạng đã có nhiều Video hướng dẫn rất chi tiết các bạn có thể tham khảo step by step (bằng tiếng anh – xin cảm ơn tác giả):
[youtube https://www.youtube.com/watch?v=s8cpqFrbnk8?list=PL2603F3CABBF5EEB0]Các bạn có thể tải demo tại đây http://www.achartengine.org/content/demo.html

Tải các thư viện tại đây: http://www.achartengine.org/content/download.html (https://code.google.com/p/achartengine/downloads/list)

Tui sẽ đan xen cách vẽ biểu đồ từ dữ liệu Sqlite, excel, webservice thay vì hardcode giống như bản demo.

Bạn xem qua một số ứng dụng cụ thể về các loại biểu đồ và Framework AchartEngine cung cấp như sau:

-Line chart:

Chart image inside view group

-Average temperature:

Average temperature chart image

Average temperature chart landscape image

-Monthly Sale Report:

Sales bar chart image  Sales bar chart landscape image

-Trigonometric functions:

Trigonometric chart image  Trigonometric chart landscape image

-Scatter Chart:

Scatter chart image  Scatter chart landscape image

– Monthly Sale Report (conts):

Sales line and area chart image  Sales line and area chart landscape image

-Project Work Status:

Project status chart image

Project status chart landscape image-Sale Growth:

Sales growth chart image  Sales growth chart landscape image

-budget:

Projects budget chart image

Projects budget chart landscape image – Các bạn hãy thử làm quen với cách sử dụng thư viện AchartEngine với dữ liệu hardcode trước, Tui sẽ tranh thủ bổ sung cách hiển thị Chart từ Sqlite, Excel Webservice.

– (còn nữa…)

Bài 65: Xây dựng phần mềm Camera Uploader trong Android Studio

[polldaddy poll=9764234]

Ngày nay với sự ra đời của nhiều mạng xã hội (Facebook, Google +, Linkedin, Twitter…) nơi mà mỗi con người chúng ta có thể dễ dàng chém gió xả stress cũng như bắt người khác ăn stress. Tui nghĩ rằng mạng xã hội đã và đang đi sâu vào quần chúng, đi sâu vào mọi ngõ ngách hẻm hóc trong mỗi người sử dụng công nghệ. Ngoài chém thuần túy thông qua những trận phun châu nhả ngọc chúng ta còn có thể chém gió thông qua những tấm hình… để giải stress hoặc ăn thêm stress.

Việc chia sẻ hình ảnh trên Facebook giúp mọi người sử dụng trong mạng có kết nối có thể nhận được sự chia sẻ và hưởng thụ cảm giác hạnh phúc từ những tấm hình không hề vô tri vô giác. Tuy nhiên không phải tấm hình nào chúng ta cũng có thể chia sẻ lên mạng xã hội để tránh gây phiền toái cũng như bảo mật thông tin. Hiện nay các dòng máy Sờ Mác Phôn của Hồ Cẩm Đào ngày càng thịnh hành với giá rẻ đến ngạc nhiên nên hầu như ai cũng có thể sở hữu nó, và đặc biệt đi đến đâu cũng có WIFI miễn phí, quán nước mía 5k/1 ly cũng có WIFI miễn phí và kể cả quán cơm chay cũng có WIFI miễn phí (rất may WIFI chưa được đưa vào là món ăn mặn). Việc sở hữu 1 chiếc điện thoại hoành tráng cùng với internet miễn phí nên chúng ta có thể tự sướng và chỉ cần 1 cú nhấn “tách” là hình này có thể lên “Phây” ngay và “nuôn”. Nhưng có những công ty họ cần viết các phần mềm trên Smartphone để nhận hình ảnh từ nhân viên gửi về máy chủ, họ không muốn chia sẻ những hình ảnh bí mật này, họ muốn xây dựng một server riêng mỗi lần nhân viên chụp hình thì có thể tự động gửi hình này lên Server để tiến hành phân tích. Ví dụ như Tui có một người bạn làm trong ngành định giá bất động sản, phải đến tận nơi khảo sát chụp ảnh mọi vùng liên quan để có chứng cứ định giá chính xác hơn, nhân viên khi đi khảo sát ở xa chỉ cần chụp hình và thông qua 3G sẽ gửi những hình ảnh trực tiếp này lên server và ở công ty nhóm phân tích sẽ dựa vào những hình ảnh này để hỗ trợ đắc lực cho việc ra quyết định định giá.

-Vì vậy Trong bài tập này Tui muốn hướng dẫn các bạn xây dựng phần mềm Camera Uploader, hi vọng nếu như một ngày nào đó có bạn sinh viên nào cần phải viết phần mềm tương tự có thể đáp ứng được.

– Phần mềm này gồm các chức năng sau (ở đây Tui không làm giao diện đẹp, Tui xử lý coding):

1) Xây dựng Server riêng để lưu trữ hình ảnh gửi về từ client

2) “Thiết kế” một website PHP hiển thị hình ảnh để demo (cho có cảm giác)

3) Xây dựng chức năng Cho phép sử dụng Camera để chụp ảnh

4) Đưa ảnh mới chụp lên Server riêng của công ty

5) Cho phép lấy những hình ảnh khác được chụp trước đó trong điện thoại lên Server riêng.

Giao diện chính vô cùng đơn gian như sau:

android65_1Chương trình chỉ có 3 control chính: ImageView để hiển thị hình ảnh chụp được hoặc hình ảnh có sẵn, ImageButton chụp ảnh, ImageButton upload lên Server, ngoài ra có Menu để cho phép lấy hình ảnh có sẵn trong điện thoại lên giao diện.

1)- Trước tiên ta cần xây dựng server riêng, ở đây Tui hướng dẫn các bạn sử dụng một server khác miễn phí tương tự như somee.com để các bạn có thêm trải nghiệm.

Các bạn vào trang http://freevnn.com/ đăng ký gói free hosting.

Sau khi đăng ký thành công hệ thống sẽ gửi email cho bạn thông tin chi tiết về đăng nhập Cpanel, FTP, phpAdmin…

android65_2Sau khi đăng ký thành công, bạn sẽ nhân được 1 email tương tự như sau:

android65_3Bạn cần nghiên cứu CPANEL của hosting này vì Tui thấy nó rất hữu ích cho các bạn.

– Ta tiến hành viết 2 trang php để làm service tải hình từ client lên server riêng và dùng để trình diễn những hình ảnh đã tải lên server riêng. Nếu bạn nào chưa biết php cũng không sao (cứ coi như mình đã biết để đỡ tủi thân, sau đó tự học sau cho nó bằng bạn bằng bè).

– Bạn dùng Notepad ++ để tạo Trang index2.php cho lẹ, trang nay Tui dùng để nhận hình ảnh từ Client gửi về.

[code language=”php”]

<?php
header(‘Content-Type: text/html; charset=utf-8’);
echo "Lấy Hình Từ Android";
error_reporting(E_ALL);
$target_Path = "images/";
if(isset($_POST[‘ImageName’])){
$imgname = $_POST[‘ImageName’];
$target_Path = $target_Path.$imgname;
$imsrc = base64_decode($_POST[‘base64’]);
$fp = fopen($target_Path, ‘w’);
fwrite($fp, $imsrc);
if(fclose($fp)){
echo "Tải hình thành công";
}else{
echo "Tải hình thất bại";
}
}
?>

[/code]

Coding ở trên mỗi lần lấy được bất cứ hình nào gửi về từ client thì nó sẽ lưu vào thư mục images trên server. Bạn để ý 2 từ khóa “ImageName” và “base64” nó được gửi về từ client là tên hình và binary hình định dạng chuỗi.

– Tiếp theo bạn “thiết kế” một trang index.php để trình diễn mọi hình ảnh gửi về từ client.

[code language=”php”]

<?php
$url1=$_SERVER[‘REQUEST_URI’];
header("Refresh: 5; URL=$url1");
$imagesDir = ‘images/’;
$images = glob($imagesDir . ‘*.{jpg,jpeg,png,gif}’, GLOB_BRACE);
foreach ($images as $img) {
echo "<img src=’$img’ width=’300′ height=’300’/> ";
}
?>

[/code]

code trên đơn giản chỉ là đọc toàn bộ hình ảnh trong thư mục images rồi hiển thị lên giao diện, mỗi hình Tui để 300, 300.

– Sau đó ta đưa 2 trang web này lên Server riêng vừa đăng ký, ở đây bạn có thể sài bất kỳ phần mềm nào (FTP) cũng được. Vì nó có mấy lạng nên tui dùng Totalcommander luôn cho lẹ (bạn phải copy paste thông tin mà nó gửi email về cho các bạn để đăng nhập vào FTP):

android65_4Vào menu Net/ chọn FTP connect…

android65_5Chọn New Connection :

android65_6Nhập Hostname, user name, password… rồi nhấn nút OK. Sau đó ra màn hình nhấn nút Connect.

android65_7Bạn vào bên trong thư mục htdocs. Tạo 1 thư mục images, và chép 2 file index.phpindex2.php vào htdocs như hình Tui chụp ở trên.

index2.php sẽ được gọi trong android client, còn index.php sẽ được truy suất trực tiếp trên website. Ví dụ khi bạn chụp và gửi 1 hình lên Server riêng thì bạn chỉ cần gọi tên miền đã đăng ký là chương trình sẽ tự động hiển thị toàn bộ hình lên website (không cần gõ index.php vì nó ngầm mặc định là trang chủ), ví dụ tui vào http://duythanhcse.freevnn.com/ sẽ có kết quả:

android65_8– Như vậy là bạn đã cấu hình xong Server, bây giờ tiến hành coding cho Client.

– Ta xem cấu trúc của Project Android:

android65_9– Tiến hành thiết kế giao diện cho activity_main.xml như sau:

[code language=”xml”]

<LinearLayout xmlns:android="http://schemas.android.com/apk/res/android"
xmlns:tools="http://schemas.android.com/tools" android:layout_width="match_parent"
android:layout_height="match_parent" android:paddingLeft="@dimen/activity_horizontal_margin"
android:paddingRight="@dimen/activity_horizontal_margin"
android:paddingTop="@dimen/activity_vertical_margin"
android:paddingBottom="@dimen/activity_vertical_margin" tools:context=".MainActivity"
android:orientation="vertical"
>

<ImageView
android:id="@+id/Imageprev"
android:layout_width="match_parent"
android:layout_height="380dp" />

<LinearLayout
android:layout_width="match_parent"
android:layout_height="wrap_content" >

<ImageButton
android:layout_width="wrap_content"
android:layout_height="wrap_content"
android:id="@+id/btnCapture"
android:src="@drawable/camera" />

<ImageButton
android:layout_width="wrap_content"
android:layout_height="wrap_content"
android:id="@+id/btnUpload"
android:src="@drawable/upload"
android:layout_gravity="right" />
</LinearLayout>

</LinearLayout>

[/code]

-Nhớ bổ sung thêm 1 menu đọc hình ảnh từ điện thoại:

[code language=”xml”]

<menu xmlns:android="http://schemas.android.com/apk/res/android"
xmlns:app="http://schemas.android.com/apk/res-auto"
xmlns:tools="http://schemas.android.com/tools" tools:context=".MainActivity">
<item android:id="@+id/mnuImageList" android:title="Xem hình trong SD Card"></item>
<item android:id="@+id/action_settings" android:title="@string/action_settings"
android:orderInCategory="100" app:showAsAction="never" />
</menu>

[/code]

-Tiến hành viết UploadToServerTask là lớp đa tiến trình để tải hình từ client lên Server.

[code language=”java”]

package com.tranduythanh.camerauploader;

import android.app.Activity;
import android.app.ProgressDialog;
import android.os.AsyncTask;
import android.util.Log;

import org.apache.http.HttpResponse;
import org.apache.http.NameValuePair;
import org.apache.http.client.HttpClient;
import org.apache.http.client.entity.UrlEncodedFormEntity;
import org.apache.http.client.methods.HttpPost;
import org.apache.http.impl.client.DefaultHttpClient;
import org.apache.http.message.BasicNameValuePair;
import org.apache.http.util.EntityUtils;

import java.util.ArrayList;

/**
* Created by drthanh on 14/05/2015.
*/
public class UploadToServerTask extends AsyncTask<Void, Void, String> {

//URL để tải hình lên server
private String URL = "http://duythanhcse.freevnn.com/index2.php";
private Activity context=null;
private ProgressDialog progressDialog=null;
private String ba1;
public UploadToServerTask(Activity context, String ba1)
{
this.context=context;
this.ba1=ba1;
this.progressDialog=new ProgressDialog(this.context);
}
protected void onPreExecute() {
super.onPreExecute();
this.progressDialog.setMessage("Vui lòng chờ hệ thống đang upload hình!");
this.progressDialog.show();
}

@Override
protected String doInBackground(Void… params) {
//Coding gửi hình lên Server
ArrayList<NameValuePair> nameValuePairs = new ArrayList<NameValuePair>();
nameValuePairs.add(new BasicNameValuePair("base64", ba1));
nameValuePairs.add(new BasicNameValuePair("ImageName", System.currentTimeMillis() + ".jpg"));
try {
HttpClient httpclient = new DefaultHttpClient();
HttpPost httppost = new HttpPost(URL);
httppost.setEntity(new UrlEncodedFormEntity(nameValuePairs));
HttpResponse response = httpclient.execute(httppost);
String st = EntityUtils.toString(response.getEntity());
Log.v("log_tag", "In the try Loop" + st);

} catch (Exception e) {
Log.v("log_tag", "Lỗi kết nối : " + e.toString());
}
return "Thành công";

}

protected void onPostExecute(String result) {
super.onPostExecute(result);
this.progressDialog.hide();
this.progressDialog.dismiss();
}
}

[/code]

– Cuối cùng tiến hành coding cho MainActivity:

+ Trong lớp này cho phép chụp hình và chỉ lấy thumbnail để tối ưu bộ nhớ

+ Tương tự cho việc lấy hình ảnh có sẵn cũng lấy thumbnail

+ Đặc biệt tự động quay lại hình (rotate) nếu như hình bị quay không đúng hướng layout của phần mềm.

[code language=”java”]

package com.tranduythanh.camerauploader;

import android.graphics.Matrix;
import android.support.v7.app.ActionBarActivity;
import android.os.Bundle;
import android.view.Menu;
import android.view.MenuItem;
import java.io.ByteArrayOutputStream;
import android.content.Intent;
import android.content.pm.PackageManager;
import android.database.Cursor;
import android.graphics.Bitmap;
import android.graphics.BitmapFactory;
import android.net.Uri;
import android.provider.MediaStore;
import android.util.Base64;
import android.util.Log;
import android.view.View;
import android.widget.ImageButton;
import android.widget.ImageView;
import android.widget.Toast;

public class MainActivity extends ActionBarActivity {
ImageButton btnCapture, btnUpload;
ImageView imageView;
private Uri fileUri;
String picturePath;
Uri selectedUriImage;
Bitmap selectedBitmap;
String ba1;
@Override
protected void onCreate(Bundle savedInstanceState) {
super.onCreate(savedInstanceState);
setContentView(R.layout.activity_main);
addControls();
addEvents();
}
public void addControls()
{
btnCapture = (ImageButton) findViewById(R.id.btnCapture);
btnUpload = (ImageButton) findViewById(R.id.btnUpload);
imageView = (ImageView) findViewById(R.id.Imageprev);
btnUpload.setEnabled(false);
}
public void addEvents()
{
btnCapture.setOnClickListener(new View.OnClickListener() {
@Override
public void onClick(View view) {
capturePicture();
}
});
btnUpload.setOnClickListener(new View.OnClickListener() {
@Override
public void onClick(View view) {
uploadPictureToServer();
}
});
}

/**
* hàm xử lý lấy thumbnail để tối ưu bộ nhớ
* @param pathHinh
* @return
*/
public Bitmap getThumbnail(String pathHinh)
{
BitmapFactory.Options bounds = new BitmapFactory.Options();
bounds.inJustDecodeBounds = true;
BitmapFactory.decodeFile(pathHinh, bounds);
if ((bounds.outWidth == -1) || (bounds.outHeight == -1))
return null;
int originalSize = (bounds.outHeight > bounds.outWidth) ?
bounds.outHeight
: bounds.outWidth;
BitmapFactory.Options opts = new BitmapFactory.Options();
opts.inSampleSize = originalSize / 500;
return BitmapFactory.decodeFile(pathHinh, opts);
}

/**
* Hàm xử lys lấy encode hình để gửi lên Server
*/
private void uploadPictureToServer() {
Log.e("path", "—————-" + picturePath);
ByteArrayOutputStream bao = new ByteArrayOutputStream();
selectedBitmap.compress(Bitmap.CompressFormat.JPEG, 100, bao);
byte[] ba = bao.toByteArray();
ba1 =Base64.encodeToString(ba,Base64.DEFAULT);

Log.e("base64", "—–" + ba1);

// Upload hình  lên server
UploadToServerTask uploadToServer=new UploadToServerTask(MainActivity.this,ba1);
uploadToServer.execute();
}

private void capturePicture() {
// Kiểm tra Camera trong thiết bị
if (getApplicationContext().getPackageManager().hasSystemFeature(
PackageManager.FEATURE_CAMERA)) {
// Mở camera mặc định
Intent intent = new Intent(MediaStore.ACTION_IMAGE_CAPTURE);
intent.putExtra(MediaStore.EXTRA_OUTPUT, fileUri);

// Tiến hành gọi Capture Image intent
startActivityForResult(intent, 100);

} else {
Toast.makeText(getApplication(), "Camera không được hỗ trợ", Toast.LENGTH_LONG).show();
}
}

/**
* Lấy đường dẫn file hình theo uri hình
* @param uriImage
* @return
*/
public String getPicturePath(Uri uriImage)
{
String[] filePathColumn = {MediaStore.Images.Media.DATA};
Cursor cursor = getContentResolver().query(uriImage,
filePathColumn, null, null, null);
cursor.moveToFirst();

int columnIndex = cursor.getColumnIndex(filePathColumn[0]);
String path = cursor.getString(columnIndex);
cursor.close();
return path;
}
protected void onActivityResult(int requestCode, int resultCode, Intent data) {
if ((requestCode == 100||requestCode==200) && resultCode == RESULT_OK) {
//Lấy URI hình kết quả trả về
selectedUriImage = data.getData();
//lấy đường dẫn hình
picturePath=getPicturePath(selectedUriImage);
//lấy thumbnail để tối ưu bộ nhớ
selectedBitmap=getThumbnail(picturePath);
selectedBitmap=rotateImageIfRequired(selectedBitmap,selectedUriImage);
imageView.setImageBitmap(selectedBitmap);
btnUpload.setEnabled(true);
}
}
/**
* Hàm hiển thị Camera folder và cho phép hiển thị hình người sử dụng chọn
* lên giao diện, hình này sẽ được gửi lên Server nếu muốn
*/
public void processChonHinh()
{
Intent intent = new Intent(Intent.ACTION_GET_CONTENT);
intent.setType("image/*");
startActivityForResult(intent, 200);
}
/**
* Quay lại hình nếu chưa đúng
* @param img
* @param selectedImage
* @return
*/
private  Bitmap rotateImageIfRequired(Bitmap img, Uri selectedImage) {

// Detect rotation
int rotation=getRotation();
if(rotation!=0){
Matrix matrix = new Matrix();
matrix.postRotate(rotation);
Bitmap rotatedImg = Bitmap.createBitmap(img, 0, 0, img.getWidth(), img.getHeight(), matrix, true);
img.recycle();
return rotatedImg;
}else{
return img;
}
}
/**
* Lấy Rotation của hình
* @return
*/
private int getRotation() {
String[] filePathColumn = {MediaStore.Images.Media.ORIENTATION};
Cursor cursor = getContentResolver().query(selectedUriImage,
filePathColumn, null, null, null);
cursor.moveToFirst();

int rotation =0;
rotation = cursor.getInt(0);
cursor.close();
return rotation;
}
@Override
public boolean onCreateOptionsMenu(Menu menu) {
// Inflate the menu; this adds items to the action bar if it is present.
getMenuInflater().inflate(R.menu.menu_main, menu);
return true;
}

@Override
public boolean onOptionsItemSelected(MenuItem item) {
// Handle action bar item clicks here. The action bar will
// automatically handle clicks on the Home/Up button, so long
// as you specify a parent activity in AndroidManifest.xml.
int id = item.getItemId();

//noinspection SimplifiableIfStatement
if (id == R.id.action_settings) {
return true;
}
if(id==R.id.mnuImageList)
{
processChonHinh();
}
return super.onOptionsItemSelected(item);
}
}

[/code]

– Nhớ cấu hình AndroidManifest:

[code language=”xml”]

<?xml version="1.0" encoding="utf-8"?>
<manifest xmlns:android="http://schemas.android.com/apk/res/android"
package="com.tranduythanh.camerauploader" >

<uses-feature
android:name="android.hardware.Camera"
android:required="true" >
</uses-feature>

<uses-permission android:name="android.permission.CAMERA" >
</uses-permission>
<uses-permission android:name="android.permission.WRITE_EXTERNAL_STORAGE" />
<uses-permission android:name="android.permission.INTERNET" >
</uses-permission>

<application
android:allowBackup="true"
android:icon="@mipmap/ic_launcher"
android:label="@string/app_name"
android:theme="@style/AppTheme" >
<activity
android:name=".MainActivity"
android:label="@string/app_name" >
<intent-filter>
<action android:name="android.intent.action.MAIN" />

<category android:name="android.intent.category.LAUNCHER" />
</intent-filter>
</activity>
</application>

</manifest>

[/code]

– Thực thi phần mềm, tiến hành chụp rồi gửi lên Server

– Hoặc vào menu lấy hình có sẵn trong máy gửi lên server:

android65_10– Sau đó nhấn nút Upload để đưa lên Server:

android65_11–> Chương trình sử dụng kỹ thuật đa tiến trình để tải hình lên server.

Ta có thể kiểm tra lại kết quả các hình chụp và hình lấy sẵn được truyền lên server:

android65_12– Như vậy bạn đã hoàn thành xong phần mềm và có thể test chạy trực tiếp trên server riêng Tôi tạo, nhưng các bạn nhớ tự tạo riêng để test để học hỏi được nhiều hơn.

– và nhớ bổ sung thêm hàm kiểm tra xem điện thoại có đang kết nối internet hay không nhé, nếu chưa có internet thì phải tắt nút Upload hình đi, đoạn code kiểm tra internet có hay không đã được đề cập đến trong bài 64 dự báo thời tiết.

– Bạn có thể tải source code đầy đủ ở đây: http://www.mediafire.com/download/ts6agjkv3z30z8a/CameraUploader.rar

-Chúc các bạn thành công.

Bài 64: Xây dựng phần mềm dự báo thời tiết

[polldaddy poll=9764234]

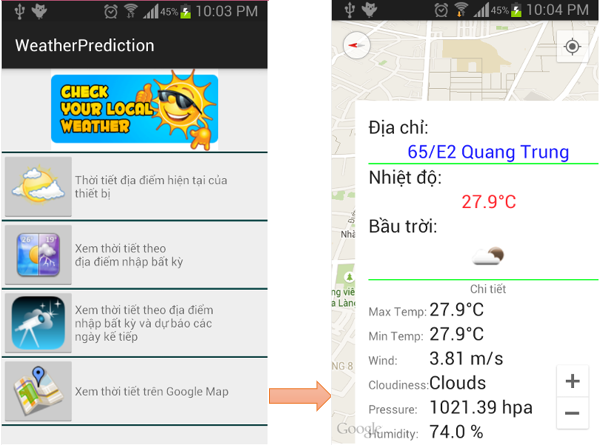
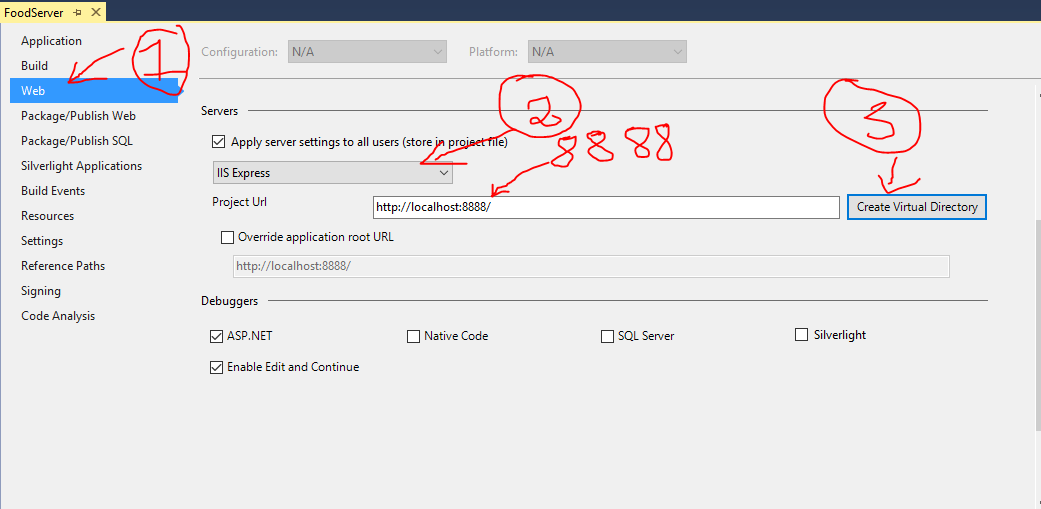
Tui muốn tổng hợp các bài tập về Google Map, về Đa tiến trình, về JSon, Webservice…. để xây dựng phần mềm dự báo thời tiết đơn giản như hình dưới đây:

android_64_0
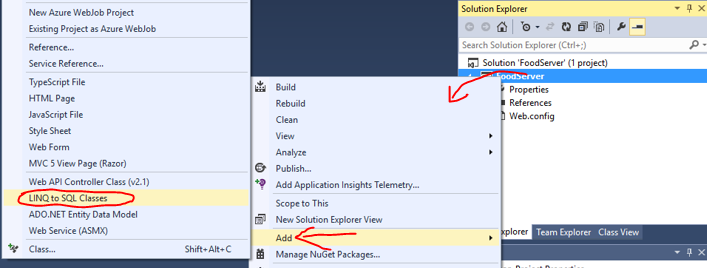
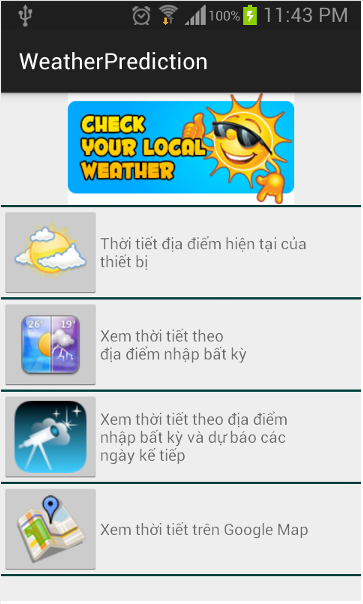
– Phần mềm sẽ có 4 chức năng như mô tả ở trên, để làm được bài này thì các bạn cần phải có các kiến thức sau:

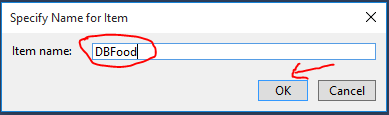
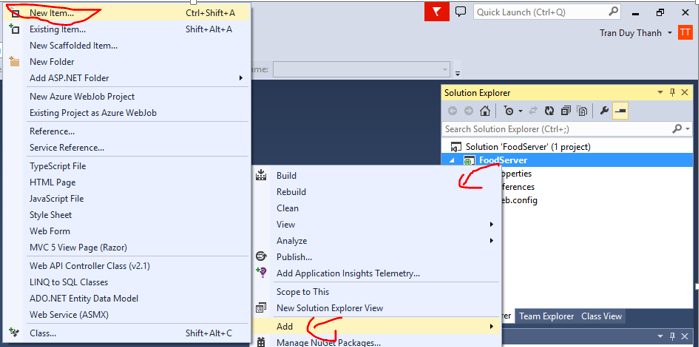
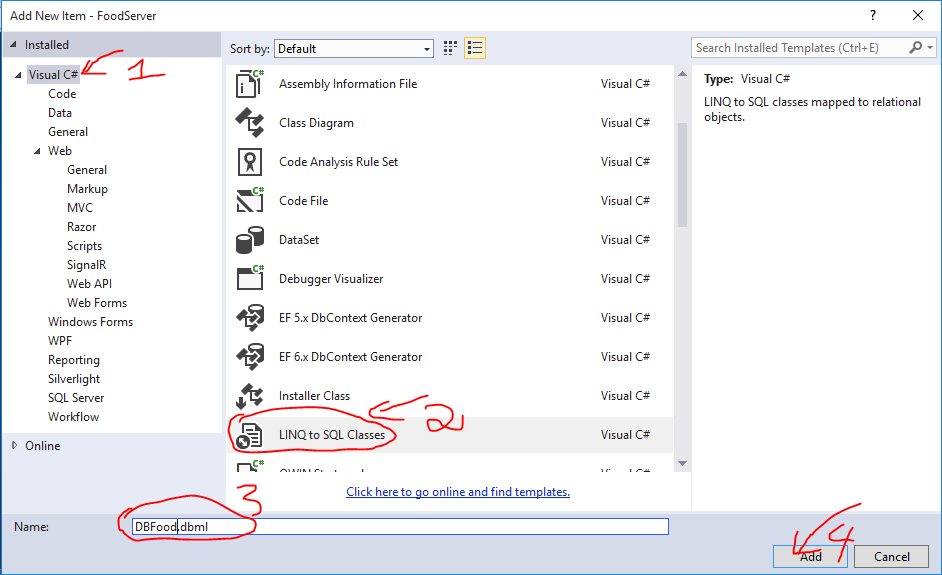
+ Kiến thức về lập trình đa tiến trình:

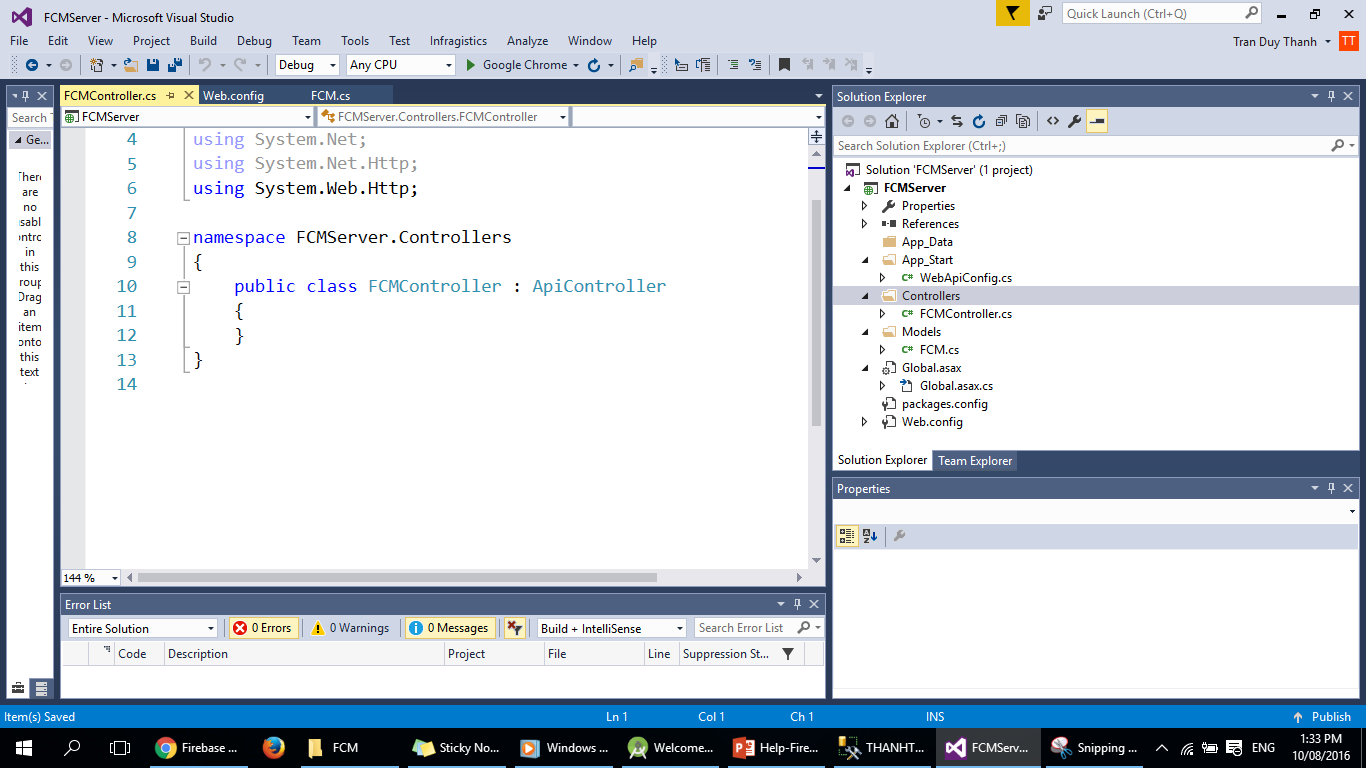
Bài tập 33: Sử dụng ContentProvider trong Android

Bài tập 34: đa tiến trình trong Android (Multi-Threading)

Bài 35 : Vẽ Button lúc Runtime, dùng Using Message của Handler class

Bài 36: Update ListView At runtime by Handler class using post

Bài 37: Xử lý đa tiến trình bằng AsyncTask

Bài 38: Lấy kết quả trả về sau khi thực hiện đa tiến trình bằng AsyncTask

Bài 39: Kết hợp AsyncTask và Handler class

+ Kiến thức về lập trình Google Map:

Bài 53: Google Maps Android API – phần 1

Bài 54: Google Maps Android API – phần 2

Bài 55: Google Maps Android API – phần 3

Bài 56: Google Maps Android API – phần 4

+Kiến thức về Webservice với định dạng JSON hoặc SOAP (XML):

Bài 43: Android vs .net Web Services

Bài 44: Cách tạo Webservice

Bài 45: Sử dụng .Net Webservice trong C#

Bài 46: Sử dụng .Net Webservice trong Android

Bài 51: Xử lý JSON trong Android

Bài 52: Tạo định dạng JSON trong C# asp.net service vs Android

+Kiến thức về chuyển đổi JSON qua Java class:

Bài 61: Cách đưa định dạng JSon về Java class bằng GSon

Bài 62: Cách đưa định dạng JSon về Java class bằng GSon (tiếp 1)

Bài 63: Cách đưa định dạng JSon về Java class bằng GSon (tiếp 2)

Đồng thời nghiên cứu thêm API Open Weather Map(Hỗ trợ xem thời tiết hầu hết mọi nơi trên thế giới, được đánh giá là một trong những API cũng cấp webservice về dự báo thời tiết tốt nhất hiện nay)

Cập nhật ngày 13/12/2015

Để sử dụng được API này bạn cần đăng nhập để lấy appid, chi tiết đọc tại : http://openweathermap.org/appid

Khi đăng ký và đăng nhập thành công, bạn sẽ có API key bên dưới:

key

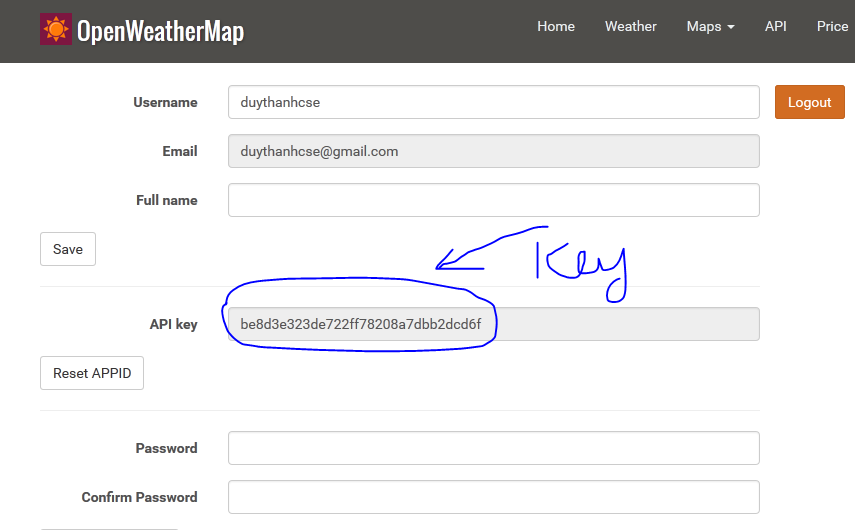
http://api.openweathermap.org/data/2.5/forecast/daily?lat=10.778182&lon=106.665504&cnt=1&appid=be8d3e323de722ff78208a7dbb2dcd6f

Ví dụ 0: Xem thời tiết ở Thành Phố Hồ Chí Minh:

http://api.openweathermap.org/data/2.5/weather?q=hồ chí minh&appid=be8d3e323de722ff78208a7dbb2dcd6f

Ví dụ 1: Xem thời tiết ở Đà Lạt

http://api.openweathermap.org/data/2.5/forecast/daily?q=đà lạt&appid=be8d3e323de722ff78208a7dbb2dcd6f

Ví dụ 2: Xem thời tiết ở Đà Lạt sau 15 ngày nữa thì như thế nào:

http://api.openweathermap.org/data/2.5/forecast/daily?q=đà lạt&cnt=15&appid=be8d3e323de722ff78208a7dbb2dcd6f

Ví dụ 3: Xem thời tiết ở 1 Kinh độ và Vĩ độ bất kỳ (ứng dụng hiển thị trên Google Map)

http://api.openweathermap.org/data/2.5/forecast/daily?lat=35&lon=139&cnt=10&mode=json&appid=be8d3e323de722ff78208a7dbb2dcd6f

Chi tiết hướng dẫn sử dụng: http://openweathermap.org/api

Các bạn tranh thủ ôn lại các bài trên sau đó Tui sẽ trình bày chi tiết từng bước cách thực hiện dự án này.

Trước khi bắt tay vào lập trình bài này thì ta xem sơ qua cấu trúc JSON khi kiểm tra thời tiết của một địa điểm nào đó, ví dụ ở Thành Phố Hồ Chí Minh:

http://api.openweathermap.org/data/2.5/weather?q=hồ chí minh&appid=be8d3e323de722ff78208a7dbb2dcd6f

hay dùng kinh độ vĩ độ (để áp dụng cho chức năng đầu tiên là xem thời tiết tại địa điểm hiện tại, theo địa chỉ bất kỳ, hay xem trên Google Map):

http://api.openweathermap.org/data/2.5/weather?lat=10.778182&lon=106.665504&appid=be8d3e323de722ff78208a7dbb2dcd6f

Ta được kết quả tương tự như sau:

android_64_1

Các source code bạn tự nối đuôi appid mà Tui đã chỉ ở trên là có thể chạy tốt.

End update 13/12/2015

—————————————–

Việc phân tích cấu trúc JSON để viết Java class các bạn đã được học kỹ ở các bài trước rồi, nên bài này Tui không nói nữa mà Tui chỉ show Mô hình Java class đã viết ra như sau (Bạn tự viết):

android_64_2
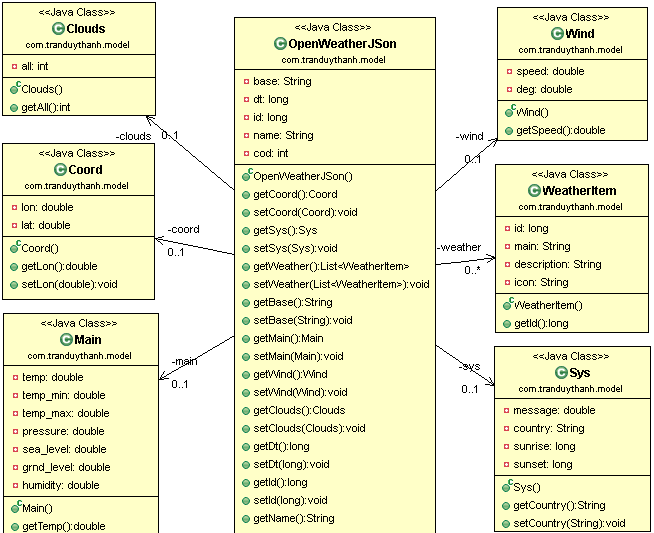
– Ta sẽ dùng GSon để chuyển JSON qua Java class, từ đó dễ dàng cho việc sử dụng lấy thông tin dự báo thời tiết.

– Còn dưới đây là cấu trúc JSON cho trường hợp dự báo các ngày khác (Daily):

Ví dụ:

http://api.openweathermap.org/data/2.5/forecast/daily?lat=10.778182&lon=106.665504&cnt=10

Hay:

http://api.openweathermap.org/data/2.5/forecast/daily?q=hồ chí minh&cnt=10

Thì ta có kết quả với cấu trúc JSON khá khác cho với trường hợp trên như sau:

android_64_3–> Bạn tự phân tích cấu trúc ở trên để viết Java Class cho trường hợp Daily (chức năng số 3).

Trong Project này Tui sẽ thực hiện 3 chức năng (thời tiết địa điểm hiện tại của thiết bị, xem thời tiết theo địa điểm nhập bất kỳ và xem thời tiết trên Google Map), còn chức năng dự báo ngày kế tiếp các bạn tiếp tục thực hiện.

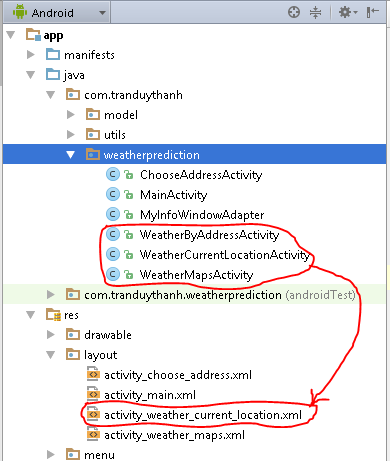
Tui có cấu trúc tập tin, class của dự án như sau:

android64_1
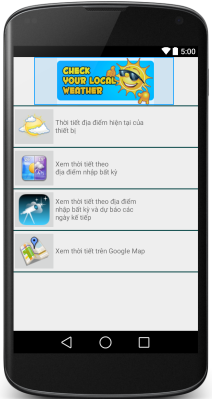
– Tui chụp màn hình sử dụng phần mềm dự báo thời tiết như sau:

1) Từ màn hình chính, nếu bấm vào “Thời tiết địa điểm hiện tại của thiết bị”:

android64_2
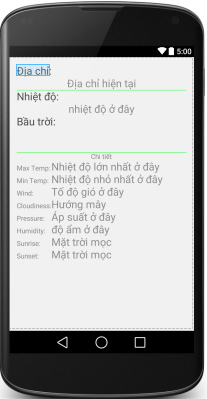
Chương trình sẽ hiển thị thông báo chi tiết dự báo thời tiết như sau:

android64_3
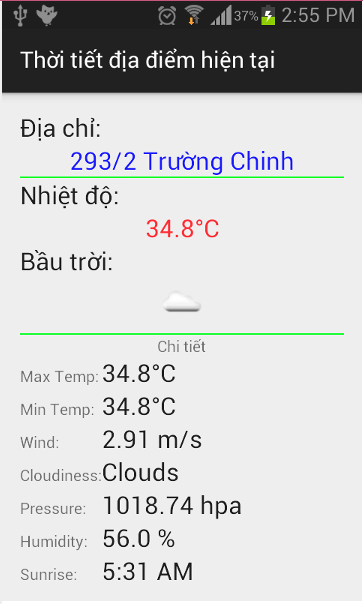
Ta thấy chi tiết của địa điểm hiện tại của thiết bị (vị trị hiện tại tương đối trong phạm vi thiết bị), ở trên ta thấy nhiệt độ, bầu trời bằng hình có nắng, có mây, có mưa…, tốc độ gió, áp suất…

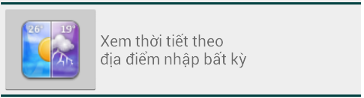
2) Từ màn hình chính, nếu bấm vào “Xem thời tiết theo địa điểm nhập bất kỳ”:

android64_4Chương trình sẽ hiển thị màn hình cho phép nhập địa chỉ bất kỳ, hoặc chọn các tỉnh thành có sẵn của Việt Nam (muốn bất kỳ địa điểm nào khác ở Việt Nam hay trên thế giới thì tự gõ địa chỉ vào), màn hình chọn địa điểm:

android64_5Nếu ta chọn hoặc nhập địa điểm bất kỳ, ví dụ như Hồ Chí Minh, ta có kết quả sau:

android64_6Ở hình trên ta thấy đấy, Hồ Chí Minh tuy có mưa nhưng nhiệt độ vẫn nóng là 34.2 độ C. Đúng là tại thời điểm Tui post hình này lên là Sài gòn đang mưa và vẫn nóng le lưỡi.

3) Tại màn hình chính, chọn “Xem thời tiết trên Google Map”, chương trình sẽ tự động hiển thị thời tiết tại vị trí hiện tại trên bản đồ, và cho phép bạn nhấn chọn bất kỳ địa điểm nào đó trên bản đồ để xem thời tiết. Đây là chức năng rất thú vị và coding hơi phức tạp.

android64_7Ta có kết quả:

android64_8Nhớ là bạn có thể nhấn chọn vị trí khác để xem thời tiết, ví dụ Tui chọn Nguyễn văn Trỗi:

android64_9Nếu làm tốt bài này bạn có thể áp dụng một cách uyển chuyển vào các dự án liên quan tới Du lịch, xem thời tiết….

Sau đây là Coding chi tiết cho từng phần, tui sẽ giải thích những đặc tính mới trong Android Studio, còn những cái này tương tự như Eclipse thì thôi  (Tui chỉ trỏ link tới rồi các bạn đọc lại).

Ta cần xây dựng mô hình class cho Weather theo tọa độ và địa chỉ của kết quả Json 2 loại dưới đây:

http://api.openweathermap.org/data/2.5/weather?lat=10.778182&lon=106.665504

http://api.openweathermap.org/data/2.5/weather?q=Đà lạt

Như sau:

android64_10Tui sẽ không phân tích hay giải thích tại sao phải viết các lớp như trên nữa, vì Tui đã hướng dẫn chi tiết ở các bài 61, bài 62, bài 63 các bạn bắt buộc phải đọc lại.

Soure code từng lớp như sau:

Lớp Clouds:

[code language=”java”]

package com.tranduythanh.model;

/**
* Created by drthanh on 04/04/2015.
*/
public class Clouds {
private int all;

public int getAll() {
return all;
}

public void setAll(int all) {
this.all = all;
}
}

[/code]

Lớp Coord:

[code language=”java”]

package com.tranduythanh.model;

/**
* Created by drthanh on 04/04/2015.
*/
public class Coord {
private  double lon;
private double lat;

public double getLon() {
return lon;
}

public void setLon(double lon) {
this.lon = lon;
}

public double getLat() {
return lat;
}

public void setLat(double lat) {
this.lat = lat;
}
}

[/code]

Lớp Main:

[code language=”java”]

package com.tranduythanh.model;

public class Main {
private double temp;
private double temp_min;
private double temp_max;
private double pressure;
private double sea_level;
private double grnd_level;
private double humidity;
public double getTemp() {
return temp;
}
public void setTemp(double temp) {
this.temp = temp;
}
public double getTemp_min() {
return temp_min;
}
public void setTemp_min(double temp_min) {
this.temp_min = temp_min;
}
public double getTemp_max() {
return temp_max;
}
public void setTemp_max(double temp_max) {
this.temp_max = temp_max;
}
public double getPressure() {
return pressure;
}
public void setPressure(double pressure) {
this.pressure = pressure;
}
public double getHumidity() {
return humidity;
}
public void setHumidity(double humidity) {
this.humidity = humidity;
}

public double getSea_level() {
return sea_level;
}

public void setSea_level(double sea_level) {
this.sea_level = sea_level;
}

public double getGrnd_level() {
return grnd_level;
}

public void setGrnd_level(double grnd_level) {
this.grnd_level = grnd_level;
}
}

[/code]

Lớp Sys:

[code language=”java”]

package com.tranduythanh.model;

public class Sys {
private double message;
private String country;
private long sunrise;
private long sunset;
public String getCountry() {
return country;
}
public void setCountry(String country) {
this.country = country;
}
public long getSunrise() {
return sunrise;
}
public void setSunrise(long sunrise) {
this.sunrise = sunrise;
}
public long getSunset() {
return sunset;
}
public void setSunset(long sunset) {
this.sunset = sunset;
}

public double getMessage() {
return message;
}

public void setMessage(double message) {
this.message = message;
}
}

[/code]

Lớp WeatherItem:

[code language=”java”]

package com.tranduythanh.model;

public class WeatherItem {
private long id;
private String main;
private String description;
private String icon;
public long getId() {
return id;
}
public void setId(long id) {
this.id = id;
}
public String getMain() {
return main;
}
public void setMain(String main) {
this.main = main;
}
public String getDescription() {
return description;
}
public void setDescription(String description) {
this.description = description;
}
public String getIcon() {
return icon;
}
public void setIcon(String icon) {
this.icon = icon;
}

}

[/code]

Lớp Wind:

[code language=”java”]

package com.tranduythanh.model;

public class Wind {
private double speed;
private double deg;

public double getSpeed() {
return speed;
}

public void setSpeed(double speed) {
this.speed = speed;
}

public double getDeg() {
return deg;
}

public void setDeg(double deg) {
this.deg = deg;
}
}

[/code]

Và cuối cùng là lớp tổng hợp JSON:

Lớp OpenWeatherJSon:

[code language=”java”]

package com.tranduythanh.model;

import java.util.List;

public class OpenWeatherJSon {
private Coord coord;
private Sys sys;
private List&lt;WeatherItem&gt; weather;
private String base;
private Main main;
private Wind wind;
private Clouds clouds;
private long dt;
private long id;
private String name;
private int cod;

public Coord getCoord() {
return coord;
}

public void setCoord(Coord coord) {
this.coord = coord;
}

public Sys getSys() {
return sys;
}

public void setSys(Sys sys) {
this.sys = sys;
}

public List&lt;WeatherItem&gt; getWeather() {
return weather;
}

public void setWeather(List&lt;WeatherItem&gt; weather) {
this.weather = weather;
}

public String getBase() {
return base;
}

public void setBase(String base) {
this.base = base;
}

public Main getMain() {
return main;
}

public void setMain(Main main) {
this.main = main;
}

public Wind getWind() {
return wind;
}

public void setWind(Wind wind) {
this.wind = wind;
}

public Clouds getClouds() {
return clouds;
}

public void setClouds(Clouds clouds) {
this.clouds = clouds;
}

public long getDt() {
return dt;
}

public void setDt(long dt) {
this.dt = dt;
}

public long getId() {
return id;
}

public void setId(long id) {
this.id = id;
}

public String getName() {
return name;
}

public void setName(String name) {
this.name = name;
}

public int getCod() {
return cod;
}

public void setCod(int cod) {
this.cod = cod;
}
}

[/code]

– Như vậy ta đã có đủ mô hình lớp về kết quả dự báo thời tiết theo định dạng JSON.

– Bạn cần chú ý phải thêm thư viện cho dự án để đưa về Json thông qua GSon (Bạn xem lại thư viện ở các bài trước, ở bài này Tui không hướng dẫn nữa).

– Tiến hành viết thư viện đọc thời tiết bằng đa tiến trình, thư viên này được sử dụng và tái sử dụng cho các chức năng kiểm tra thời tiết theo tọa độ hay địa chỉ.

android64_11
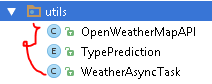
Chi tiết từng lớp như sau:

Enum TypePrediction:

[code language=”java”]

package com.tranduythanh.utils;

/**
* Created by drthanh on 11/05/2015.
*/
public enum TypePrediction {
ADDRESS_NAME,//nhập theo địa chỉ cụ thể
LATITUDE_LONGITUDE//nhập theo vĩ độ kinh độ
}

[/code]

enum này để chia ra 2 loại là xem thời tiết theo địa chỉ và theo tọa độ.

Lớp OpenWeatherMapAPI, lớp này dùng để đọc thông tin thời tiết (đưa Json về model java class thông qua GSon):

[code language=”java”]

package com.tranduythanh.utils;

import com.google.gson.Gson;
import com.tranduythanh.model.OpenWeatherJSon;

import java.io.IOException;
import java.io.InputStreamReader;
import java.net.MalformedURLException;
import java.net.URL;
import java.net.URLEncoder;

/**
* Created by drthanh on 03/04/2015.
*/
public class OpenWeatherMapAPI {
public static OpenWeatherJSon prediction(String q)
{
try {
String location= URLEncoder.encode(q, "UTF-8");

URL url = new URL("http://api.openweathermap.org/data/2.5/weather?q="+location);
InputStreamReader reader = new InputStreamReader(url.openStream(),"UTF-8");
OpenWeatherJSon results = new Gson().fromJson(reader, OpenWeatherJSon.class);

String idIcon = results.getWeather().get(0).getIcon().toString();
String urlIcon = "http://openweathermap.org/img/w/"+idIcon+".png";
URL urlImage = new URL(urlIcon);

return results;

} catch (MalformedURLException e) {
// TODO Auto-generated catch block
//e.printStackTrace();
} catch (IOException e) {
// TODO Auto-generated catch block
//e.printStackTrace();
}
return null;
}

/**
*
* http://api.openweathermap.org/data/2.5/weather?lat=10.778182&amp;lon=106.665504
* @param lat
* @param lon
* @return
*/
public static OpenWeatherJSon prediction(double lat,double lon)
{
try {

URL url = new URL("http://api.openweathermap.org/data/2.5/weather?lat="+lat+"&amp;lon="+lon);
InputStreamReader reader = new InputStreamReader(url.openStream(),"UTF-8");
OpenWeatherJSon results = new Gson().fromJson(reader, OpenWeatherJSon.class);

String idIcon = results.getWeather().get(0).getIcon().toString();
String urlIcon = "http://openweathermap.org/img/w/"+idIcon+".png";
URL urlImage = new URL(urlIcon);

return results;

} catch (MalformedURLException e) {
// TODO Auto-generated catch block
//e.printStackTrace();
} catch (IOException e) {
// TODO Auto-generated catch block
//e.printStackTrace();
}
return null;
}

/**
* Sửa lại WeatherJSON vì chưa phù hợp trong trường hợp Daily
* http://api.openweathermap.org/data/2.5/forecast/daily?lat=10.778182&amp;lon=106.66550&amp;cnt=10
* @param lat
* @param lon
* @param cnt
* @return
*/
public static OpenWeatherJSon predictionDaily(double lat,double lon,int cnt)
{
try {

URL url = new URL("http://api.openweathermap.org/data/2.5/forecast/daily?lat="+lat+"&amp;lon="+lon+"&amp;cnt="+cnt);
InputStreamReader reader = new InputStreamReader(url.openStream(),"UTF-8");
OpenWeatherJSon results = new Gson().fromJson(reader, OpenWeatherJSon.class);

String idIcon = results.getWeather().get(0).getIcon().toString();
String urlIcon = "http://openweathermap.org/img/w/"+idIcon+".png";
URL urlImage = new URL(urlIcon);

return results;

} catch (MalformedURLException e) {
// TODO Auto-generated catch block
//e.printStackTrace();
} catch (IOException e) {
// TODO Auto-generated catch block
//e.printStackTrace();
}
return null;
}

/**
* Sửa lại WeatherJSON vì chưa phù hợp trong trường hợp Daily
* http://api.openweathermap.org/data/2.5/forecast/daily?q=Đà lạt&amp;cnt=10
* @param q
* @param cnt
* @return
*/
public static OpenWeatherJSon predictionDaily(String q,int cnt)
{
try {
String location= URLEncoder.encode(q, "UTF-8");
URL url = new URL("http://api.openweathermap.org/data/2.5/forecast/daily?q="+location+"&amp;cnt="+cnt);
InputStreamReader reader = new InputStreamReader(url.openStream(),"UTF-8");
OpenWeatherJSon results = new Gson().fromJson(reader, OpenWeatherJSon.class);

String idIcon = results.getWeather().get(0).getIcon().toString();
String urlIcon = "http://openweathermap.org/img/w/"+idIcon+".png";
URL urlImage = new URL(urlIcon);

return results;

} catch (MalformedURLException e) {
// TODO Auto-generated catch block
//e.printStackTrace();
} catch (IOException e) {
// TODO Auto-generated catch block
//e.printStackTrace();
}
return null;
}
}

[/code]

– Lớp WeatherAsyncTask, để thực hiện đa tiến trình truy vấn thời tiết, hiển thị lên giao diện. Lớp này được sử dụng chung cho cả theo Địa chỉ hay theo tọa độ.

[code language=”java”]

package com.tranduythanh.utils;

import android.app.Activity;
import android.app.ProgressDialog;
import android.graphics.Bitmap;
import android.graphics.BitmapFactory;
import android.location.Address;
import android.location.Geocoder;
import android.os.AsyncTask;
import android.view.View;
import android.widget.ImageView;
import android.widget.TextView;

import com.google.android.gms.maps.GoogleMap;
import com.google.android.gms.maps.model.Marker;
import com.gtranslate.Language;
import com.gtranslate.Translator;
import com.tranduythanh.model.OpenWeatherJSon;
import com.tranduythanh.weatherprediction.MyInfoWindowAdapter;
import com.tranduythanh.weatherprediction.R;

import java.io.IOException;
import java.io.InputStream;
import java.net.HttpURLConnection;
import java.net.URL;
import java.text.DecimalFormat;
import java.text.NumberFormat;
import java.util.Date;
import java.util.List;
import java.util.Locale;

/**
* Created by drthanh on 11/05/2015.
*/
public class WeatherAsyncTask extends AsyncTask&lt;Void,Void,OpenWeatherJSon&gt;{
ProgressDialog dialog;
Activity activity;
TypePrediction typePrediction;
String q;
double latitude;
double longitude;
NumberFormat format = new DecimalFormat("#0.0");
Bitmap myBitmap=null;

Marker marker=null;
GoogleMap map=null;

/**
* Constructor dùng để lấy thời tiết theo địa chỉ bất kỳ
* @param activity
* @param q
*/
public WeatherAsyncTask(Activity activity,String q)
{
this.activity=activity;
this.typePrediction=TypePrediction.ADDRESS_NAME;
this.q=q;
this.dialog=new ProgressDialog(activity);
this.dialog.setTitle("Đang tải thông tin …");
this.dialog.setMessage("Vui lòng chờ…");
this.dialog.setCancelable(true);
}

/**
* constructor cho phép lấy thông tin thời tiết theo tọa độ bất kỳ
* @param activity
* @param latitude
* @param longitude
*/
public WeatherAsyncTask(Activity activity,double latitude,double longitude)
{
this.activity=activity;
this.typePrediction=TypePrediction.LATITUDE_LONGITUDE;
this.latitude=latitude;
this.longitude=longitude;
this.dialog=new ProgressDialog(activity);
this.dialog.setTitle("Đang tải thông tin …");
this.dialog.setMessage("Vui lòng chờ…");
this.dialog.setCancelable(true);
}

/**
* constructor cho lấy thông tin thời tiết theo tọa độ bất kỳ trên bản đồ
* @param marker
* @param map
* @param activity
* @param latitude
* @param longitude
*/
public WeatherAsyncTask(Marker marker,GoogleMap map,Activity activity,double latitude,double longitude)
{
this(activity,latitude,longitude);
this.marker=marker;
this.map=map;
}
@Override
protected void onPreExecute() {
super.onPreExecute();
this.dialog.show();
}

@Override
protected OpenWeatherJSon doInBackground(Void… params) {
OpenWeatherJSon openWeatherJSon=null;
if(typePrediction== TypePrediction.LATITUDE_LONGITUDE)
openWeatherJSon= OpenWeatherMapAPI.prediction(latitude,longitude);
else
openWeatherJSon= OpenWeatherMapAPI.prediction(q);
try {
String idIcon = openWeatherJSon.getWeather().get(0).getIcon().toString();
String urlIcon = "http://openweathermap.org/img/w/"+idIcon+".png";
//Tiến hành tạo đối tượng URL
URL urlConnection = new URL(urlIcon);
//Mở kết nối
HttpURLConnection connection = (HttpURLConnection) urlConnection
.openConnection();
connection.setDoInput(true);
connection.connect();
//Đọc dữ liệu
InputStream input = connection.getInputStream();
//Tiến hành convert qua hình ảnh
myBitmap = BitmapFactory.decodeStream(input);
} catch (Exception e) {
e.printStackTrace();
}
return openWeatherJSon;
}

@Override
protected void onProgressUpdate(Void… values) {
super.onProgressUpdate(values);
}

@Override
protected void onPostExecute(OpenWeatherJSon openWeatherJSon) {
super.onPostExecute(openWeatherJSon);
if(map!=null) {
map.setInfoWindowAdapter(new MyInfoWindowAdapter(openWeatherJSon,myBitmap,marker, this.activity,latitude,longitude));
marker.showInfoWindow();
this.dialog.dismiss();
return;
}
TextView txtTemperature=(TextView) activity.findViewById(R.id.txtTemperature);
TextView txtCurrentAddressName=(TextView) activity.findViewById(R.id.txtCurrentAddressName);
ImageView imageView=(ImageView) activity.findViewById(R.id.imgBauTroi);
TextView txtMaxtemp=(TextView) activity.findViewById(R.id.txtMaxTemp);
TextView txtMinTemp=(TextView) activity.findViewById(R.id.txtMinTemp);
TextView txtWind=(TextView) activity.findViewById(R.id.txtWind);
TextView txtCloudliness= (TextView) activity.findViewById(R.id.txtCloudliness);
TextView txtPressure= (TextView) activity.findViewById(R.id.txtPressure);
TextView txtHumidty= (TextView) activity.findViewById(R.id.txtHumidty);
TextView txtSunrise= (TextView) activity.findViewById(R.id.txtSunrise);
TextView txtSunset= (TextView) activity.findViewById(R.id.txtSunset);
double temperature=openWeatherJSon.getMain().getTemp()-273.15;
String maxtemp= format.format(openWeatherJSon.getMain().getTemp_max()-273.15)+"°C";
String mintemp= format.format(openWeatherJSon.getMain().getTemp_min()-273.15)+"°C";
String wind= openWeatherJSon.getWind().getSpeed()+" m/s";
String mesg = openWeatherJSon.getWeather().get(0).getMain();
//  Translator translate = Translator.getInstance();
// String cloudiness=mesg+" ("+translate.translate(mesg, Language.ENGLISH, Language.VIETNAMESE)+")";
String cloudiness=mesg;
String pressure= openWeatherJSon.getMain().getPressure()+" hpa";
String humidity=openWeatherJSon.getMain().getHumidity()+" %";

Date timeSunrise = new Date(openWeatherJSon.getSys().getSunrise()*1000);
String Sunrise= timeSunrise.getHours()+":"+timeSunrise.getMinutes()+" AM";
Date timeSunSet = new Date(openWeatherJSon.getSys().getSunset()*1000);
String sunset= timeSunSet.getHours()+":"+timeSunSet.getMinutes();
txtTemperature.setText(format.format(temperature)+"°C");
imageView.setImageBitmap(myBitmap);
txtMaxtemp.setText(maxtemp);
txtMinTemp.setText(mintemp);
txtWind.setText(wind);
txtCloudliness.setText(cloudiness);
txtPressure.setText(pressure);
txtHumidty.setText(humidity);
txtSunrise.setText(Sunrise);
txtSunset.setText(sunset);

try {
Geocoder geocoder;
List&lt;Address&gt; addresses;
geocoder = new Geocoder(this.activity, Locale.getDefault());
if(typePrediction==TypePrediction.LATITUDE_LONGITUDE)
addresses = geocoder.getFromLocation(latitude, longitude, 1); // Here 1 represent max location result to returned, by documents it recommended 1 to 5
else
{
addresses = geocoder.getFromLocationName(q, 1);
}
Address address=null;
if(addresses.size()&gt;0)
address=addresses.get(0);
if(address!=null)
{
if(typePrediction==TypePrediction.LATITUDE_LONGITUDE)
txtCurrentAddressName.setText(address.getAddressLine(0));
else
txtCurrentAddressName.setText(q);
/*String city = address.getLocality();
String state = address.getAdminArea();
String country = address.getCountryName();
String postalCode = address.getPostalCode();
String knownName = address.getFeatureName();*/
}

} catch (IOException e) {
e.printStackTrace();
}
this.dialog.dismiss();
}
}

[/code]

–  Sau đó ta tiến hành thiết kế các màn hình về viết code cho từng màn hình.

android64_12-Ở trên 3 Activity đều sử dụng 1 màn hình (vì cho dù tìm theo kiểu nào đi nữa thì thông tin thời tiết cũng đầy đủ thông số giống nhau).

– Ta đi vào từng màn hình, trước tiên là màn hình MainActivity:

Activity_main.xml:

android64_13

[code language=”xml”]

&lt;LinearLayout xmlns:android="http://schemas.android.com/apk/res/android"
xmlns:tools="http://schemas.android.com/tools"
android:layout_width="match_parent"
android:layout_height="match_parent"
android:orientation="vertical"
tools:context=".MainActivity"&gt;

&lt;ImageView
android:layout_width="wrap_content"
android:layout_height="100dp"
android:id="@+id/imageView"
android:src="@drawable/weatherforecast"
android:layout_gravity="center_horizontal" /&gt;

&lt;TableLayout
android:layout_width="match_parent"
android:layout_height="match_parent"
android:stretchColumns="1"
&gt;
&lt;TableRow
android:layout_width="fill_parent"
android:layout_height="fill_parent"&gt;

&lt;TextView
android:layout_span="2"
android:layout_width="wrap_content"
android:layout_height="2dp"
android:text=""
android:id="@+id/textView10"
android:background="#004040" /&gt;
&lt;/TableRow&gt;
&lt;TableRow
android:onClick="showCurrentWeatherClick"
android:layout_width="fill_parent"
android:layout_height="fill_parent"&gt;

&lt;ImageButton
android:onClick="showCurrentWeatherClick"
android:layout_width="wrap_content"
android:layout_height="wrap_content"
android:id="@+id/imageButton"
android:src="@drawable/weathercurrent" /&gt;

&lt;TextView
android:layout_width="wrap_content"
android:layout_height="wrap_content"
android:id="@+id/textView"
android:text="Thời tiết địa điểm hiện tại của \nthiết bị "
android:textAlignment="center"
android:layout_gravity="center_vertical" /&gt;
&lt;/TableRow&gt;
&lt;TableRow
android:layout_width="fill_parent"
android:layout_height="fill_parent"&gt;

&lt;TextView
android:layout_span="2"
android:layout_width="match_parent"
android:layout_height="2dp"
android:text=""
android:id="@+id/textView5"
android:background="#004040" /&gt;
&lt;/TableRow&gt;
&lt;TableRow
android:onClick="showWeatherByAddressClick"
android:layout_width="fill_parent"
android:layout_height="fill_parent"&gt;

&lt;ImageButton
android:onClick="showWeatherByAddressClick"
android:layout_width="wrap_content"
android:layout_height="wrap_content"
android:id="@+id/imageButton2"
android:src="@drawable/weatheranywhere" /&gt;

&lt;TextView
android:layout_width="match_parent"
android:layout_height="wrap_content"
android:id="@+id/textView2"
android:layout_gravity="center_vertical"
android:gravity="fill_vertical"
android:text="Xem thời tiết theo \nđịa điểm nhập bất kỳ " /&gt;

&lt;/TableRow&gt;
&lt;TableRow
android:layout_width="fill_parent"
android:layout_height="fill_parent"&gt;

&lt;TextView
android:layout_span="2"
android:layout_width="match_parent"
android:layout_height="2dp"
android:text=""
android:id="@+id/textView6"
android:background="#004040" /&gt;
&lt;/TableRow&gt;
&lt;TableRow
android:layout_width="fill_parent"
android:layout_height="fill_parent"&gt;

&lt;ImageButton
android:layout_width="wrap_content"
android:layout_height="wrap_content"
android:id="@+id/imageButton3"
android:src="@drawable/weatherpredict" /&gt;

&lt;TextView
android:layout_width="match_parent"
android:layout_height="wrap_content"
android:id="@+id/textView3"
android:layout_gravity="center_vertical"
android:gravity="fill_vertical"
android:text="Xem thời tiết theo địa điểm \nnhập bất kỳ và dự báo các \nngày kế tiếp " /&gt;
&lt;/TableRow&gt;
&lt;TableRow
android:layout_width="fill_parent"
android:layout_height="fill_parent"&gt;

&lt;TextView
android:layout_span="2"
android:layout_width="match_parent"
android:layout_height="2dp"
android:text=""
android:id="@+id/textView7"
android:background="#004040" /&gt;
&lt;/TableRow&gt;
&lt;TableRow
android:layout_width="fill_parent"
android:onClick="showMapClick"
android:layout_height="fill_parent"&gt;

&lt;ImageButton
android:layout_width="wrap_content"
android:layout_height="wrap_content"
android:onClick="showMapClick"
android:id="@+id/imageButton4"
android:src="@drawable/weathermap" /&gt;

&lt;TextView
android:layout_width="match_parent"
android:layout_height="wrap_content"
android:id="@+id/textView4"
android:ellipsize="middle"
android:layout_gravity="center_vertical"
android:text="Xem thời tiết trên Google Map " /&gt;
&lt;/TableRow&gt;
&lt;TableRow
android:layout_width="fill_parent"
android:layout_height="fill_parent"&gt;

&lt;TextView
android:layout_span="2"
android:layout_width="match_parent"
android:layout_height="2dp"
android:text=""
android:id="@+id/textView8"
android:background="#004040" /&gt;
&lt;/TableRow&gt;

&lt;/TableLayout&gt;

&lt;/LinearLayout&gt;

[/code]

– Source code MainActivity:

[code language=”java”]

package com.tranduythanh.weatherprediction;

import android.content.Context;
import android.content.Intent;
import android.net.ConnectivityManager;
import android.net.NetworkInfo;
import android.support.v7.app.ActionBarActivity;
import android.os.Bundle;
import android.view.Menu;
import android.view.MenuItem;
import android.view.View;
import android.widget.Toast;

public class MainActivity extends ActionBarActivity {

@Override
protected void onCreate(Bundle savedInstanceState) {
super.onCreate(savedInstanceState);
setContentView(R.layout.activity_main);
}

/**
* sự kiện mở màn hình xem thời tiết trên bản đồ
* @param v
*/
public void showMapClick(View v)
{
if(!isNetworkConnected())
{
Toast.makeText(MainActivity.this,"Bạn cần mở kết nối internet",Toast.LENGTH_LONG).show();
return;
}
Intent iMap=new Intent(MainActivity.this,WeatherMapsActivity.class) ;
startActivity(iMap);
}

/**
* sự kiện xem thời tiết tại vị trí hiện tại
* @param v
*/
public void showCurrentWeatherClick(View v)
{
if(!isNetworkConnected())
{
Toast.makeText(MainActivity.this,"Bạn cần mở kết nối internet",Toast.LENGTH_LONG).show();
return;
}
Intent iCurrent=new Intent(MainActivity.this,WeatherCurrentLocationActivity.class) ;
startActivity(iCurrent);
}

/**
* sự kiện dùng để xem thời tiết theo địa chỉ nhập bất kỳ
* @param v
*/
public void showWeatherByAddressClick(View v)
{
if(!isNetworkConnected())
{
Toast.makeText(MainActivity.this,"Bạn cần mở kết nối internet",Toast.LENGTH_LONG).show();
return;
}
Intent iaddress=new Intent(MainActivity.this,ChooseAddressActivity.class) ;
startActivity(iaddress);
}

@Override
public boolean onCreateOptionsMenu(Menu menu) {
// Inflate the menu; this adds items to the action bar if it is present.
getMenuInflater().inflate(R.menu.menu_main, menu);
return true;
}

@Override
public boolean onOptionsItemSelected(MenuItem item) {
// Handle action bar item clicks here. The action bar will
// automatically handle clicks on the Home/Up button, so long
// as you specify a parent activity in AndroidManifest.xml.
int id = item.getItemId();

//noinspection SimplifiableIfStatement
if (id == R.id.action_settings) {
return true;
}

return super.onOptionsItemSelected(item);
}

/**
* hàm dùng để kiểm tra xem điện thoại đang kết nối internet hay không
* @return
*/
private boolean isNetworkConnected() {
ConnectivityManager cm = (ConnectivityManager) getSystemService(Context.CONNECTIVITY_SERVICE);
NetworkInfo ni = cm.getActiveNetworkInfo();
if (ni == null) {
// There are no active networks.
return false;
} else
return true;
}
}

[/code]

– Tiếp tục xử lý cho màn hình xem thời tiết tại địa điểm hiện tại của thiết bị, đó là

WeatherCurrentLocationActivity, chú ý là cả 3 trường hợp hiển thị chi tiết thời tiết đều sử dụng chung layout “activity_weather_current_location.xml“:

android64_14nội dung XML của màn hình hiển thị chi tiết :

[code language=”xml”]

&lt;LinearLayout xmlns:android="http://schemas.android.com/apk/res/android"
xmlns:tools="http://schemas.android.com/tools" android:layout_width="match_parent"
android:layout_height="match_parent" android:paddingLeft="@dimen/activity_horizontal_margin"
android:paddingRight="@dimen/activity_horizontal_margin"
android:paddingTop="@dimen/activity_vertical_margin"
android:paddingBottom="@dimen/activity_vertical_margin"
android:orientation="vertical"
tools:context="com.tranduythanh.weatherprediction.WeatherCurrentLocationActivity"&gt;

&lt;TextView
android:layout_width="wrap_content"
android:layout_height="wrap_content"
android:textAppearance="?android:attr/textAppearanceLarge"
android:text="Địa chỉ:"
android:id="@+id/textView11" /&gt;

&lt;TextView
android:layout_width="match_parent"
android:layout_height="wrap_content"
android:textAppearance="?android:attr/textAppearanceLarge"
android:id="@+id/txtCurrentAddressName"
android:hint="Địa chỉ hiện tại"
android:gravity="center"
android:textColor="#ff1919ff" /&gt;

&lt;TextView
android:layout_width="match_parent"
android:layout_height="wrap_content"
android:id="@+id/textView12"
android:background="#ff06ff22"
android:height="1dp" /&gt;

&lt;TextView
android:layout_width="wrap_content"
android:layout_height="wrap_content"
android:textAppearance="?android:attr/textAppearanceLarge"
android:text="Nhiệt độ:"
android:id="@+id/textView9" /&gt;

&lt;TextView
android:layout_width="match_parent"
android:layout_height="wrap_content"
android:textAppearance="?android:attr/textAppearanceLarge"
android:id="@+id/txtTemperature"
android:hint="nhiệt độ ở đây"
android:gravity="center"
android:textColor="#ffff2d34" /&gt;

&lt;TextView
android:layout_width="wrap_content"
android:layout_height="wrap_content"
android:textAppearance="?android:attr/textAppearanceLarge"
android:text="Bầu trời:"
android:id="@+id/textView15" /&gt;

&lt;ImageView
android:layout_width="50dp"
android:layout_height="50dp"
android:id="@+id/imgBauTroi"
android:layout_gravity="center" /&gt;

&lt;TextView
android:layout_width="match_parent"
android:layout_height="wrap_content"
android:id="@+id/textView16"
android:background="#ff06ff22"
android:height="1dp" /&gt;

&lt;TextView
android:layout_width="wrap_content"
android:layout_height="wrap_content"
android:text="Chi tiết"
android:id="@+id/textView17"
android:layout_gravity="center" /&gt;

&lt;ScrollView
android:layout_width="wrap_content"
android:layout_height="wrap_content"
android:id="@+id/scrollView" &gt;

&lt;TableLayout
android:layout_width="match_parent"
android:layout_height="wrap_content"
android:layout_gravity="center_horizontal" &gt;

&lt;TableRow
android:layout_width="fill_parent"
android:layout_height="fill_parent" &gt;

&lt;TextView
android:layout_width="wrap_content"
android:layout_height="wrap_content"
android:textAppearance="?android:attr/textAppearanceSmall"
android:text="Max Temp:"
android:id="@+id/textView18" /&gt;

&lt;TextView
android:layout_width="wrap_content"
android:layout_height="wrap_content"
android:textAppearance="?android:attr/textAppearanceLarge"
android:id="@+id/txtMaxTemp"
android:hint="Nhiệt độ lớn nhất ở đây" /&gt;
&lt;/TableRow&gt;

&lt;TableRow
android:layout_width="fill_parent"
android:layout_height="fill_parent" &gt;

&lt;TextView
android:layout_width="wrap_content"
android:layout_height="wrap_content"
android:textAppearance="?android:attr/textAppearanceSmall"
android:text="Min Temp:"
android:id="@+id/textView20" /&gt;

&lt;TextView
android:layout_width="wrap_content"
android:layout_height="wrap_content"
android:textAppearance="?android:attr/textAppearanceLarge"
android:id="@+id/txtMinTemp"
android:hint="Nhiệt độ nhỏ nhất ở đây" /&gt;
&lt;/TableRow&gt;

&lt;TableRow
android:layout_width="fill_parent"
android:layout_height="fill_parent" &gt;

&lt;TextView
android:layout_width="wrap_content"
android:layout_height="wrap_content"
android:textAppearance="?android:attr/textAppearanceSmall"
android:text="Wind:"
android:id="@+id/textView21" /&gt;

&lt;TextView
android:layout_width="wrap_content"
android:layout_height="wrap_content"
android:textAppearance="?android:attr/textAppearanceLarge"
android:id="@+id/txtWind"
android:hint="Tố độ gió ở đây" /&gt;
&lt;/TableRow&gt;

&lt;TableRow
android:layout_width="fill_parent"
android:layout_height="fill_parent" &gt;

&lt;TextView
android:layout_width="wrap_content"
android:layout_height="wrap_content"
android:textAppearance="?android:attr/textAppearanceSmall"
android:text="Cloudiness:"
android:id="@+id/textView22" /&gt;

&lt;TextView
android:layout_width="wrap_content"
android:layout_height="wrap_content"
android:textAppearance="?android:attr/textAppearanceLarge"
android:id="@+id/txtCloudliness"
android:hint="Hướng mây" /&gt;
&lt;/TableRow&gt;

&lt;TableRow
android:layout_width="fill_parent"
android:layout_height="fill_parent" &gt;

&lt;TextView
android:layout_width="wrap_content"
android:layout_height="wrap_content"
android:textAppearance="?android:attr/textAppearanceSmall"
android:text="Pressure:"
android:id="@+id/textView23" /&gt;

&lt;TextView
android:layout_width="wrap_content"
android:layout_height="wrap_content"
android:textAppearance="?android:attr/textAppearanceLarge"
android:id="@+id/txtPressure"
android:hint="Áp suất ở đây" /&gt;
&lt;/TableRow&gt;

&lt;TableRow
android:layout_width="fill_parent"
android:layout_height="fill_parent" &gt;

&lt;TextView
android:layout_width="wrap_content"
android:layout_height="wrap_content"
android:textAppearance="?android:attr/textAppearanceSmall"
android:text="Humidity:"
android:id="@+id/textView24" /&gt;

&lt;TextView
android:layout_width="wrap_content"
android:layout_height="wrap_content"
android:textAppearance="?android:attr/textAppearanceLarge"
android:id="@+id/txtHumidty"
android:hint="độ ẩm ở đây" /&gt;
&lt;/TableRow&gt;

&lt;TableRow
android:layout_width="fill_parent"
android:layout_height="fill_parent" &gt;

&lt;TextView
android:layout_width="wrap_content"
android:layout_height="wrap_content"
android:textAppearance="?android:attr/textAppearanceSmall"
android:text="Sunrise:"
android:id="@+id/textView25" /&gt;

&lt;TextView
android:layout_width="wrap_content"
android:layout_height="wrap_content"
android:textAppearance="?android:attr/textAppearanceLarge"
android:id="@+id/txtSunrise"
android:hint="Mặt trời mọc" /&gt;
&lt;/TableRow&gt;

&lt;TableRow
android:layout_width="fill_parent"
android:layout_height="fill_parent" &gt;

&lt;TextView
android:layout_width="wrap_content"
android:layout_height="wrap_content"
android:textAppearance="?android:attr/textAppearanceSmall"
android:text="Sunset:"
android:id="@+id/textView26" /&gt;

&lt;TextView
android:layout_width="wrap_content"
android:layout_height="wrap_content"
android:textAppearance="?android:attr/textAppearanceLarge"
android:id="@+id/txtSunset"
android:hint="Mặt trời mọc" /&gt;
&lt;/TableRow&gt;
&lt;/TableLayout&gt;
&lt;/ScrollView&gt;

&lt;/LinearLayout&gt;

[/code]

– source code WeatherCurrentLocationActivity(xử lý xem chi tiết thời tiết tại vị trí hiện tại của thiết bị):

[code language=”java”]

package com.tranduythanh.weatherprediction;

import android.location.Criteria;
import android.location.Location;
import android.location.LocationManager;
import android.support.v7.app.ActionBarActivity;
import android.os.Bundle;
import android.view.Menu;
import android.view.MenuItem;

import com.google.android.gms.maps.CameraUpdateFactory;
import com.google.android.gms.maps.model.BitmapDescriptorFactory;
import com.google.android.gms.maps.model.CameraPosition;
import com.google.android.gms.maps.model.LatLng;
import com.google.android.gms.maps.model.Marker;
import com.google.android.gms.maps.model.MarkerOptions;
import com.tranduythanh.utils.WeatherAsyncTask;

import java.text.DecimalFormat;
import java.text.NumberFormat;

public class WeatherCurrentLocationActivity extends ActionBarActivity {
NumberFormat format = new DecimalFormat("#0.0");
@Override
protected void onCreate(Bundle savedInstanceState) {
super.onCreate(savedInstanceState);
setContentView(R.layout.activity_weather_current_location);

}

@Override
protected void onResume() {
super.onResume();
getCurrentLocation();
}

/**
* source code lấy địa điểm hiện tại của thiết bị
* chú ý nhớ cấp quyền trong Manifest để cho phép truy suất
*/
private void getCurrentLocation() {

LocationManager locationManager = (LocationManager) getSystemService(LOCATION_SERVICE);
Criteria criteria = new Criteria();

Location lastLocation = locationManager.getLastKnownLocation(locationManager.getBestProvider(criteria, false));
if (lastLocation != null)
{
//ta lấy được thì truyền vĩ độ, kinh độ để xem thời tiết
WeatherAsyncTask task=new WeatherAsyncTask(this,lastLocation.getLatitude(),lastLocation.getLongitude());
task.execute();
}
}
@Override
public boolean onCreateOptionsMenu(Menu menu) {
// Inflate the menu; this adds items to the action bar if it is present.
getMenuInflater().inflate(R.menu.menu_weather_current_location, menu);
return true;
}

@Override
public boolean onOptionsItemSelected(MenuItem item) {
// Handle action bar item clicks here. The action bar will
// automatically handle clicks on the Home/Up button, so long
// as you specify a parent activity in AndroidManifest.xml.
int id = item.getItemId();

//noinspection SimplifiableIfStatement
if (id == R.id.action_settings) {
return true;
}

return super.onOptionsItemSelected(item);
}
}

[/code]

-Ta qua màn hình xem thời tiết tại một địa chỉ bất kỳ:

android64_15Như vậy chức năng này cũng sử dụng chung màn hình hiển thị chi tiết thời tiết, và ta cần cung cấp màn hình chọn tỉnh thành Việt Nam có sẵn hoặc trong ô nhập địa chỉ cho phép người sử dụng nhập bất kỳ địa điểm nào đó trên thế giới. Bấm nút Xem thời tiết hệ thống sẽ xuất hiện kết quả như hình số 3 ở trên (bạn thấy đó ở sài gòn bây giờ là 27.9 độ C quá là mát mẻ… vì Tui chụp hình này lúc 10h đêm, chứng tỏ phần mềm này nó thông minh, nó biết ban đêm thường là mát hơn ban ngày ).

– Ta xem layout của màn hình chọn địa chỉ (activity_choose_address.xml):

[code language=”xml”]

&lt;LinearLayout xmlns:android="http://schemas.android.com/apk/res/android"
xmlns:tools="http://schemas.android.com/tools" android:layout_width="match_parent"
android:layout_height="match_parent" android:paddingLeft="@dimen/activity_horizontal_margin"
android:paddingRight="@dimen/activity_horizontal_margin"
android:paddingTop="@dimen/activity_vertical_margin"
android:paddingBottom="@dimen/activity_vertical_margin"
android:orientation="vertical"
tools:context="com.tranduythanh.weatherprediction.ChooseAddressActivity"&gt;

&lt;TextView
android:layout_width="wrap_content"
android:layout_height="wrap_content"
android:text="Nhập địa chỉ:"
android:id="@+id/textView13" /&gt;

&lt;AutoCompleteTextView
android:layout_width="match_parent"
android:layout_height="wrap_content"
android:id="@+id/txtAddressCheck"
android:completionThreshold="1"
android:hint="Địa chỉ kiểm tra ở đây" /&gt;

&lt;Button
android:layout_width="wrap_content"
android:layout_height="wrap_content"
android:text="Xem thời tiết"
android:id="@+id/btnCheckWeather"
android:layout_gravity="center_horizontal" /&gt;

&lt;TextView
android:layout_width="match_parent"
android:layout_height="wrap_content"
android:text="Chọn theo tỉnh thành có sẵn"
android:id="@+id/textView14"
android:layout_gravity="center_horizontal" /&gt;

&lt;ListView
android:layout_width="match_parent"
android:layout_height="match_parent"
android:id="@+id/lvTinhThanh"
android:layout_gravity="center_horizontal" /&gt;
&lt;/LinearLayout&gt;

[/code]

Source xử lý cho màn hình này như sau (ChooseAddressActivity):

[code language=”java”]

package com.tranduythanh.weatherprediction;

import android.content.Intent;
import android.support.v7.app.ActionBarActivity;
import android.os.Bundle;
import android.text.Editable;
import android.text.TextWatcher;
import android.view.Menu;
import android.view.MenuItem;
import android.view.View;
import android.widget.AdapterView;
import android.widget.ArrayAdapter;
import android.widget.AutoCompleteTextView;
import android.widget.Button;
import android.widget.ListView;

public class ChooseAddressActivity extends ActionBarActivity {

AutoCompleteTextView txtAddress;
ListView lvTinhThanh;
String []arrTinhThanh;
ArrayAdapter&lt;String&gt;adapterTinhThanh;

Button  btnCheckWeather;

@Override
protected void onCreate(Bundle savedInstanceState) {
super.onCreate(savedInstanceState);
setContentView(R.layout.activity_choose_address);
addControls();
addEvents();
}
public void  addControls()
{
txtAddress=(AutoCompleteTextView)findViewById(R.id.txtAddressCheck);
lvTinhThanh= (ListView) findViewById(R.id.lvTinhThanh);
arrTinhThanh=getResources().getStringArray(R.array.arrTinhThanh);
adapterTinhThanh=new ArrayAdapter&lt;String&gt;(this,android.R.layout.simple_list_item_1,arrTinhThanh);
lvTinhThanh.setAdapter(adapterTinhThanh);
btnCheckWeather= (Button) findViewById(R.id.btnCheckWeather);
txtAddress.setAdapter(adapterTinhThanh);
}
public  void addEvents()
{
txtAddress.addTextChangedListener(new TextWatcher() {
@Override
public void beforeTextChanged(CharSequence s, int start, int count, int after) {
adapterTinhThanh.getFilter().filter(s);
}

@Override
public void onTextChanged(CharSequence s, int start, int before, int count) {

}

@Override
public void afterTextChanged(Editable s) {

}
});
btnCheckWeather.setOnClickListener(new View.OnClickListener() {
@Override
public void onClick(View v) {
//mở màn hình xem thời tiết theo địa chỉ nhập bất kỳ
Intent intent=new Intent(ChooseAddressActivity.this,WeatherByAddressActivity.class);
//truyền địa chỉ qua bên kia để xử lý
intent.putExtra("ADDRESS",txtAddress.getText()+"");
startActivity(intent);
}
});
lvTinhThanh.setOnItemClickListener(new AdapterView.OnItemClickListener() {
@Override
public void onItemClick(AdapterView&lt;?&gt; parent, View view, int position, long id) {
txtAddress.setText(arrTinhThanh[position]);
}
});
}
@Override
public boolean onCreateOptionsMenu(Menu menu) {
// Inflate the menu; this adds items to the action bar if it is present.
getMenuInflater().inflate(R.menu.menu_weather_by_address, menu);
return true;
}

@Override
public boolean onOptionsItemSelected(MenuItem item) {
// Handle action bar item clicks here. The action bar will
// automatically handle clicks on the Home/Up button, so long
// as you specify a parent activity in AndroidManifest.xml.
int id = item.getItemId();

//noinspection SimplifiableIfStatement
if (id == R.id.action_settings) {
return true;
}

return super.onOptionsItemSelected(item);
}
}

[/code]

– sau khi bấm vào nút xem thời tiết, hệ thống sẽ mở màn hình (WeatherByAddressActivity), chú ý màn hình này như đã nói ở trên là sử dụng chung layout với chức năng xem thời tiết tại vị trí hiện tại của máy.

source code của lớp WeatherByAddressActivity như sau:

[code language=”java”]

package com.tranduythanh.weatherprediction;

import android.content.Intent;
import android.location.Criteria;
import android.location.Location;
import android.location.LocationManager;
import android.support.v7.app.ActionBarActivity;
import android.os.Bundle;
import android.view.Menu;
import android.view.MenuItem;

import com.tranduythanh.utils.WeatherAsyncTask;

public class WeatherByAddressActivity extends ActionBarActivity {

@Override
protected void onCreate(Bundle savedInstanceState) {
super.onCreate(savedInstanceState);
setContentView(R.layout.activity_weather_current_location);

}

@Override
protected void onResume() {
super.onResume();
getWeatherByAddress();
}

/**
* hàm gọi đa tiến trình truy suất thời tiết theo địa chỉ
*/
private void getWeatherByAddress() {
Intent i=getIntent();
//lấy địa chỉ từ bên ChooseAddressActivity gửi qua:
String q=i.getStringExtra("ADDRESS");
WeatherAsyncTask task=new WeatherAsyncTask(this,q);
task.execute();
}

@Override
public boolean onCreateOptionsMenu(Menu menu) {
// Inflate the menu; this adds items to the action bar if it is present.
getMenuInflater().inflate(R.menu.menu_weather_by_address, menu);
return true;
}

@Override
public boolean onOptionsItemSelected(MenuItem item) {
// Handle action bar item clicks here. The action bar will
// automatically handle clicks on the Home/Up button, so long
// as you specify a parent activity in AndroidManifest.xml.
int id = item.getItemId();

//noinspection SimplifiableIfStatement
if (id == R.id.action_settings) {
return true;
}

return super.onOptionsItemSelected(item);
}
}

[/code]

-Chức năng cuối cùng Tui muốn hướng dẫn là xem thời tiết tại vị trí bất kỳ trên bản đồ (lần đầu tiên mở lên thì hệ thống sẽ hiển thị thời tiết tại vị trí hiện tại của thiết bị lên bản đồ, sau đó người sử dụng muốn xem nơi khác thì chỉ cần nhấn vào vị trí trên bản đồ, chức năng này rất tiện lợi):

android64_16– Chức năng này ta cần xử lý coding hơi phức tạp chút xíu, cần phải xử lý custom InfoWindowAdapter cho việc hiển thị giao diện khác nên bản đồ cũng như xác định vị trí mà người sử dụng chọn bất kỳ trên bản đồ rồi di chuyển và hiển thị chi tiết thời tiết tại địa chỉ mới này.

– Bạn chú ý để hiển thị Map trong Android Studio thì nó đơn giản hơn rất nhiều so với Eclipse vì Android Studio đã hỗ trợ rất tốt chức năng này.

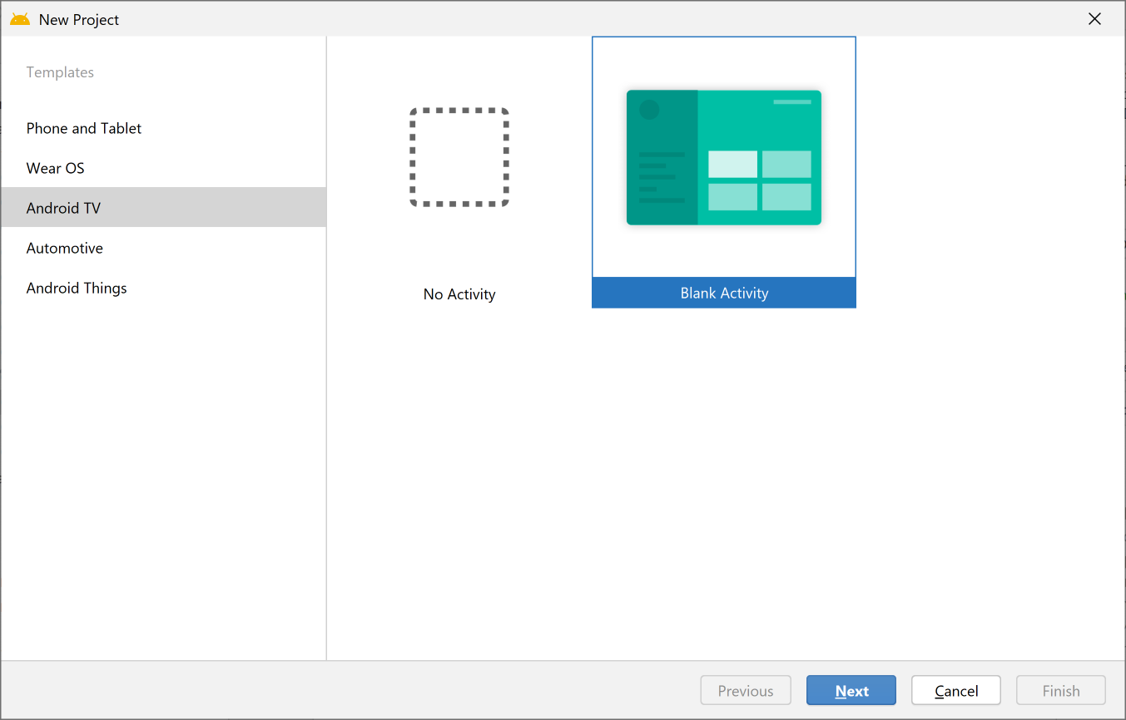
– Ta cần tạo Google Map Activity tên là WeatherMapsActivity như sau:

– Bấm chuột phải vào Package/ chọn New/ chọn Google/ chọn Google Maps Activity:

android64_17
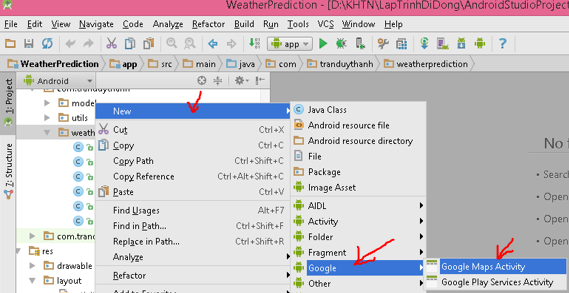
– Sau đó màn hình tạo activity hiển thị lên, bạn đặt tên là WeatherMapsActivity hệ thống sẽ tạo ra layout tương thích để hiển thị Map (activity_weather_maps.xml):

[code language=”xml”]

&lt;fragment xmlns:android="http://schemas.android.com/apk/res/android"
xmlns:tools="http://schemas.android.com/tools" android:layout_width="match_parent"
android:layout_height="match_parent" android:id="@+id/map"
tools:context="com.tranduythanh.weatherprediction.WeatherMapsActivity"
android:name="com.google.android.gms.maps.SupportMapFragment" /&gt;

[/code]

Và lớp WeatherMapsActivity kế thừa từ FragmentActivity.

Đồng thời nó sẽ phát sinh ra thêm 1 file google_maps_api.xml để lưu trữ KEY sử dụng Map như đã hướng dẫn ở các bài trước (bạn cần tự tạo để lấy KEY dán vào đây):

android64_18
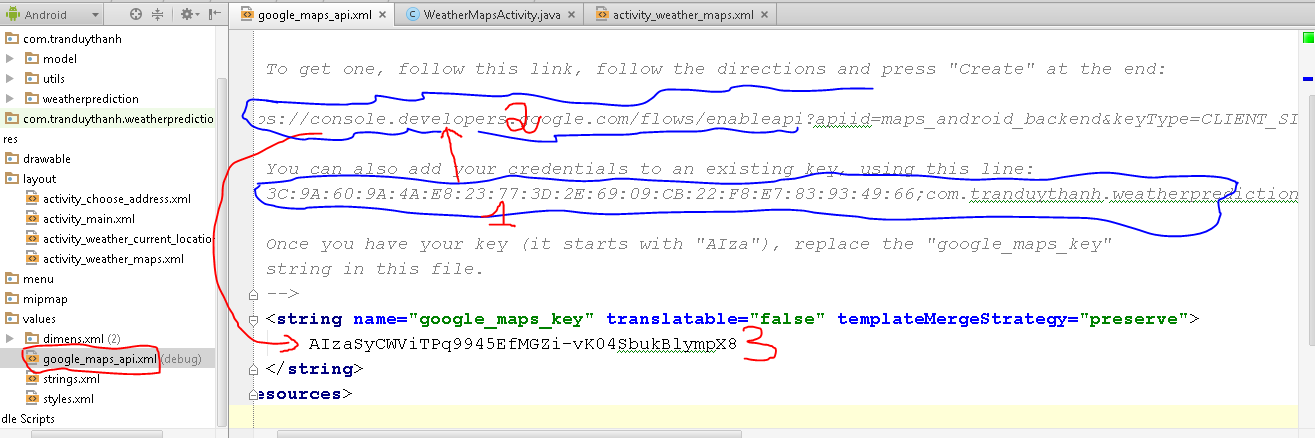
Ở trên bạn cần làm theo bước: Copy toàn bộ dữ liệu trong dòng mà tui đánh dấu là số 1, đưa nó vào link trong vùng Tui đánh dấu là số 2 (cách tạo key trong này đã hướng dẫn từ các bài trước về Map, bạn tự coi lại), sau khi nó tạo ra Key truy suất MAP, bạn dán Key đó vào vùng số 3. Ở vùng Số  hệ thông có tự đặt tên là google_maps_key.

– Sau đó bạn mở AndroidManifest lên để quát sát nó có cái gì ở đây:

android64_19Bạn thấy đấy, nó đơn giản hơn rất là nhiều, nó tự làm giùm cho chúng ta.

– Tiếp theo ta tiến hành coding để xử lý cho cho thời tiết trên map:

– Tạo lớp MyInfoWindowAdapter (sử dụng chung Layout xem thời tiết như đã đề cập ở trên) để hiển thị lên Map:

[code language=”java”]

package com.tranduythanh.weatherprediction;

import android.app.Activity;
import android.graphics.Bitmap;
import android.graphics.Color;
import android.location.Address;
import android.location.Geocoder;
import android.location.Location;
import android.view.View;
import android.widget.ImageView;
import android.widget.TextView;

import com.google.android.gms.maps.GoogleMap;
import com.google.android.gms.maps.model.Marker;
import com.tranduythanh.model.OpenWeatherJSon;
import com.tranduythanh.utils.TypePrediction;
import com.tranduythanh.utils.WeatherAsyncTask;

import java.io.IOException;
import java.text.DecimalFormat;
import java.text.NumberFormat;
import java.util.Date;
import java.util.List;
import java.util.Locale;

/**
* Created by drthanh on 12/05/2015.
*/
public class MyInfoWindowAdapter  implements GoogleMap.InfoWindowAdapter {
private Activity context;
Marker maker=null;
OpenWeatherJSon openWeatherJSon=null;
Bitmap myBitmap=null;
NumberFormat format = new DecimalFormat("#0.0");
double latitude;
double longitude;
public MyInfoWindowAdapter(Activity context)
{
this.context=context;
}
public MyInfoWindowAdapter(OpenWeatherJSon openWeatherJSon,Bitmap myBitmap,Marker maker,Activity context)
{
this(context);
this.maker=maker;
this.openWeatherJSon=openWeatherJSon;
this.myBitmap=myBitmap;
}
public MyInfoWindowAdapter(OpenWeatherJSon openWeatherJSon,Bitmap myBitmap,Marker maker,Activity context,double latitude,double longitude)
{
this(openWeatherJSon,myBitmap,maker,context);
this.latitude=latitude;
this.longitude=longitude;
}
@Override
public View getInfoWindow(Marker marker) {
View v = this.context.getLayoutInflater().inflate(R.layout.activity_weather_current_location, null);

TextView txtTemperature=(TextView) v.findViewById(R.id.txtTemperature);
TextView txtCurrentAddressName=(TextView) v.findViewById(R.id.txtCurrentAddressName);
ImageView imageView=(ImageView) v.findViewById(R.id.imgBauTroi);
TextView txtMaxtemp=(TextView) v.findViewById(R.id.txtMaxTemp);
TextView txtMinTemp=(TextView) v.findViewById(R.id.txtMinTemp);
TextView txtWind=(TextView) v.findViewById(R.id.txtWind);
TextView txtCloudliness= (TextView) v.findViewById(R.id.txtCloudliness);
TextView txtPressure= (TextView) v.findViewById(R.id.txtPressure);
TextView txtHumidty= (TextView) v.findViewById(R.id.txtHumidty);
TextView txtSunrise= (TextView) v.findViewById(R.id.txtSunrise);
TextView txtSunset= (TextView) v.findViewById(R.id.txtSunset);
double temperature=openWeatherJSon.getMain().getTemp()-273.15;
String maxtemp= format.format(openWeatherJSon.getMain().getTemp_max()-273.15)+"°C";
String mintemp= format.format(openWeatherJSon.getMain().getTemp_min()-273.15)+"°C";
String wind= openWeatherJSon.getWind().getSpeed()+" m/s";
String mesg = openWeatherJSon.getWeather().get(0).getMain();
//  Translator translate = Translator.getInstance();
// String cloudiness=mesg+" ("+translate.translate(mesg, Language.ENGLISH, Language.VIETNAMESE)+")";
String cloudiness=mesg;
String pressure= openWeatherJSon.getMain().getPressure()+" hpa";
String humidity=openWeatherJSon.getMain().getHumidity()+" %";

Date timeSunrise = new Date(openWeatherJSon.getSys().getSunrise()*1000);
String Sunrise= timeSunrise.getHours()+":"+timeSunrise.getMinutes()+" AM";
Date timeSunSet = new Date(openWeatherJSon.getSys().getSunset()*1000);
String sunset= timeSunSet.getHours()+":"+timeSunSet.getMinutes();
txtTemperature.setText(format.format(temperature)+"°C");
imageView.setImageBitmap(myBitmap);
txtMaxtemp.setText(maxtemp);
txtMinTemp.setText(mintemp);
txtWind.setText(wind);
txtCloudliness.setText(cloudiness);
txtPressure.setText(pressure);
txtHumidty.setText(humidity);
txtSunrise.setText(Sunrise);
txtSunset.setText(sunset);

try {
Geocoder geocoder;
List&lt;Address&gt; addresses;
geocoder = new Geocoder(this.context, Locale.getDefault());
addresses = geocoder.getFromLocation(latitude, longitude, 1); // Here 1 represent max location result to returned, by documents it recommended 1 to 5

Address address=null;
if(addresses.size()&gt;0)
address=addresses.get(0);
if(address!=null)
{
txtCurrentAddressName.setText(address.getAddressLine(0));
/*String city = address.getLocality();
String state = address.getAdminArea();
String country = address.getCountryName();
String postalCode = address.getPostalCode();
String knownName = address.getFeatureName();*/
}

} catch (IOException e) {
e.printStackTrace();
}
v.setBackgroundColor (Color.WHITE);
return v;
}

@Override
public View getInfoContents(Marker marker) {
return null;
}
}

[/code]

– Cuối cùng ta xử lý coding cho phép hiển thị thời tiết bất kỳ trên Bản đồ (WeatherMapsActivity):

[code language=”java”]

package com.tranduythanh.weatherprediction;

import android.app.ProgressDialog;
import android.location.Criteria;
import android.location.Location;
import android.location.LocationManager;
import android.support.v4.app.FragmentActivity;
import android.os.Bundle;

import com.google.android.gms.maps.CameraUpdateFactory;
import com.google.android.gms.maps.GoogleMap;
import com.google.android.gms.maps.SupportMapFragment;
import com.google.android.gms.maps.model.BitmapDescriptorFactory;
import com.google.android.gms.maps.model.CameraPosition;
import com.google.android.gms.maps.model.LatLng;
import com.google.android.gms.maps.model.Marker;
import com.google.android.gms.maps.model.MarkerOptions;
import com.tranduythanh.utils.WeatherAsyncTask;

public class WeatherMapsActivity extends FragmentActivity {

private GoogleMap mMap; // Might be null if Google Play services APK is not available.
ProgressDialog myProgress;
@Override
protected void onCreate(Bundle savedInstanceState) {
super.onCreate(savedInstanceState);
setContentView(R.layout.activity_weather_maps);
myProgress = new ProgressDialog(this);
myProgress.setTitle("Đang tải Map …");
myProgress.setMessage("Vui lòng chờ…");
myProgress.setCancelable(true);
//Hiển thị Progress Bar
myProgress.show();
setUpMapIfNeeded();
addEvents();
}

/**
* xử lý chọn địa điểm bất kỳ trên Map
* lấy ra được lớp LatLng để lấy kinh độ vĩ độ
* truyền cho hàm moveAndShowWeatherNewPlace để hiển thị thời tiết  tại địa điể mới
*/
public void addEvents()
{
if(mMap==null)return;
mMap.setOnMapClickListener(new GoogleMap.OnMapClickListener() {
@Override
public void onMapClick(LatLng latLng) {
moveAndShowWeatherNewPlace(latLng);
}
});
}

/**
* hiển thị lại thời tiết tại địa điểm mới chọn trên bản đồ
* @param latLng
*/
private void moveAndShowWeatherNewPlace(LatLng latLng) {
if (latLng != null)
{
mMap.animateCamera(CameraUpdateFactory.newLatLngZoom(
new LatLng(latLng.latitude, latLng.longitude), 13));

CameraPosition cameraPosition = new CameraPosition.Builder()
.target(new LatLng(latLng.latitude, latLng.longitude))      // Sets the center of the map to location user
.zoom(15)                   // Sets the zoom
.bearing(90)                // Sets the orientation of the camera to east
.tilt(40)                   // Sets the tilt of the camera to 30 degrees
.build();                   // Creates a CameraPosition from the builder
mMap.animateCamera(CameraUpdateFactory.newCameraPosition(cameraPosition));

MarkerOptions option=new MarkerOptions();
option.position(new LatLng(latLng.latitude, latLng.longitude));
option.title("Cho o cua tui").snippet("Tran Duy Thanh");
option.icon(BitmapDescriptorFactory.defaultMarker(BitmapDescriptorFactory.HUE_AZURE));
//option.icon(BitmapDescriptorFactory.fromResource(R.drawable.icon_tiempo));
//option.alpha(0.8f);
//option.rotation(90);
Marker maker = mMap.addMarker(option);
//maker.showInfoWindow();
WeatherAsyncTask task=new WeatherAsyncTask(maker,mMap,WeatherMapsActivity.this,latLng.latitude,latLng.longitude);
task.execute();
//maker.showInfoWindow();
//mMap.setInfoWindowAdapter(new MyInfoWindowAdapter(maker,WeatherMapsActivity.this,lastLocation));
//tiến hành hiển thị lên Custom marker option lên Map:
//maker.showInfoWindow();
}
}

@Override
protected void onResume() {
super.onResume();
//setUpMapIfNeeded();
}

/**
* Sets up the map if it is possible to do so (i.e., the Google Play services APK is correctly
* installed) and the map has not already been instantiated.. This will ensure that we only ever
* call {@link #setUpMap()} once when {@link #mMap} is not null.
* &lt;p/&gt;
* If it isn’t installed {@link SupportMapFragment} (and
* {@link com.google.android.gms.maps.MapView MapView}) will show a prompt for the user to
* install/update the Google Play services APK on their device.
* &lt;p/&gt;
* A user can return to this FragmentActivity after following the prompt and correctly
* installing/updating/enabling the Google Play services. Since the FragmentActivity may not
* have been completely destroyed during this process (it is likely that it would only be
* stopped or paused), {@link #onCreate(Bundle)} may not be called again so we should call this
* method in {@link #onResume()} to guarantee that it will be called.
*/
private void setUpMapIfNeeded() {
// Do a null check to confirm that we have not already instantiated the map.
if (mMap == null) {
// Try to obtain the map from the SupportMapFragment.
mMap = ((SupportMapFragment) getSupportFragmentManager().findFragmentById(R.id.map))
.getMap();
// Check if we were successful in obtaining the map.
if (mMap != null) {
mMap.setOnMapLoadedCallback(new GoogleMap.OnMapLoadedCallback() {

@Override
public void onMapLoaded() {
//Đã tải thành công thì tắt Dialog Progress đi
myProgress.dismiss();
}
});
mMap.setMapType(GoogleMap.MAP_TYPE_NORMAL);
mMap.getUiSettings().setZoomControlsEnabled(true);
mMap.setMyLocationEnabled(true);

//setUpMap();
TuiDangODau();
}
}
}

/**
* This is where we can add markers or lines, add listeners or move the camera. In this case, we
* just add a marker near Africa.
* &lt;p/&gt;
* This should only be called once and when we are sure that {@link #mMap} is not null.
*/
private void setUpMap() {
LatLng TTTH_KHTN = new LatLng(10.763181, 106.675664);
MarkerOptions option=new MarkerOptions();
option.position(TTTH_KHTN);
option.title("Trung tâm tin học ĐH KHTN").snippet("Tran Duy Thanh");
option.icon(BitmapDescriptorFactory.defaultMarker(BitmapDescriptorFactory.HUE_AZURE));
//option.alpha(0.8f);
//option.rotation(90);
Marker maker = mMap.addMarker(option);
maker.showInfoWindow();
mMap.moveCamera(CameraUpdateFactory.newLatLngZoom(TTTH_KHTN, 15));
//mMap.addMarker(new MarkerOptions().position(new LatLng(0, 0)).title("Marker"));
}

/**
* mặc định lần đầu mở Map lên sẽ hiển thị chi tiết thời tiết tại vị trí hiện tại
* lên trên bản đồ
*/
private void TuiDangODau() {

LocationManager locationManager = (LocationManager) getSystemService(LOCATION_SERVICE);
Criteria criteria = new Criteria();

Location lastLocation = locationManager.getLastKnownLocation(locationManager.getBestProvider(criteria, false));
if (lastLocation != null)
{
mMap.animateCamera(CameraUpdateFactory.newLatLngZoom(
new LatLng(lastLocation.getLatitude(), lastLocation.getLongitude()), 13));

CameraPosition cameraPosition = new CameraPosition.Builder()
.target(new LatLng(lastLocation.getLatitude(), lastLocation.getLongitude()))      // Sets the center of the map to location user
.zoom(15)                   // Sets the zoom
.bearing(90)                // Sets the orientation of the camera to east
.tilt(40)                   // Sets the tilt of the camera to 30 degrees
.build();                   // Creates a CameraPosition from the builder
mMap.animateCamera(CameraUpdateFactory.newCameraPosition(cameraPosition));

MarkerOptions option=new MarkerOptions();
option.position(new LatLng(lastLocation.getLatitude(), lastLocation.getLongitude()));
option.title("Cho o cua tui").snippet("Tran Duy Thanh");
option.icon(BitmapDescriptorFactory.defaultMarker(BitmapDescriptorFactory.HUE_AZURE));
//option.icon(BitmapDescriptorFactory.fromResource(R.drawable.icon_tiempo));
//option.alpha(0.8f);
//option.rotation(90);
Marker maker = mMap.addMarker(option);
//maker.showInfoWindow();
WeatherAsyncTask task=new WeatherAsyncTask(maker,mMap,WeatherMapsActivity.this,lastLocation.getLatitude(),lastLocation.getLongitude());
task.execute();
//maker.showInfoWindow();
//mMap.setInfoWindowAdapter(new MyInfoWindowAdapter(maker,WeatherMapsActivity.this,lastLocation));
//tiến hành hiển thị lên Custom marker option lên Map:
//maker.showInfoWindow();
}
}
}

[/code]

– Sau cùng ta cần cấu hình AndroidManifest đầy đủ như sau:

[code language=”xml”]

&lt;?xml version="1.0" encoding="utf-8"?&gt;
&lt;manifest xmlns:android="http://schemas.android.com/apk/res/android"
package="com.tranduythanh.weatherprediction" &gt;

&lt;uses-permission android:name="android.permission.ACCESS_WIFI_STATE" /&gt;
&lt;uses-permission android:name="android.permission.INTERNET" /&gt;
&lt;uses-permission android:name="android.permission.ACCESS_NETWORK_STATE" /&gt;
&lt;uses-permission android:name="android.permission.WRITE_EXTERNAL_STORAGE" /&gt;
&lt;uses-permission android:name="com.google.android.providers.gsf.permission.READ_GSERVICES" /&gt;
&lt;!–
The ACCESS_COARSE/FINE_LOCATION permissions are not required to use
Google Maps Android API v2, but are recommended.
–&gt;
&lt;uses-permission android:name="android.permission.ACCESS_COARSE_LOCATION" /&gt;
&lt;uses-permission android:name="android.permission.ACCESS_FINE_LOCATION" /&gt;

&lt;application
android:allowBackup="true"
android:icon="@mipmap/ic_launcher"
android:label="@string/app_name"
android:theme="@style/AppTheme" &gt;
&lt;activity
android:name=".MainActivity"
android:label="@string/app_name" &gt;
&lt;intent-filter&gt;
&lt;action android:name="android.intent.action.MAIN" /&gt;

&lt;category android:name="android.intent.category.LAUNCHER" /&gt;
&lt;/intent-filter&gt;
&lt;/activity&gt;

&lt;meta-data
android:name="com.google.android.gms.version"
android:value="@integer/google_play_services_version" /&gt;
&lt;meta-data
android:name="com.google.android.maps.v2.API_KEY"
android:value="@string/google_maps_key" /&gt;

&lt;activity
android:name=".WeatherMapsActivity"
android:label="@string/title_activity_weather_maps" &gt;
&lt;/activity&gt;
&lt;activity
android:name=".WeatherCurrentLocationActivity"
android:label="@string/title_activity_weather_current_location" &gt;
&lt;/activity&gt;
&lt;activity
android:name=".WeatherByAddressActivity"
android:label="@string/title_activity_weather_by_address" &gt;
&lt;/activity&gt;
&lt;activity
android:name=".ChooseAddressActivity"
android:label="@string/title_activity_choose_address" &gt;
&lt;/activity&gt;
&lt;/application&gt;

&lt;/manifest&gt;

[/code]

– Như vậy Tui đã trình bày gần hoàn chỉnh phần mềm xem dự báo thời tiết (còn chức năng dự báo ngày kế tiếp bạn tự làm).

– Bạn cần đọc kỹ lại các bài về Map trước đó nếu như chưa rành, cố gắng đọc hiểu và làm lại bài này nhều lần.

– Các bạn có thể tải source code đầy đủ ở đây (nhớ phải đổi lại KEY mới hoạt động phần Map): http://www.mediafire.com/download/3fwxcr8ziudjt47/WeatherPrediction.rar

Nếu bạn nào muốn rèn luyện thêm lập trình Java, lập trình Android, lập trình Webservice với tổng thời lượng học >80 giờ thì có thể đăng ký học theo các link sau:

1) Lập trình java trong 4 tuần – 19 giờ(chỉ dành cho những ai CHƯA BIẾT GÌ VỀ LẬP TRÌNH hoặc đã biết lơ mơ về Java, lý thuyết và các bài tập phong phú tạo nền tảng lập trình Android và các hướng khác liên quan tới Java):
https://kyna.vn/lap-trinh-java-trong-4-tuan/325931
2) Lập trình Android cơ bản (>24 giờ học) – toàn bộ kiến thức về Android cơ bản:
https://kyna.vn/lap-trinh-android-co-ban/325931
3) Lập trình Android nâng cao (23 giờ học) – toàn bộ kiến thức về Android nâng cao:
https://kyna.vn/lap-trinh-android-nang-cao/325931
4) Lập trình Webservice cho Di Động – 14 giờ (dành cho những ai ĐÃ BIẾT ANDROID), những ai chưa biết Android tuyệt đối không đăng ký, khóa học hướng dẫn tỉ mỉ từ A->Z để có thể xây dựng được một phần mềm hoàn chỉnh tương tác client-server:
https://kyna.vn/lap-trinh-webservice-cho-di-dong/325931

– Chúc các bạn thành công.