Để học được khóa Lập trình Cơ sở dữ liệu với Java này bắt buộc các bạn phải có kiến thức về lập trình hướng đối tượng với Java trước. Trong chương trình tặng 14 khóa học khi cung cấp minh chứng ủng hộ quỹ vaccine của Chính Phủ Tui đã tặng các bạn rồi, bây giờ Tui tặng thêm khóa Lập trình cơ sở dữ liệu với Java, Khóa này Tui publish trên youtube các bạn tham khảo.
Khóa học cung cấp kiến thức nâng cao của ngôn ngữ lập trình java . -Xử lý giao diện -Tiếp cận được 4 loại hệ cơ sở dữ liệu phổ biến: Microsoft Access, Microsoft SQL Server, MySQL và Oracle. -Nắm chắc các kiến thức về JDBC như truy vấn, cập nhật, xóa dữ liệu… -Tiếp cận được JPA để nâng cao hiệu suất lập trình cơ sở dữ liệu với Java -Sau khi hoàn thành khóa học, có thể tự viết được dự án liên quan tới quản trị cơ sở dữ liệu.
Học liệu: Bao gồm Slide từng bài học và source code của từng bài học, tải ở đây.
Full link khóa học Lập trình cơ sở dữ liệu với Java trên Youtube:
Như vậy hầu hết các loại Rest API trong Vert.X Tui đã hướng dẫn cụ thể. Tuy nhiên bất kỳ ai cũng có thể nhào vào các API này, thật là nguy hiểm đúng không? việc yêu cầu xác thực khi truy suất vào các REST API là rất quan trọng, nó giúp chúng ta bảo vệ dữ liệu, tránh bị hack ở một giới hạn nhất định nào đó.
Có rất nhiều cách để yêu cầu xác thực, dưới đây Tui sẽ hướng dẫn các bạn chi tiết cách dùng Bear Token để tạo lớp bảo vệ cho các REST API.
Dưới đây là các bước chi tiết để xây dựng bức tường xác thực cho các REST API, mở lại dự án “LearnRESTApi” ở bài trước:
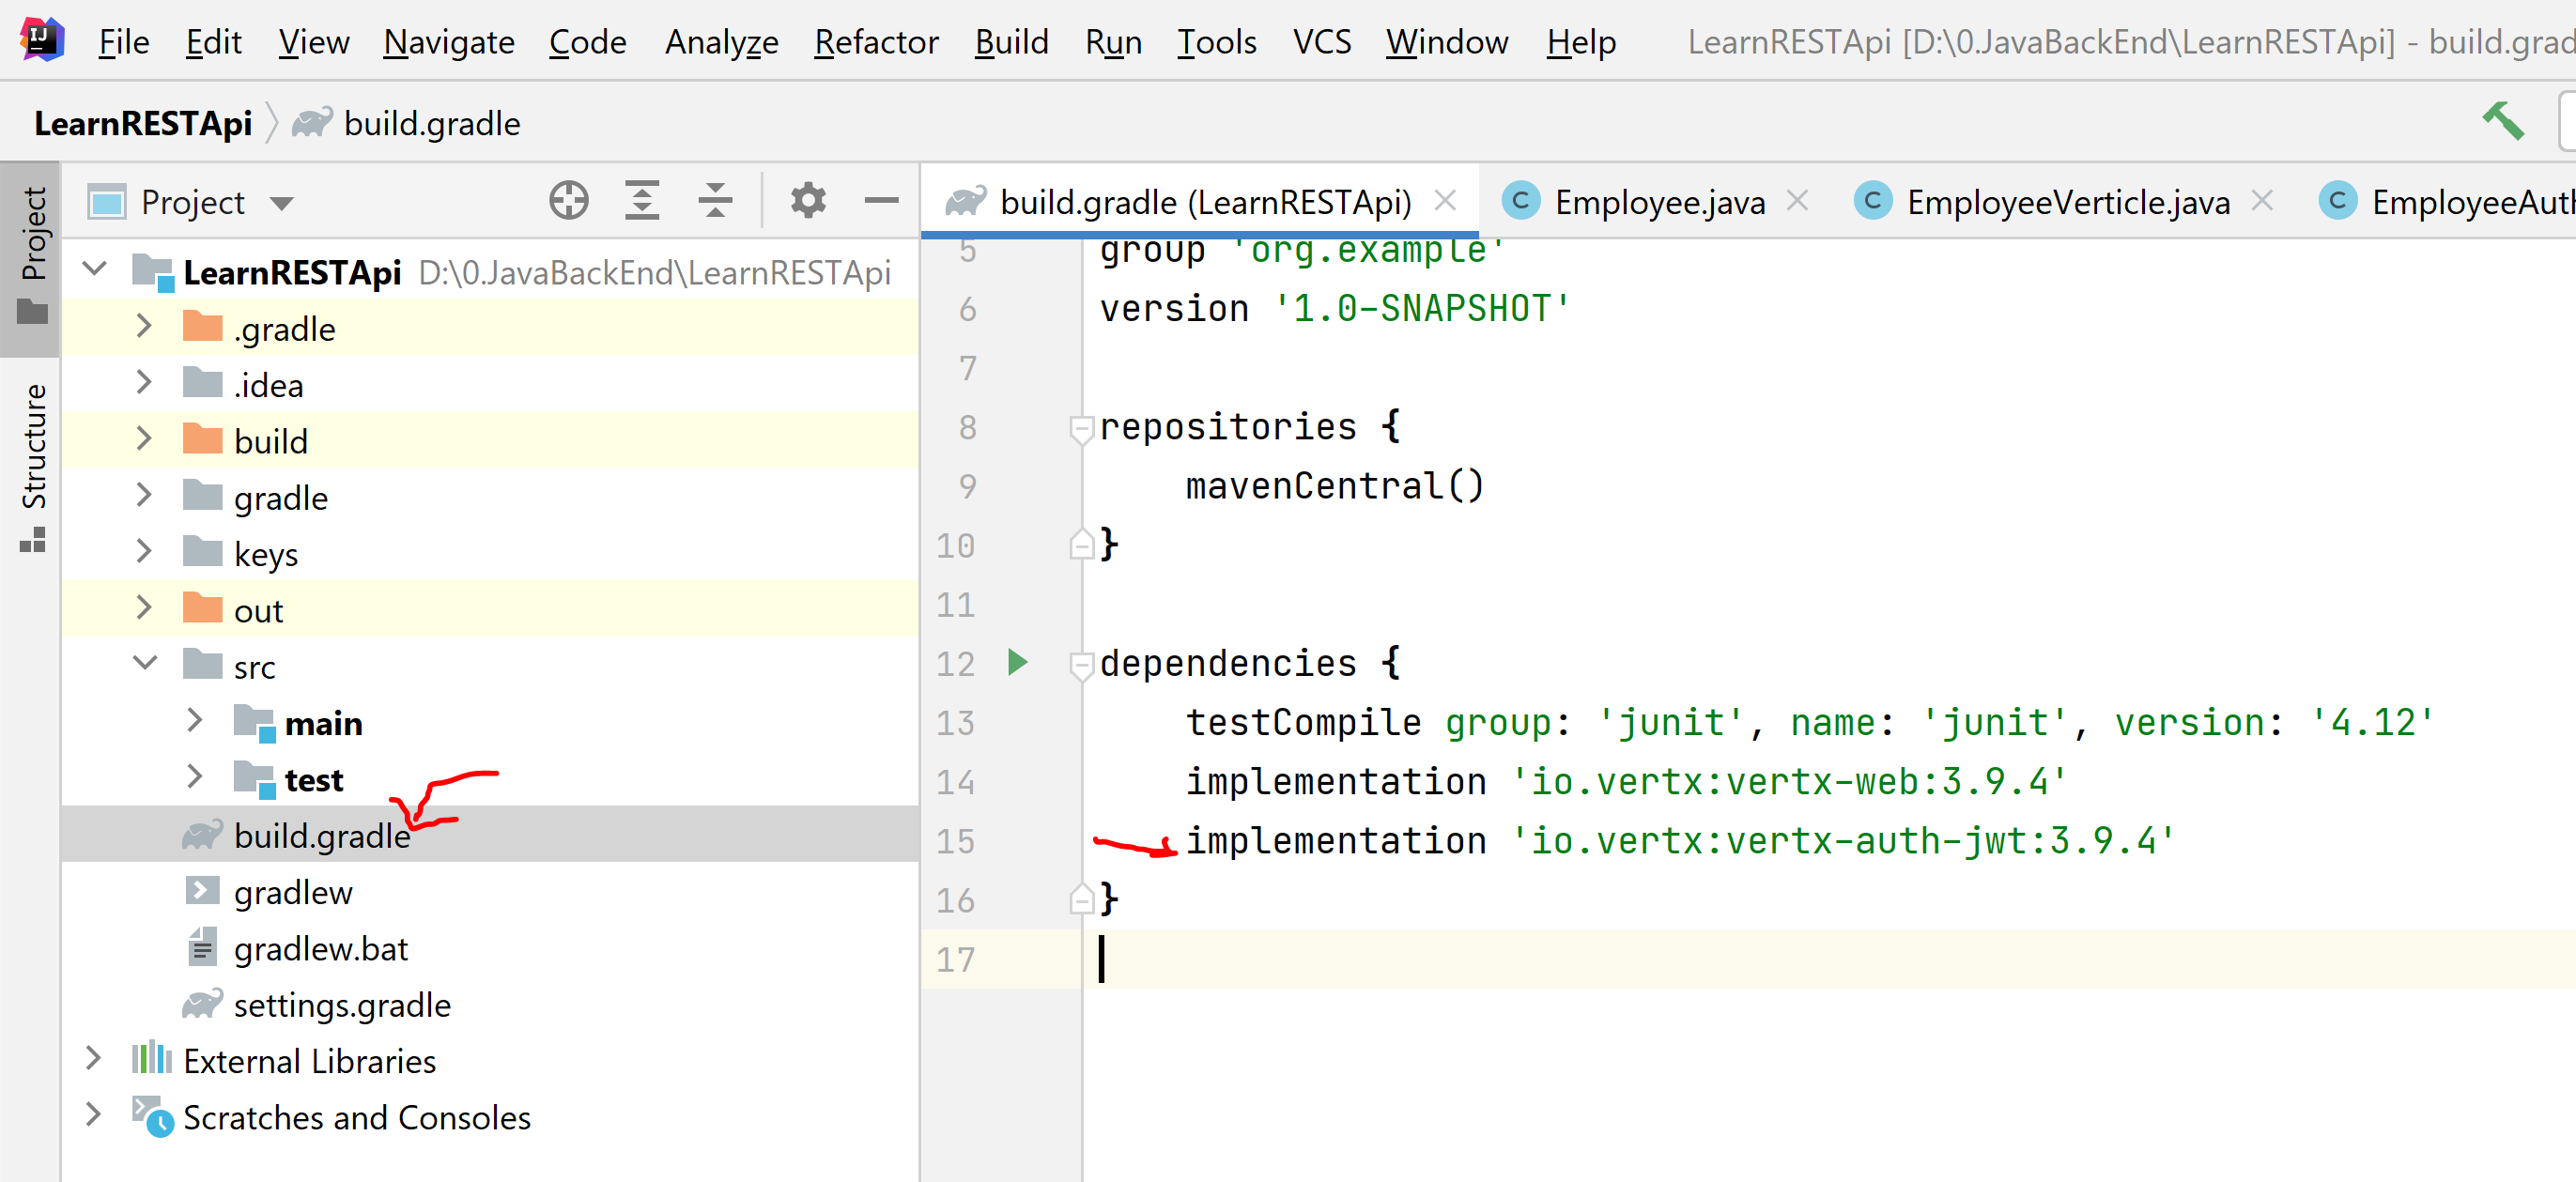
Lưu ý vertx-web và vertx-auth-jwt phải cùng phiên bản. Ví dụ ở trong bài viết này đang dùng 3.9.4.
JWT là một dạng token đơn giản sử dụng trong lập trình web giúp việc xác thực người dùng trong hệ thống trở nên dễ dàng hơn (đặc biệt trong ứng dụng Single Page Application).
Một số điểm mạnh của JWT:
Dễ dàng xác thực token
Có thể chứa data dưới dạng JSON -> dễ dàng giao tiếp trong nhiều hệ thống, gọn nhẹ.
Completely stateless
Bước 2:Tạo Java keystore files và sao chép vào dự án
JWT trong vertx có 3 cách load keys:
Sử dụng secrets (sysmetric keys)
OpenSSL (pem format) -> phổ biến là RSA
Java keystore files
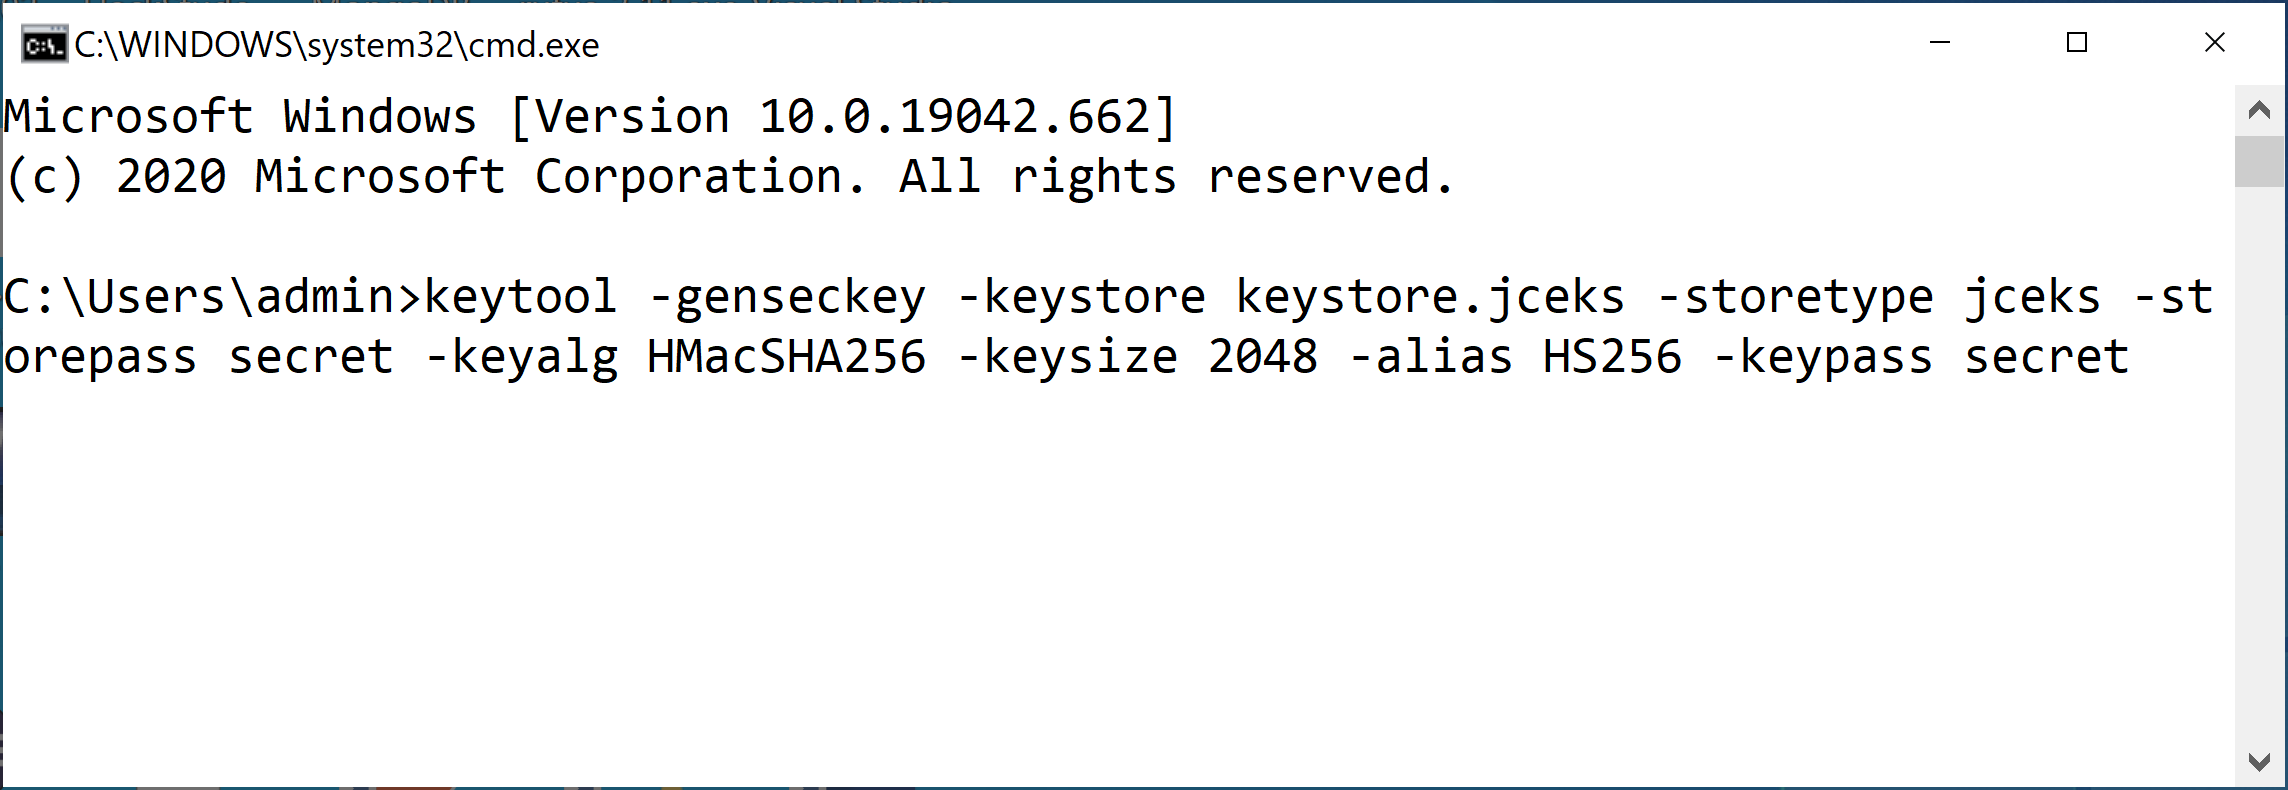
Bài này Tui chọn cách setup java keystore. Tùy theo thuật toán mình muốn sử dụng mà cần tạo ra keystore tương ứng (RSA, SHA,….). Mặc định vertx sẽ sử dụng HS256.
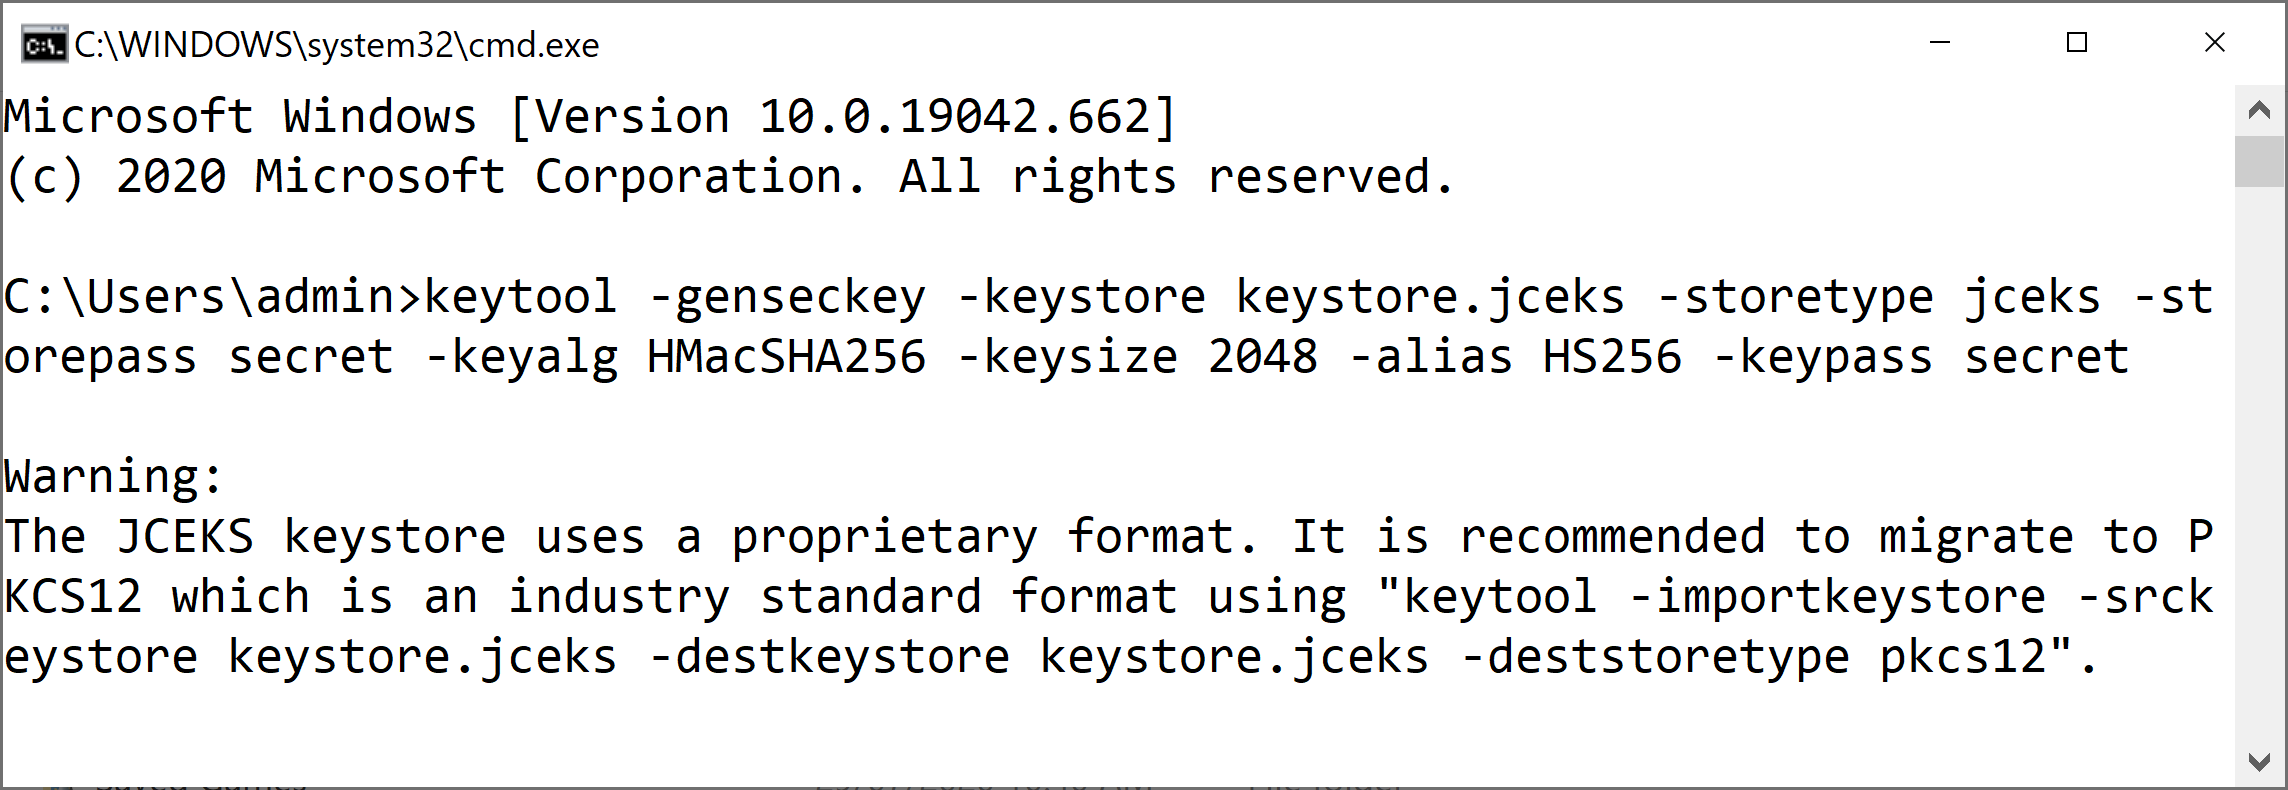
file keystore.jceks sẽ được tạo ra, với thuật toán HS256
Cụ thể ta mở command line:
nhấn tổ hợp phím Windows + R để mở cửa sổ Run:
gõ lệnh cmd rồi nhấn OK, màn hình command line hiển thị ra như dưới đây:
Sao chép lệnh tạo Keystore ở trên vào command line:
Nhấn Enter:
như vậy file keystore.jceks được tạo ra trong C:\Users\<your user>
máy tính của bạn đang dùng account nào thì nó lưu vào account đó, ví dụ trong máy của Tui thì:
ở trên các bạn thấy keystore.jceks được tạo ra.
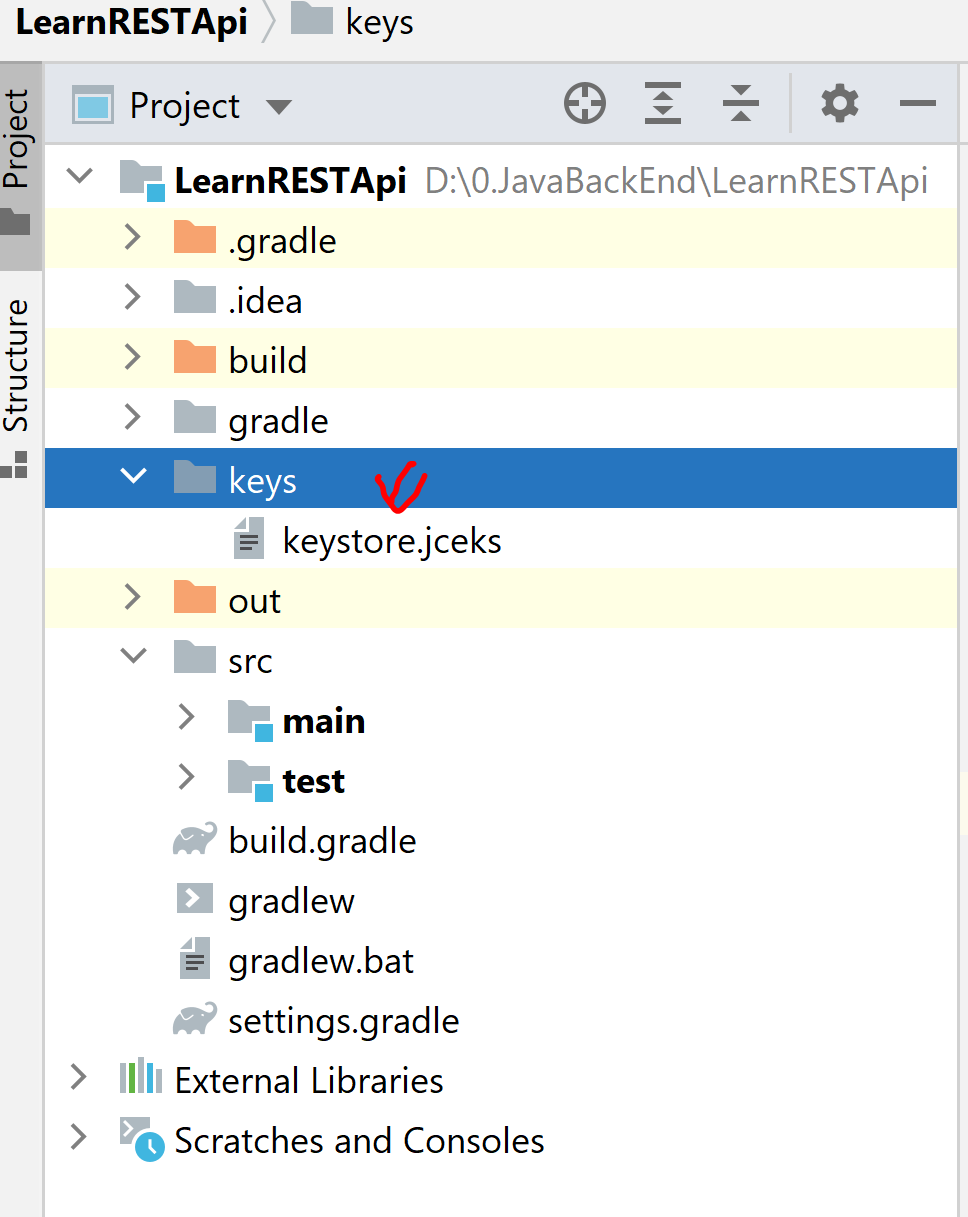
tạo thư mục keys trong dự án, sao chép file này vào thư mục keys (muốn tạo thư mục thì bấm chuột phải vào dự án chọn New/chọn Directory):
Bước 3: Cài yêu cầu xác thực Authetication cho các API
Để tránh không bị rối, không bị hư coding cũ, Tui tạo thêm 1 verticle tên là “EmployeeAuthenVerticle“, Verticle này chỉ đơn thuần là có 1 API lấy danh sách Employee. Nhưng phải có xác thực thì mới lấy được. Khi nào các bạn rành rồi thì tự cấu hình cho các API còn lại:
Nội dung mã nguồn như sau(sao chép từ EmployeeVerticle qua và chỉ giữ lại API lấy toàn bộ Employee):
Code trên là để tạo ra api login, yêu cầu đăng nhập (trường hợp này Tui sẽ dùng JsonObject để truyền user+password lên server, trong hàm đăng nhập sẽ nói kỹ).
Coding chi tiết hàm hàm start:
[code language=”java”]
public void start(Promise startPromise) throws Exception {
createExampleData();
Router router=Router.router(vertx);
JWTAuth jwt=JWTAuth.create(vertx,
new JsonObject()
.put(“keyStore”,
new JsonObject()
.put(“type”,”jceks”)
.put(“path”,”keys\\keystore.jceks”)
.put(“password”,”secret”)));
router.route(“/api/*”).handler(authHandler(jwt));
router.get(“/api/employees”).handler(this::getAllEmployees);
router.route(“/api*”).handler(BodyHandler.create());
router.post(“/api/login”).handler(ctx->{login(ctx,jwt);});
vertx
.createHttpServer()
.requestHandler(router::accept)
.listen(config().getInteger(“http.port”, 8080),
result -> {
if (result.succeeded()) {
startPromise.complete();
} else {
startPromise.fail(result.cause());
}
}
);
}
[/code]
Còn dưới đây là mã lệnh chi tiết hàm API login:
[code language=”java”]
public void login(RoutingContext context,JWTAuth jwtAuth)
{
try
{
//lấy dữ liệu là 1 JsonObject ở client truyền lên
JsonObject data = context.getBodyAsJson();
//Tui giả sử username: admin và password là: 123
/* cú pháp minh họa từ client gửi lên:
{
“user”: “admin”,
“pass”: “123”
}
dĩ nhiên khi làm MongoDB thì mình sẽ truy vấn account thực tế, chỉ cần đổi chỗ này thôi, rất dễ
*/
if(!(data.getString(“user”).equals(“admin”) && data.getString(“pass”).equals(“123”)))
{
return;
}
//tạo token, hạn dùng 60 giây
String token=jwtAuth.generateToken(new JsonObject(),
new JWTOptions().setExpiresInSeconds(60));
//dùng cookie lưu xuống phía client, trong vòng 60 giây truy cấp được các API thoải mái
Cookie cookie=Cookie.cookie(“auth”,token);
cookie.setHttpOnly(true).setPath(“/”).encode();
context.addCookie(cookie).response()
.putHeader(“content-type”,”text/plain”)
.putHeader(“Authorization”,token)
.end(token);
}
catch (Exception ex)
{
context.response().setStatusCode(401)
.putHeader(“content-type”,”application/json”)
.end(ex.getMessage());
}
}
[/code]
Dưới đây là coding đầy đủ của EmployeeAuthenVerticle:
admin và 123 là tài khoản minh họa, khi làm MongoDB ta sẽ đăng nhập chính xác account trong CSDL.
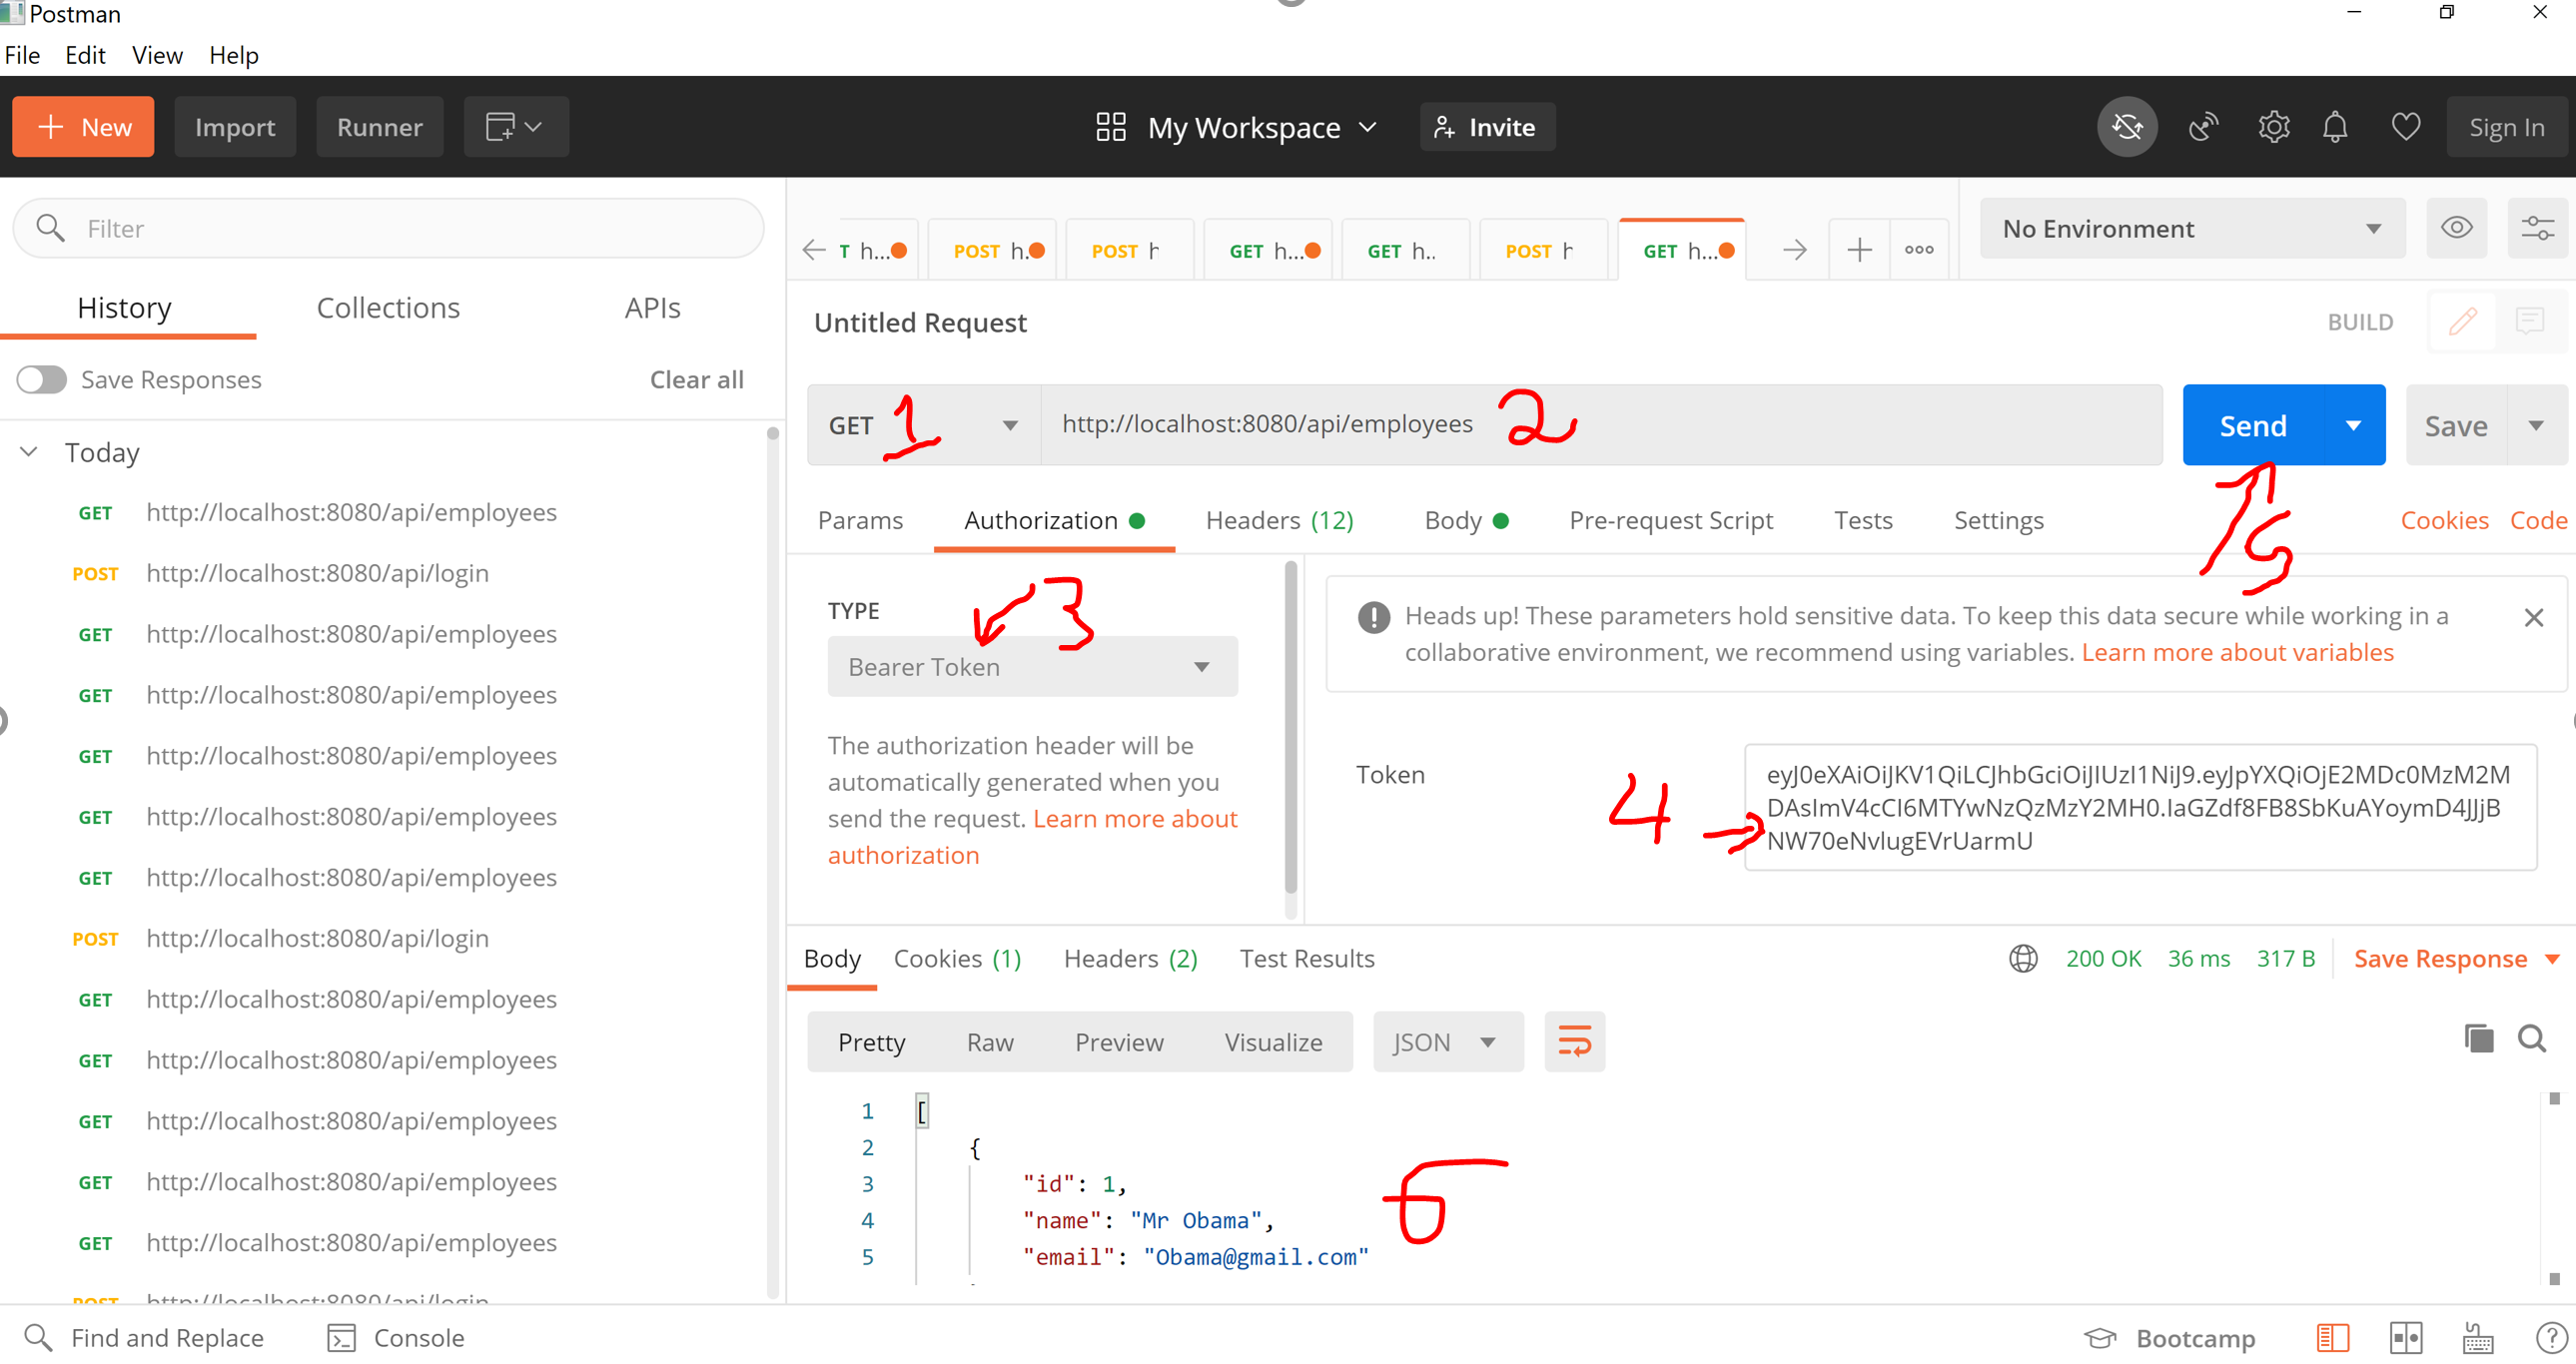
Mục 4: bấm send để đăng nhập
Mục 5: Sau khi bấm send, đăng nhập thành công sẽ trả về chuỗi Token như hình.
Token này sẽ được dùng để triệu gọi các API trong hệ thống.
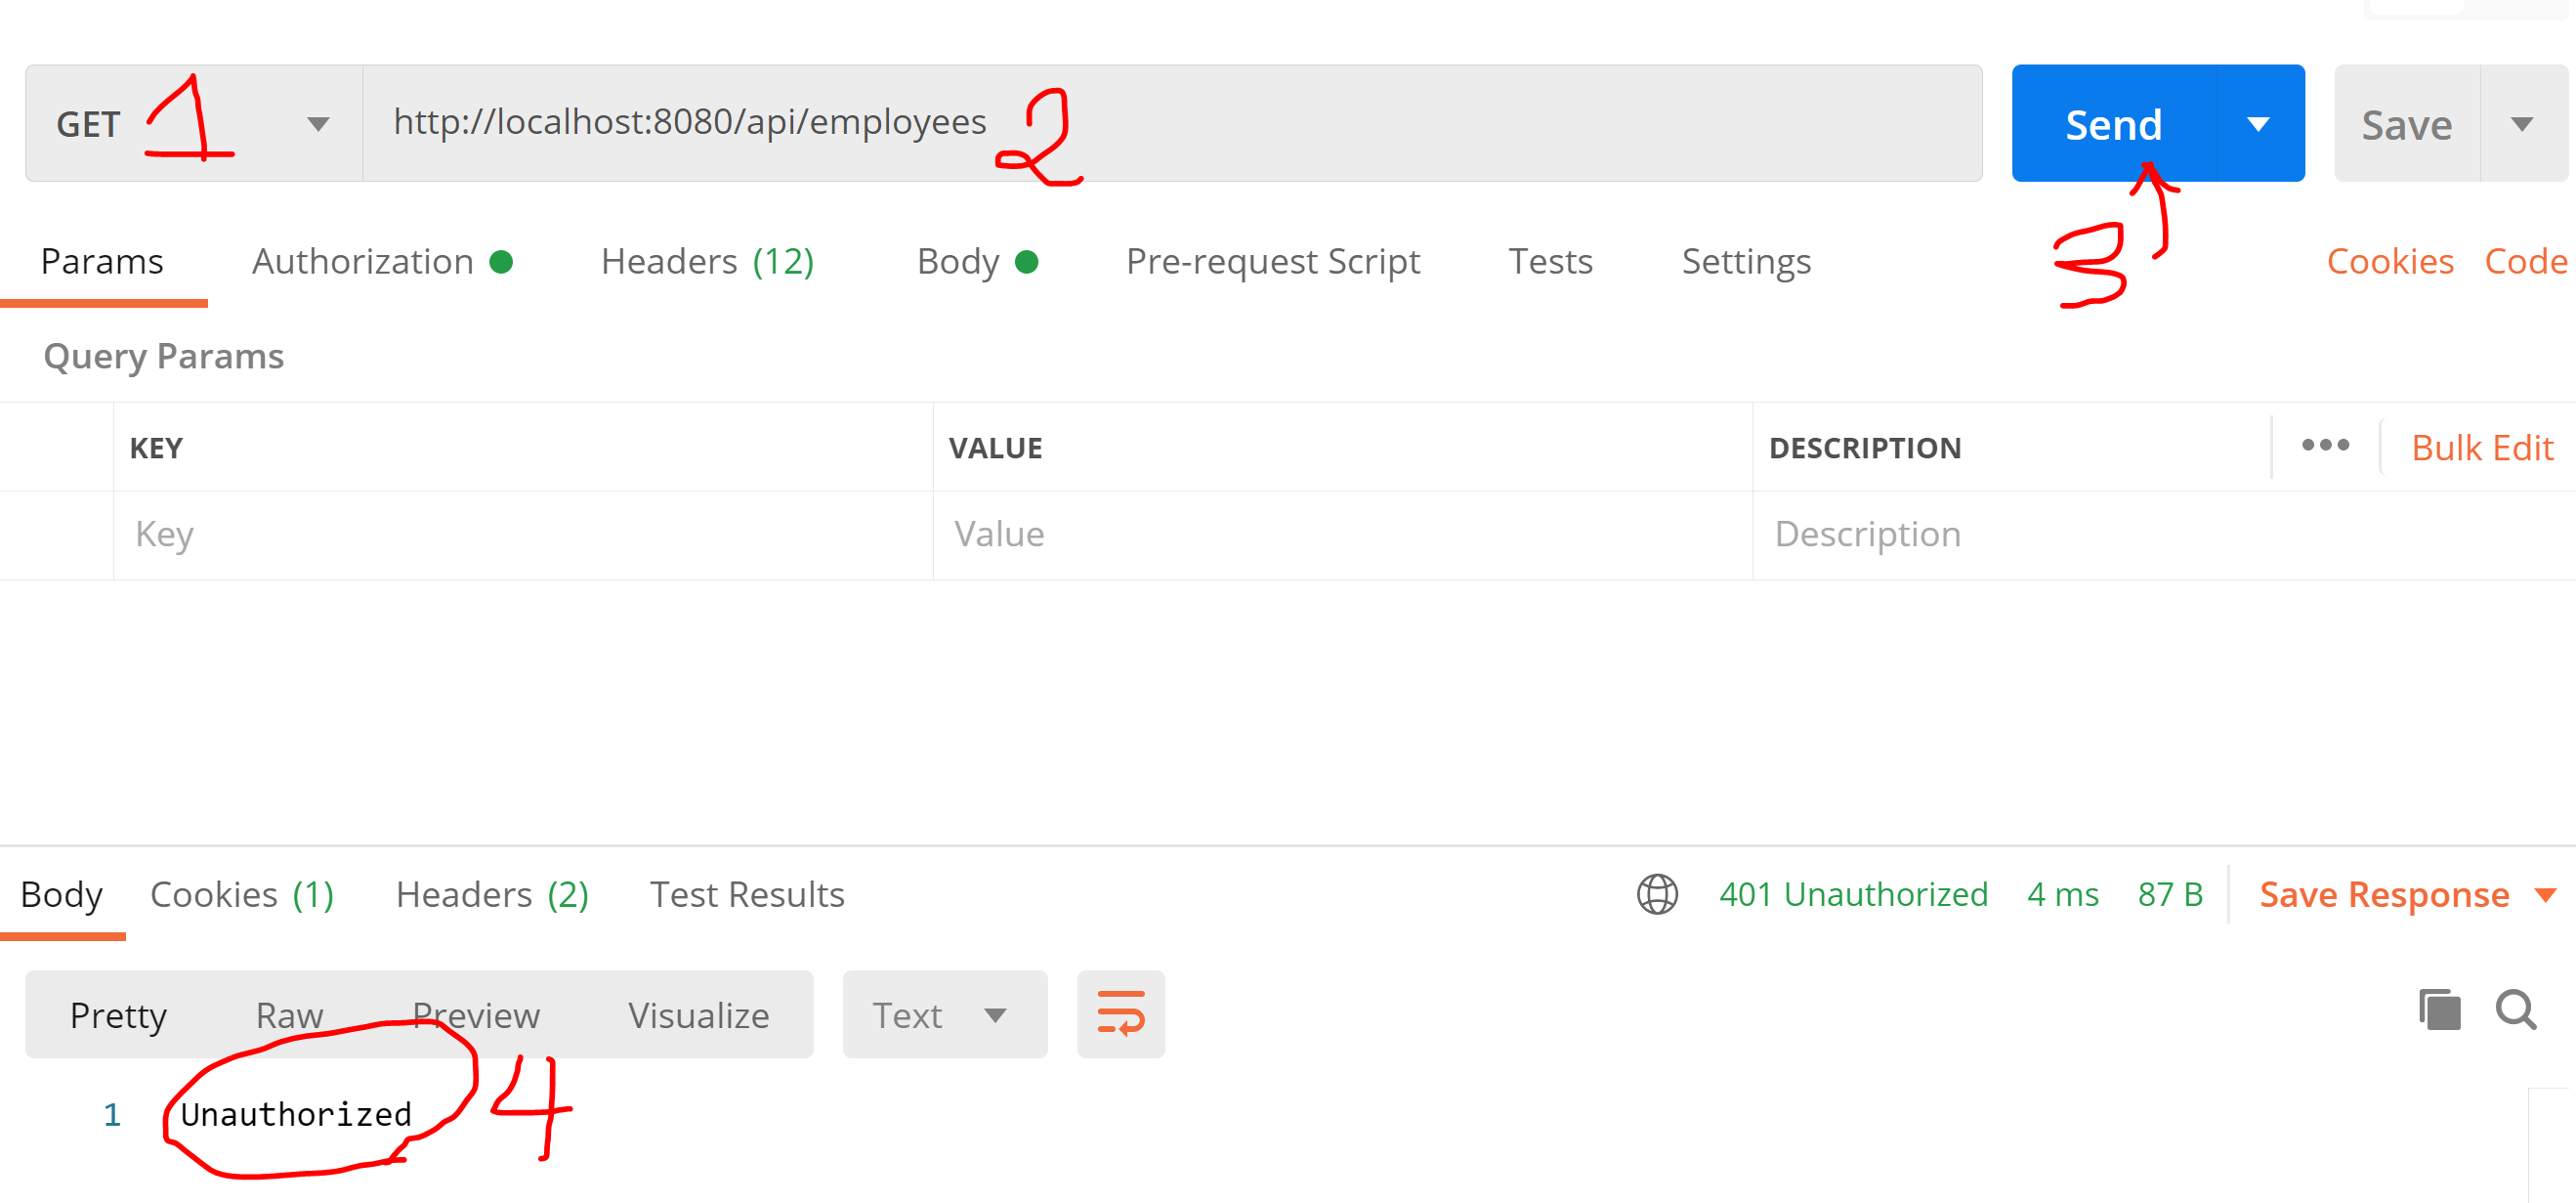
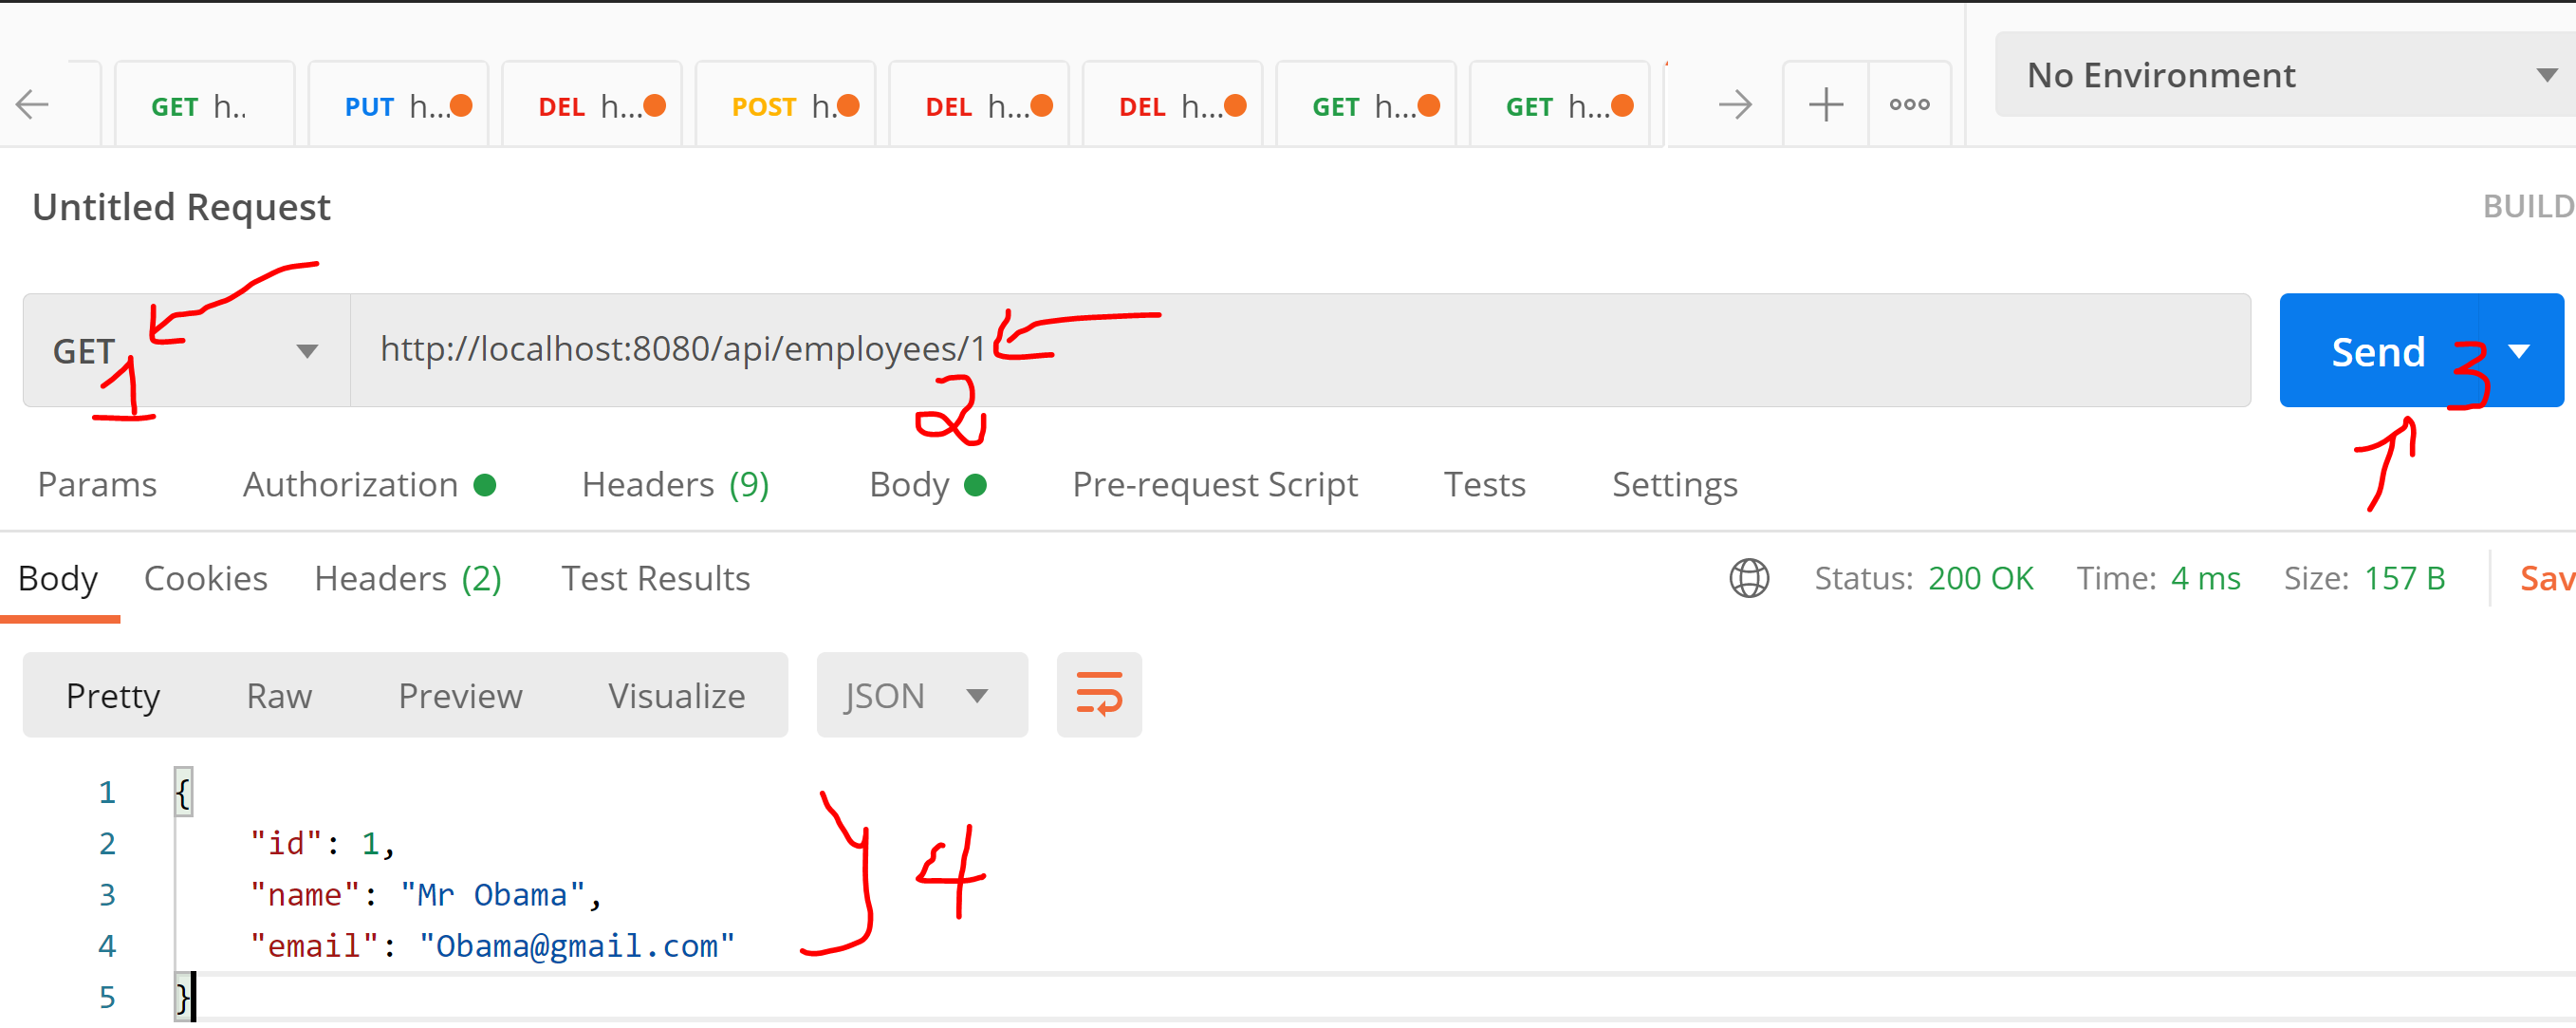
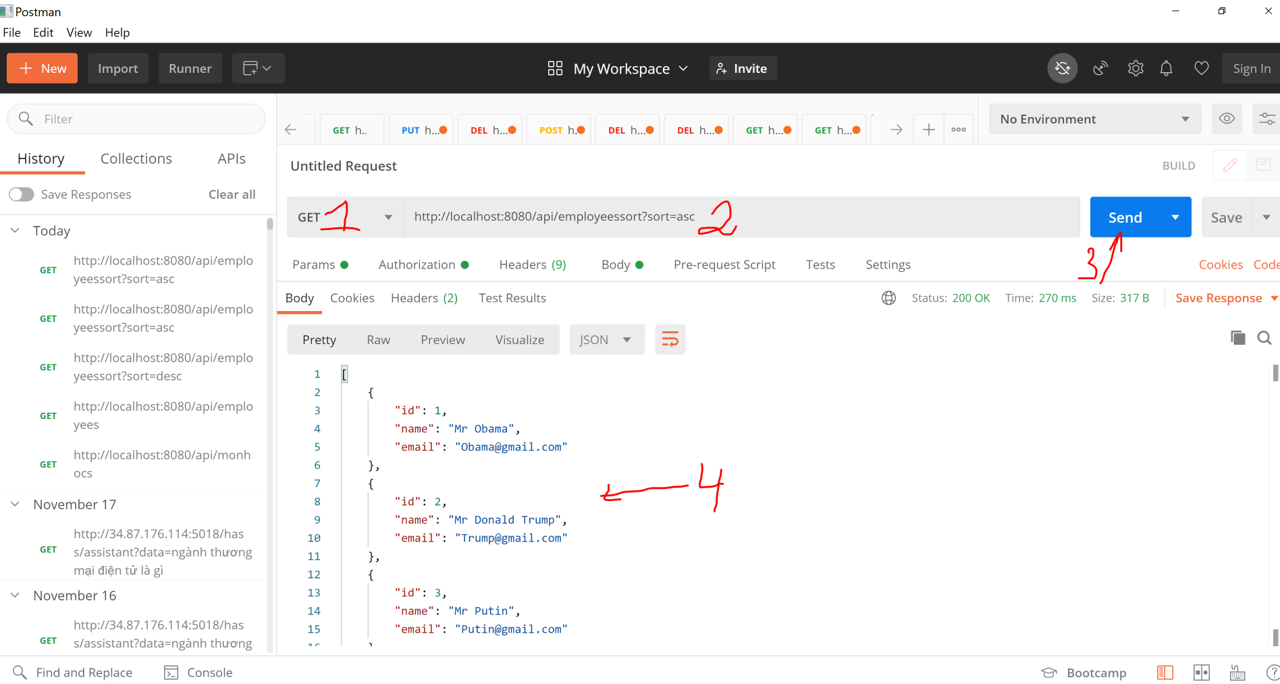
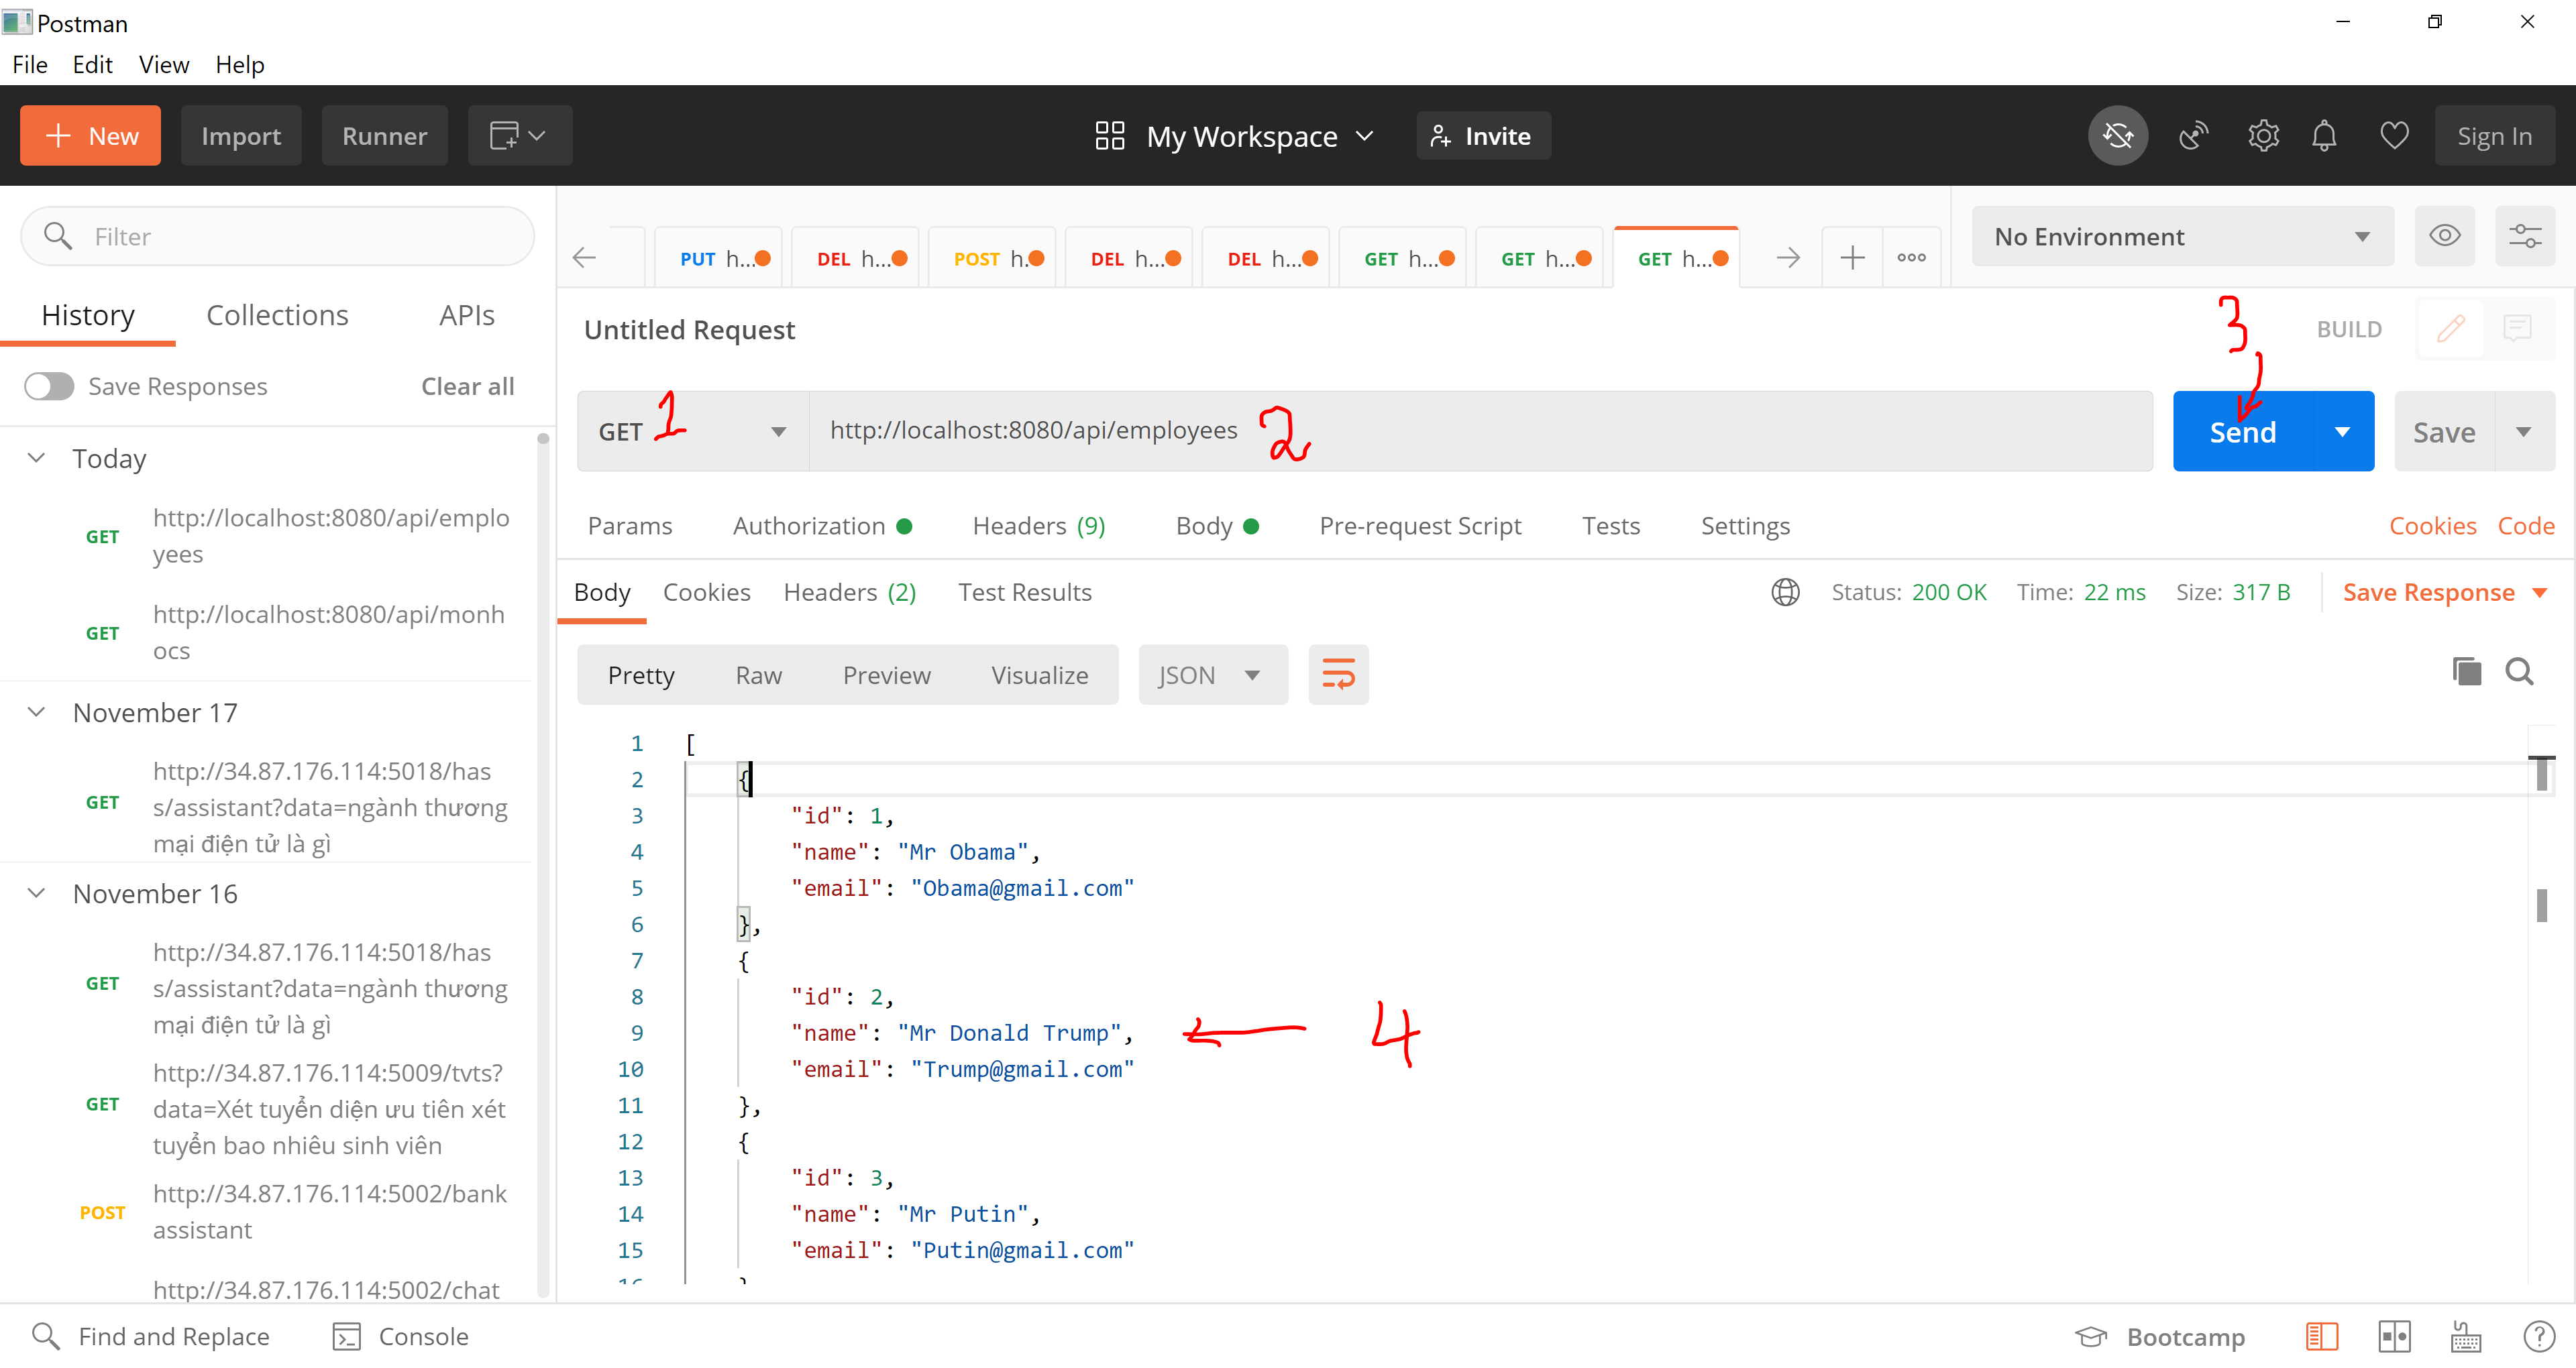
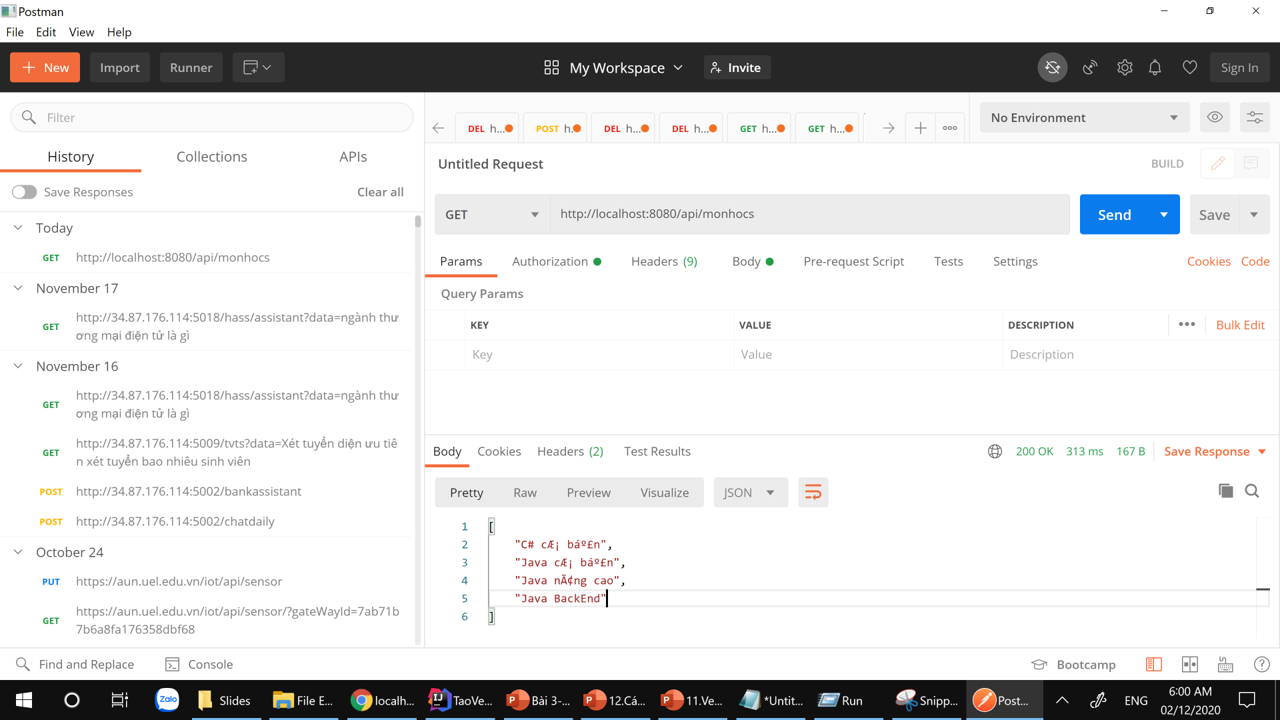
Bây giờ ta triệu gọi API lấy danh sách Employee, từ Postman ta triệu gọi:
Mục 1: Chọn GET
Mục 2: chọn API http://localhost:8080/api/employees
Mục 3: Chọn Authorization, trong Type chọn Bearer Token
Mục 4: Nhập token ở bước đăng nhập mà hệ thống trả về, dán vào mục Token
Mục 5: nhấn Send để truy vập API lấy danh sách Employee
Mục 6: sau khi xác thực thành công thì ta có kết quả như bên dưới, không bị báo là chưa xác thực. Lưu ý là token ta cấu hình chỉ có 60 giây vòng đời, các Em muốn tăng thì cứ tăng lên để test.
Như vậy tới đây Tui đã trình bày một cách đầy đủ và chi tiết từng bước tạo xác thực cho các API. các Bạn dựa vào đây để áp dụng cho các hàm còn lại nha (thực ra đơn giản), ráng suy nghĩ, coi như là 1 bài tập Tui giao.
Như vậy trong CRUD API các bạn đã xong được C, R, U. Bây giờ ta qua API cuối cùng nhé, đó là Xóa dữ liệu trong Vert.X. Sau bài này các bạn sẽ được học về Authen, MongoDB kết hợp với Vert.X
(nguồn hình https://debugmode.net/)
C: Create (thêm mới)-> dùng phương thức POST
R: Retrieve (hay Read), truy vấn và sắp xếp dữ liệu-> dùng phương thức GET
U: Update – Cập nhật dữ liệu->dùng phương thức PUT
D: Delete->xóa dữ liệu->dùng phương thức Delete
Ta bổ sung coding bằng cách thêm hàm deleteOneEmployee. Hàm này sẽ nhận vào id của Employee truyền vào để tiến hành kiểm tra và xóa nếu id tồn tại:
[code language=”java”]
/**
* Hàm này dùng để xóa một Employee khi biết Id
* @param routingContext
*/
private void deleteOneEmployee(RoutingContext routingContext) {
HttpServerResponse response=routingContext.response();
response.putHeader(“content-type”,”application/json;charset=UTF-8″);
//lấy id từ client
String sid=routingContext.request().getParam(“id”);
//đưa về int
int id=Integer.parseInt(sid);
//kiểm tra id tồn tại hay không
if(employees.containsKey(id)) {
employees.remove(id);//có thì xóa
response.end(“true”);//xóa thành công trả về true
}
else
response.end(“false”);//không tìm thấy trả về false
}
[/code]
/**
* Hàm này dùng để lấy danh sách dữ liệu Employee mà có sắp xếp
* http://localhost:8080/api/employeessort?sort=desc ->giảm dần
* http://localhost:8080/api/employeessort?sort=asc ->tăng dần
* @param routingContext
*/
private void getSortEmployees(RoutingContext routingContext) {
HttpServerResponse response=routingContext.response();
response.putHeader(“content-type”,”application/json;charset=UTF-8″);
//parameter lấy từ người dùng
String sort = routingContext.request().getParam(“sort”);
if (sort == null)
{
//nếu không có thì cho lỗi luôn API
routingContext.response().setStatusCode(400).end();
}
else
{
//dùng ArrayList để lưu trữ các Key của dữ liệu
ArrayList sortedKeys =
new ArrayList(employees.keySet());
//mặc định sắp xếp tăng dần các Key
Collections.sort(sortedKeys);
//nếu sort là desc (giảm dần)
if(sort.equalsIgnoreCase(“desc”))
{
//thì đảo ngược lại danh sách đang tăng dần -> nó tự thành giảm dần
Collections.reverse(sortedKeys);
}
//khai báo danh sách Employee là ArrayList
ArrayListsortEmployees=new ArrayList();
//vòng lặp theo Key
for (int key : sortedKeys)
{
//mỗi lần lấy employees.get(key) là đã lấy tăng dần hoặc giảm dần (vì key đã sắp xếp)
sortEmployees.add(employees.get(key));
}
//trả về danh sách đã sắp xêp
response.end(Json.encodePrettily(sortEmployees));
}
}
//Hàm trả về thông tin chi tiết của 1 Employee khi biết Id của họ
private void getOneEmployee(RoutingContext routingContext) {
HttpServerResponse response=routingContext.response();
response.putHeader(“content-type”,”application/json;charset=utf-8″);
//lấy id nhập từ URL
String sid = routingContext.request().getParam(“id”);
if (sid == null) {//nếu không tồn tại thì báo lỗi
routingContext.response().setStatusCode(400).end();
}
else
{
//đưa id đó về số (vì dữ liệu lấy từ URL là chuỗi
int id=Integer.parseInt(sid);
//trả về Empoyee có mã là id
Employee empFound=employees.get(id);
//xuất Json chi tiết Employee ra cho client
response.end(Json.encodePrettily(empFound));
}
}
//Hàm nhận Json Object Employee để lưu vào Server
private void insertNewEmployee(RoutingContext routingContext) {
HttpServerResponse response=routingContext.response();
response.putHeader(“content-type”,”application/json;charset=UTF8″);
try {
//routingContext.getBody() lấy dữ liệu từ client gửi lên, nó có định dạng Json
//Json.decodeValue(routingContext.getBody(),Employee.class);->đưa Json đó về Employee
Employee emp=Json.decodeValue(routingContext.getBody(),Employee.class);
//đưa vào HashMap
employees.put(emp.getId(),emp);
//xuất kết quả là true xuống cho client nếu lưu thành công
response.end(“true”);
}
catch (Exception ex)
{
response.end(ex.getMessage());//lưu thất bại (khác true)
}
}
/**
* Hàm cập nhật dữ liệu
* @param routingContext
*/
private void updateOneEmpoyee(RoutingContext routingContext) {
HttpServerResponse response=routingContext.response();
response.putHeader(“content-type”,”application/json;charset=UTF8″);
//routingContext.getBody() lấy dữ liệu là cấu trúc Json từ client
//Json.decodeValue(routingContext.getBody(),Employee.class); mô hình hóa là Java model
Employee emp=Json.decodeValue(routingContext.getBody(),Employee.class);
//kiểm tra id tồn tại không
if(employees.containsKey(emp.getId()))
{
employees.put(emp.getId(), emp);//nếu tốn tại thì chỉnh sửa
response.end(“true”);//trả về true khi chỉnh sửa thành công
}
else
response.end(“false”);//trả về false khi chỉnh sửa thất bại
}
/**
* Hàm này dùng để xóa một Employee khi biết Id
* @param routingContext
*/
private void deleteOneEmployee(RoutingContext routingContext) {
HttpServerResponse response=routingContext.response();
response.putHeader(“content-type”,”application/json;charset=UTF-8″);
//lấy id từ client
String sid=routingContext.request().getParam(“id”);
//đưa về int
int id=Integer.parseInt(sid);
//kiểm tra id tồn tại hay không
if(employees.containsKey(id)) {
employees.remove(id);//có thì xóa
response.end(“true”);//xóa thành công trả về true
}
else
response.end(“false”);//không tìm thấy trả về false
}
}
[/code]
Chạy phần mềm ta được:
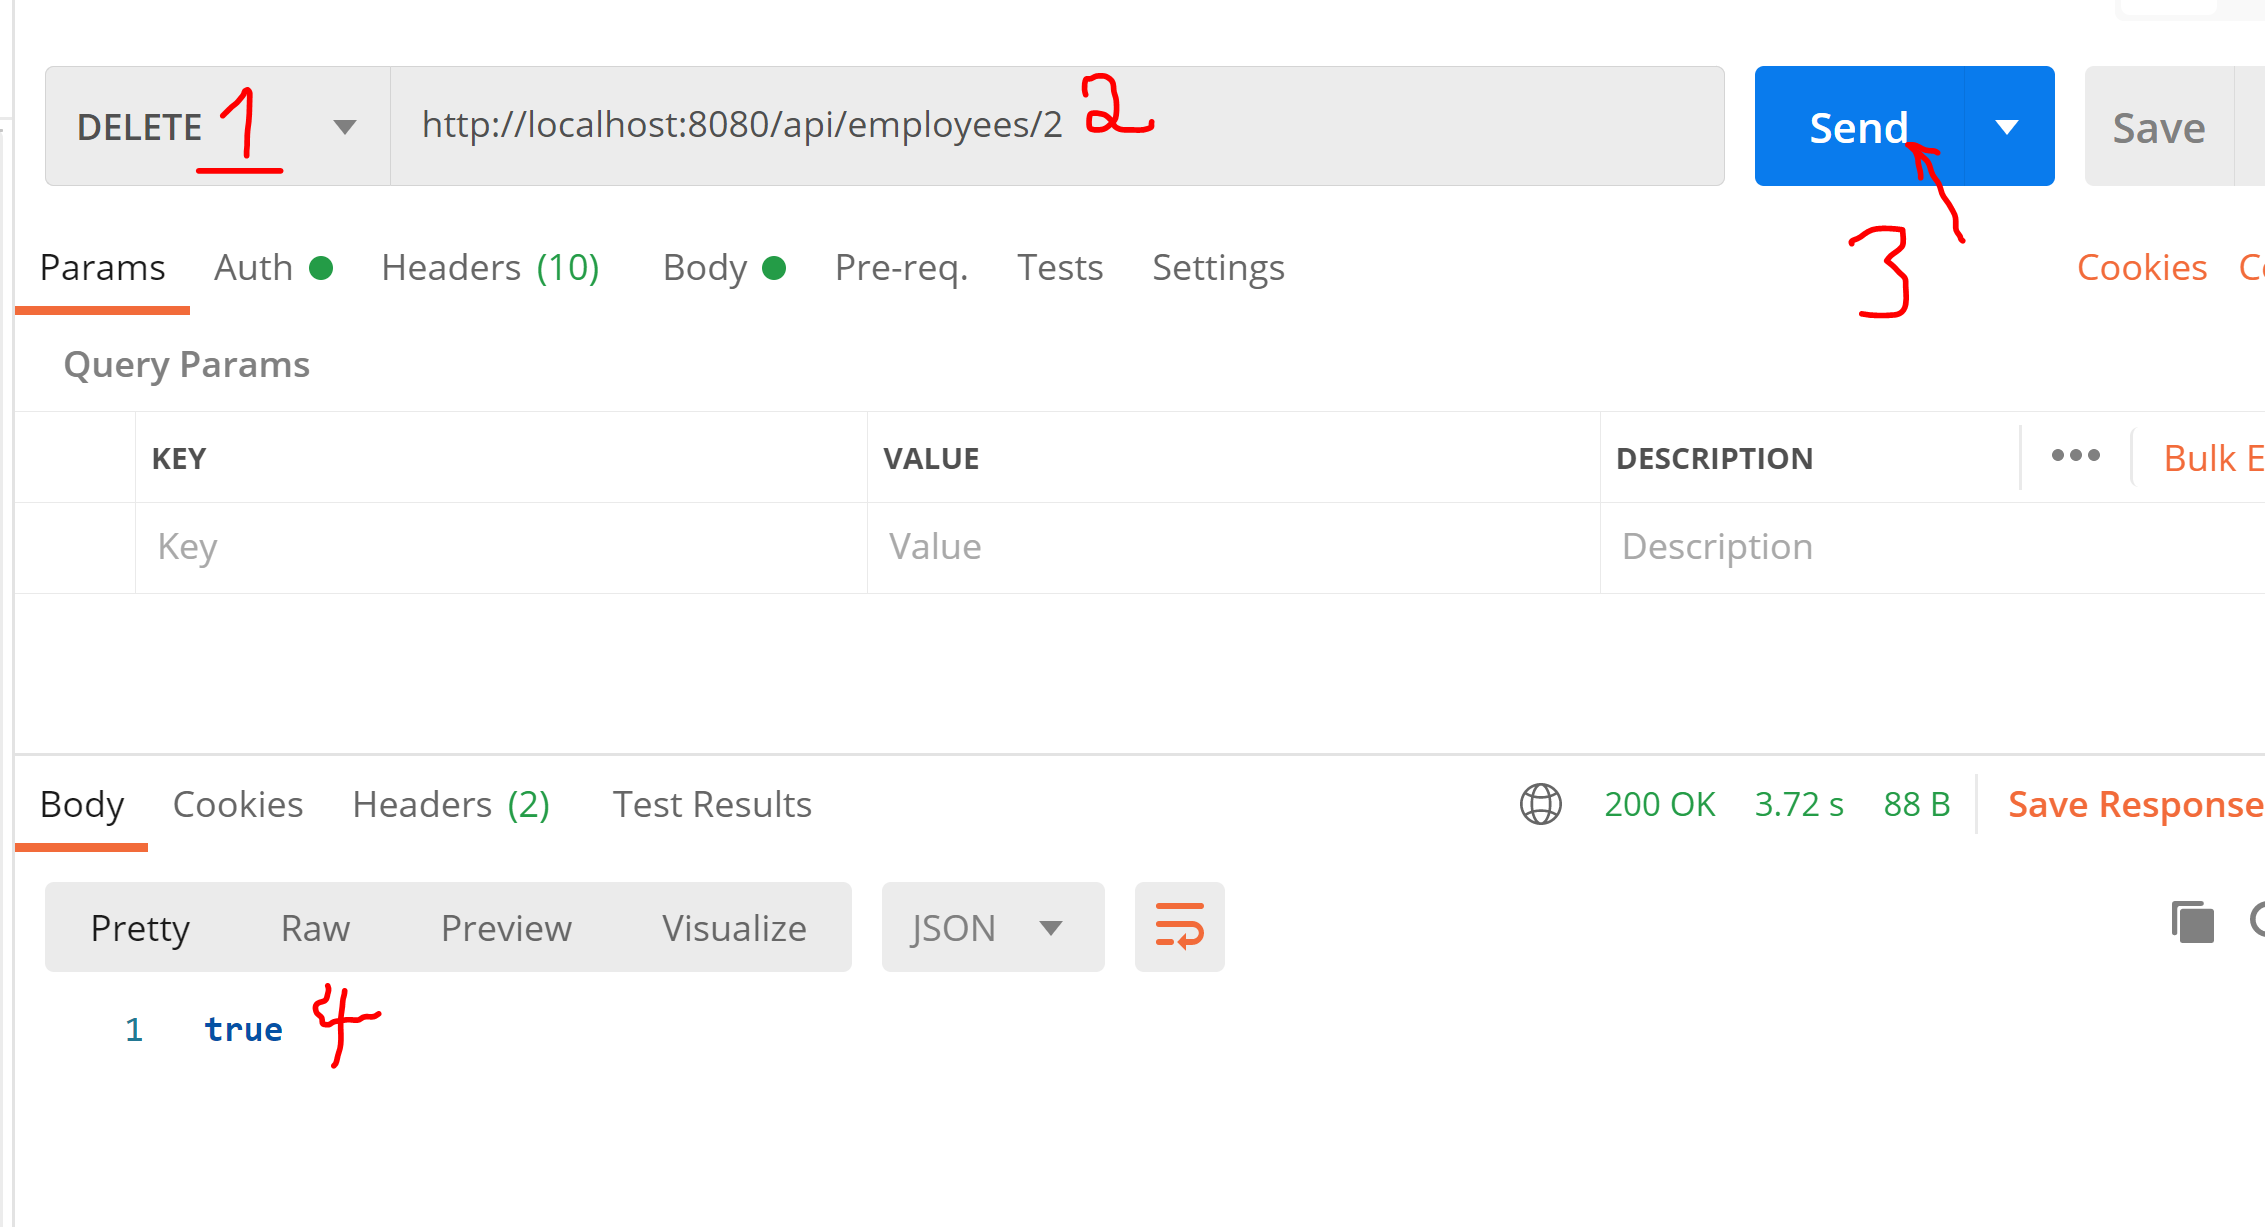
chọn Phương thức DELETE
nhập http://localhost:8080/api/employees/2 với 2 là id employee muốn xóa
nhấn nút send
kết quả trả về true nếu xóa thành công, false nếu xóa thất bại
Sau đó build một hàm tên updateOneEmpoyee để cập nhật dữ liệu:
[code language=”java”]
/**
* Hàm cập nhật dữ liệu
* @param routingContext
*/
private void updateOneEmpoyee(RoutingContext routingContext) {
HttpServerResponse response=routingContext.response();
response.putHeader(“content-type”,”application/json;charset=UTF8″);
//routingContext.getBody() lấy dữ liệu là cấu trúc Json từ client
//Json.decodeValue(routingContext.getBody(),Employee.class); mô hình hóa là Java model
Employee emp=Json.decodeValue(routingContext.getBody(),Employee.class);
//kiểm tra id tồn tại không
if(employees.containsKey(emp.getId()))
{
employees.put(emp.getId(), emp);//nếu tốn tại thì chỉnh sửa
response.end(“true”);//trả về true khi chỉnh sửa thành công
}
else
response.end(“false”);//trả về false khi chỉnh sửa thất bại
}
[/code]
/**
* Hàm này dùng để lấy danh sách dữ liệu Employee mà có sắp xếp
* http://localhost:8080/api/employeessort?sort=desc ->giảm dần
* http://localhost:8080/api/employeessort?sort=asc ->tăng dần
* @param routingContext
*/
private void getSortEmployees(RoutingContext routingContext) {
HttpServerResponse response=routingContext.response();
response.putHeader(“content-type”,”application/json;charset=UTF-8″);
//parameter lấy từ người dùng
String sort = routingContext.request().getParam(“sort”);
if (sort == null)
{
//nếu không có thì cho lỗi luôn API
routingContext.response().setStatusCode(400).end();
}
else
{
//dùng ArrayList để lưu trữ các Key của dữ liệu
ArrayList sortedKeys =
new ArrayList(employees.keySet());
//mặc định sắp xếp tăng dần các Key
Collections.sort(sortedKeys);
//nếu sort là desc (giảm dần)
if(sort.equalsIgnoreCase(“desc”))
{
//thì đảo ngược lại danh sách đang tăng dần -> nó tự thành giảm dần
Collections.reverse(sortedKeys);
}
//khai báo danh sách Employee là ArrayList
ArrayListsortEmployees=new ArrayList();
//vòng lặp theo Key
for (int key : sortedKeys)
{
//mỗi lần lấy employees.get(key) là đã lấy tăng dần hoặc giảm dần (vì key đã sắp xếp)
sortEmployees.add(employees.get(key));
}
//trả về danh sách đã sắp xêp
response.end(Json.encodePrettily(sortEmployees));
}
}
//Hàm trả về thông tin chi tiết của 1 Employee khi biết Id của họ
private void getOneEmployee(RoutingContext routingContext) {
HttpServerResponse response=routingContext.response();
response.putHeader(“content-type”,”application/json;charset=utf-8″);
//lấy id nhập từ URL
String sid = routingContext.request().getParam(“id”);
if (sid == null) {//nếu không tồn tại thì báo lỗi
routingContext.response().setStatusCode(400).end();
}
else
{
//đưa id đó về số (vì dữ liệu lấy từ URL là chuỗi
int id=Integer.parseInt(sid);
//trả về Empoyee có mã là id
Employee empFound=employees.get(id);
//xuất Json chi tiết Employee ra cho client
response.end(Json.encodePrettily(empFound));
}
}
//Hàm nhận Json Object Employee để lưu vào Server
private void insertNewEmployee(RoutingContext routingContext) {
HttpServerResponse response=routingContext.response();
response.putHeader(“content-type”,”application/json;charset=UTF8″);
try {
//routingContext.getBody() lấy dữ liệu từ client gửi lên, nó có định dạng Json
//Json.decodeValue(routingContext.getBody(),Employee.class);->đưa Json đó về Employee
Employee emp=Json.decodeValue(routingContext.getBody(),Employee.class);
//đưa vào HashMap
employees.put(emp.getId(),emp);
//xuất kết quả là true xuống cho client nếu lưu thành công
response.end(“true”);
}
catch (Exception ex)
{
response.end(ex.getMessage());//lưu thất bại (khác true)
}
}
/**
* Hàm cập nhật dữ liệu
* @param routingContext
*/
private void updateOneEmpoyee(RoutingContext routingContext) {
HttpServerResponse response=routingContext.response();
response.putHeader(“content-type”,”application/json;charset=UTF8″);
//routingContext.getBody() lấy dữ liệu là cấu trúc Json từ client
//Json.decodeValue(routingContext.getBody(),Employee.class); mô hình hóa là Java model
Employee emp=Json.decodeValue(routingContext.getBody(),Employee.class);
//kiểm tra id tồn tại không
if(employees.containsKey(emp.getId()))
{
employees.put(emp.getId(), emp);//nếu tốn tại thì chỉnh sửa
response.end(“true”);//trả về true khi chỉnh sửa thành công
}
else
response.end(“false”);//trả về false khi chỉnh sửa thất bại
}
}
[/code]
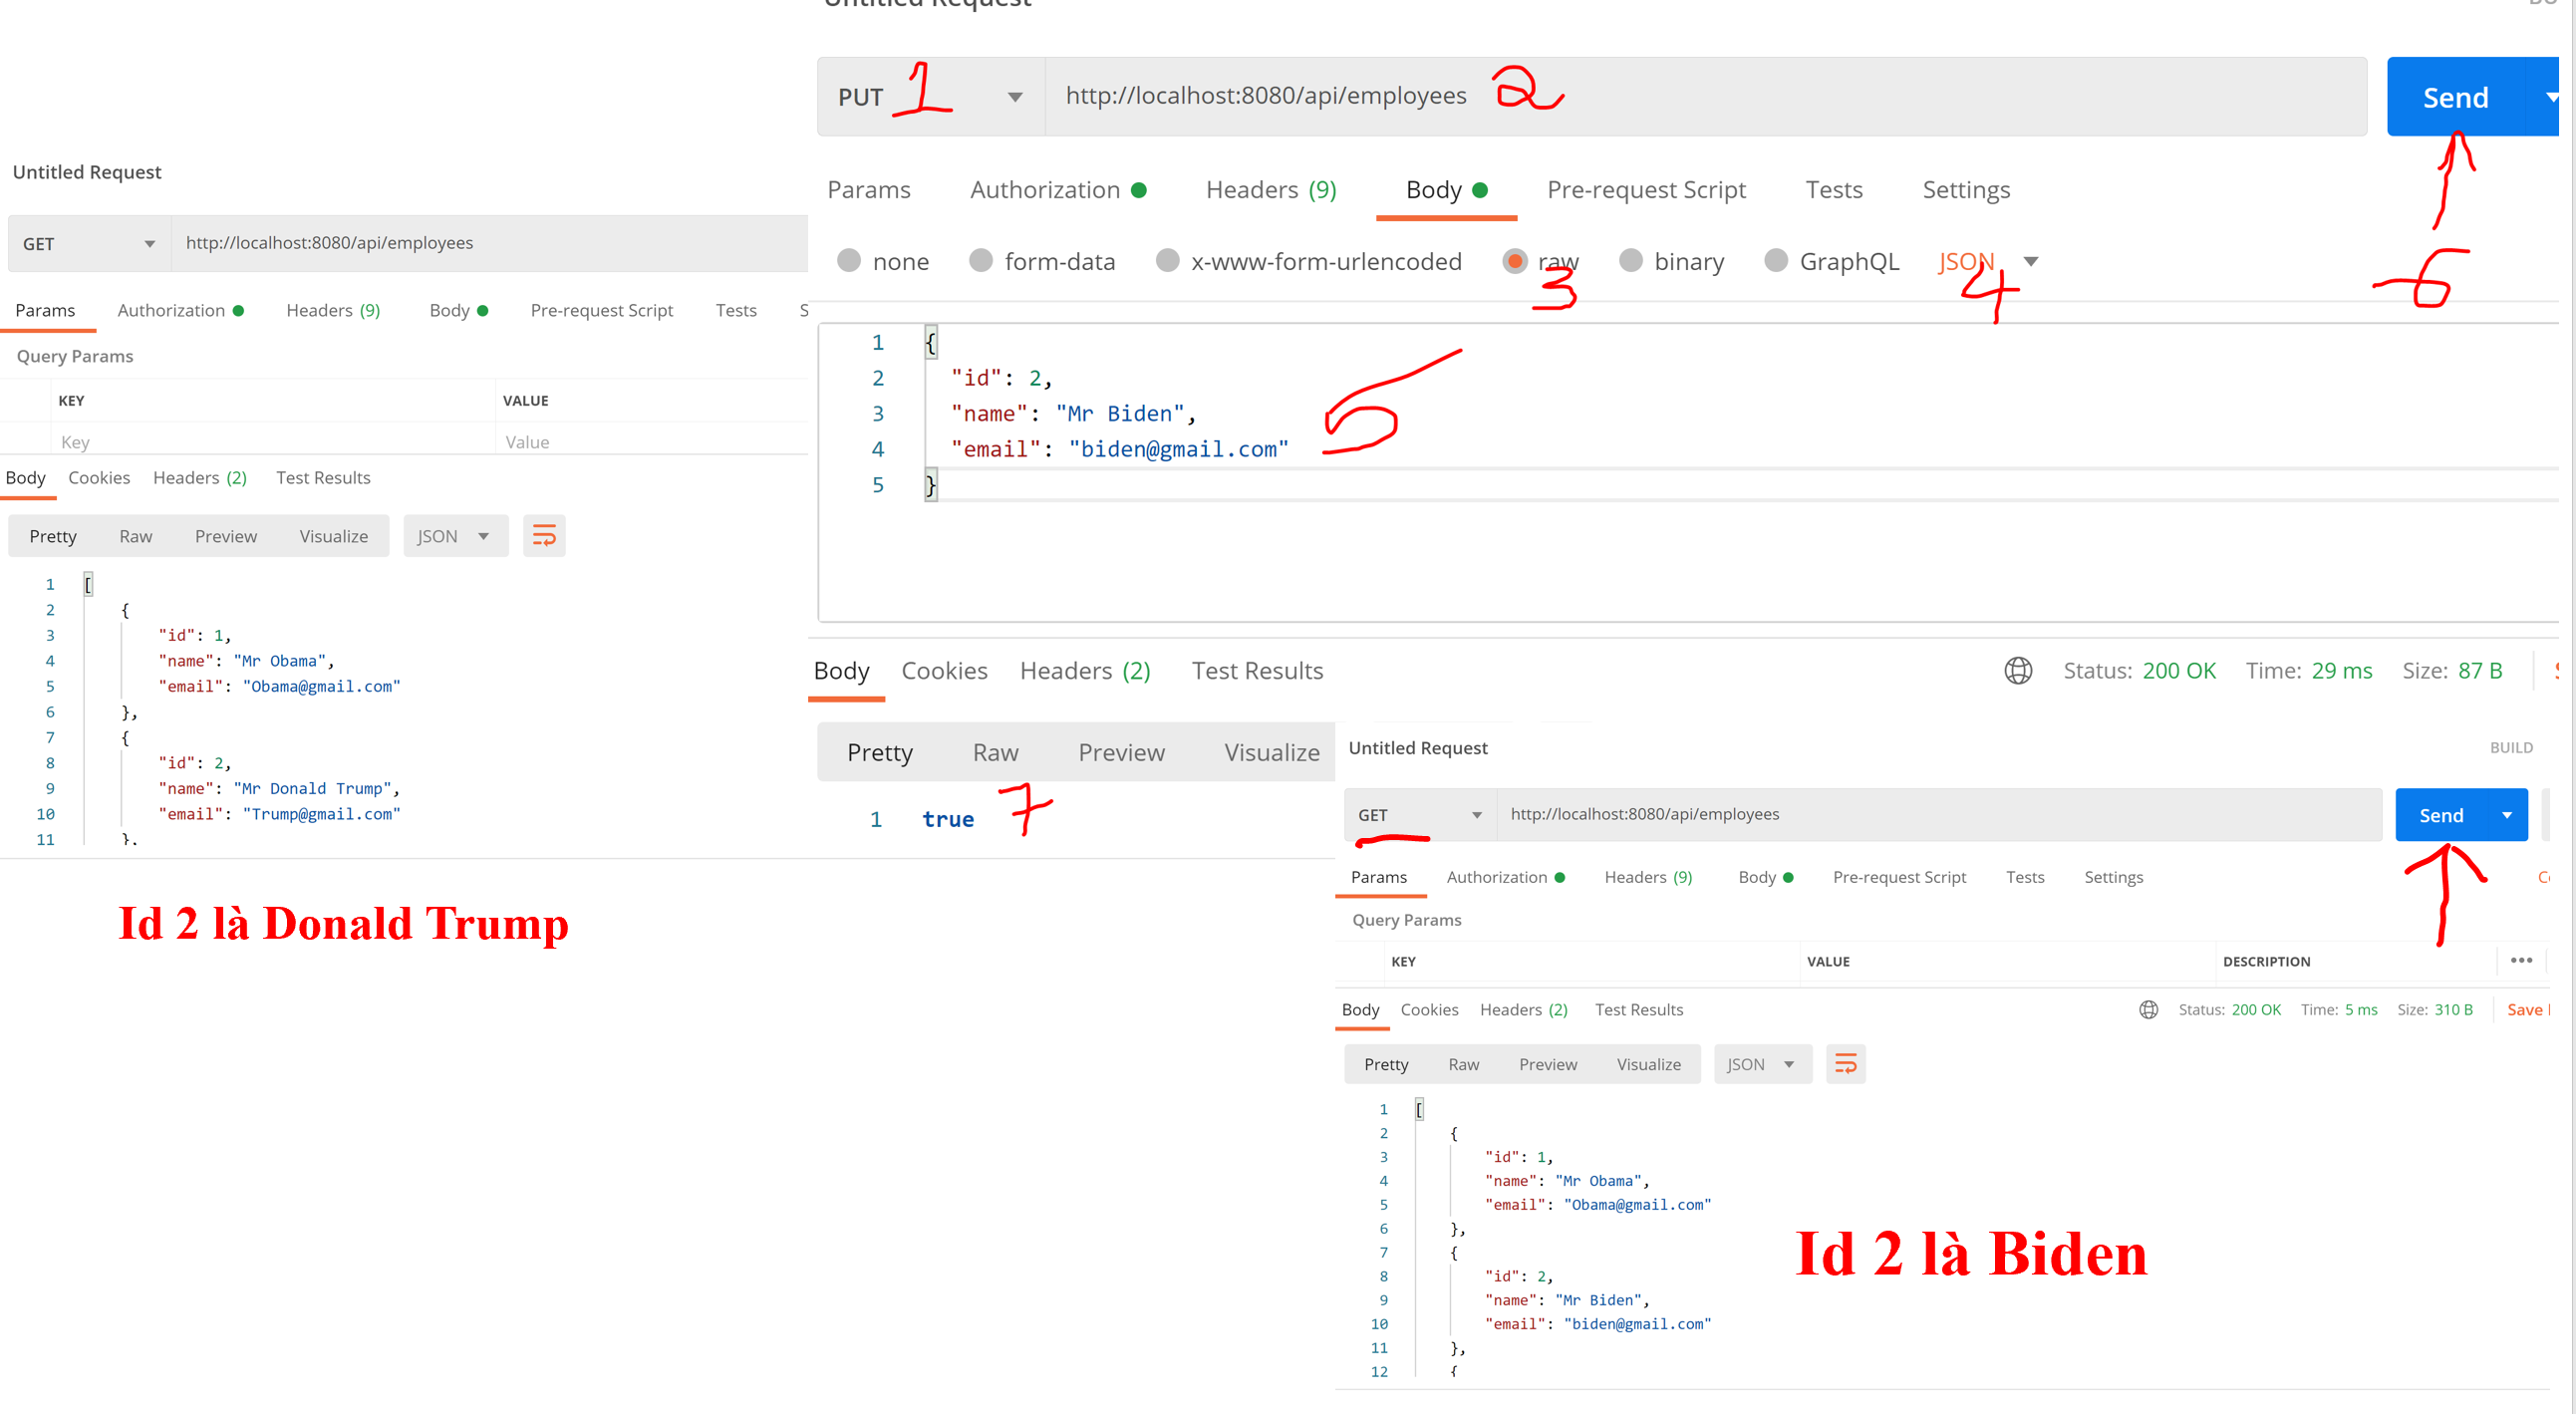
Deploy EmployeeVerticle, ta thử nghiệm thứ tự:
gọi API GET để lấy danh sách Employee->có Id 2 tên là Mr Donald Trump
sau đó gọi method PUT, chỉnh cấu trúc body Json là Employee như:
chọn phương thức PUT (nút số 1)
chọn API http://localhost:8080/api/employees (nút số 2)
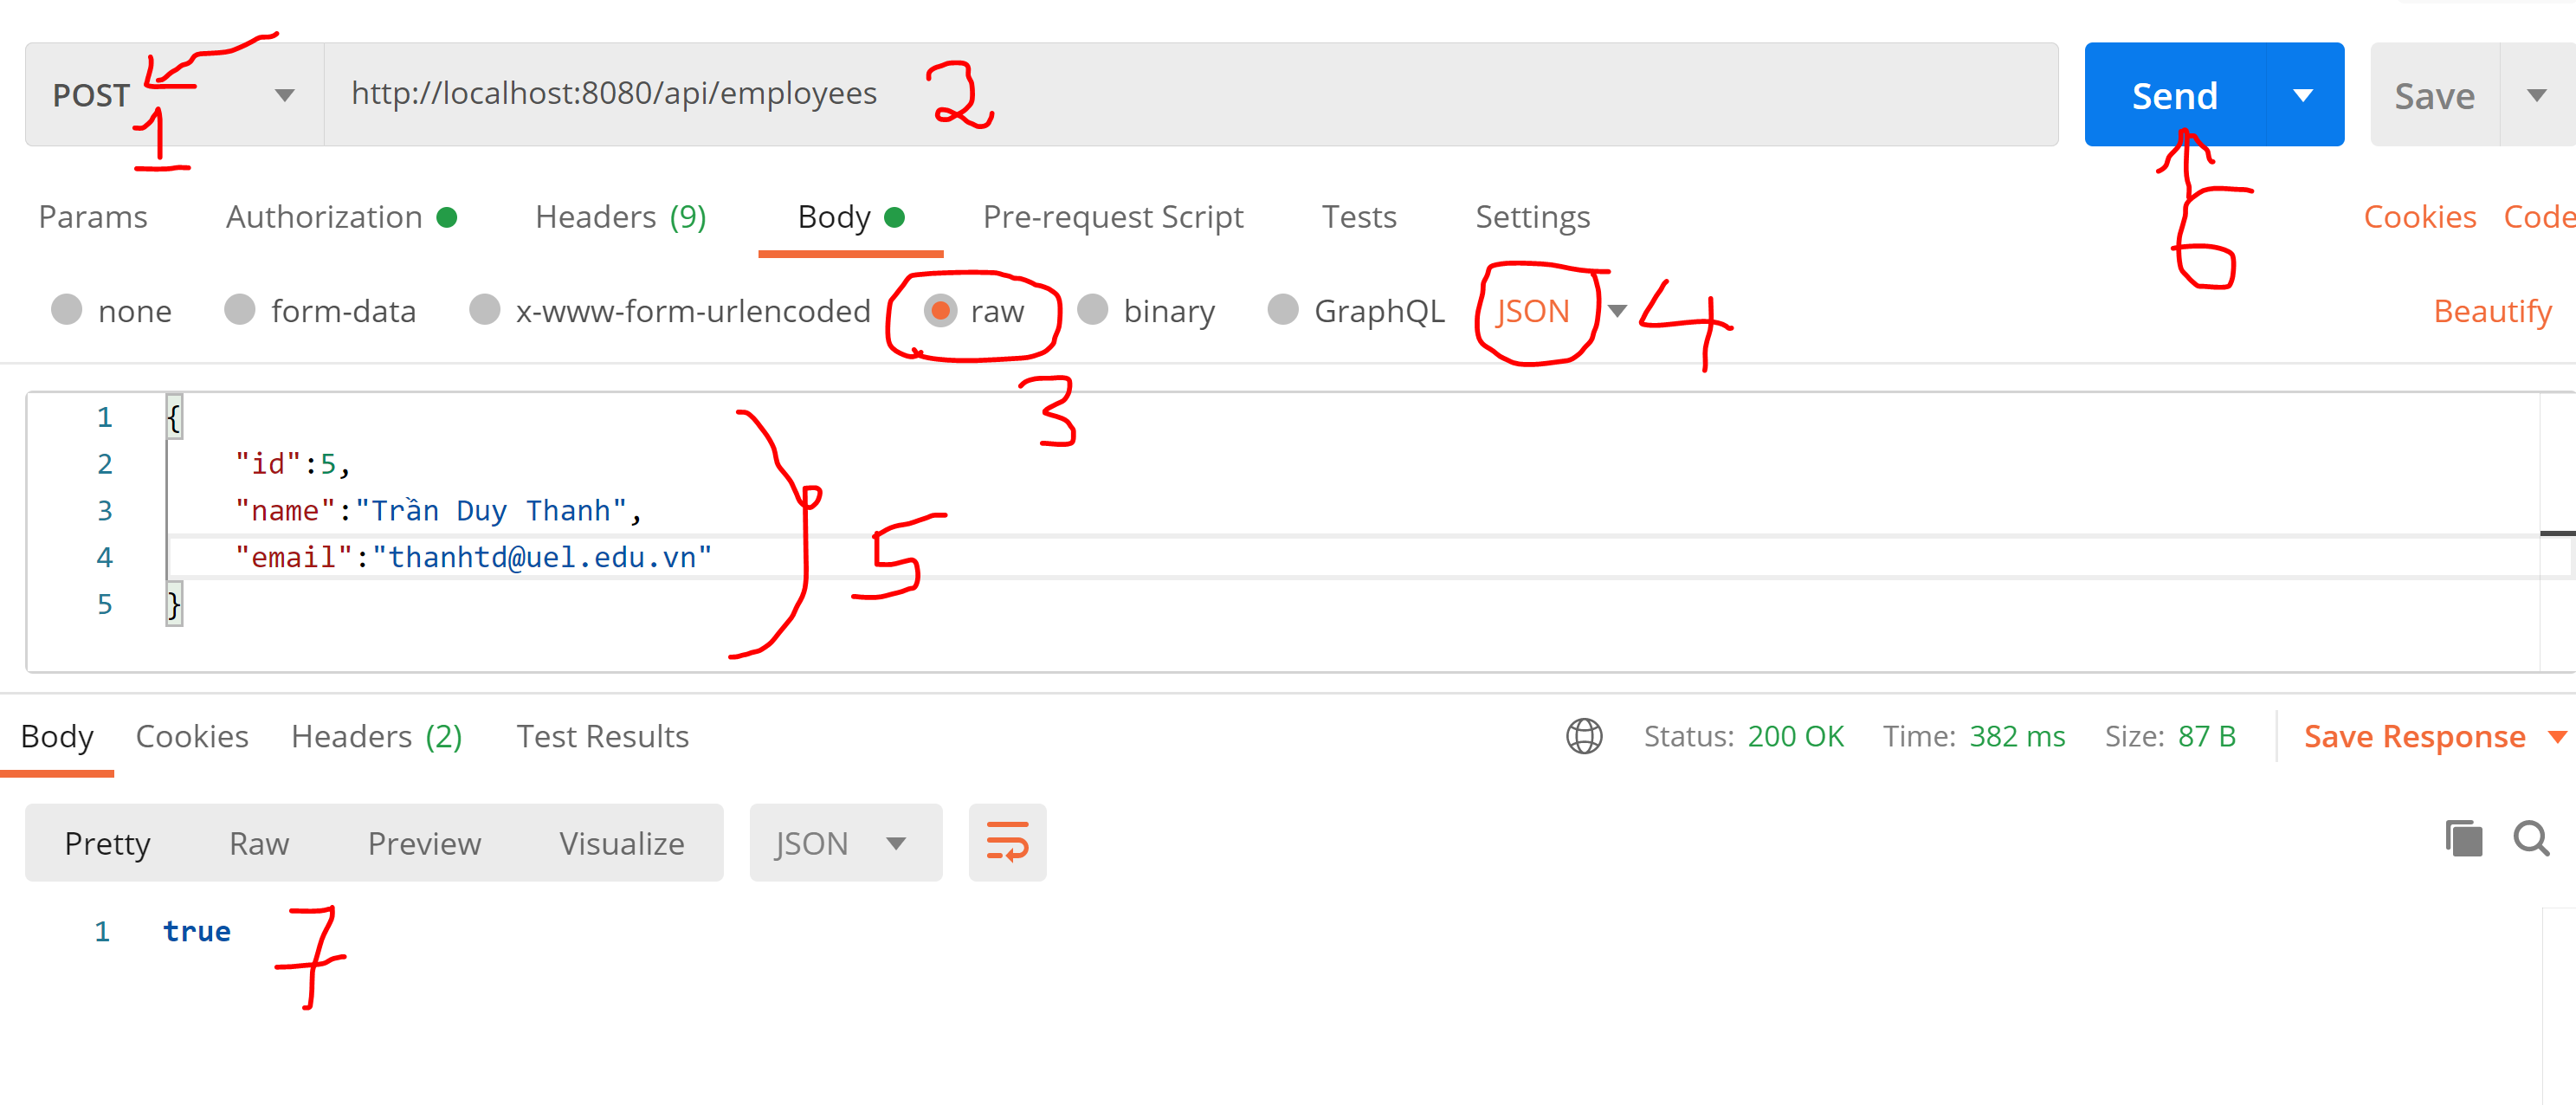
Các bài trước, Tui đã hướng dẫn tạo các Rest API GET để lấy danh sách dữ liệu, sắp xếp danh sách và xem chi tiết đối tượng. Ở bài này chúng ta học Method mới, đó là POST để thêm mới dữ liệu lên Server.
trong các bài này, Tui đang dùng In-Memory Data. lưu danh sách Employee trong HashMap. Ở các bài sau, các bạn sẽ được học cách thức lưu trữ và thao tác trên MongoDB. Trước tiên cần biết kỹ thuật tạo Rest API POST đã.
các dữ liệu chuyển qua lại giữa Client-Server ta sẽ dùng định dạng Json, xem thêm lý thuyết ở đây.
Trước tiên trong public void start(Promise startPromise)
Lệnh trên giúp hệ thống nhận các dữ liệu từ client gửi lên. Nếu thiếu sẽ báo lỗi.
Sau đó trong EmployeeVerticle ta tiếp tục viết hàm để nhận Json Object là Employee gửi lên như sau:
[code language=”java”]
//Hàm nhận Json Object Employee để lưu vào Server
private void insertNewEmployee(RoutingContext routingContext) {
HttpServerResponse response=routingContext.response();
response.putHeader(“content-type”,”application/json;charset=UTF8″);
try {
//routingContext.getBody() lấy dữ liệu từ client gửi lên, nó có định dạng Json
//Json.decodeValue(routingContext.getBody(),Employee.class);->đưa Json đó về Employee
Employee emp=Json.decodeValue(routingContext.getBody(),Employee.class);
//đưa vào HashMap
employees.put(emp.getId(),emp);
//xuất kết quả là true xuống cho client nếu lưu thành công
response.end(“true”);
}
catch (Exception ex)
{
response.end(ex.getMessage());//lưu thất bại (khác true)
}
}
[/code]
Trong start ngay đằng sau BodyHandler.create() gọi lệnh insertNewEmployee:
ở trên cú pháp :id cho phép ta lấy dữ liệu theo dạng :
/api/employees/1 –> lấy chi tiết Employee có id =1
/api/employees/2–>lấy chi tiết Employee có id =2
và hàm getOneEmployee: Hàm này sẽ nhận parameter mà ta triệu gọi. Sau đó tìm Employee có Id giống như Parameter này trả về cho viết client, coding:
[code language=”java”]
private void getOneEmployee(RoutingContext routingContext) {
HttpServerResponse response=routingContext.response();
response.putHeader(“content-type”,”application/json;charset=utf-8″);
//lấy id nhập từ URL
String sid = routingContext.request().getParam(“id”);
if (sid == null) {//nếu không tồn tại thì báo lỗi
routingContext.response().setStatusCode(400).end();
}
else
{
//đưa id đó về số (vì dữ liệu lấy từ URL là chuỗi
int id=Integer.parseInt(sid);
//trả về Empoyee có mã là id
Employee empFound=employees.get(id);
//xuất Json chi tiết Employee ra cho client
response.end(Json.encodePrettily(empFound));
}
}
[/code]
public class EmployeeVerticle extends AbstractVerticle
{
private HashMap employees=new HashMap();
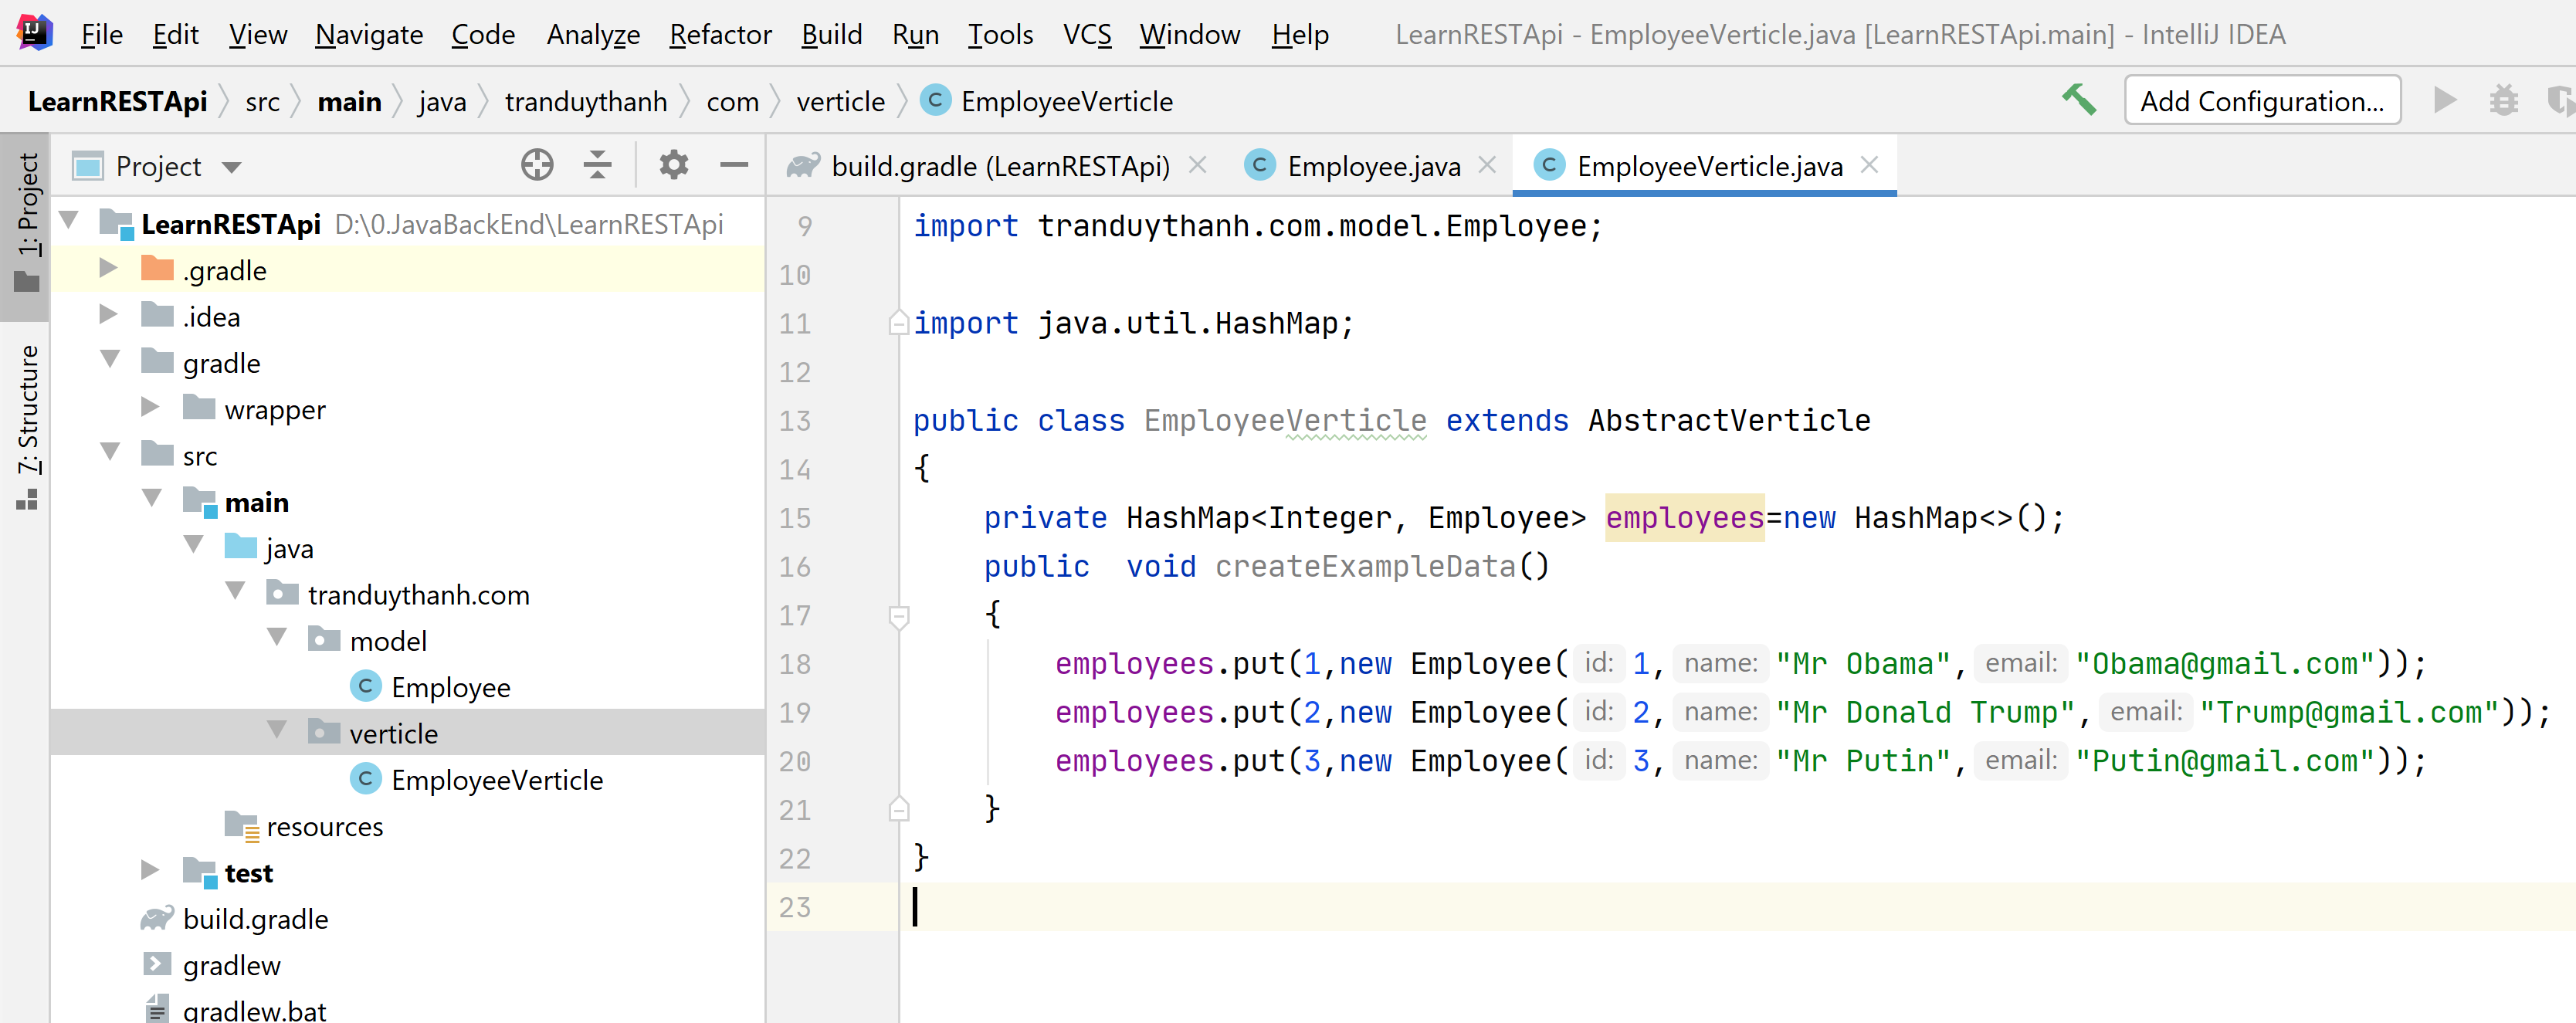
public void createExampleData()
{
employees.put(1,new Employee(1,”Mr Obama”,”Obama@gmail.com”));
employees.put(2,new Employee(2,”Mr Donald Trump”,”Trump@gmail.com”));
employees.put(3,new Employee(3,”Mr Putin”,”Putin@gmail.com”));
}
private void getAllEmployees(RoutingContext routingContext) {
HttpServerResponse response=routingContext.response();
response.putHeader(“content-type”,”application/json;charset=UTF-8″);
response.end(Json.encodePrettily(employees.values()));
}
@Override
public void start(Promise startPromise) throws Exception {
createExampleData();
Router router=Router.router(vertx);
router.get(“/api/employees”).handler(this::getAllEmployees);
router.get(“/api/employeessort”).handler(this::getSortEmployees);
router.get(“/api/employees/:id”).handler(this::getOneEmployee);
vertx
.createHttpServer()
.requestHandler(router::accept)
.listen(config().getInteger(“http.port”, 8080),
result -> {
if (result.succeeded()) {
startPromise.complete();
} else {
startPromise.fail(result.cause());
}
}
);
}
/**
* Hàm này dùng để lấy danh sách dữ liệu Employee mà có sắp xếp
* http://localhost:8080/api/employeessort?sort=desc ->giảm dần
* http://localhost:8080/api/employeessort?sort=asc ->tăng dần
* @param routingContext
*/
private void getSortEmployees(RoutingContext routingContext) {
HttpServerResponse response=routingContext.response();
response.putHeader(“content-type”,”application/json;charset=UTF-8″);
//parameter lấy từ người dùng
String sort = routingContext.request().getParam(“sort”);
if (sort == null)
{
//nếu không có thì cho lỗi luôn API
routingContext.response().setStatusCode(400).end();
}
else
{
//dùng ArrayList để lưu trữ các Key của dữ liệu
ArrayList sortedKeys =
new ArrayList(employees.keySet());
//mặc định sắp xếp tăng dần các Key
Collections.sort(sortedKeys);
//nếu sort là desc (giảm dần)
if(sort.equalsIgnoreCase(“desc”))
{
//thì đảo ngược lại danh sách đang tăng dần -> nó tự thành giảm dần
Collections.reverse(sortedKeys);
}
//khai báo danh sách Employee là ArrayList
ArrayListsortEmployees=new ArrayList();
//vòng lặp theo Key
for (int key : sortedKeys)
{
//mỗi lần lấy employees.get(key) là đã lấy tăng dần hoặc giảm dần (vì key đã sắp xếp)
sortEmployees.add(employees.get(key));
}
//trả về danh sách đã sắp xêp
response.end(Json.encodePrettily(sortEmployees));
}
}
//Hàm trả về thông tin chi tiết của 1 Employee khi biết Id của họ
private void getOneEmployee(RoutingContext routingContext) {
HttpServerResponse response=routingContext.response();
response.putHeader(“content-type”,”application/json;charset=utf-8″);
//lấy id nhập từ URL
String sid = routingContext.request().getParam(“id”);
if (sid == null) {//nếu không tồn tại thì báo lỗi
routingContext.response().setStatusCode(400).end();
}
else
{
//đưa id đó về số (vì dữ liệu lấy từ URL là chuỗi
int id=Integer.parseInt(sid);
//trả về Empoyee có mã là id
Employee empFound=employees.get(id);
//xuất Json chi tiết Employee ra cho client
response.end(Json.encodePrettily(empFound));
}
}
}
[/code]
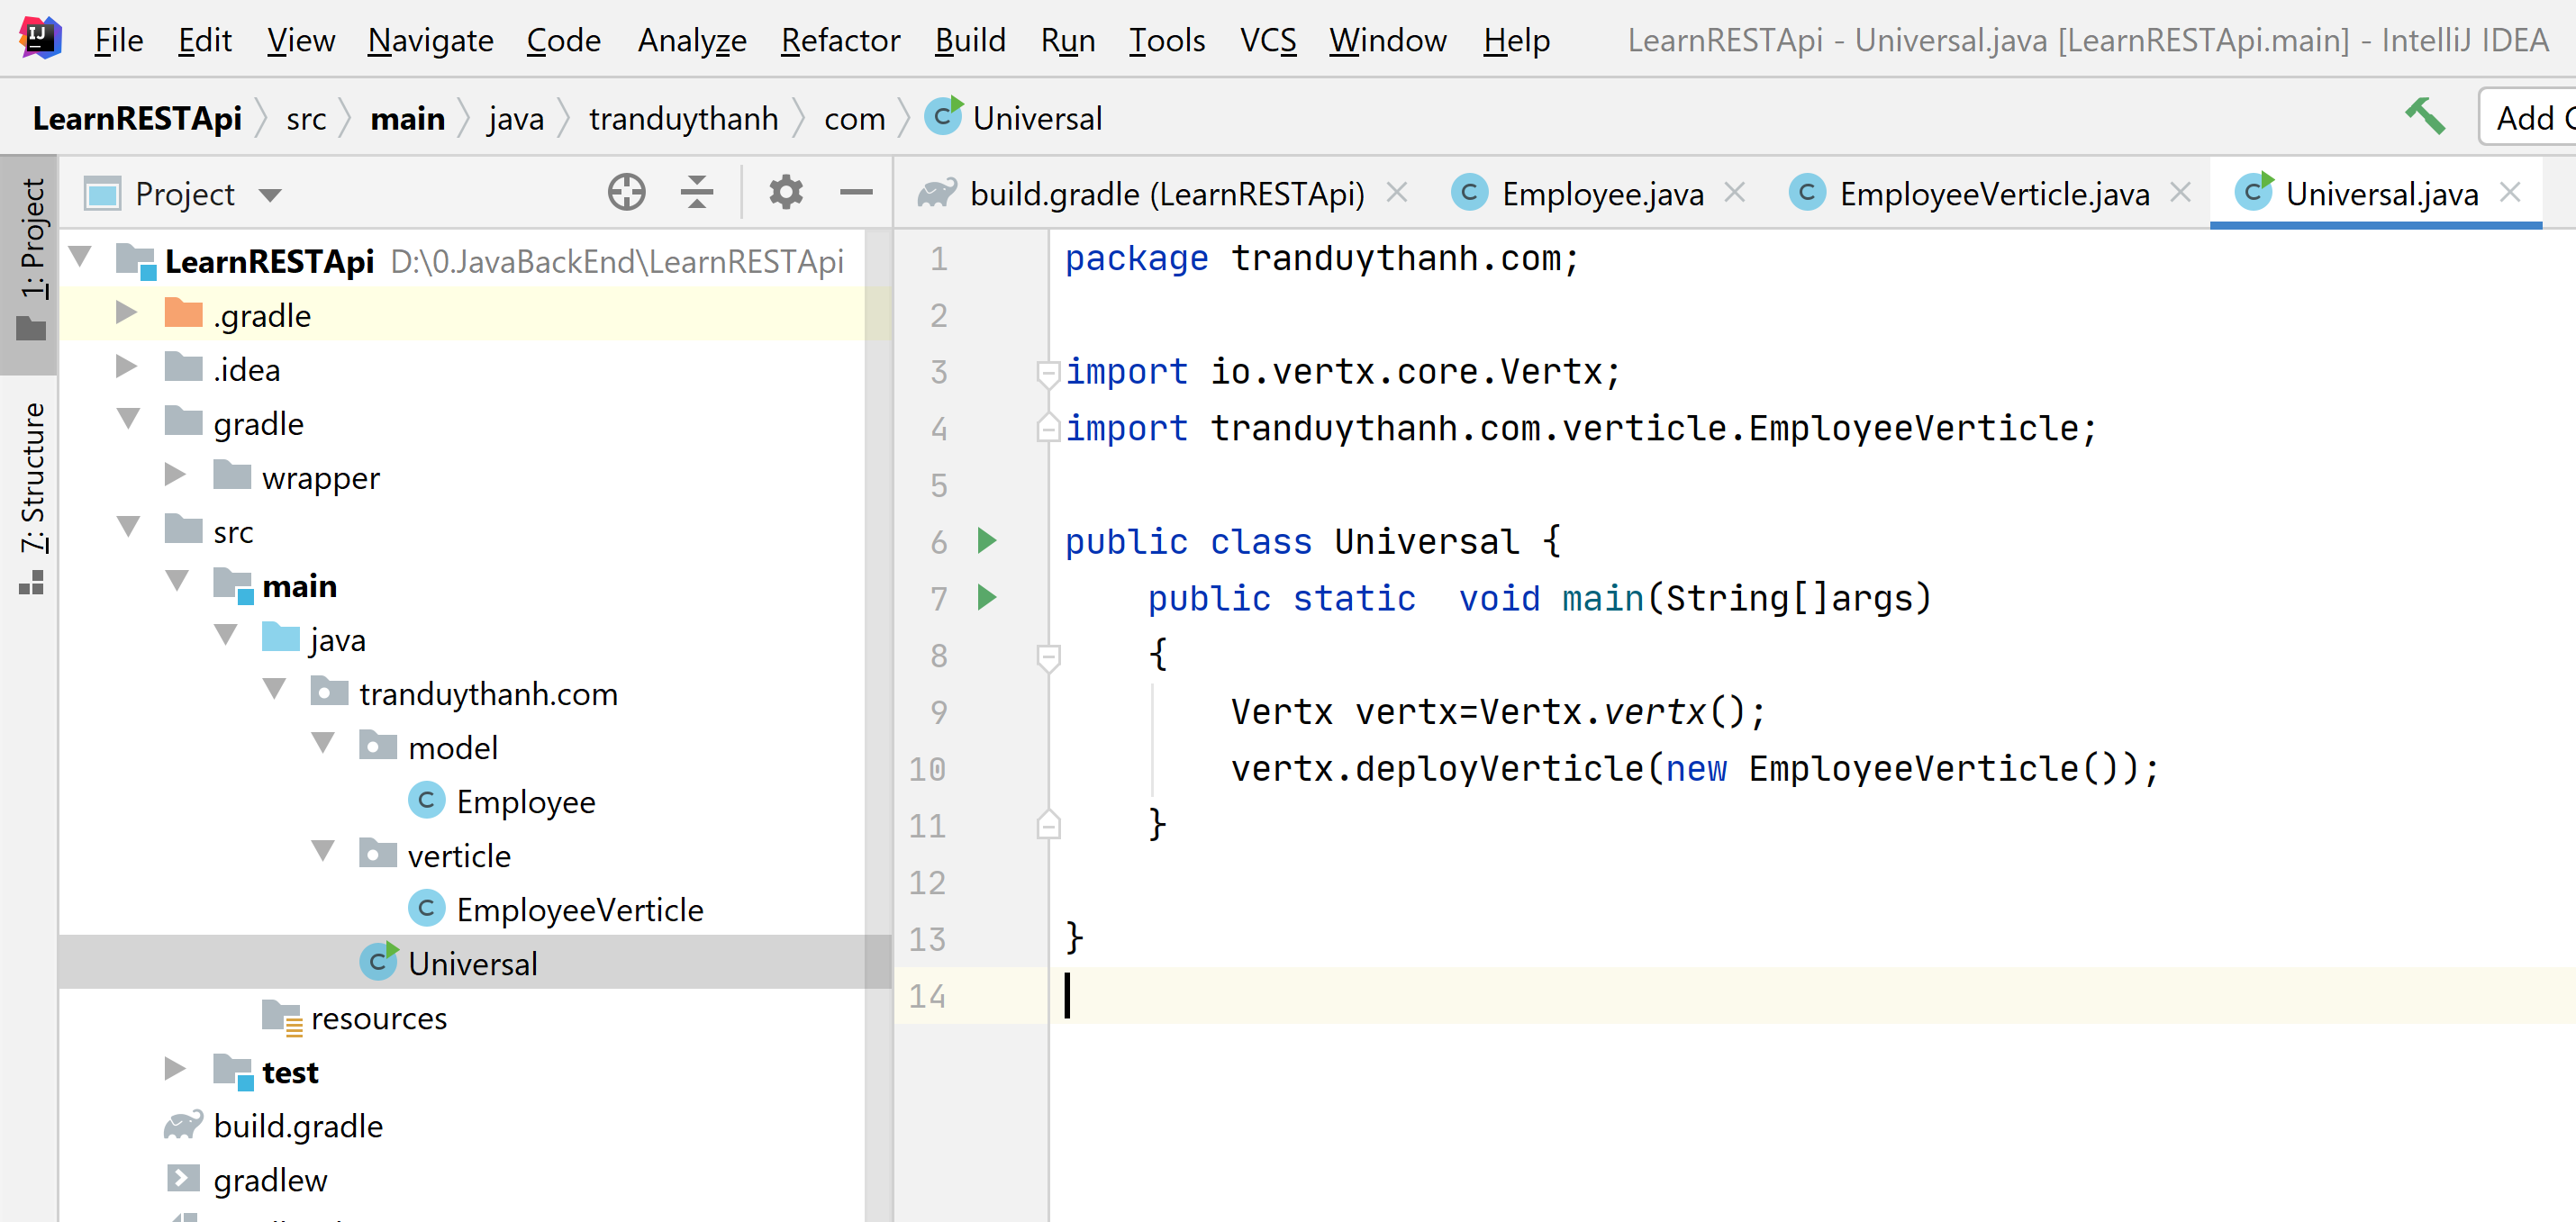
Vào lớp Universal để chạy ta sẽ có kết quả như mong muốn.
Như vậy các bạn đã biết cách viết API lấy chi tiết 1 đối tượng dựa vào id theo đúng cú pháp Rest
coding mẫu phần này ở đây: https://www.mediafire.com/file/5vmh4dm6hefpomv/LearnRESTApi_OneEmployee.rar/file
Bài sau Tui sẽ hướng dẫn các bạn cách thức thêm mới dữ liệu REST API POST
Ở bài 5, Tui đã hướng dẫn dẫn các bạn cách tạo API lấy danh sách employees rồi, trong quá trình truy vấn dữ liệu, đôi khi ta cần sắp xếp dữ liệu. Ở bài này Tui sẽ trình bày cách sắp xếp dữ liệu (tăng dần hoặc giảm dần tùy thuộc vào người dùng). Lưu ý dữ liệu ở đây là Fake, Tui tạo một số dữ liệu để Test, ở các bài sau chúng ta sẽ dùng dữ liệu trực tiếp trên MongoDB. Các bài này ở mức cơ bản, mục đích là giúp các bạn biết được kỹ thuật lấy danh sách cũng như lấy parameter từ chỗ gọi API như thế nào, khi qua MongoDB thì kỹ thuật y chang, chỉ khác chỗ thay vì lấy dữ liệu giả thì lấy dữ liệu thật từ MongoDB thôi.
Ta tiếp tục mở lại dự án “LearnRESTApi“. Trong EmployeeVerticle bổ sung thêm hàm getSortEmployees có nội dung như dưới đây:
[code language=”java”]
/**
* Hàm này dùng để lấy danh sách dữ liệu Employee mà có sắp xếp
* http://localhost:8080/api/employeessort?sort=desc ->giảm dần
* http://localhost:8080/api/employeessort?sort=asc ->tăng dần
* @param routingContext
*/
private void getSortEmployees(RoutingContext routingContext) {
HttpServerResponse response=routingContext.response();
response.putHeader(“content-type”,”application/json;charset=UTF-8″);
//parameter lấy từ người dùng
String sort = routingContext.request().getParam(“sort”);
if (sort == null)
{
//nếu không có thì cho lỗi luôn API
routingContext.response().setStatusCode(400).end();
}
else
{
//dùng ArrayList để lưu trữ các Key của dữ liệu
ArrayList sortedKeys =
new ArrayList(employees.keySet());
//mặc định sắp xếp tăng dần các Key
Collections.sort(sortedKeys);
//nếu sort là desc (giảm dần)
if(sort.equalsIgnoreCase(“desc”))
{
//thì đảo ngược lại danh sách đang tăng dần -> nó tự thành giảm dần
Collections.reverse(sortedKeys);
}
//khai báo danh sách Employee là ArrayList
ArrayListsortEmployees=new ArrayList();
//vòng lặp theo Key
for (int key : sortedKeys)
{
//mỗi lần lấy employees.get(key) là đã lấy tăng dần hoặc giảm dần (vì key đã sắp xếp)
sortEmployees.add(employees.get(key));
}
//trả về danh sách đã sắp xêp
response.end(Json.encodePrettily(sortEmployees));
}
}
[/code]
public class EmployeeVerticle extends AbstractVerticle
{
private HashMap employees=new HashMap();
public void createExampleData()
{
employees.put(1,new Employee(1,”Mr Obama”,”Obama@gmail.com”));
employees.put(2,new Employee(2,”Mr Donald Trump”,”Trump@gmail.com”));
employees.put(3,new Employee(3,”Mr Putin”,”Putin@gmail.com”));
}
private void getAllEmployees(RoutingContext routingContext) {
HttpServerResponse response=routingContext.response();
response.putHeader(“content-type”,”application/json;charset=UTF-8″);
response.end(Json.encodePrettily(employees.values()));
}
@Override
public void start(Promise startPromise) throws Exception {
createExampleData();
Router router=Router.router(vertx);
router.get(“/api/employees”).handler(this::getAllEmployees);
router.get(“/api/employeessort”).handler(this::getSortEmployees);
vertx
.createHttpServer()
.requestHandler(router::accept)
.listen(config().getInteger(“http.port”, 8080),
result -> {
if (result.succeeded()) {
startPromise.complete();
} else {
startPromise.fail(result.cause());
}
}
);
}
/**
* Hàm này dùng để lấy danh sách dữ liệu Employee mà có sắp xếp
* http://localhost:8080/api/employeessort?sort=desc ->giảm dần
* http://localhost:8080/api/employeessort?sort=asc ->tăng dần
* @param routingContext
*/
private void getSortEmployees(RoutingContext routingContext) {
HttpServerResponse response=routingContext.response();
response.putHeader(“content-type”,”application/json;charset=UTF-8″);
//parameter lấy từ người dùng
String sort = routingContext.request().getParam(“sort”);
if (sort == null)
{
//nếu không có thì cho lỗi luôn API
routingContext.response().setStatusCode(400).end();
}
else
{
//dùng ArrayList để lưu trữ các Key của dữ liệu
ArrayList sortedKeys =
new ArrayList(employees.keySet());
//mặc định sắp xếp tăng dần các Key
Collections.sort(sortedKeys);
//nếu sort là desc (giảm dần)
if(sort.equalsIgnoreCase(“desc”))
{
//thì đảo ngược lại danh sách đang tăng dần -> nó tự thành giảm dần
Collections.reverse(sortedKeys);
}
//khai báo danh sách Employee là ArrayList
ArrayListsortEmployees=new ArrayList();
//vòng lặp theo Key
for (int key : sortedKeys)
{
//mỗi lần lấy employees.get(key) là đã lấy tăng dần hoặc giảm dần (vì key đã sắp xếp)
sortEmployees.add(employees.get(key));
}
//trả về danh sách đã sắp xêp
response.end(Json.encodePrettily(sortEmployees));
}
}
}
[/code]
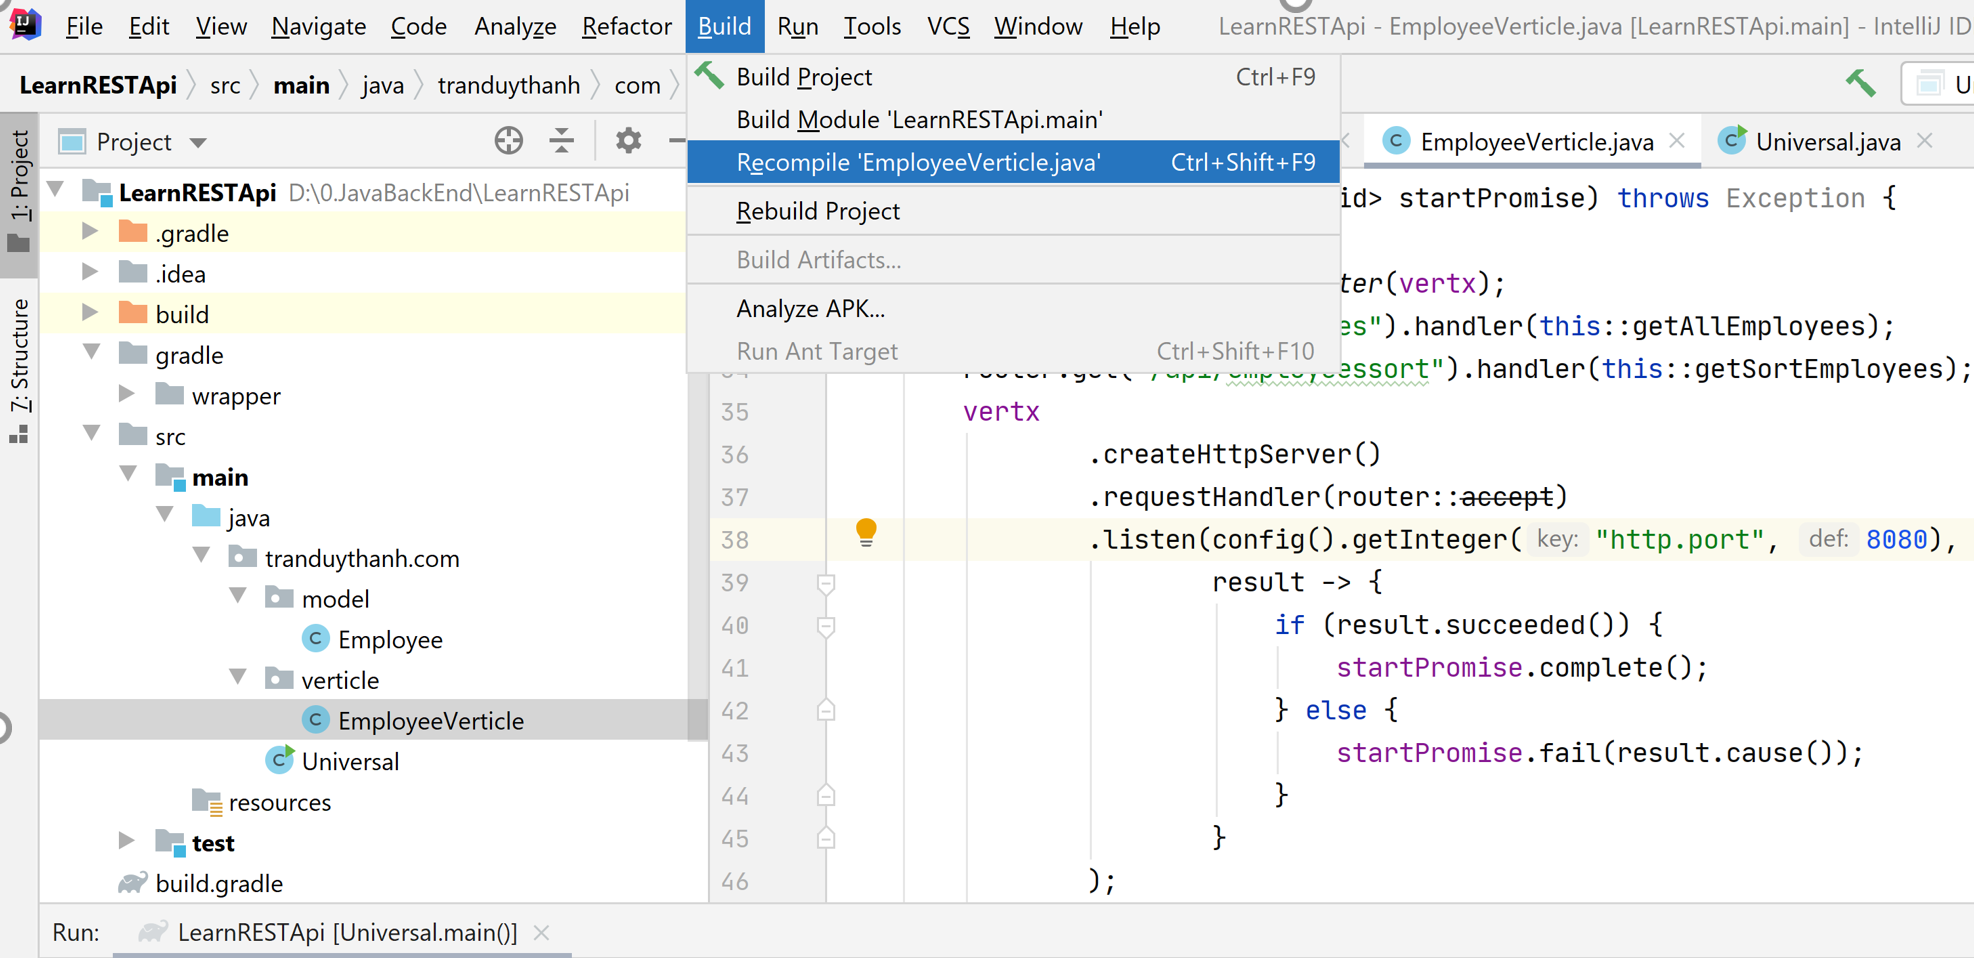
Lưu ý, khi chỉnh sửa code thì cần biên dịch lại các Verticle, nếu không có thể nó vẫn chạy code cũ:
Ta mở class EmployeeVerticle–> vào menu Build –>chọn Recompile ‘EmployeeVerticle.java‘ hoặc nhấn tổ hợp phím tắt “Ctrl+Shift+F9“
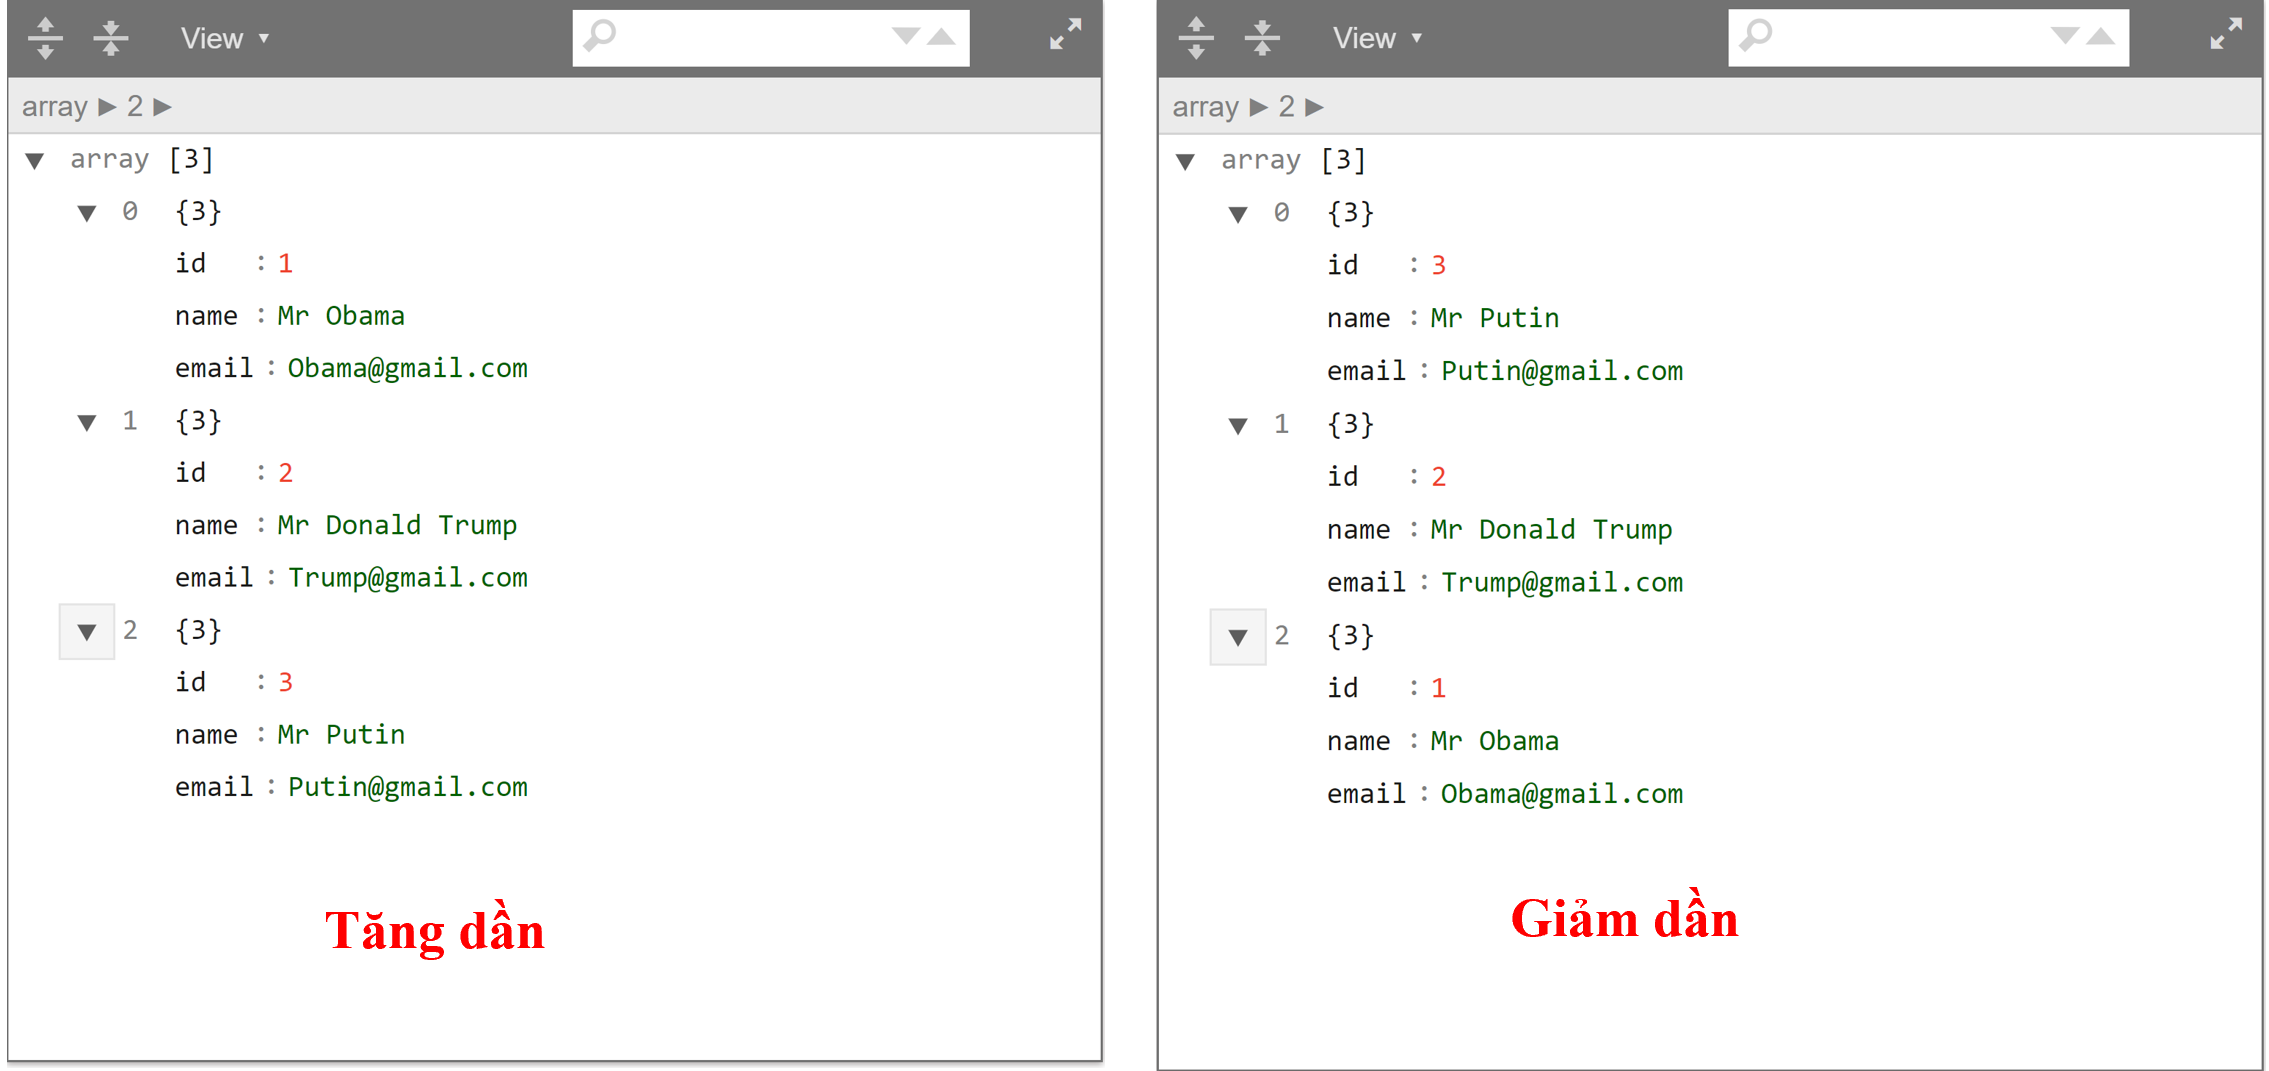
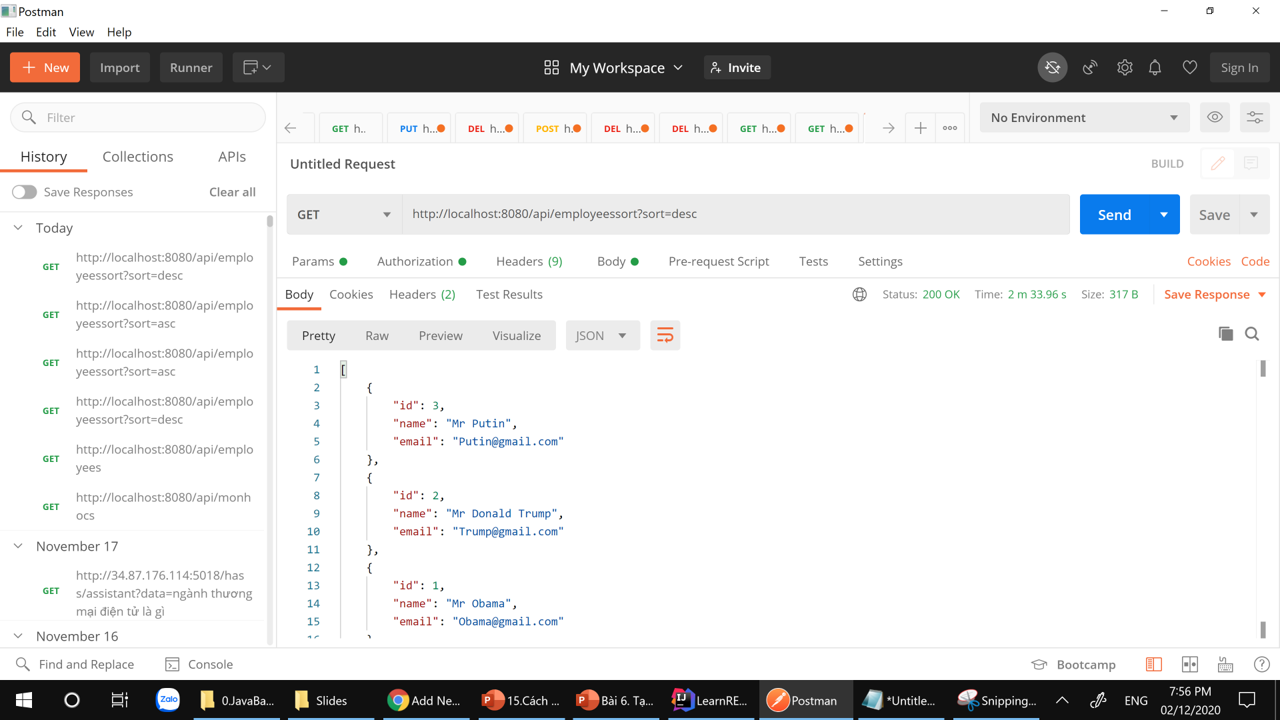
lấy danh sách Employee tăng dần: http://localhost:8080/api/employeessort?sort=asc
Minh họa gọi API xem danh sách Employee giảm dần theo id:
Minh họa gọi API xem danh sách Employee tăng dần theo id:
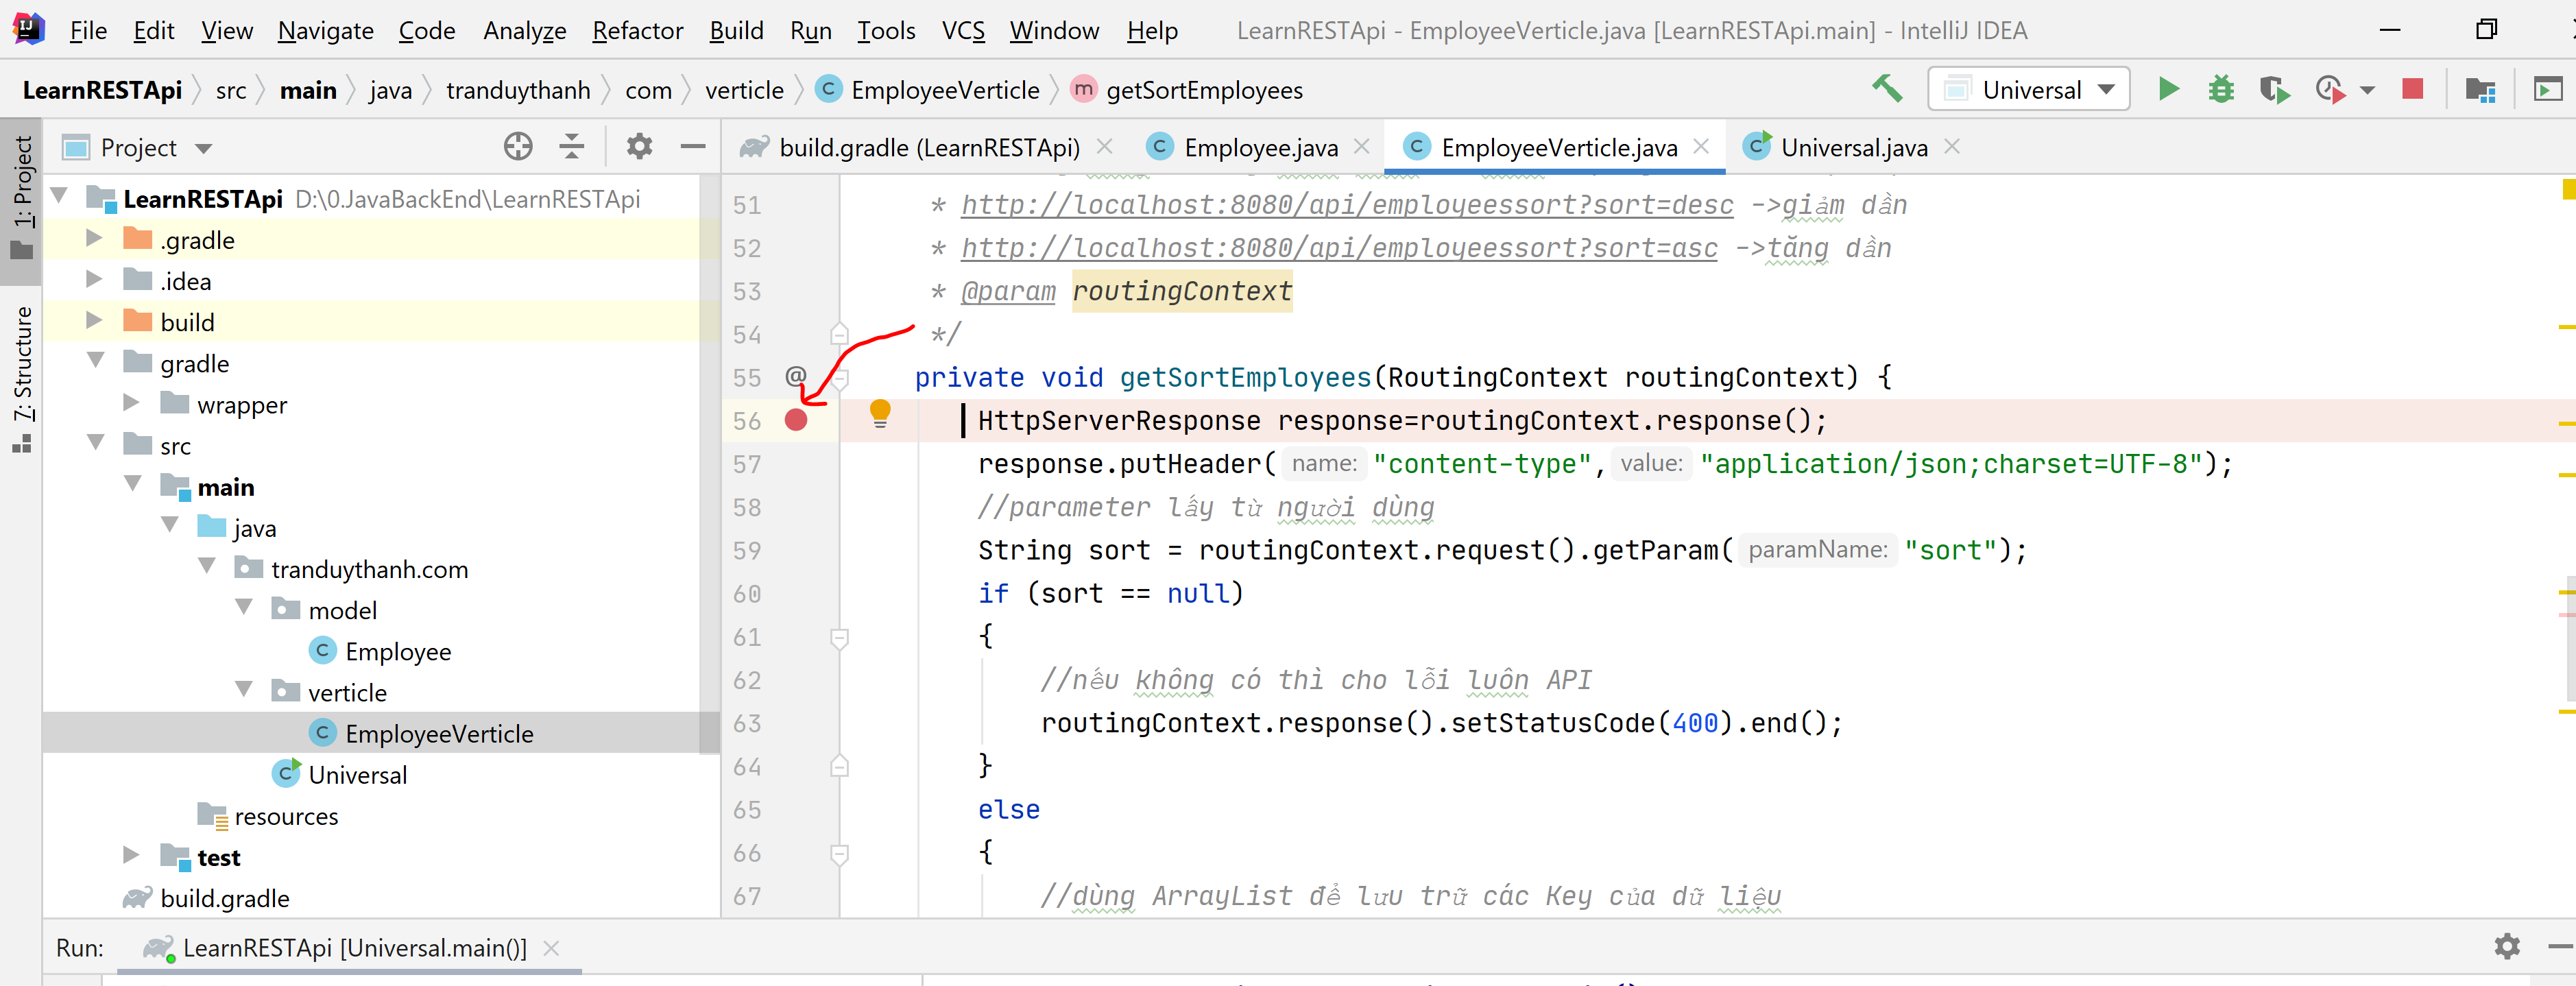
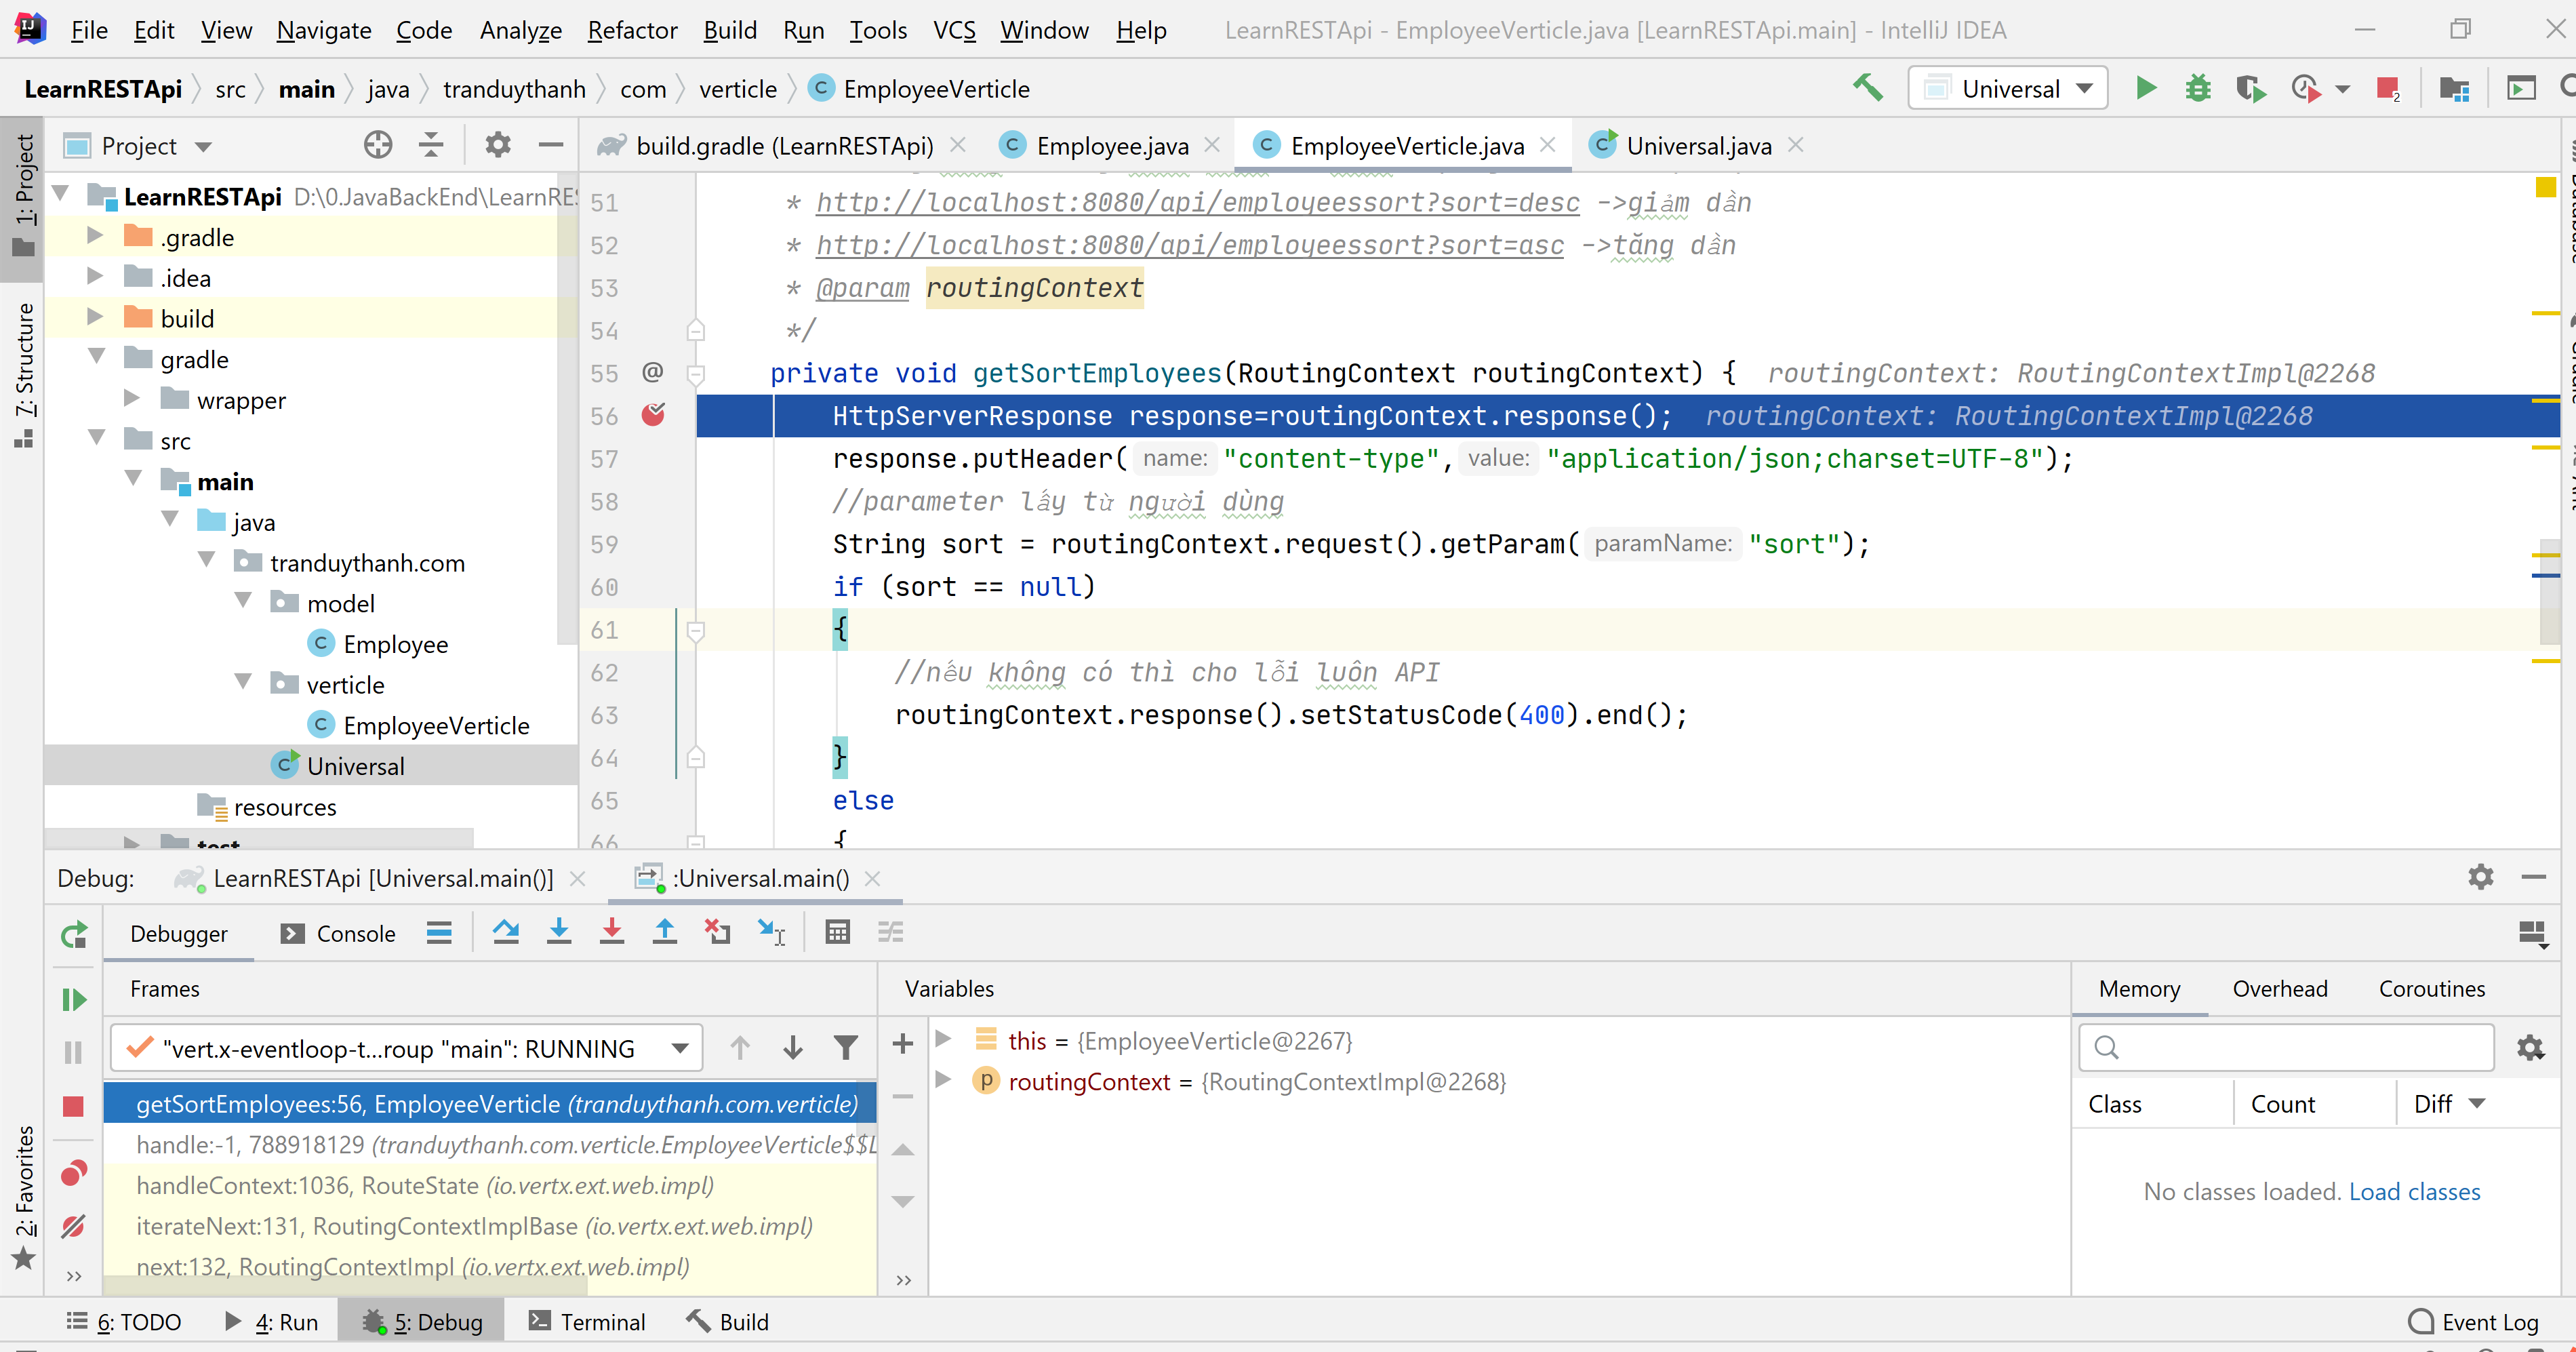
Ngoài ra với các API mà có các Parameter truyền vào, ta thường xuyên phải dùng chức năng debug để xem giá trị họ truyền vào có đúng hay chưa?
ta tạo BreakPoint cho nó trước (breakpoint là điểm mà phần mềm sẽ dừng lại để cho ta review tiến trình chạy). Ví dụ ta muốn xem hàm sắp xếp nó lấy parameter và truy vấ dữ liệu thì ta cần tạo breakpoint –>bằng cách click chuột vào vị trí mũi tên màu đỏ ở dòng mà ta muốn debug–>nó ra điểm dừng hình tròn màu đỏ.
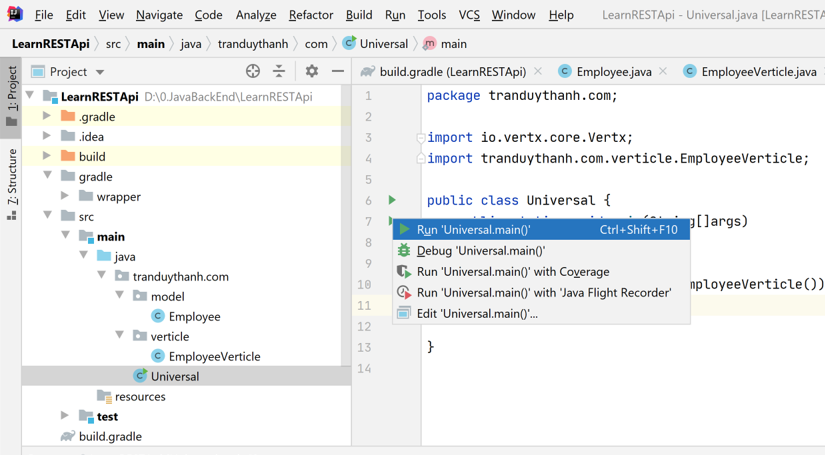
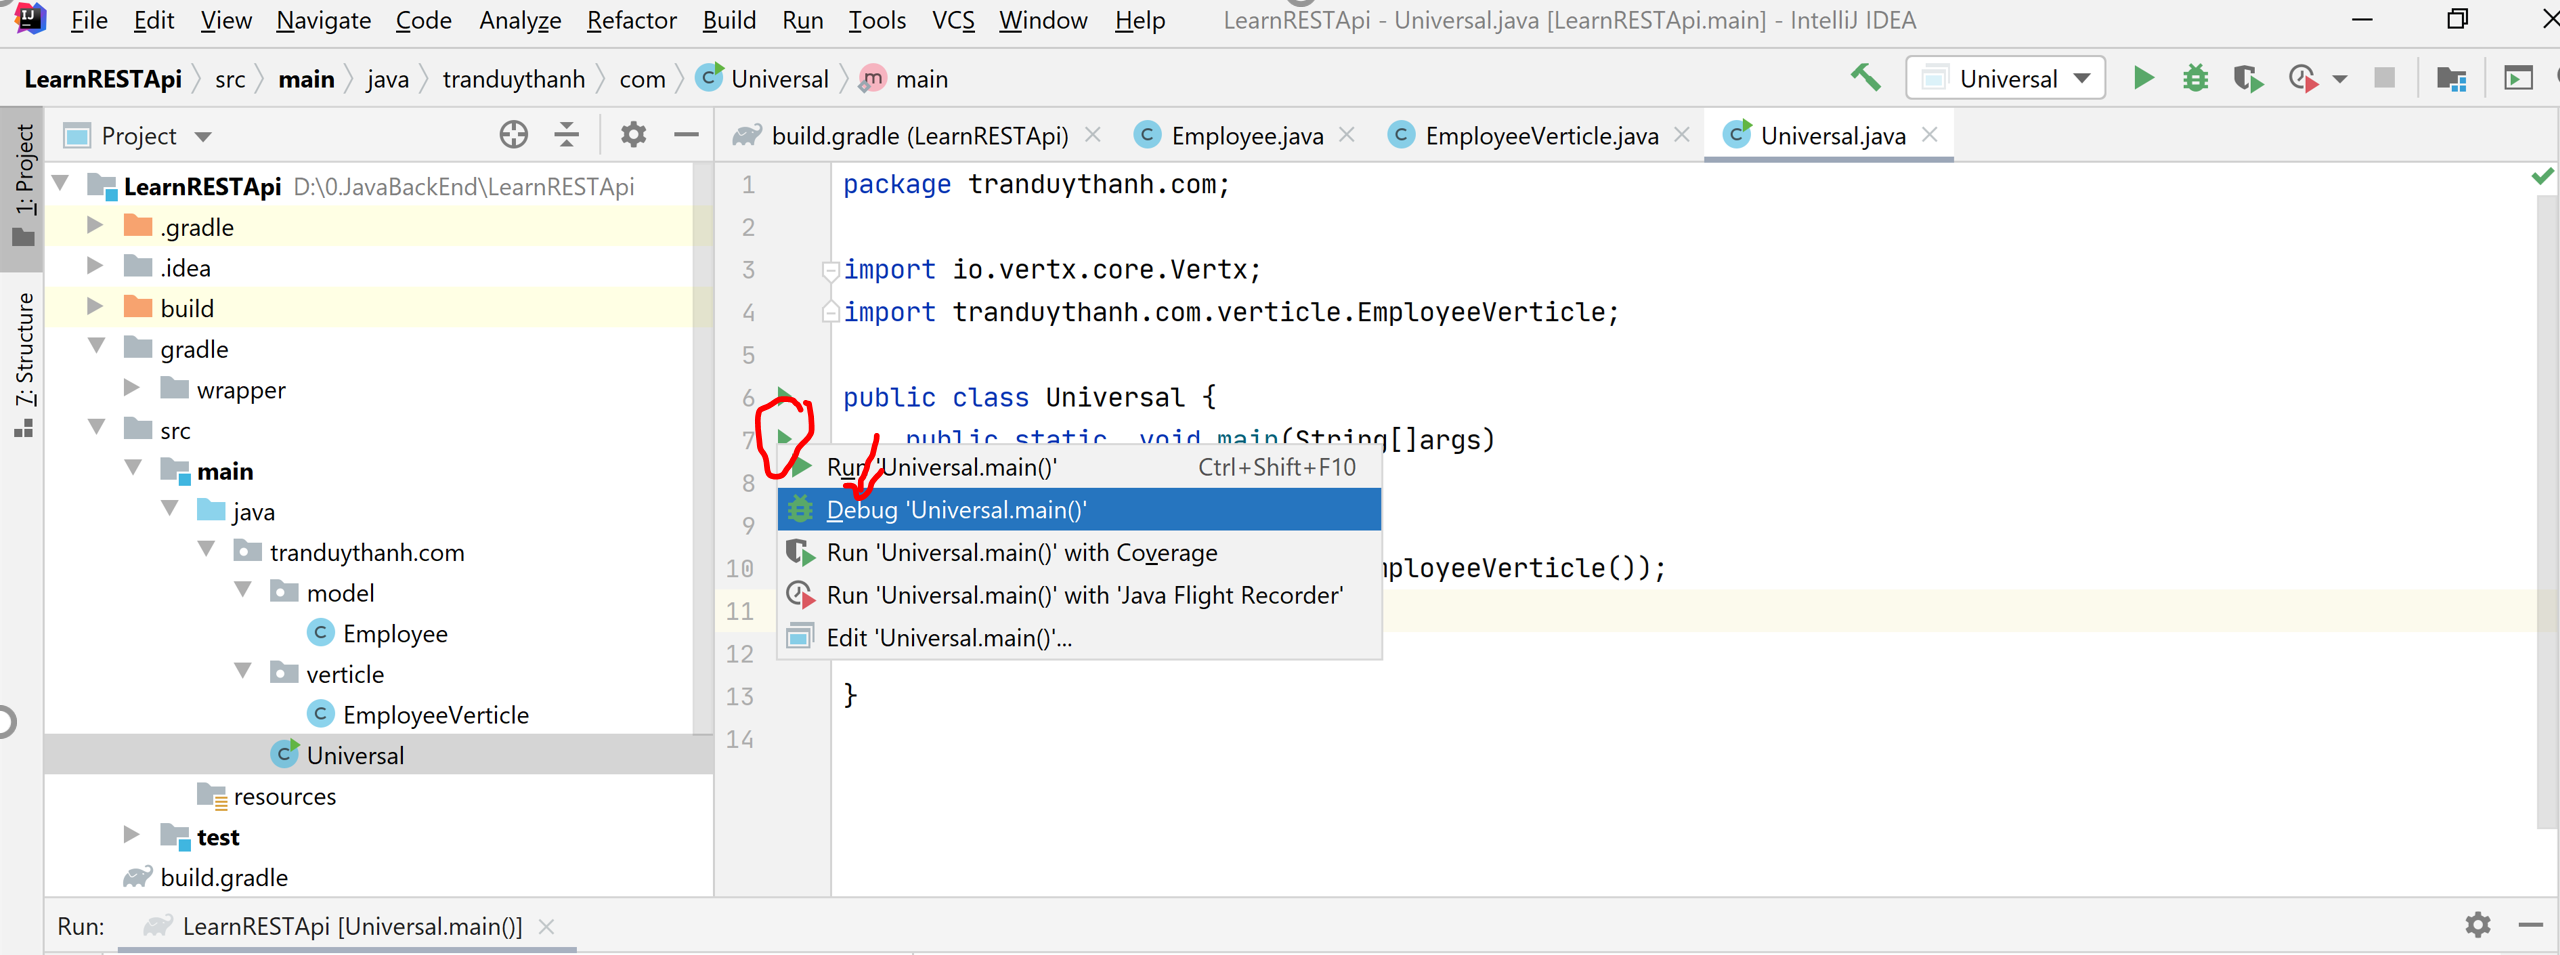
Tiếp theo vào Universal để chạy, nhưng lần này chạy debug chứ không phải run:
Chọn Debug ‘Universal.main()’. Phần mềm sẽ được đưa vào chế độ chạy debug.
Bây giờ có bất kỳ thao tác triệu gọi API sắp xếp thì nó sẽ tự động vào breakpoint mà mình đã đặt, từ chỗ này ta có thể dễ dàng kiểm tra được dữ liệu parameter đầu vào cũng như quá trình phần mềm xử lý sắp xếp:
Ví dụ:
Bước 1) từ Postman ta triệu gọi API lấy danh sách Employee và sắp xếp giảm dần:
gọi phương thức GET cho API: http://localhost:8080/api/employeessort?sort=desc
nhấn Send, lúc này Server sẽ cho debug ở API http://localhost:8080/api/employeessort?sort=desc.
Ngay lập tức bên API sẽ di chuyển vào trang thái debug, nơi mà ta đặt breakpoint (dòng 56)
Để di từng dòng lệnh ta nhấn phím F8: Chỉ thị lệnh sẽ đi lần lượt xuống dưới, lúc này ta có thể kiểm tra được giá trị của các parameter mà ta truyền vào khi triệu gọi API:
Muốn chạy luôn, dừng Debug thì nhấn phím F9, lúc này ta sẽ thấy được kết quả bên PostMan do API trả về:
Như vậy Tui đã trình bày xong cách viết REST API HTTPGET để lấy danh sách Employee có sắp xếp dữ liệu. các bạn nhớ làm lại nhiều lần để có thể hiểu và triển khai được nhé.
Bài này Tui sẽ hướng dẫn các bạn cách tạo API GET để lấy ra danh sách dữ liệu, sau đó dùng PostMan để thử nghiệm.
HTTP GET:
GET là một trong những phương thức để tạo ra API để truy suất dữ liệu: Dữ liệu đơn, dữ liệu danh sách, hỗ trợ tạo các chức năng tìm kiếm và sắp xếp….
Bài học này sẽ hướng dẫn chúng ta cách thức tạo API GET để lấy danh danh sách Employee. Bài học sau sẽ tiếp tục với phần chi tiết Employee, minh họa bộ dữ liệu:
Ta tạo 1 Project tên LearnRESTApi, sau đó thêm thư viện Vert.X vào:
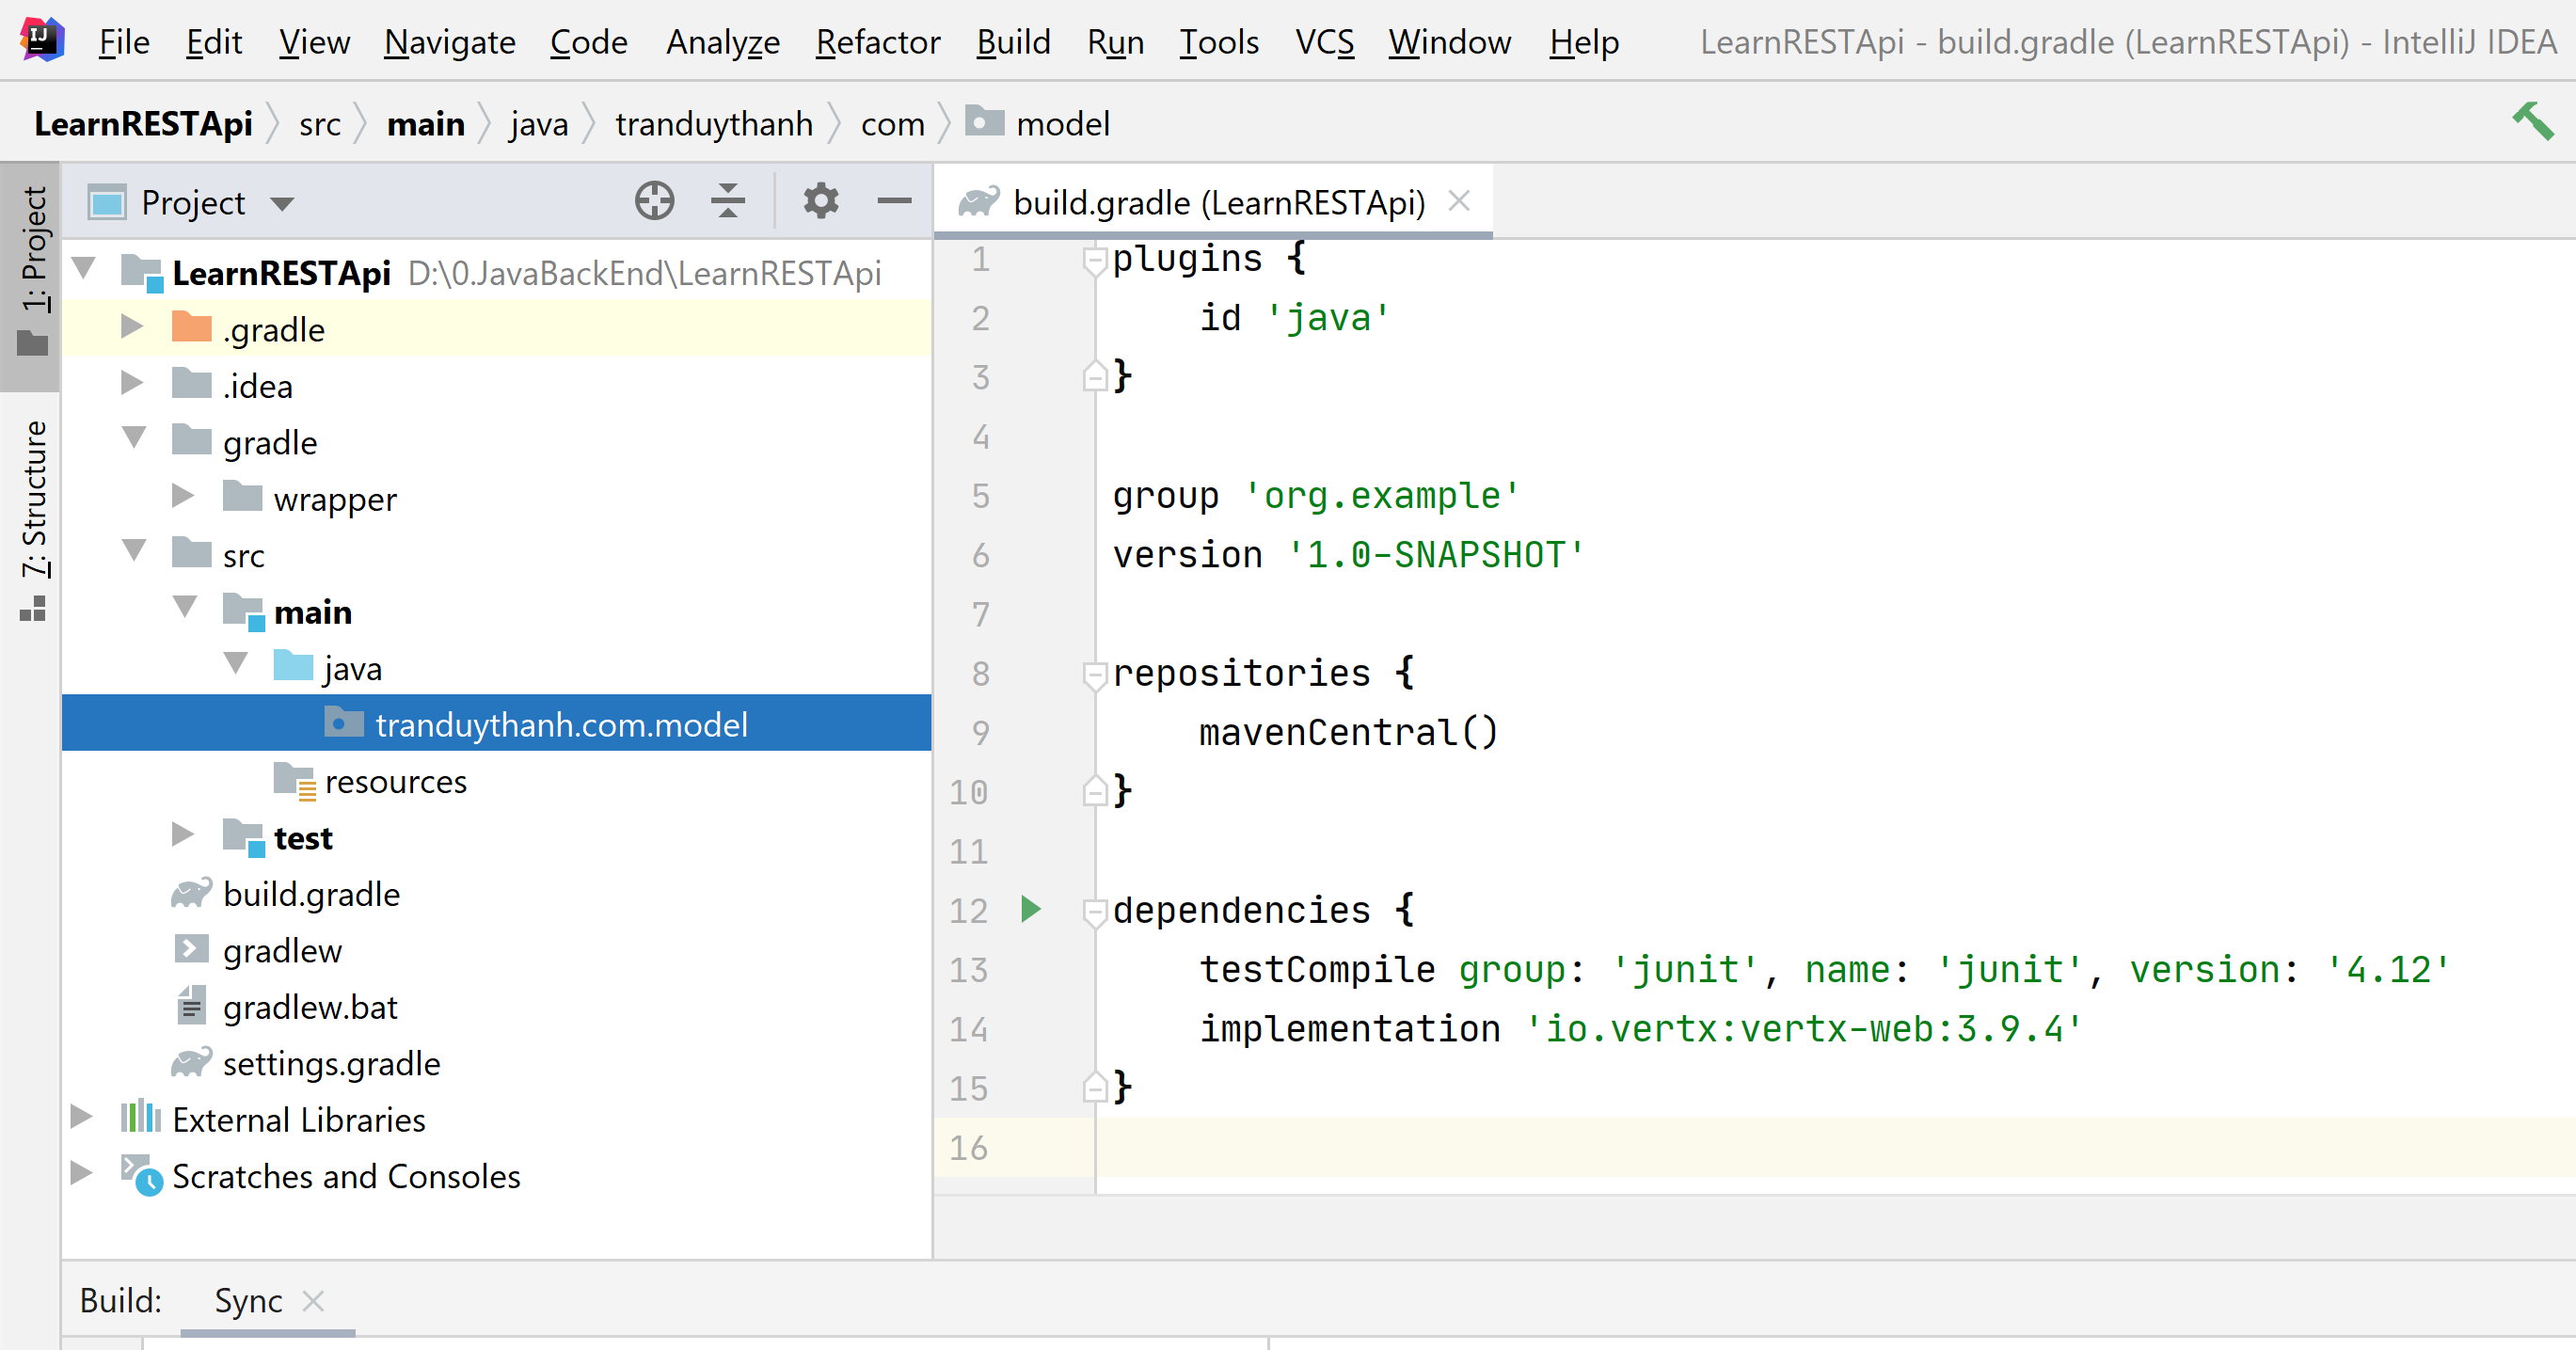
compile ‘io.vertx:vertx-web:3.9.4’
hoặc:
implementation ‘io.vertx:vertx-web:3.9.4’
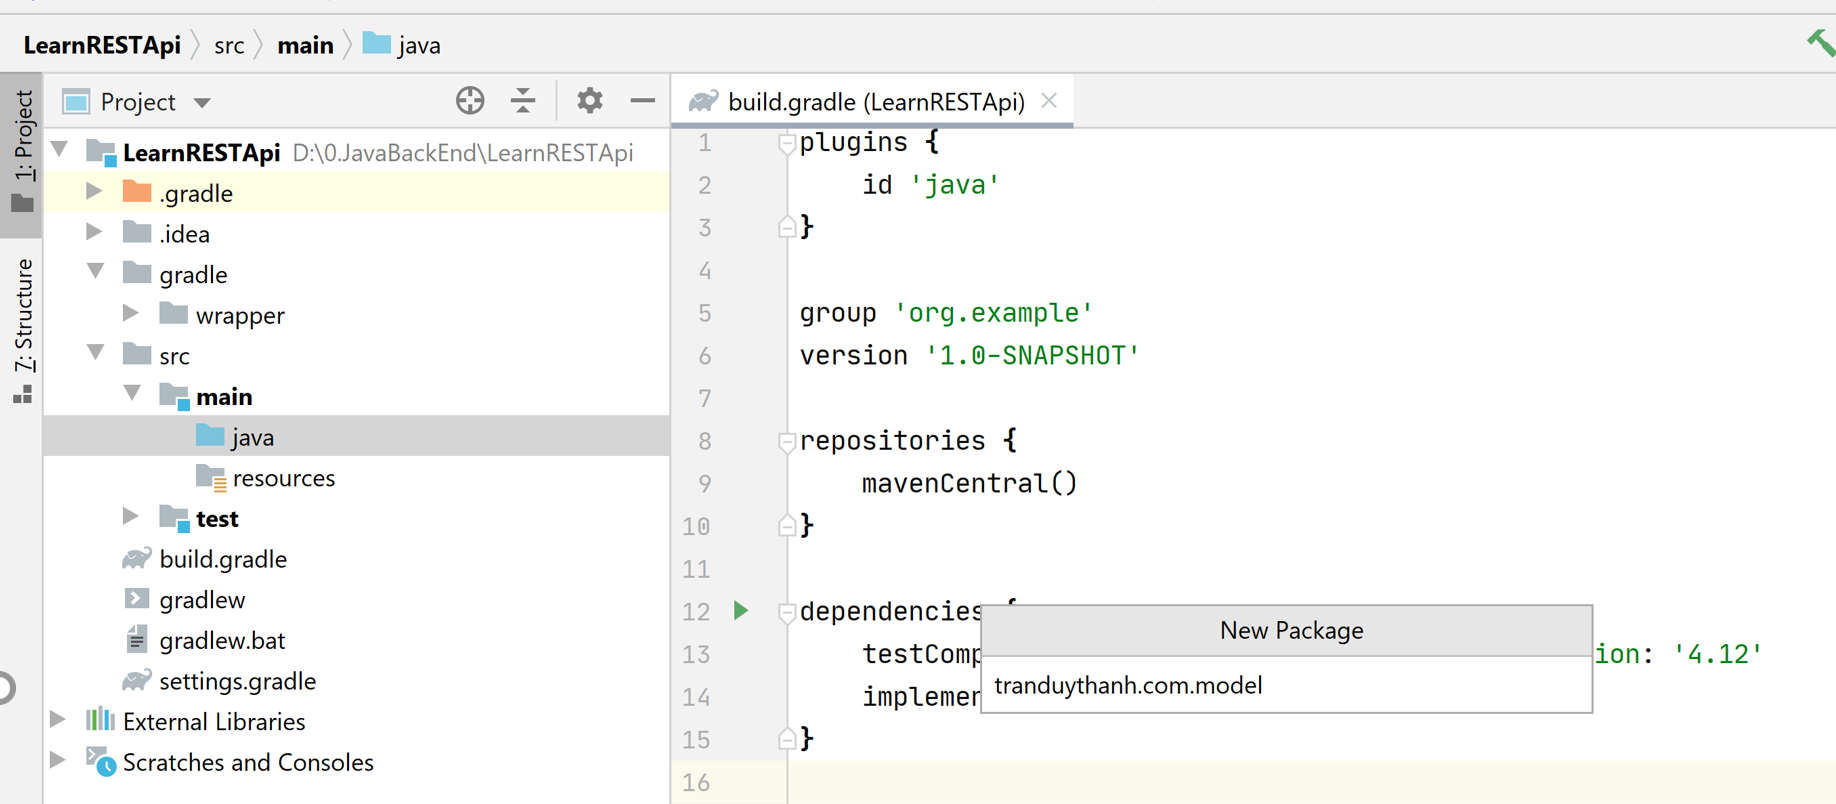
Tiến hành tạo một package tên là model: Bấm chuột phải vào java chọn new/ package
Tiến hành tạo một package tên là tranduythanh.com.model: Bấm chuột phải vào java chọn new/ package
Nhập tranduythanh.com.model rồi nhấn Enter, ta có package xuất hiện như dưới đây:
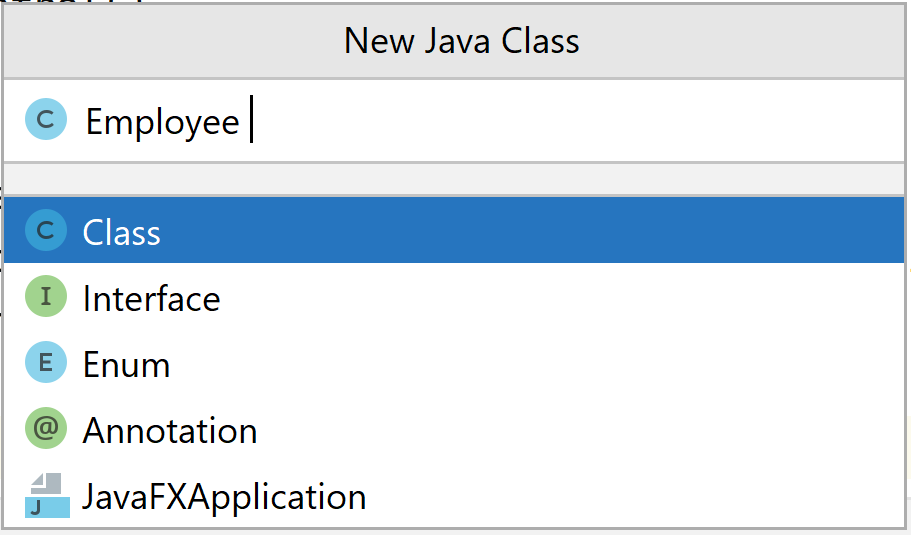
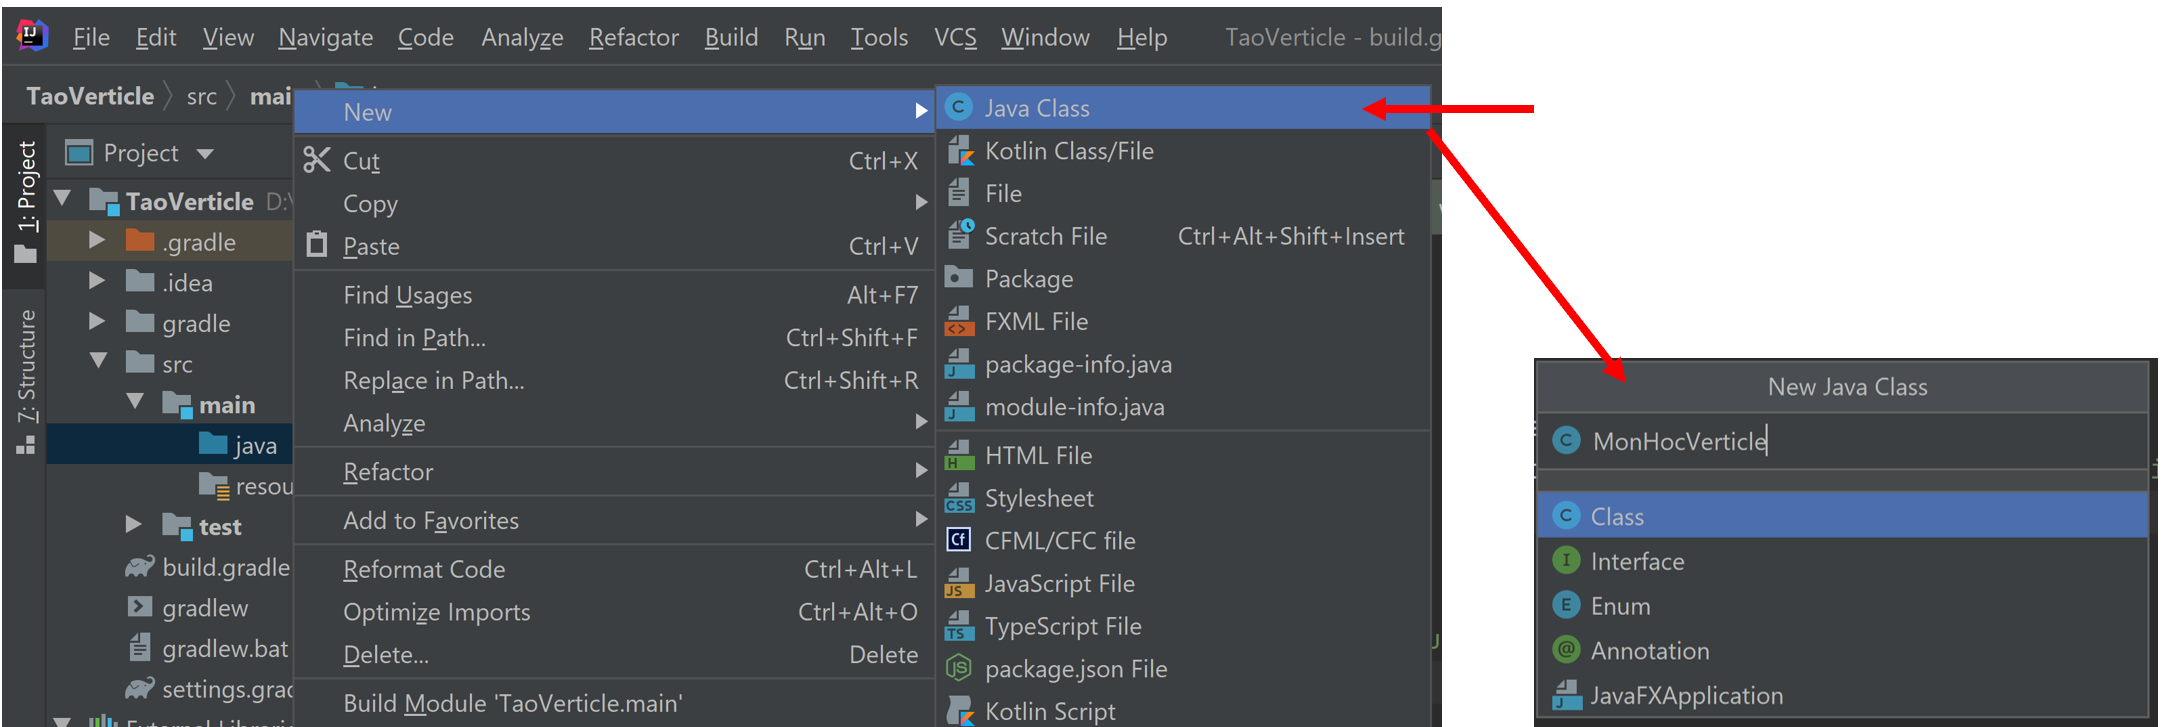
Tiếp tục bấm chuột phải vào model/ chọn New/ chọn Java Class:
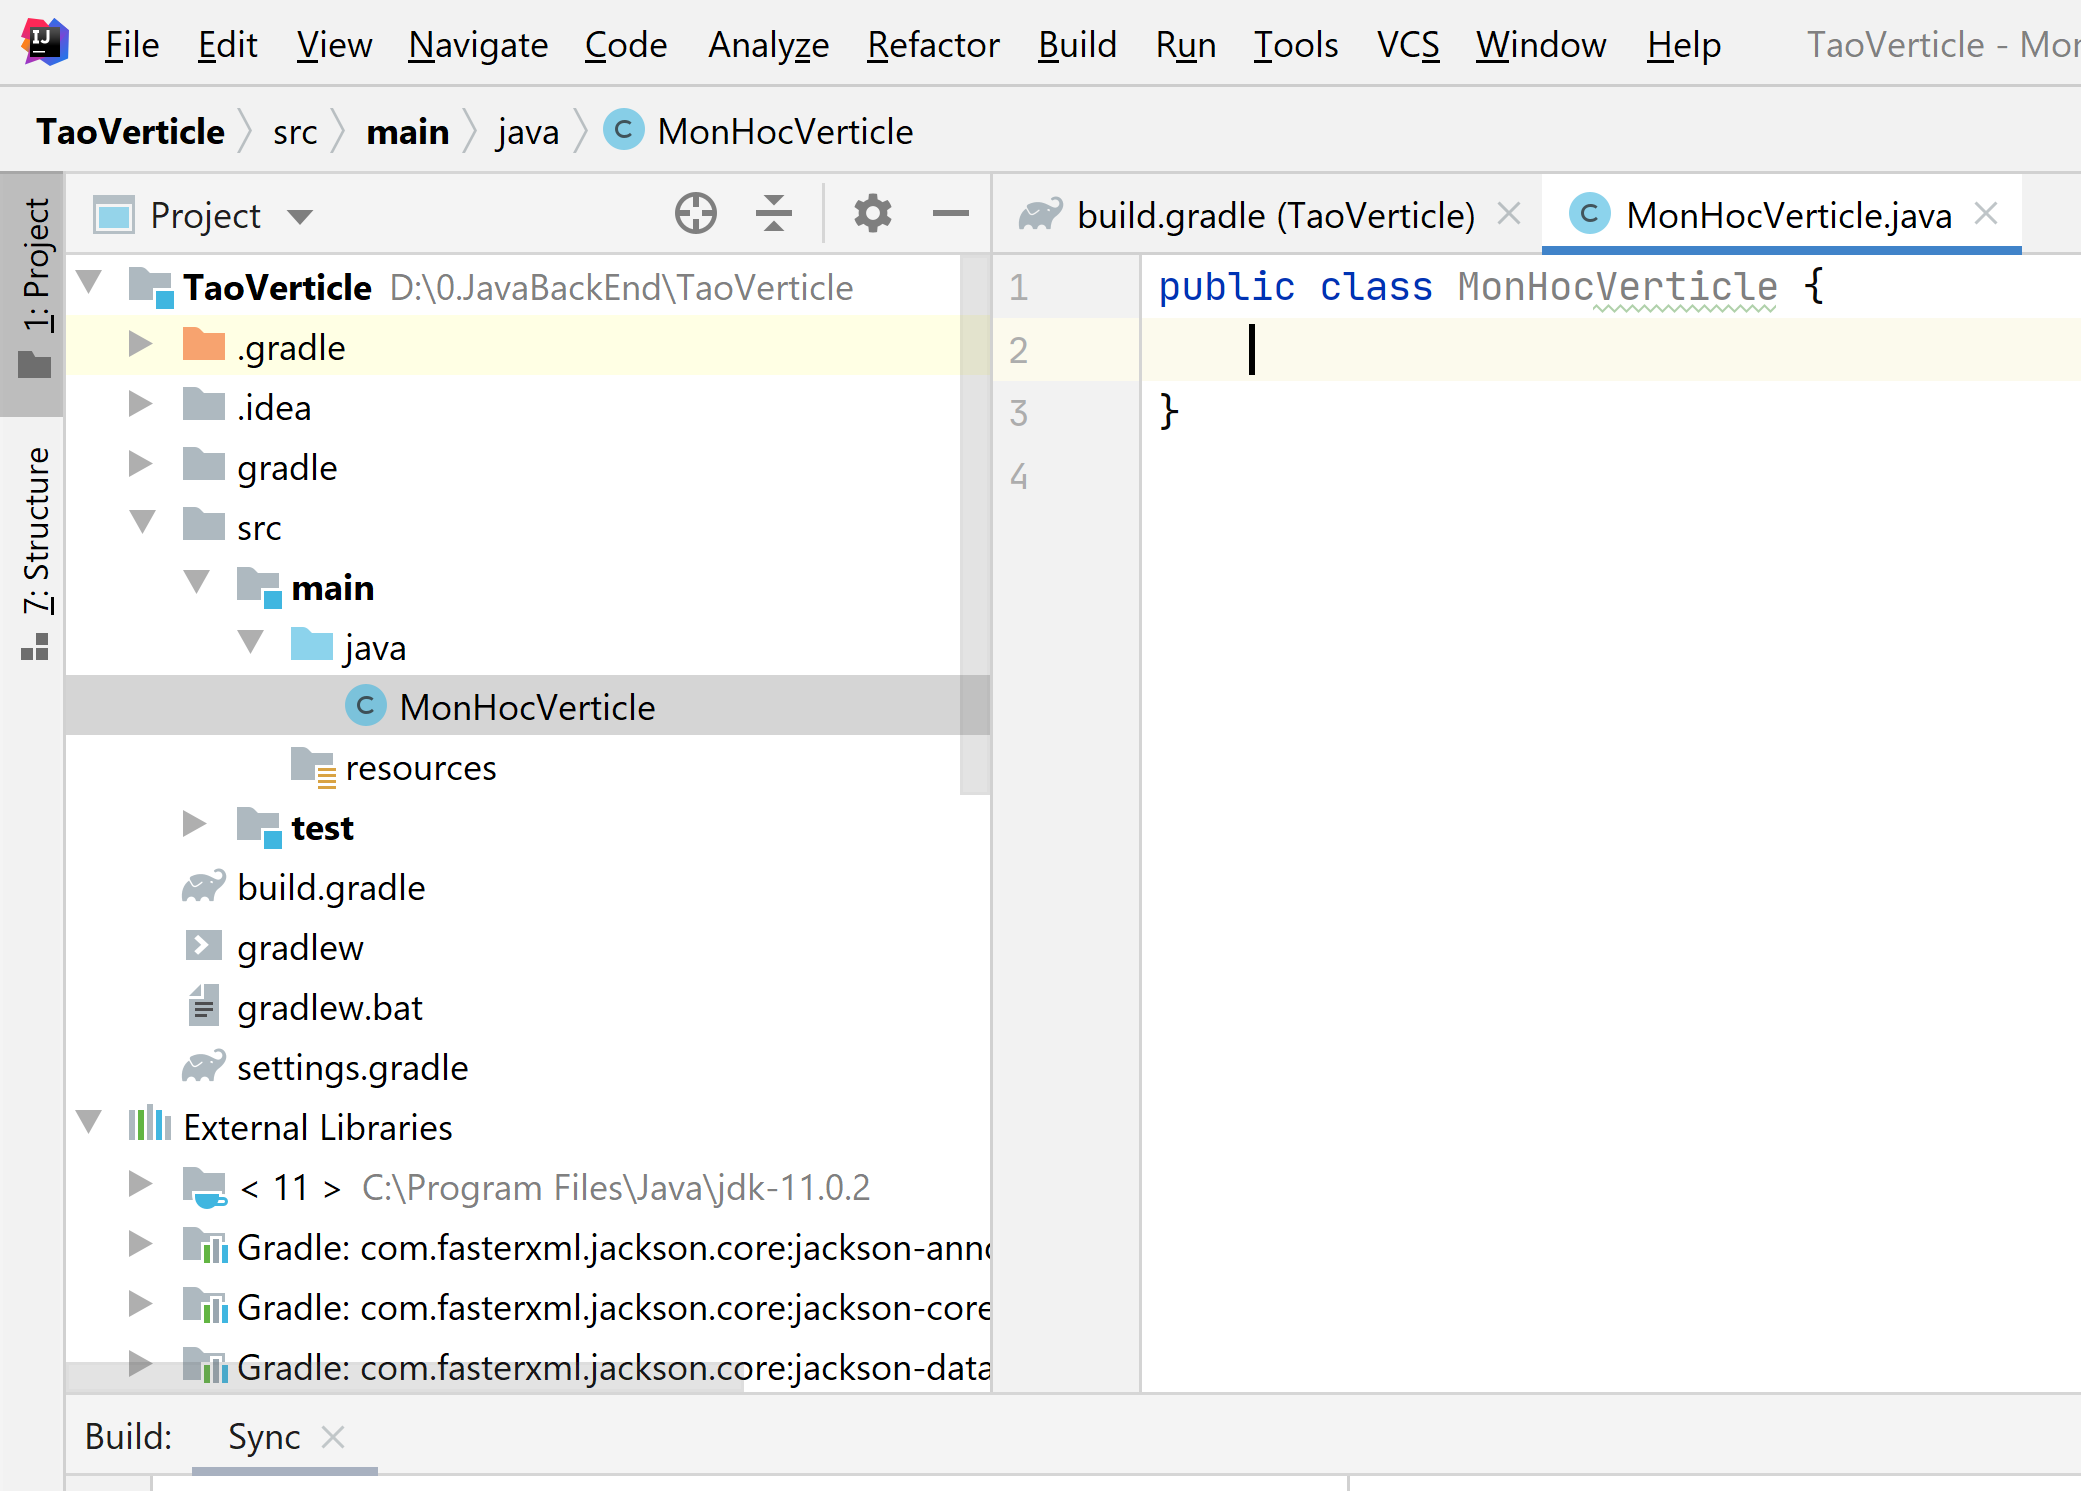
Đặt tên là Employee , chọn Class rồi nhấn phím Enter:
Kết quả sau khi nhấn Enter:
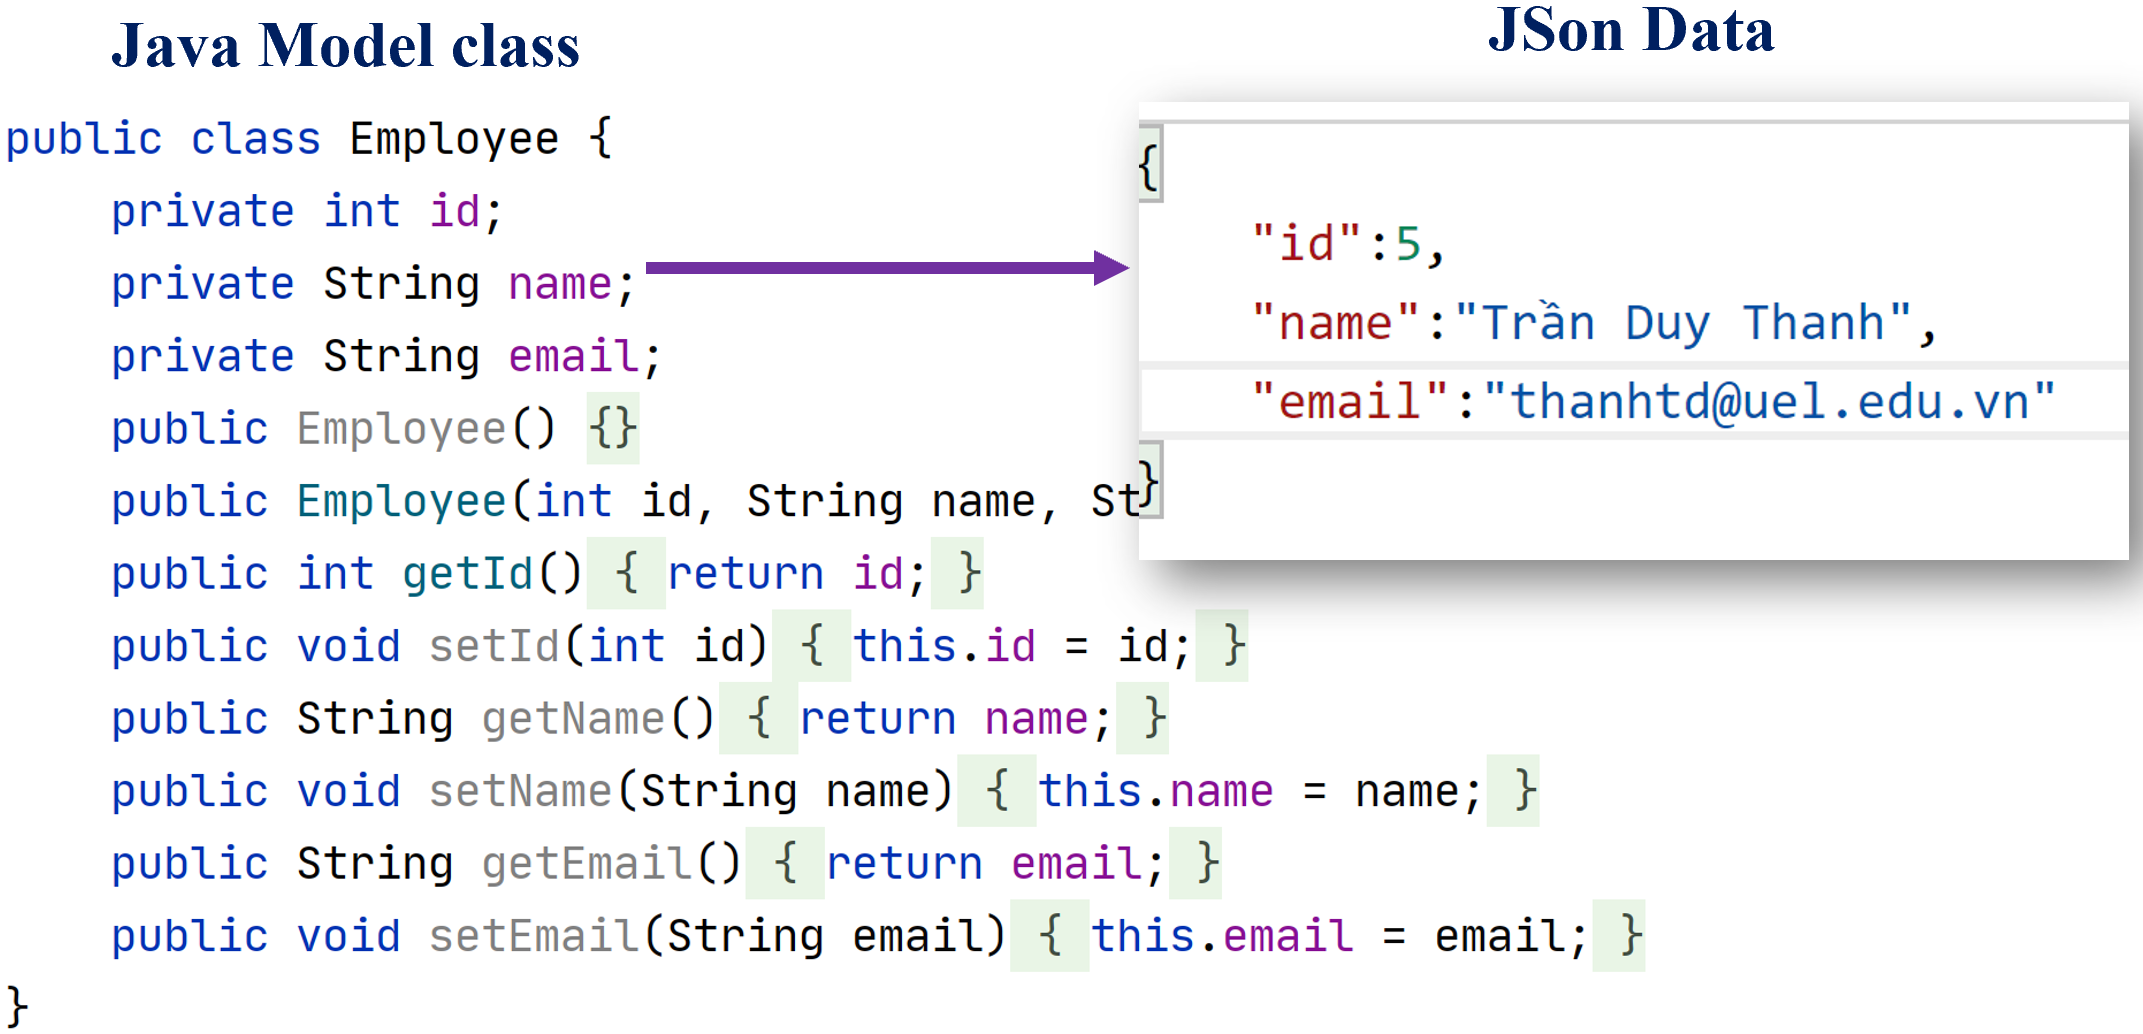
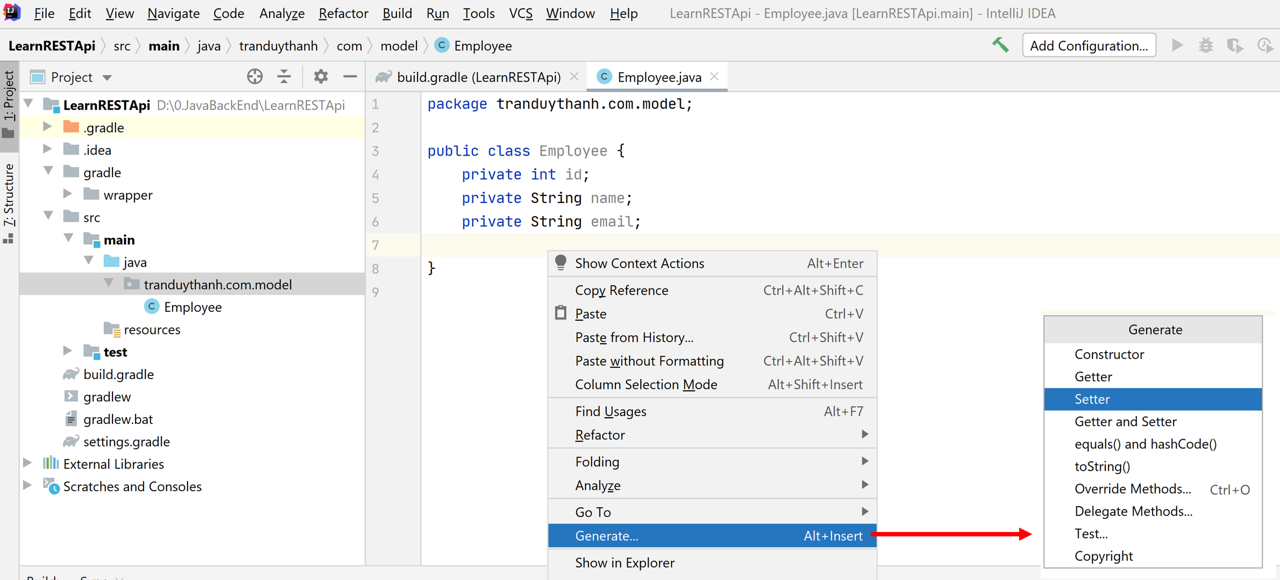
Coding cho lớp Employee gồm 3 thuộc tính: id, name, email. Tạo các getter/setter, constructor
public class Employee {
private int id;
private String name;
private String email;
public Employee() {
}
public Employee(int id, String name, String email) {
this.id = id;
this.name = name;
this.email = email;
}
public int getId() {
return id;
}
public void setId(int id) {
this.id = id;
}
public String getName() {
return name;
}
public void setName(String name) {
this.name = name;
}
public String getEmail() {
return email;
}
public void setEmail(String email) {
this.email = email;
}
}
[/code]
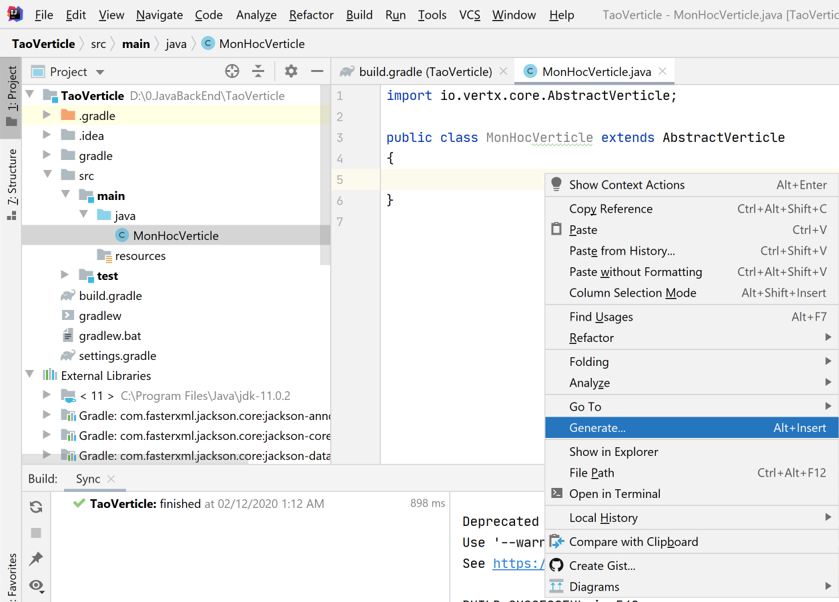
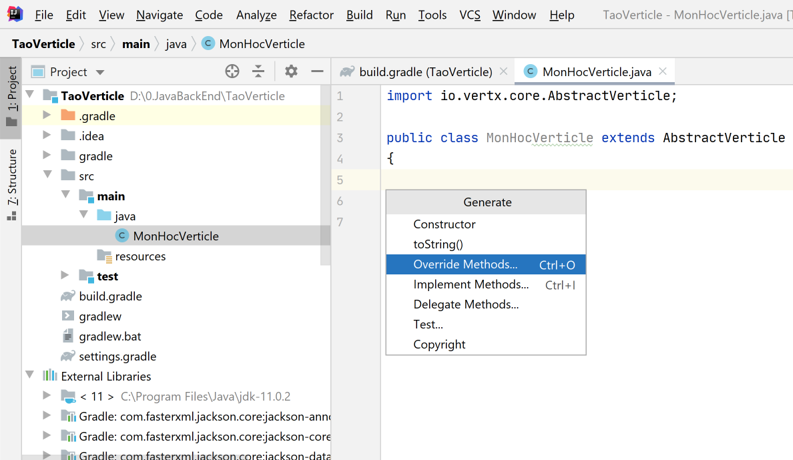
Lưu ý, ta chỉ cần khai báo các thuộc tính của Employee, các getter/setter, constructor… ta có thể dùng công cụ có sẵn để tạo: Bấm chuột phải vào màn hình coding-> chọn Generate…–>chọn getter/setter/constructor….
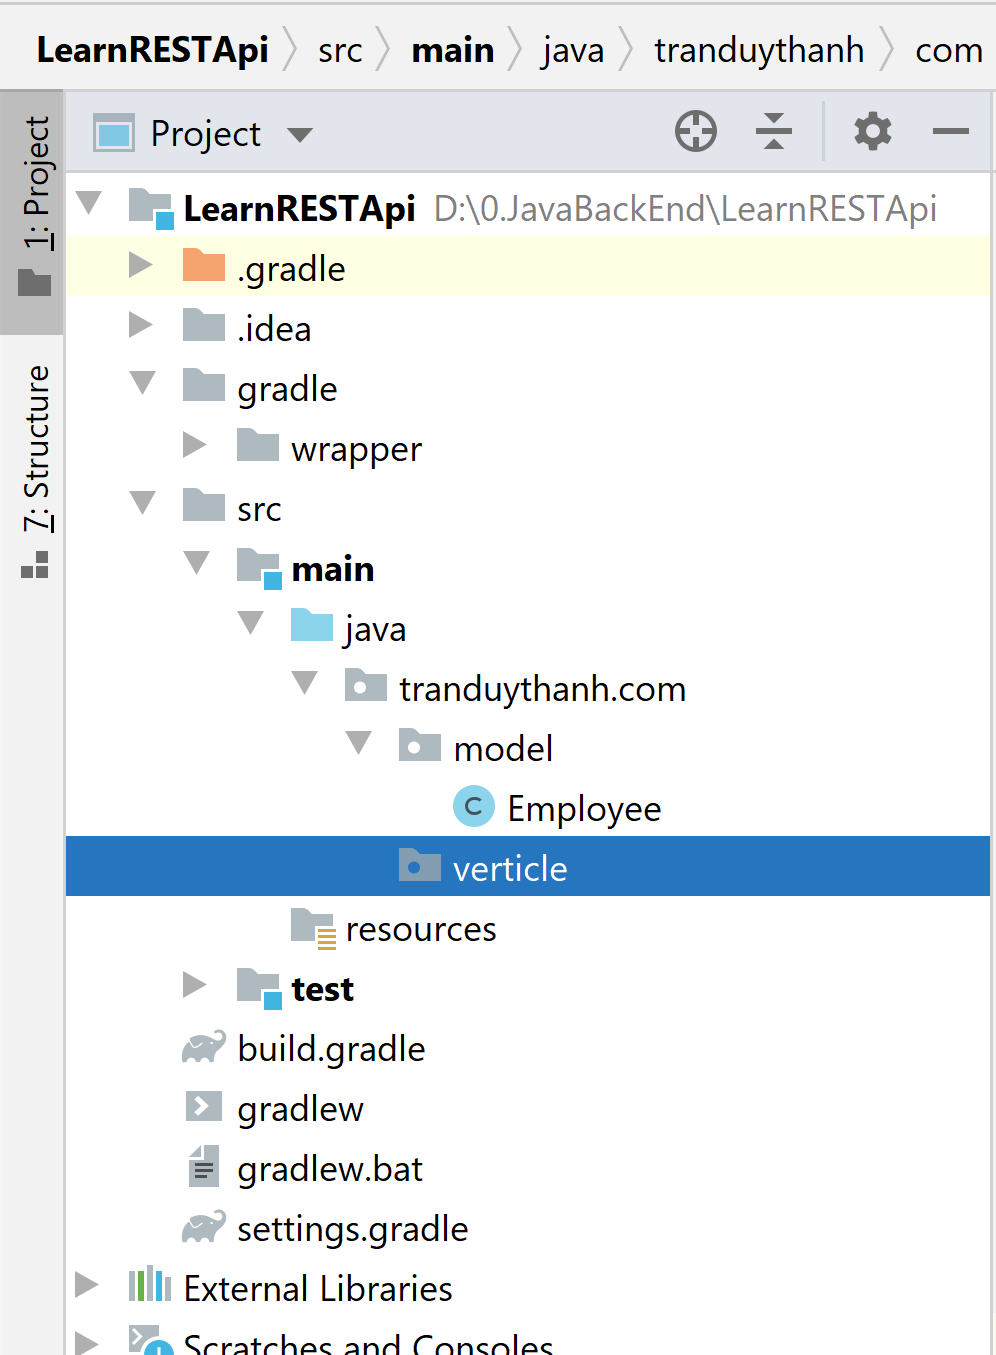
Tiếp theo Tiến hành tạo một package tên là tranduythanh.com.verticle để lập trình các REST Api. Cụ thể là lấy danh sách Employee. Cách tạo package như model.
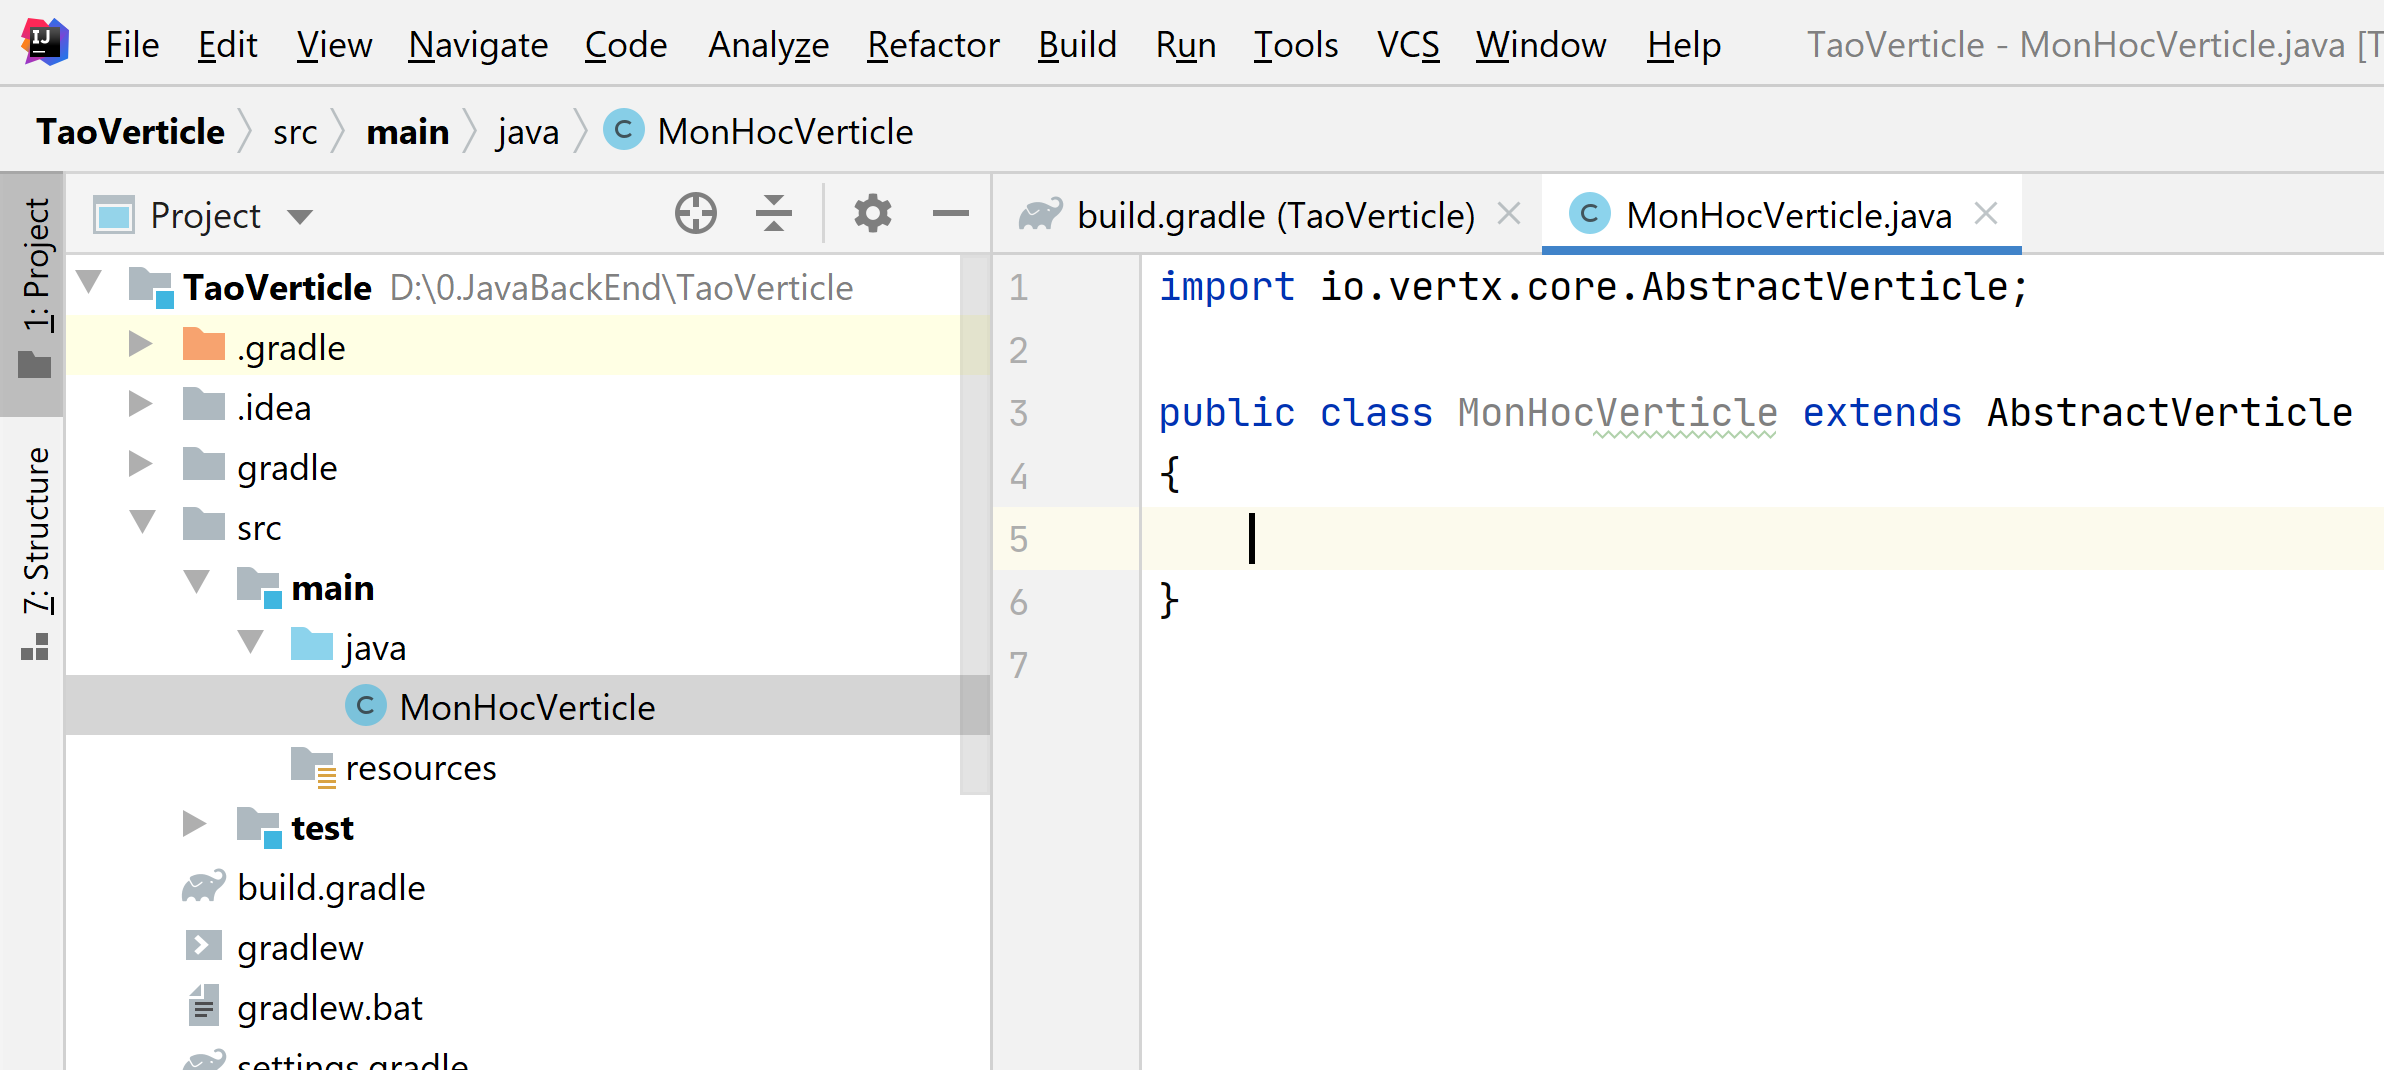
Trong package verticle ta tạo 1 lớp EmployeeVerticel. Cho lớp EmployeeVerticle kế thừa AbstractVerticle:
Ta giả lập một ít dữ liệu, bằng cách viết hàm createExampleData() để tạo ra một số Employee mẫu, lưu vào HashMap:
Bài 3 ta đã điểm qua kiến trúc và cơ chế hoạt động của Vert.X. Bài này ta đi vào kỹ thuật xây dựng lớp kế thừa từ AbstractVerticle và cách deploy chúng.
Ta nên tạo 1 Event Loop cho một nhóm giao tác. Ví dụ như nhóm giao tác về Sản phẩm, về Hóa Đơn… có thể gom chung 1 Verticle.
Nhóm Phòng Ban, Nhân viên… có thể gom chung 1 Verticle.
Mỗi Model class như vậy là 1 REST, nhưng các REST có thể gom chung thành 1 Event Loop (Tạo 1 Verticle chung). Đây cũng là kiến trúc để sau này phát triển các hệ thống MicroServices.
Để cho dễ hiểu, bài học này Tui sẽ thử tạo 1 Verticle có API là lấy danh sách tên các Khóa Học.
lệnh trên sẽ tạo API (api/monhocs) chạy ở port 8080. Nếu là localhost thì chạy theo:
http://localhost:8080/api/monhocs
Tui giải thích thêm một số chức năng của một số class:
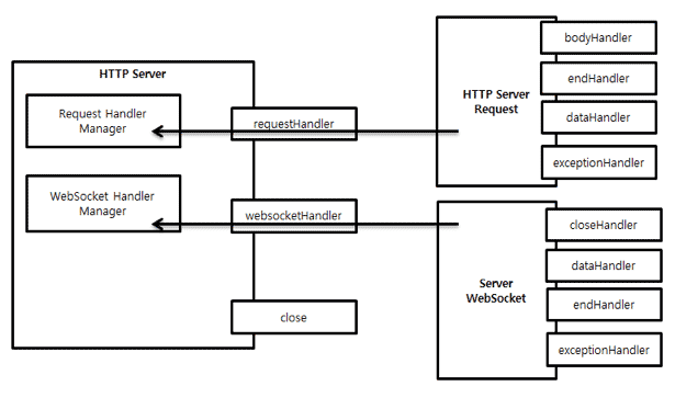
1. Router
Router sẽ nhận yêu cầu từ HttpServer và có nhiệm vụ định tuyến cũng như tạo các API Method. Có rất nhiều phương thức được cung cấp bởi Router. Trong đó Ta cần nhớ các phương thức sau:
Lưu ý: Ngoài ra ta chỉ cần sử dụng RoutingContext cũng có thể tương tác qua lại giữa Client – Server mỗi lần có handler xảy ra. Bản thân RoutingContext có thể truy suất trực tiếp response, request nên không nhất thiết phải tạo từng đổi tượng HttpServeRespone hay HttpServerRequest nữa.
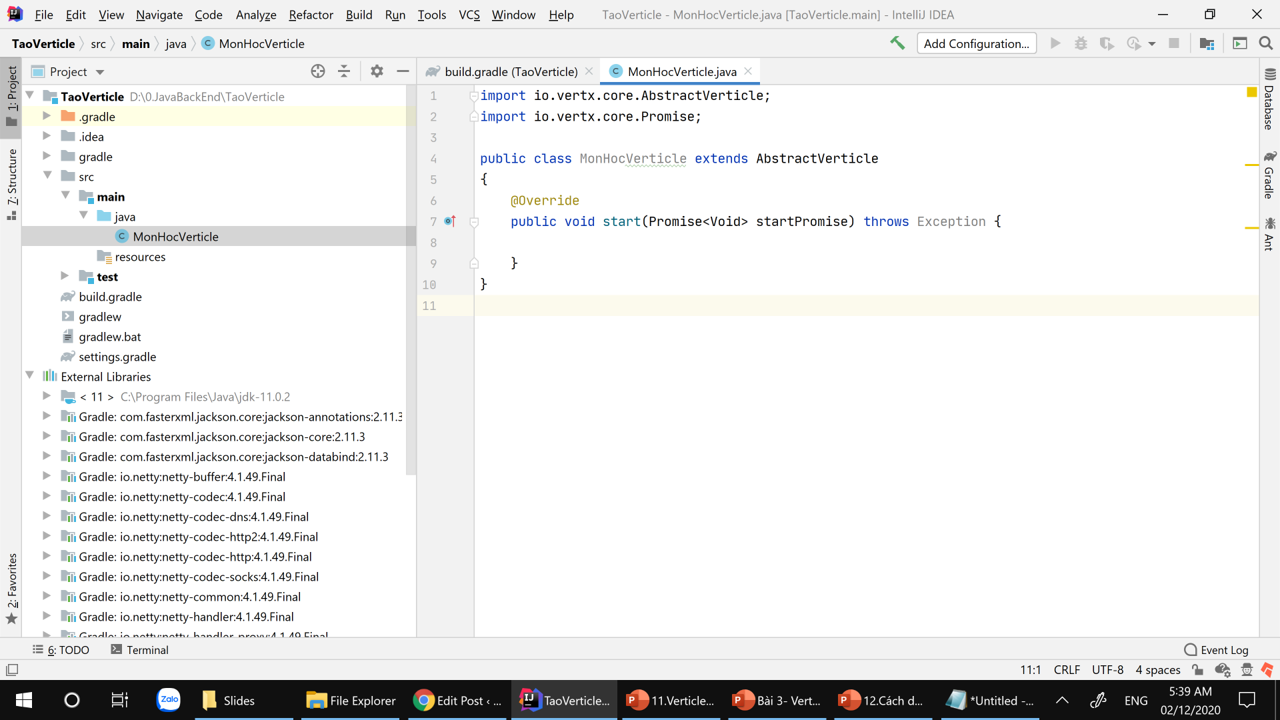
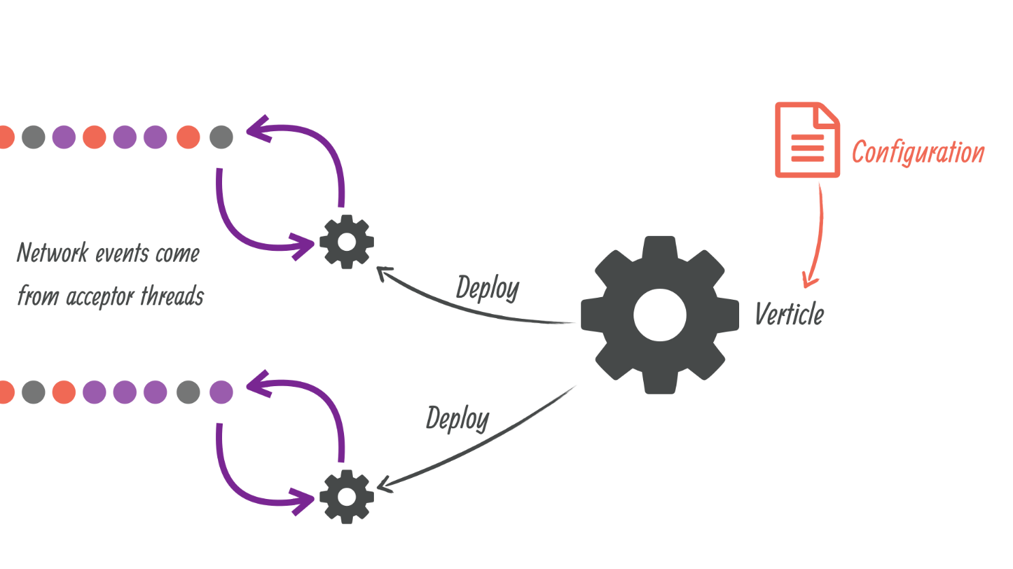
Như vậy ở trên ta đã tạo được 1 Verticle tên là “MonHocVerticle”, bây giờ làm sao Deploy nó?
Để deploy một Verticle (hoặc nhiều verticle cùng lúc), ta tạo một lớp chứa hàm main để khởi tạo các Event loop:
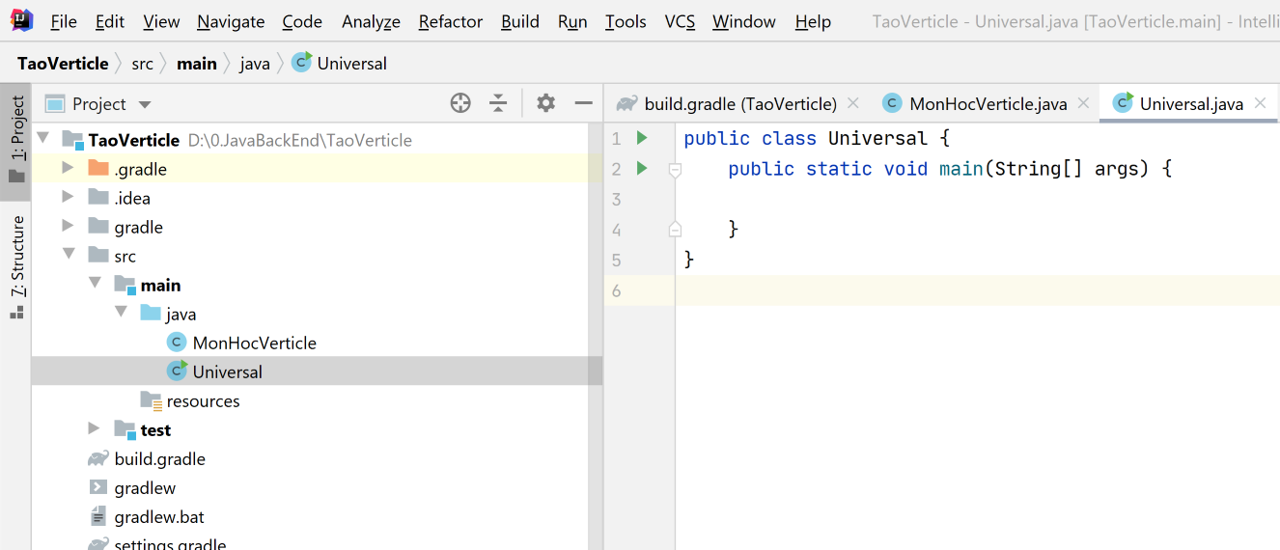
Ta tạo thêm 1 class tên là “Universal”, bổ sung thêm hàm main như dưới đây:
[code language=”java”]
public class Universal {
public static void main(String[] args) {
public class Universal {
public static void main(String[] args) {
Vertx vertx=Vertx.vertx();
vertx.deployVerticle(new MonHocVerticle());
}
}
[/code]
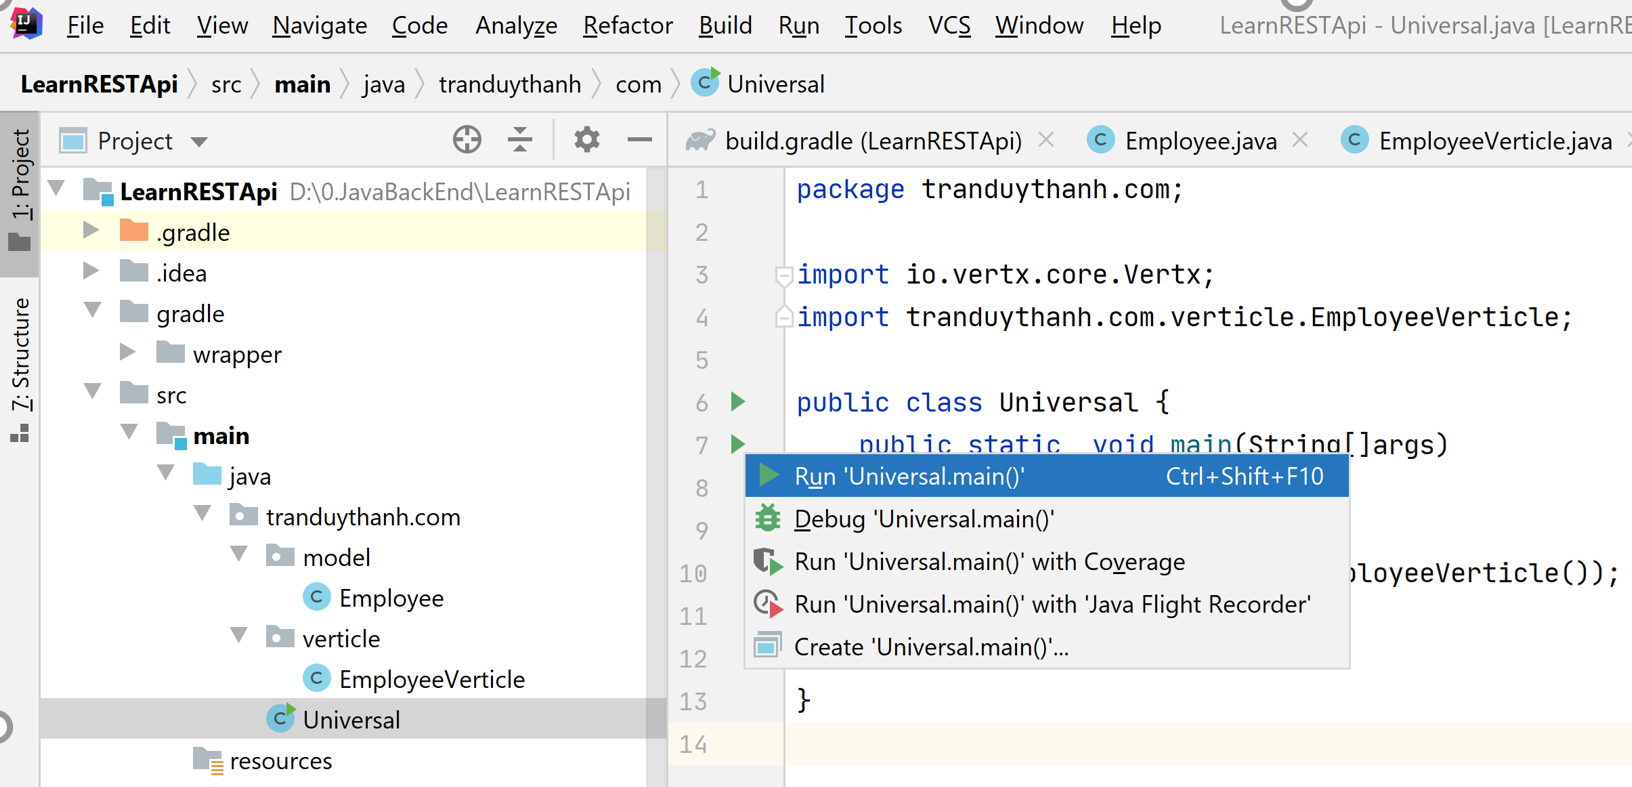
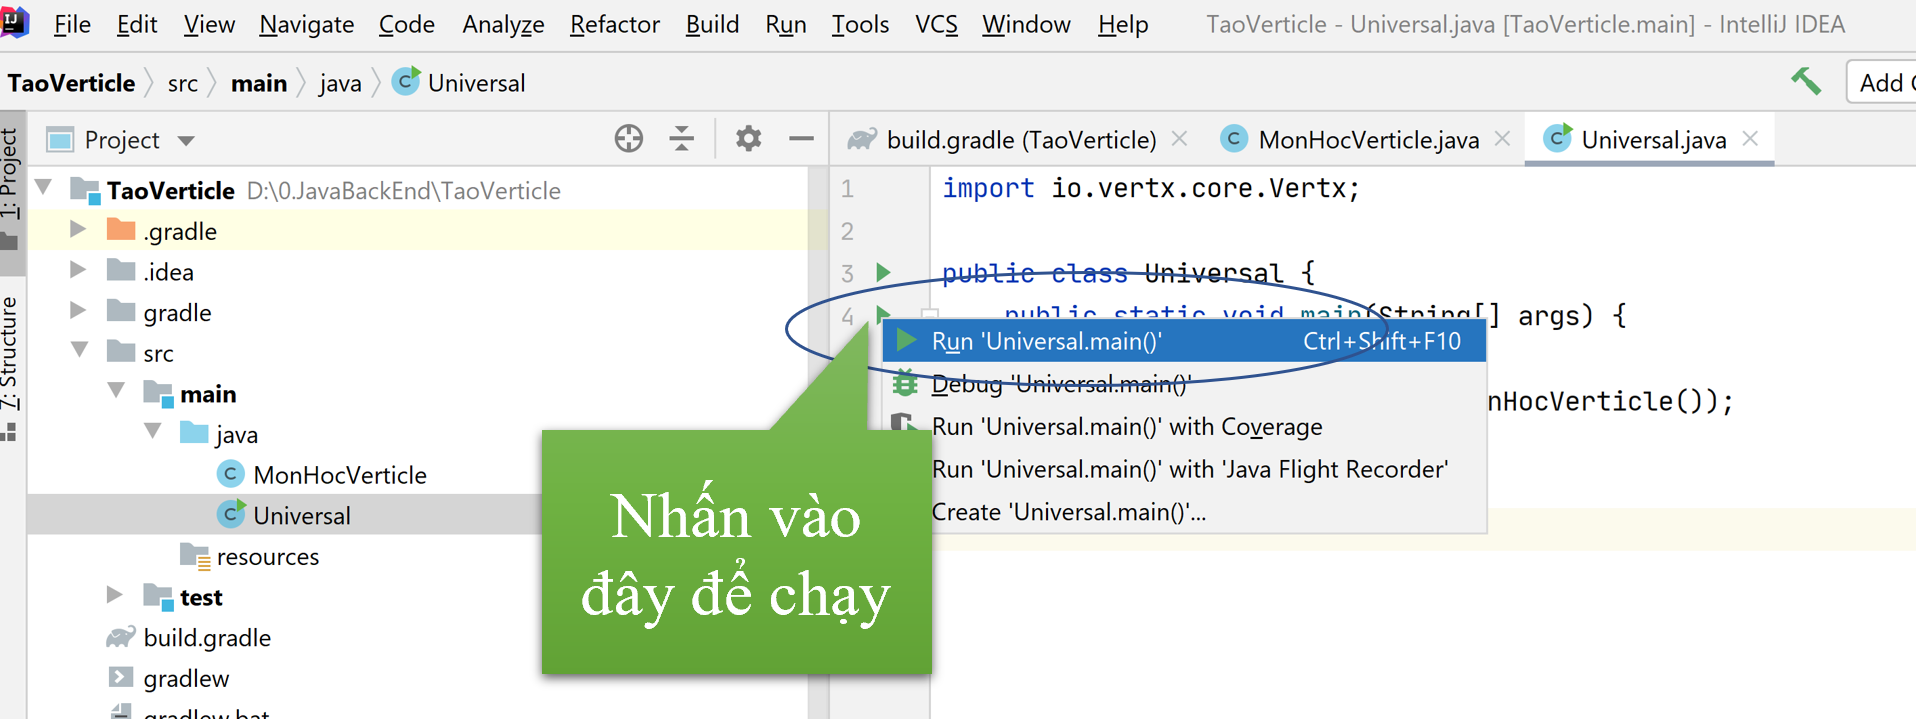
Deploy bằng cách nhấn vào biểu tượng hình tam giác màu xanh (ở bài này là dòng số 4): Nhấn vào nó xổ ra danh sách lựa chọn–>chọn Run ‘Universal.main()’
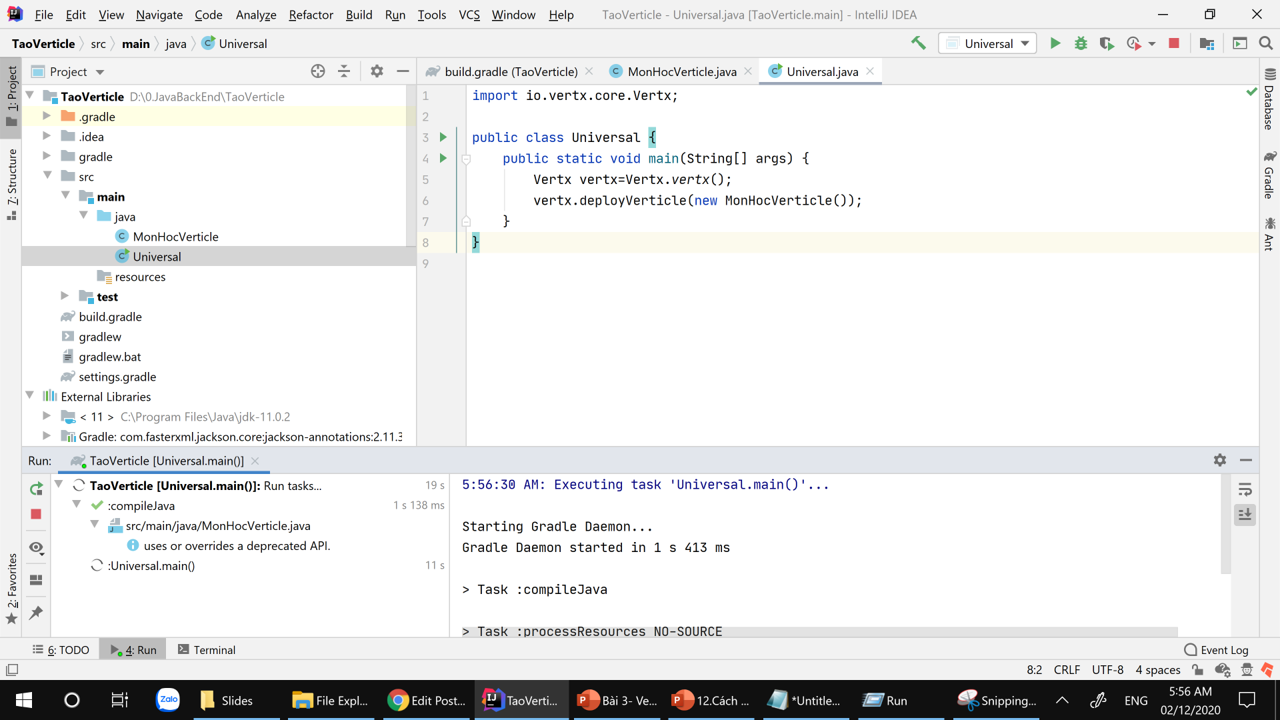
Chương trình sẽ được deploy và như dưới đây:
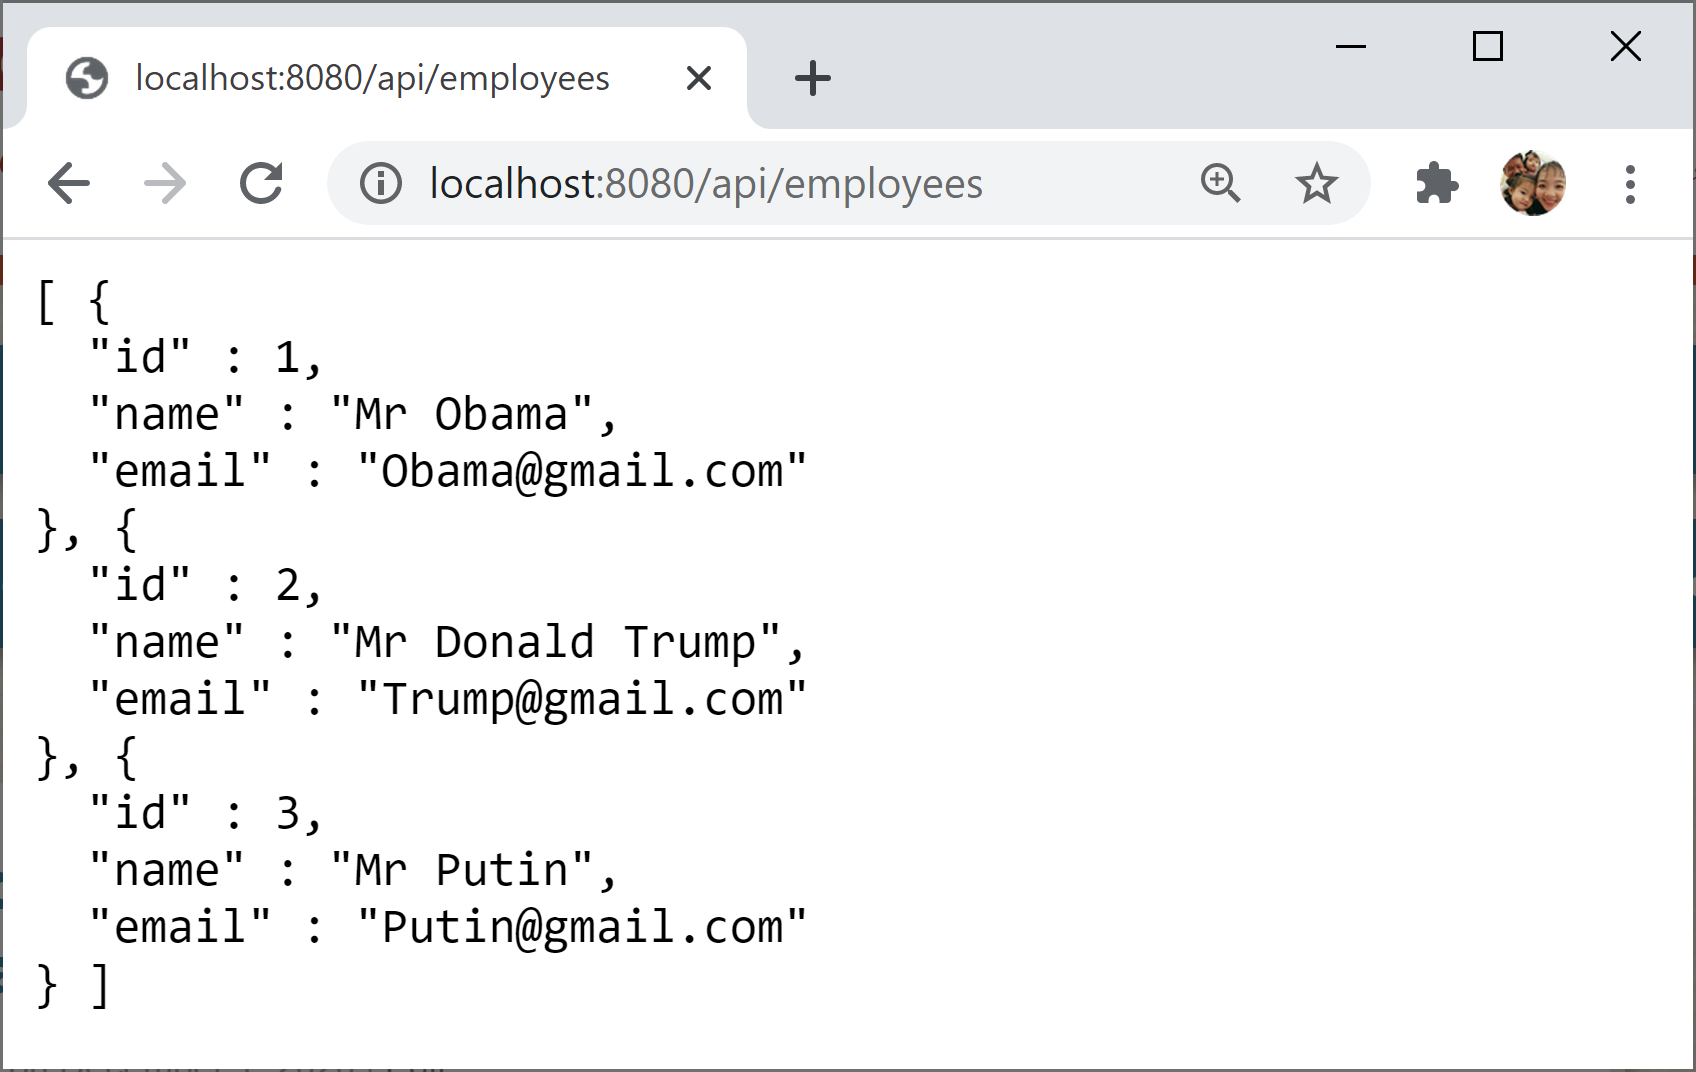
Mở phần mềm Postman hoặc trình duyệt lên để test:
Như vậy Tui đã hoàn thành xong bài hướng dẫn cách xây dựng Verticle trong Vert.X
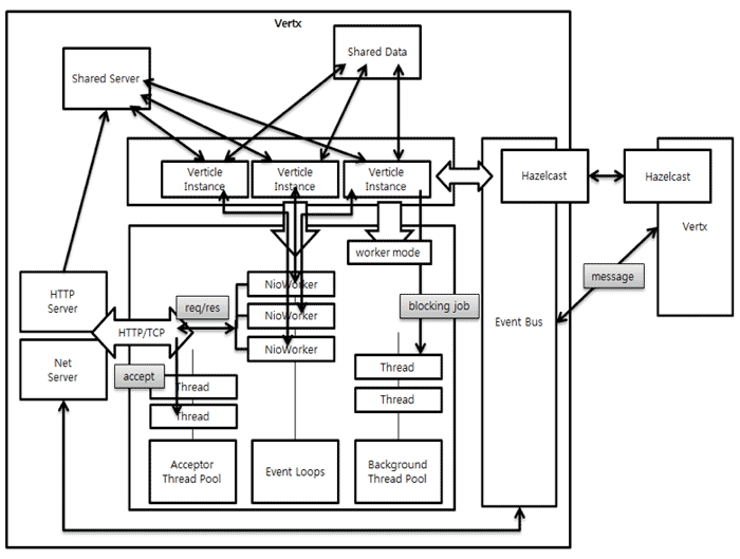
Lõi của Vert.X dựa trên giao thức Hazelcast (trên mạng có nhiều bài, Tui tóm lược lại, nguồn):
Hazelcast là một mạng lưu trữ dữ liệu trên bộ nhớ Ram (in-memory data grid). Hazelcast đưa ra cài đặt của các interface trong Java như: Map, Queue, ExcecutorService, Lock… Nó được thiết kế rất nhẹ và dễ sử dụng. Hazelcast đảm bảo tính sẵn sàng cao (high available) và có khả năng mở rộng (scalable). Các ứng dụng phân tán có thể sử dụng Hazelcast vào mục đích lưu dữ liệu đệm dạng phân tán (distributed caching), đồng bộ hóa, … Hazelcast được cài đặt bằng ngôn ngữ Java và client cho các ngôn ngữ Java, C/C++, C#… Hazelcast cũng có thể được xem như một giao thức lưu đệm (memcache protocol).
Bên trong có 2 thành phần quan trọng HTTP Server và Net Server
HTTP Server và Net Server Dùng để điều khiển sự kiện mạng và xử lý sự kiện. Net Server dùng cho các sự kiện và xử lý giao thức riêng và HTTP Server cho phép đăng ký trình xử lý với sự kiện HTTP như GET, POST, PUT, DELETE.
Vert.x có 3 loại thread pools:
1.Acceptor: Là 1 tiến trình để xử lý 1 socket. Và 1 tiến trình được tạo trên 1 port.
2.Event Loops: Khi một sự kiện xảy ra, nó thực thi một trình xử lý tương ứng. Khi Event được thực hiện xong, nó lặp lại đọc một Event khác. Khi mỗi sự kiện được gắn vào một tiến trình, thì mặc định Vert.x gắn 2 sự kiện cho mỗi CPU core thread.
3.Background: Được sử dụng khi Event Loop thực thi trình xử lý và yêu cầu một luồng bổ sung. Ta có thể chỉ định số lượng Thread trong backgroundPoolSize.
verticle
Khi triển khai một dịch vụ, ta kế thừa từ AbstractVerticle nó được gọi là verticle. Các verticle này khi triệu gọi sẽ được đẩy vào Event loop
Ta cũng có thể thiết lập nhiều cấu hình cho verticle cũng như có thể deploy nó nhiều lần:
Event bus
Event bus là công cụ chính để các verticles khác nhau có thể giao tiếp bất động bộ.