Chúc mừng các bạn đã lết được tới bài cuối cùng trong chuỗi bài hướng dẫn tương tác MongoDB trong Android Kotlin, ta đã biết xem, thêm, sửa và giờ là thao tác Xóa. Kết thúc bài này ta đã hoàn thành sứ mệnh CRUD, tập các nghiệp vụ thiết yếu phải có trong các phần mềm quản lý liên quan tới CSDL.
Tương tự như bài 16, Tui di chuyển quán Cafe khác nha, lần này IP của máy Tui là: 192.168.1.137, các Thím nhớ cấu hình lại file mongodb.cfg và chạy lại Service như Tui đã nhắc nhở trong bài 14 nha.
Kết thúc bài hướng dẫn này bạn phải làm được giao diện Xóa như sau:
 Nhấn vào biểu tượng thùng rác để xóa.
Coding xóa 1 Product khỏi MongoDB trong Android Kotlin ta làm như sau:
[code language=”java”]
try {
var connectionString = MongoClientURI(“mongodb://192.168.1.137:27017”)
var mongoClient = MongoClient(connectionString)
var database = mongoClient.getDatabase(“QuanLySanPham”)
var collection = database.getCollection(“Product”)
var filter = Filters.eq(“Ma”, “P1”)
collection.deleteOne(filter)
} catch (ex: Exception) {
Log.e(“LOI”, ex.toString())
}
[/code]
Coding ở trên ta xóa Product có mà là P1 (tìm nó trước dùng lệnh eq), dùng lệnh deleteOne để xóa.
Chi tiết:
Mở lại Project đã làm ở bài trước. Để làm hiển thị được dữ liệu dạng Custom layout như vậy ta sẽ kế thừa ArrayAdapter để hiệu chỉnh giao diện như ý muốn. Trước tiên ta cần tạo một layout custom cho từng dòng ở trên.
Ta tạo 1 file layout tên là : item.xml (bấm chuột phải vào layout/ chọn new/ chọn Layout resource file:

Đặt tên item, LinearLayout rồi bấm OK:

thiết kế layout như sau:
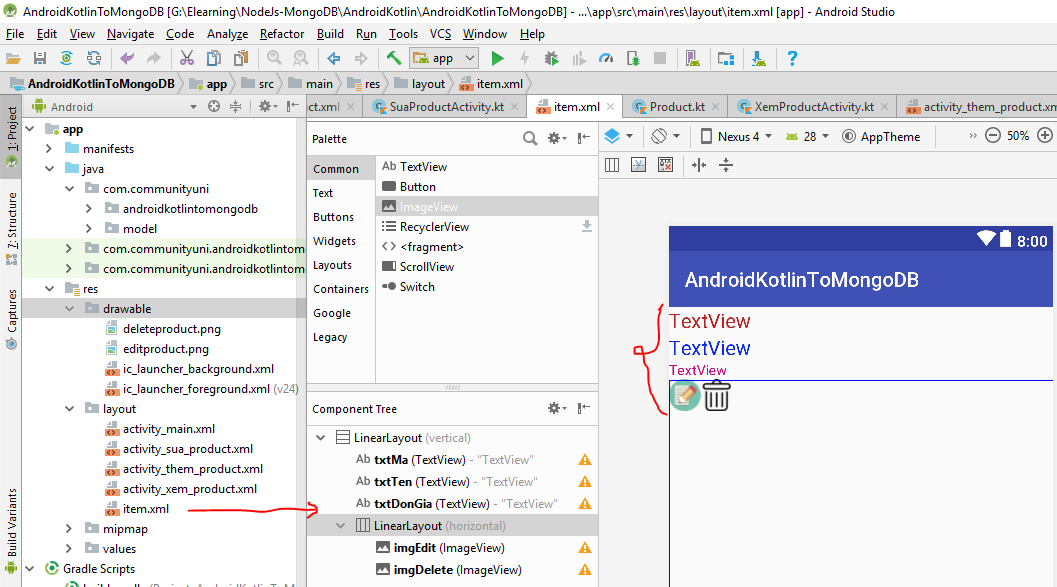
đây là file XML của item.xml:
[code language=”xml”]
<?xml version=”1.0″ encoding=”utf-8″?>
<LinearLayout xmlns:app=”http://schemas.android.com/apk/res-auto”
android:orientation=”vertical”
xmlns:android=”http://schemas.android.com/apk/res/android” android:layout_width=”match_parent”
android:layout_height=”match_parent”>
<TextView
android:id=”@+id/txtMa”
android:layout_width=”match_parent”
android:layout_height=”wrap_content”
android:text=”TextView”
android:textColor=”@color/mauchuma”
android:textSize=”20sp” />
<TextView
android:id=”@+id/txtTen”
android:layout_width=”match_parent”
android:layout_height=”wrap_content”
android:text=”TextView”
android:textColor=”@color/mauchuten”
android:textSize=”20sp” />
<TextView
android:id=”@+id/txtDonGia”
android:layout_width=”match_parent”
android:layout_height=”wrap_content”
android:text=”TextView”
android:textColor=”@color/mauchudongia” />
<LinearLayout
android:layout_width=”match_parent”
android:layout_height=”match_parent”
android:orientation=”horizontal”>
<ImageView
android:id=”@+id/imgEdit”
android:layout_width=”wrap_content”
android:layout_height=”wrap_content”
app:srcCompat=”@drawable/editproduct” />
<ImageView
android:id=”@+id/imgDelete”
android:layout_width=”wrap_content”
android:layout_height=”wrap_content”
app:srcCompat=”@drawable/deleteproduct” />
</LinearLayout>
</LinearLayout>
[/code]
Tiếp theo ta tạo thêm package tên là adapter như sau (bấm chuột phải vào java/ chọn new/ chọn package):

Đặt tên package như sau (tùy bạn tạo ở Project):

Bấm OK để xem kết quả:

Tiếp tục ta tạo 1 lớp tên là ProductAdapter nằm bên trong package adapter:

Bấm chuột phải vào adapter/ chọn New/ chọn Kotlin File/Class:

Name: Đặt tên là ProductAdapter
Kind: Chọn class
Bấm OK để tạo:
[code language=”java”]
package com.communityuni.adapter
class ProductAdapter {
}
[/code]
Tiến hành kết thừa và coding cho Lớp này như sau:
[code language=”java”]
package com.communityuni.adapter
import android.app.Activity
import android.content.Context
import android.os.AsyncTask
import android.util.Log
import android.view.View
import android.view.ViewGroup
import android.widget.ArrayAdapter
import android.widget.ImageView
import android.widget.TextView
import com.communityuni.androidkotlintomongodb.R
import com.communityuni.model.Product
import com.mongodb.MongoClient
import com.mongodb.client.model.Filters
import org.bson.conversions.Bson
import com.mongodb.client.MongoCollection
import com.mongodb.client.MongoDatabase
import com.mongodb.MongoClientURI
class ProductAdapter(internal var context: Activity, internal var resource: Int) : ArrayAdapter(context, resource) {
override fun getView(position: Int, convertView: View?, parent: ViewGroup): View {
var custom = context.layoutInflater.inflate(resource, null)
var txtMa = custom.findViewById(R.id.txtMa)
var txtTen = custom.findViewById(R.id.txtTen)
var txtDonGia = custom.findViewById(R.id.txtDonGia)
var p = getItem(position)
txtMa.text = p!!.Ma
txtTen.text = p.Ten
txtDonGia.text = p.DonGia.toString()
var img=custom.findViewById(R.id.imgDelete)
img.setOnClickListener { xuLyXoa(p) }
return custom
}
private fun xuLyXoa(p: Product?) {
}
}
[/code]
OK, như vậy là ta đã làm xong lớp ProductAdapter, nó sẽ có nhiệm vụ vẽ giao diện danh sách Product như ý muốn.
bây giờ ta tạo 1 Activity tên là XoaProductActivity

Bấm chuột phải vào Package có chứa MainActivity/ chọn New/ chọn Activity/ chọn EmptyActivity:

Đặt tên là XoaProductActivity rồi bấm Finish, xem cấu trúc sau khi bấm Finish:

Bây giờ ta sẽ thiết kế giao diện cho màn hình XoaProductActivity (mở file activity_xoa_product.xml), chỉ cần kéo 1 ListView ra là xong:

Layout XML cho màn hình xóa (activity_xoa_product.xml):
[code language=”xml”]
<?xml version=”1.0″ encoding=”utf-8″?>
<LinearLayout xmlns:android=”http://schemas.android.com/apk/res/android”
xmlns:app=”http://schemas.android.com/apk/res-auto”
xmlns:tools=”http://schemas.android.com/tools”
android:orientation=”vertical”
android:layout_width=”match_parent”
android:layout_height=”match_parent”
tools:context=”.XoaProductActivity”>
<ListView
android:id=”@+id/lvProduct”
android:layout_width=”match_parent”
android:layout_height=”match_parent” />
</LinearLayout>
[/code]
Mở Lớp XoaProductActivity lên để coding xóa:
[code language=”java”]
package com.communityuni.androidkotlintomongodb
import android.os.AsyncTask
import android.support.v7.app.AppCompatActivity
import android.os.Bundle
import android.widget.ListView
import com.communityuni.adapter.ProductAdapter
import com.communityuni.model.Product
import com.mongodb.MongoClient
import com.mongodb.MongoClientURI
import org.json.JSONObject
class XoaProductActivity : AppCompatActivity() {
lateinit var lvProduct: ListView
lateinit var adapter: ProductAdapter
override fun onCreate(savedInstanceState: Bundle?) {
super.onCreate(savedInstanceState)
setContentView(R.layout.activity_xoa_product)
addControls()
viewListProduct()
}
private fun viewListProduct() {
var task= ProductTask()
task.execute()
}
private fun addControls() {
lvProduct=findViewById(R.id.lvProduct)
adapter =ProductAdapter(this,R.layout.item)
lvProduct.adapter=adapter
}
inner class ProductTask : AsyncTask<Any, Any, List>() {
override fun onPreExecute() {
super.onPreExecute()
adapter.clear()
}
override fun doInBackground(vararg p0: Any?): List {
var connectionString = MongoClientURI(“mongodb://192.168.1.137:27017”)
var mongoClient = MongoClient(connectionString)
var database = mongoClient.getDatabase(“QuanLySanPham”)
val collection = database.getCollection(“Product”)
var cursor = collection.find().iterator()
var dsProduct = ArrayList()
try {
while (cursor.hasNext()) {
val data = cursor.next().toJson()
val jsonObject = JSONObject(data)
val ma = jsonObject.getString(“Ma”)
val ten = jsonObject.getString(“Ten”)
val gia = jsonObject.getDouble(“DonGia”)
var product=Product(ma,ten,gia)
dsProduct.add(product)
}
} finally {
cursor.close()
}
return dsProduct
}
override fun onPostExecute(result: List?) {
super.onPostExecute(result)
adapter.addAll(result)
}
}
}
[/code]
Trong màn hình MainActivity gọi lệnh mở màn hình XoaProductActivity để xem danh sách theo dạng CustomLayout:
[code language=”java”]
fun xoaProduct(view:View)
{
var intent= Intent(this,XoaProductActivity::class.java)
startActivity(intent)
}
[/code]
Chạy lên ta có kết quả:

Bây giờ ta sẽ xử lý khi người dùng bấm vào nút biểu tượng thùng rác để Xóa, ta mở lại ProductAdapter và bổ sung thêm inner class TaskDelete (coding Xóa):
[code language=”java”]
package com.communityuni.adapter
import android.app.Activity
import android.content.Context
import android.os.AsyncTask
import android.util.Log
import android.view.View
import android.view.ViewGroup
import android.widget.ArrayAdapter
import android.widget.ImageView
import android.widget.TextView
import com.communityuni.androidkotlintomongodb.R
import com.communityuni.model.Product
import com.mongodb.MongoClient
import com.mongodb.client.model.Filters
import org.bson.conversions.Bson
import com.mongodb.client.MongoCollection
import com.mongodb.client.MongoDatabase
import com.mongodb.MongoClientURI
class ProductAdapter(internal var context: Activity, internal var resource: Int) : ArrayAdapter(context, resource) {
override fun getView(position: Int, convertView: View?, parent: ViewGroup): View {
var custom = context.layoutInflater.inflate(resource, null)
var txtMa = custom.findViewById(R.id.txtMa)
var txtTen = custom.findViewById(R.id.txtTen)
var txtDonGia = custom.findViewById(R.id.txtDonGia)
var p = getItem(position)
txtMa.text = p!!.Ma
txtTen.text = p.Ten
txtDonGia.text = p.DonGia.toString()
var img=custom.findViewById(R.id.imgDelete)
img.setOnClickListener { xuLyXoa(p) }
return custom
}
private fun xuLyXoa(p: Product?) {
TaskDelete().execute(p)
}
private fun removeProduct(p:Product?)
{
remove(p)
}
inner class TaskDelete:AsyncTask()
{
override fun doInBackground(vararg p0: Product?): Boolean {
try {
var p=p0[0]
var connectionString = MongoClientURI(“mongodb://192.168.1.137:27017”)
var mongoClient = MongoClient(connectionString)
var database = mongoClient.getDatabase(“QuanLySanPham”)
val collection = database.getCollection(“Product”)
val filter = Filters.eq(“Ma”,p?.Ma)
collection.deleteOne(filter)
removeProduct(p)
return true
}
catch (e:Exception)
{
Log.e(“LOI”,e.toString())
}
return false
}
override fun onPostExecute(result: Boolean?) {
super.onPostExecute(result)
}
}
}
[/code]
Chạy lên ta sẽ được kết quả như mong muốn.
Các bạn có thể tải source code đầy đủ ở đây: Source code xóa dữ liệu MongoDB trong Android Kotlin.
Bài học Sau Tui sẽ hướng dẫn các bạn các kỹ thuật tương tác dữ liệu MongoDB với NodeJS
Các khóa học online khác, bạn có thể tham khảo tại đây:
Chúc các bạn thành công!
Làm sao để bảo mật url kết nối đến database ạ?