Tối ưu hóa LinQ

Sau khi tham khảo nhiều nguồn trên internet và thông qua các lần thảo luận với đồng nghiệp, Tôi có test thử các kỹ thuật để test tối ưu hóa trong các câu lệnh trong LinQ.

Đây là link gốc trên trang Sidar OK

http://www.sidarok.com/web/blog/content/2008/05/02/10-tips-to-improve-your-linq-to-sql-application-performance.html

(Thanks Sidar OK site)

Các bạn sẽ sử dụng Petshop để Test lại.

http://www.mediafire.com/?19pyp63h5gzc49x, các bạn load về và Attach PetShop.mdf, chú ý là Tôi sử dụng SQL Server 2008

Ở đây Tôi sao chép lại 10 tips trên trang Sidar Ok. Tôi có thay bằng PetshopDatacontext.

Tôi nghĩ cái này hay và hữu dụng nên đã sao chép nguyên bản gốc vào đây. Các bạn có thể làm lại để kiểm chứng kết quả:

=================================================================

1 – Turn off ObjectTrackingEnabled Property of Data Context If Not Necessary

If you are trying only to retrieve data as read only, and not modifying anything, you don’t need object tracking. So turn it off using it like in the example below:

using (PetshopDataContext context = new PetshopDataContext ())

{

context.ObjectTrackingEnabled = false;

}

This will allow you to turn off the unnecessary identity management of the objects – hence Data Context will not have to store them because it will be sure that there will be no change statements to generate.

2 – Do NOT Dump All Your DB Objects into One Single DataContext

DataContext represents a single unit of work, not all your database. If you have several database objects that are not connected, or they are not used at all (log tables, objects used by batch processes,etc..). These objects just unnecessarily consume space in the memory hence increasing the identity management and object tracking costs in CUD engine of the DataContext.

Instead think of separating your workspace into several DataContexts where each one represents a single unit of work associated with it. You can still configure them to use the same connection via its constructors to not to loose the benefit of connection pooling.

3 – Use CompiledQuery Wherever Needed

When creating and executing your query, there are several steps for generating the appropriate SQL from the expression, just to name some important of them:

  1. Create expression tree
  2. Convert it to SQL
  3. Run the query
  4. Retrieve the data
  5. Convert it to the objects

As you may notice, when you are using the same query over and over, hence first and second steps are just wasting time. This is where this tiny class in System.Data.Linq namespace achieves a lot. With CompiledQuery, you compile your query once and store it somewhere for later usage. This is achieved by static CompiledQuery.Compile method.

Below is a Code Snippet for an example usage:

Func<PetshopDataContext , IEnumerable<Category>> func =

CompiledQuery.Compile<PetshopDataContext , IEnumerable<Category>>

((PetshopDataContext context) => context.Categories.

Where<Category>(cat => cat.Products.Count > 5));

And now, “func” is my compiled query. It will only be compiled once when it is first run. We can now store it in a static utility class as follows :

/// <summary>

/// Utility class to store compiled queries

/// </summary>

public static class QueriesUtility

{

/// <summary>

/// Gets the query that returns categories with more than five products.

/// </summary>

/// <value>The query containing categories with more than five products.</value>

public static Func<PetshopDataContext , IEnumerable<Category>>

GetCategoriesWithMoreThanFiveProducts

{

get

{

Func<PetshopDataContext , IEnumerable<Category>> func =

CompiledQuery.Compile<PetshopDataContext , IEnumerable<Category>>

((PetshopDataContext context) => context.Categories.

Where<Category>(cat => cat.Products.Count > 5));

return func;

}

}

}

And we can use this compiled query (since it is now a nothing but a strongly typed function for us) very easily as follows:

using (PetshopDataContext context = new PetshopDataContext ())

{

QueriesUtility.GetCategoriesWithMoreThanFiveProducts(context);

}

Storing and using it in this way also reduces the cost of doing a virtual call that’s done each time you access the collection – actually it is decreased to 1 call. If you don’t call the query don’t worry about compilation too, since it will be compiled whenever the query is first executed.

4 – Filter Data Down to What You Need Using DataLoadOptions.AssociateWith

When we retrieve data with Load or LoadWith we are assuming that we want to retrieve all the associated data those are bound with the primary key (and object id). But in most cases we likely need additional filtering to this. Here is where DataLoadOptions.AssociateWith generic method comes very handy. This method takes the criteria to load the data as a parameter and applies it to the query – so you get only the data that you need.

The following code below associates and retrieves the categories only with continuing products:

using (PetshopDataContext context = new PetshopDataContext ())

{

DataLoadOptions options = new DataLoadOptions();

options.AssociateWith<Category>(cat=> cat.Products.Where<Product>(prod => !prod.Discontinued));

context.LoadOptions = options;

}

5 – Turn Optimistic Concurrency Off Unless You Need It

LINQ to SQL comes with out of the box Optimistic Concurrency support with SQL timestamp columns which are mapped to Binary type. You can turn this feature on and off in both mapping file and attributes for the properties. If your application can afford running on “last update wins” basis, then doing an extra update check is just a waste.

UpdateCheck.Never is used to turn optimistic concurrency off in LINQ to SQL.

Here is an example of turning optimistic concurrency off implemented as attribute level mapping:

[Column(Storage=“_Description”, DbType=“NText”,

UpdateCheck=UpdateCheck.Never)]

public string Description

{

get

{

return this._Description;

}

set

{

if ((this._Description != value))

{

this.OnDescriptionChanging(value);

this.SendPropertyChanging();

this._Description = value;

this.SendPropertyChanged(“Description”);

this.OnDescriptionChanged();

}

}

}

6 – Constantly Monitor Queries Generated by the DataContext and Analyze the Data You Retrieve

As your query is generated on the fly, there is this possibility that you may not be aware of additional columns or extra data that is retrieved behind the scenes. Use Data Context’s Log property to be able to see what SQL are being run by the Data Context. An example is as follows:

using (PetshopDataContext context = new PetshopDataContext ())

{

context.Log = Console.Out;

}

Using this snippet while debugging you can see the generated SQL statements in the Output Window in Visual Studio and spot performance leaks by analyzing them. Don’t forget to comment that line out for production systems as it may create a bit of an overhead. (Wouldn’t it be great if this was configurable in the config file?)

To see your DLINQ expressions in a SQL statement manner one can use SQL Query Visualizer which needs to be installed separately from Visual Studio 2008.

7 – Avoid Unnecessary Attaches to Tables in the Context

Since Object Tracking is a great mechanism, nothing comes for free. When you  Attach an object to your context, you mean that this object was disconnected for a while and now you now want to get it back in the game. DataContext then marks it as an object that potentially will change – and this is just fine when you really intent to do that.

But there might be some circumstances that aren’t very obvious, and may lead you to attach objects that arent changed. One of such cases is doing an AttachAll for collections and not checking if the object is changed or not. For a better performance, you should check that if you are attaching ONLY the objects in the collection those are changed.

I will provide a sample code for this soon.

8 – Be Careful of Entity Identity Management Overhead

During working with a non-read only context, the objects are still being tracked – so be aware that non intuitive scenarios this can cause while you proceed. Consider the following DLINQ code:

using (PetshopDataContext context = new PetshopDataContext ())

{

var a = from c in context.Categories

select c;

}

Very plain, basic DLINQ isn’t it? That’s true; there doesn’t seem any bad thing in the above code. Now let’s see the code below:

using (PetshopDataContext context = new PetshopDataContext ())

{

var a = from c in context.Categories

select new Category

{

CategoryID = c.CategoryID,

CategoryName = c.CategoryName,

Description = c.Description

};

}

The intuition is to expect that the second query will work slower than the first one, which is WRONG. It is actually much faster than the first one.

The reason for this is in the first query, for each row the objects need to be stored, since there is a possibility that you still can change them. But in the 2nd one, you are throwing that object away and creating a new one, which is more efficient.

9 – Retrieve Only the Number of Records You Need

When you are binding to a data grid, and doing paging – consider the easy to use methods that LINQ to SQL provides. These are mainly Takeand Skip methods. The code snippet involves a method which retrieves enough products for a ListView with paging enabled:

/// <summary>

/// Gets the products page by page.

/// </summary>

/// <param name=”startingPageIndex”>Index of the starting page.</param>

/// <param name=”pageSize”>Size of the page.</param>

/// <returns>The list of products in the specified page</returns>

private IList<Product> GetProducts(int startingPageIndex, int pageSize)

{

using (PetshopDataContext context = new PetshopDataContext ())

{

return context.Products

.Take<Product>(pageSize)

.Skip<Product>(startingPageIndex * pageSize)

.ToList<Product>();

}

}

10 – Don’t Misuse CompiledQuery

=================================================================

Cách sử dụng ListView Trong WPF

Topic này Tôi muốn hướng dẫn các bạn cách sử dụng ListView Trong WPF và cách Binding dữ liệu vào ListView

Vẫn sử dụng database mẫu là Petshop

http://www.mediafire.com/?19pyp63h5gzc49x, các bạn load về và Attach PetShop.mdf, chú ý là Tôi sử dụng SQL Server 2008

Trong phần này, các bạn sẽ tìm hiểu 6 cách thức sử dụng ListView trong WPF, lần lượt từ dễ tới khó.

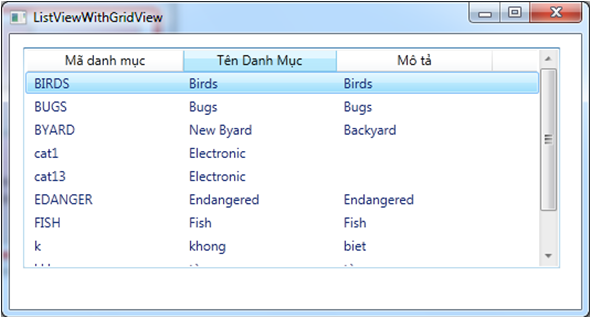
Vì không có nhiều thời gian nên Tôi cũng không có giải thích chi tiết từng dòng lệnh như các Topic khác và lại nó cũng không khó khăn lắm, trong phần Binding dữ liệu lên ListView ( khi bấm vào nút lệnh  5, và 6 ) các bạn phải chú ý tên Cột trong bảng dữ liệu để đưa nó chính xác vào control lúc Binding. Nếu không hiểu phần nào thì các bạn Comment trực tiếp vào Topic này hoặc Email cho Tôi, Tôi sẽ trả lời trong thời gian sớm nhất có thể.

Đây là giao diện chính :

Tương ứng với từng nút lệnh là cách thức sử dụng ListView

Ở đây các bạn cũng sử dụng LINQ to SQL để sử dụng 2 bảng Product và Categories:

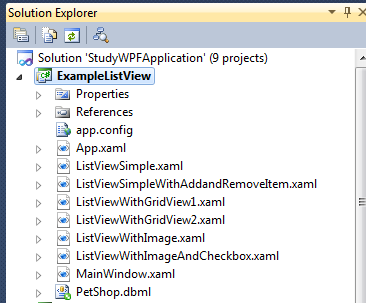
Còn đây là cấu trúc Tập tin và thư mục của Project:

Từ MainWindow.xaml, ta sẽ gọi các cửa sổ khác ứng với chức năng mà ta đã chọn

Các Bạn Bắt đầu đầu quan sát Tôi viết lệnh cho từng chức năng:

0) Cửa sổ MainWindow:

Phần XAML:

<Window x:Class=”ExampleListView.MainWindow”xmlns=”http://schemas.microsoft.com/winfx/2006/xaml/presentation”

xmlns:x=”http://schemas.microsoft.com/winfx/2006/xaml”

Title=”Demo ListView” Height=”280″ Width=”356″>

<Window.Resources>

<LinearGradientBrush x:Key=”myButtonBrush”>

<GradientStop Color=”Lavender” Offset=”0.0″></GradientStop>

<GradientStop Color=”Pink” Offset=”0.5″></GradientStop>

<GradientStop Color=”LightGray” Offset=”1.0″></GradientStop>

</LinearGradientBrush>

</Window.Resources>

<GroupBox Header=”Ví dụ về ListView” BorderThickness=”4″ BorderBrush=”Red”>

<UniformGrid Rows=”2″ Columns=”3″ Height=”200″ Width=”297″>

<Button Content=”Simple” Background=”{DynamicResource ResourceKey=myButtonBrush}” Name=”btnSimple” Click=”btnSimple_Click”></Button>

<Button  Background=”{DynamicResource ResourceKey=myButtonBrush}” Name=”btnAddAndRemoveItem” Click=”btnAddAndRemoveItem_Click”>

<TextBlock>Add and<LineBreak/> Remove Item</TextBlock>

</Button>

<Button Content=”With Image”  Background=”{DynamicResource ResourceKey=myButtonBrush}” Name=”btnWithImage” Click=”btnWithImage_Click”></Button>

<Button  Background=”{DynamicResource ResourceKey=myButtonBrush}” Name=”btnWithImageAndCheckbox” Click=”btnWithImageAndCheckbox_Click”>

<TextBlock>Image and <LineBreak/>Checkbox</TextBlock>

</Button>

<Button  Background=”{DynamicResource ResourceKey=myButtonBrush}” Name=”btnWithGridView” Click=”btnWithGridView_Click”>

<TextBlock>With GridView<LineBreak/> Binding Coding</TextBlock>

</Button>

<Button  Background=”{DynamicResource ResourceKey=myButtonBrush}” Name=”btnWithGridViewAndCombobox” Click=”btnWithGridViewAndCombobox_Click”>

<TextBlock>With GridView<LineBreak/> Binding XAML</TextBlock>

</Button>

</UniformGrid>

</GroupBox>

</Window>

Phần Code behind:

using System;using System.Collections.Generic;

using System.Linq;

using System.Text;

using System.Windows;

using System.Windows.Controls;

using System.Windows.Data;

using System.Windows.Documents;

using System.Windows.Input;

using System.Windows.Media;

using System.Windows.Media.Imaging;

using System.Windows.Navigation;

using System.Windows.Shapes;

namespace ExampleListView

{

/// <summary>

/// Interaction logic for MainWindow.xaml

/// </summary>

public partial class MainWindow : Window

{

public MainWindow()

{

InitializeComponent();

}

private void btnSimple_Click(object sender, RoutedEventArgs e)

{

ListViewSimple mylist = new ListViewSimple();

mylist.Show();

}

private void btnAddAndRemoveItem_Click(object sender, RoutedEventArgs e)

{

ListViewSimpleWithAddandRemoveItem mylist = new ListViewSimpleWithAddandRemoveItem();

mylist.Show();

}

private void btnWithImage_Click(object sender, RoutedEventArgs e)

{

ListViewWithImage mylist = new ListViewWithImage();

mylist.Show();

}

private void btnWithImageAndCheckbox_Click(object sender, RoutedEventArgs e)

{

ListViewWithImageAndCheckbox mylist = new ListViewWithImageAndCheckbox();

mylist.Show();

}

private void btnWithGridView_Click(object sender, RoutedEventArgs e)

{

ListViewWithGridView mylist = new ListViewWithGridView();

mylist.Show();

}

private void btnWithGridViewAndCombobox_Click(object sender, RoutedEventArgs e)

{

ListViewWithGridViewAndCombobox mylist = new ListViewWithGridViewAndCombobox();

mylist.Show();

}

}

}

1) Cửa sổ ListViewSimple:

Phần XAML:

<Window x:Class=”ExampleListView.ListViewSimple”xmlns=”http://schemas.microsoft.com/winfx/2006/xaml/presentation”

xmlns:x=”http://schemas.microsoft.com/winfx/2006/xaml”

Title=”ListViewSimple” Height=”300″ Width=”300″ Loaded=”Window_Loaded”>

<Grid>

</Grid>

</Window>

Phần Code Behind:

using System;using System.Collections.Generic;

using System.Linq;

using System.Text;

using System.Windows;

using System.Windows.Controls;

using System.Windows.Data;

using System.Windows.Documents;

using System.Windows.Input;

using System.Windows.Media;

using System.Windows.Media.Imaging;

using System.Windows.Shapes;

namespace ExampleListView

{

/// <summary>

/// Interaction logic for ListViewSimple.xaml

/// </summary>

public partial class ListViewSimple : Window

{

public ListViewSimple()

{

InitializeComponent();

}

private void Window_Loaded(object sender, RoutedEventArgs e)

{

ListView lv = new ListView();

PetShopDataContext context = new PetShopDataContext();

var datas = from p in context.Products select p.Name;

lv.ItemsSource = datas;

this.Content = lv;

}

}

}

2) Cửa sổ ListViewSimpleWithAddandRemoveItem:

Phần XAML:

<Window x:Class=”ExampleListView.ListViewSimpleWithAddandRemoveItem”xmlns=”http://schemas.microsoft.com/winfx/2006/xaml/presentation”

xmlns:x=”http://schemas.microsoft.com/winfx/2006/xaml”

Title=”ListViewSimpleWithAddandRemoveItem” Height=”381″ Width=”300″>

<StackPanel>

<StackPanel Orientation=”Vertical”>

<TextBox Width=”204″ Name=”txtName” Height=”21″ Background=”#FFDBA8A8″ AcceptsReturn=”True”></TextBox>

<Button Name=”btnAdd” Click=”btnAdd_Click” Height=”27″ Width=”73″>Thêm</Button>

<Button Name=”btnRemove” Click=”btnRemove_Click” Height=”32″ Width=”137″>Xóa Item Đang chọn</Button>

<Button Name=”btnRemoveAllSelected” Height=”33″ Width=”173″ Click=”btnRemoveAllSelected_Click”>Xóa Các Item Đang chọn</Button>

<Button Name=”btnRemoveAll” Height=”33″ Width=”209″ Click=”btnRemoveAll_Click”>Xóa hết luôn</Button>

</StackPanel>

<ScrollViewer Height=”200″ VerticalScrollBarVisibility=”Auto”>

<ListView Name=”lvProduct” SelectionMode=”Multiple”></ListView>

</ScrollViewer>

</StackPanel>

</Window>

Phần Code Behind:

using System;using System.Collections.Generic;

using System.Linq;

using System.Text;

using System.Windows;

using System.Windows.Controls;

using System.Windows.Data;

using System.Windows.Documents;

using System.Windows.Input;

using System.Windows.Media;

using System.Windows.Media.Imaging;

using System.Windows.Shapes;

namespace ExampleListView

{

/// <summary>

/// Interaction logic for ListViewSimpleWithAddandRemoveItem.xaml

/// </summary>

public partial class ListViewSimpleWithAddandRemoveItem : Window

{

public ListViewSimpleWithAddandRemoveItem()

{

InitializeComponent();

}

private void btnAdd_Click(object sender, RoutedEventArgs e)

{

lvProduct.Items.Add(txtName.Text);

txtName.Clear();

txtName.Focus();

}

private void btnRemove_Click(object sender, RoutedEventArgs e)

{

int nRemove=lvProduct.Items.IndexOf(lvProduct.SelectedItem);

lvProduct.Items.RemoveAt(nRemove);

//lvProduct.Items.Remove(lvProduct.SelectedItem);

}

private void btnRemoveAllSelected_Click(object sender, RoutedEventArgs e)

{

while (lvProduct.SelectedItems.Count > 0)

{

lvProduct.Items.Remove(lvProduct.SelectedItems[0]);

}

}

private void btnRemoveAll_Click(object sender, RoutedEventArgs e)

{

lvProduct.Items.Clear();

}

}

}

3) Cửa sổ ListViewWithImage:

Phần XAML:

<Window x:Class=”ExampleListView.ListViewWithImage”xmlns=”http://schemas.microsoft.com/winfx/2006/xaml/presentation”

xmlns:x=”http://schemas.microsoft.com/winfx/2006/xaml”

Title=”ListViewWithImage” Height=”560″ Width=”456″>

<StackPanel>

<UniformGrid Rows=”2″ Columns=”2″>

<Label> Nhập Tên</Label>

<TextBox Name=”txtName”></TextBox>

<Label>Chọn hình ảnh</Label>

<StackPanel Orientation=”Horizontal”>

<TextBox Width=”150″ Height=”29″ Name=”txtPicture”></TextBox>

<Button Name=”btnPicture” Click=”btnPicture_Click”>Chọn hình</Button>

</StackPanel>

</UniformGrid>

<Button Name=”btnAdd” Height=”48″ Width=”225″ Click=”btnAdd_Click”> Thêm</Button>

<ScrollViewer VerticalScrollBarVisibility=”Auto” Height=”400″>

<ListView Name=”lvProduct”></ListView>

</ScrollViewer>

</StackPanel>

</Window>

Phần Code Behind:

using System;using System.Collections.Generic;

using System.Linq;

using System.Text;

using System.Windows;

using System.Windows.Controls;

using System.Windows.Data;

using System.Windows.Documents;

using System.Windows.Input;

using System.Windows.Media;

using System.Windows.Media.Imaging;

using System.Windows.Shapes;

namespace ExampleListView

{

/// <summary>

/// Interaction logic for ListViewWithImage.xaml

/// </summary>

public partial class ListViewWithImage : Window

{

public ListViewWithImage()

{

InitializeComponent();

}

private void btnPicture_Click(object sender, RoutedEventArgs e)

{

Microsoft.Win32.OpenFileDialog of = new Microsoft.Win32.OpenFileDialog();

of.Filter = “*.*|*.*”;

if (of.ShowDialog() == true)

{

txtPicture.Text = of.FileName;

}

}

private void btnAdd_Click(object sender, RoutedEventArgs e)

{

ListViewItem lvit = new ListViewItem();

lvit.Background = new SolidColorBrush(Colors.Wheat);

if(lvProduct.Items.Count%2==0)

lvit.Background = new SolidColorBrush(Colors.Lavender);

lvit.Foreground = new SolidColorBrush(Colors.Red);

lvit.FontFamily = new FontFamily(“Verdana”);

lvit.FontSize = 15;

StackPanel sp = new StackPanel();

sp.Orientation = Orientation.Horizontal;

Image img = new Image();

img.Source = new BitmapImage(new Uri(txtPicture.Text));

img.Height = 150;

img.Width = 150;

img.Stretch = Stretch.Fill;

TextBlock txt = new TextBlock();

txt.Text = txtName.Text;

sp.Children.Add(img);

sp.Children.Add(txt);

lvit.Content = sp;

lvProduct.Items.Add(lvit);

}

}

}

4) Cửa sổ ListViewWithImageAndCheckbox:

Phần XAML:

<Window x:Class=”ExampleListView.ListViewWithImageAndCheckbox”xmlns=”http://schemas.microsoft.com/winfx/2006/xaml/presentation”

xmlns:x=”http://schemas.microsoft.com/winfx/2006/xaml”

Title=”ListViewWithImageAndCheckbox” Height=”601″ Width=”512″>

<StackPanel>

<UniformGrid Rows=”2″ Columns=”2″>

<Label>Nhập Tên</Label>

<TextBox Name=”txtName”></TextBox>

<Label>Chọn hình ảnh</Label>

<StackPanel Orientation=”Horizontal”>

<TextBox Width=”150″ Height=”29″ Name=”txtPicture”></TextBox>

<Button Name=”btnPicture” Click=”btnPicture_Click”>Chọn hình</Button>

</StackPanel>

</UniformGrid>

<Button Name=”btnAdd” Height=”48″ Width=”120″ Click=”btnAdd_Click”>Thêm</Button>

<Button Name=”btnShow” Height=”47″ Width=”147″ Click=”btnShow_Click”>Kiểm tra Item Checked</Button>

<ScrollViewer VerticalScrollBarVisibility=”Auto” Height=”400″>

<ListView Name=”lvProduct”></ListView>

</ScrollViewer>

</StackPanel>

</Window>

Phần Code Behind:

using System;using System.Collections.Generic;

using System.Linq;

using System.Text;

using System.Windows;

using System.Windows.Controls;

using System.Windows.Data;

using System.Windows.Documents;

using System.Windows.Input;

using System.Windows.Media;

using System.Windows.Media.Imaging;

using System.Windows.Shapes;

namespace ExampleListView

{

/// <summary>

/// Interaction logic for ListViewWithImageAndCheckbox.xaml

/// </summary>

public partial class ListViewWithImageAndCheckbox : Window

{

public ListViewWithImageAndCheckbox()

{

InitializeComponent();

}

private void btnPicture_Click(object sender, RoutedEventArgs e)

{

Microsoft.Win32.OpenFileDialog of = new Microsoft.Win32.OpenFileDialog();

of.Filter = “*.*|*.*”;

if (of.ShowDialog() == true)

{

txtPicture.Text = of.FileName;

}

}

private void btnAdd_Click(object sender, RoutedEventArgs e)

{

ListViewItem lvit = new ListViewItem();

lvit.Background = new SolidColorBrush(Colors.Wheat);

if (lvProduct.Items.Count % 2 == 0)

lvit.Background = new SolidColorBrush(Colors.Lavender);

lvit.Foreground = new SolidColorBrush(Colors.Red);

lvit.FontFamily = new FontFamily(“Verdana”);

lvit.FontSize = 15;

CheckBox chk = new CheckBox();

StackPanel sp = new StackPanel();

sp.Orientation = Orientation.Horizontal;

Image img = new Image();

img.Source = new BitmapImage(new Uri(txtPicture.Text));

img.Height = 50;

img.Width = 50;

img.Stretch = Stretch.Fill;

TextBlock txt = new TextBlock();

txt.Text = txtName.Text;

sp.Children.Add(img);

sp.Children.Add(txt);

chk.Content = sp;

lvit.Content = chk;

lvProduct.Items.Add(lvit);

}

private void btnShow_Click(object sender, RoutedEventArgs e)

{

foreach (ListViewItem item in lvProduct.Items)

{

CheckBox chk = (CheckBox)item.Content;

if (chk.IsChecked==true)

{

StackPanel st = (StackPanel)chk.Content;

TextBlock txt = (TextBlock)st.Children[1];

MessageBox.Show(txt.Text);

}

}

}

}

}

5) Cửa sổ ListViewWithGridView1:

Phần XAML:

<Window x:Class=”ExampleListView.ListViewWithGridView1″xmlns=”http://schemas.microsoft.com/winfx/2006/xaml/presentation”

xmlns:x=”http://schemas.microsoft.com/winfx/2006/xaml”

Title=”ListViewWithGridView” Height=”287″ Width=”533″ Loaded=”Window_Loaded”>

<StackPanel>

<ScrollViewer VerticalScrollBarVisibility=”Auto” Height=”250″>

<ListView Height=”200″ HorizontalAlignment=”Left” Margin=”12,12,0,0″ Name=”listView1″ VerticalAlignment=”Top” Width=”486″>

<ListView.View>

<GridView>

<GridViewColumn Width=”140″ Header=”Mã danh mục”

DisplayMemberBinding=”{Binding CategoryId}”  />

<GridViewColumn Width=”140″ Header=”Tên Danh Mục”

DisplayMemberBinding=”{Binding Name}” />

<GridViewColumn Width=”140″ Header=”Mô tả”

DisplayMemberBinding=”{Binding Descn}” />

</GridView>

</ListView.View>

</ListView>

</ScrollViewer>

</StackPanel>

</Window>

Phần Code Behind:

using System;using System.Collections.Generic;

using System.Linq;

using System.Text;

using System.Windows;

using System.Windows.Controls;

using System.Windows.Data;

using System.Windows.Documents;

using System.Windows.Input;

using System.Windows.Media;

using System.Windows.Media.Imaging;

using System.Windows.Shapes;

namespace ExampleListView

{

/// <summary>

/// Interaction logic for ListViewWithGridView.xaml

/// </summary>

public partial class ListViewWithGridView1 : Window

{

public ListViewWithGridView()

{

InitializeComponent();

}

private void Window_Loaded(object sender, RoutedEventArgs e)

{

PetShopDataContext context = new PetShopDataContext();

listView1.ItemsSource = context.Categories;

}

}

}

6) Cửa sổ ListViewWithGridView2:

Phần XAML:

<Window x:Class=”ExampleListView.ListViewWithGridView2″xmlns=”http://schemas.microsoft.com/winfx/2006/xaml/presentation”

xmlns:x=”http://schemas.microsoft.com/winfx/2006/xaml”

Title=”ListViewWithGridView2″ Height=”406″ Width=”532″

DataContext=”{Binding RelativeSource={RelativeSource Self}}” Loaded=”Window_Loaded”>

<StackPanel>

<ScrollViewer VerticalScrollBarVisibility=”Auto” Height=”250″>

<ListView Height=”200″ HorizontalAlignment=”Left” Margin=”12,12,0,0″ Name=”listView1″ VerticalAlignment=”Top” Width=”486″

ItemsSource=”{Binding CateCollection}”

>

<ListView.View>

<GridView>

<GridViewColumn Width=”140″ Header=”Mã danh mục”

DisplayMemberBinding=”{Binding CategoryId}”  />

<GridViewColumn Width=”140″ Header=”Tên Danh Mục”

DisplayMemberBinding=”{Binding Name}” />

<GridViewColumn Width=”140″ Header=”Mô tả”

DisplayMemberBinding=”{Binding Descn}” />

</GridView>

</ListView.View>

</ListView>

</ScrollViewer>

<StackPanel>

<UniformGrid Rows=”3″ Columns=”2″>

<Label>Mã danh mục</Label>

<TextBox Name=”txtId”></TextBox>

<Label>Tên danh mục</Label>

<TextBox Name=”txtName”></TextBox>

<Label>Mô Tả</Label>

<TextBox Name=”txtDes”></TextBox>

</UniformGrid>

<Button Name=”btnAdd” Height=”31″ Width=”175″ Click=”btnAdd_Click”>Thêm Danh mục</Button>

</StackPanel>

</StackPanel>

</Window>

Phần Code Behind:

using System;using System.Collections.Generic;

using System.Linq;

using System.Text;

using System.Windows;

using System.Windows.Controls;

using System.Windows.Data;

using System.Windows.Documents;

using System.Windows.Input;

using System.Windows.Media;

using System.Windows.Media.Imaging;

using System.Windows.Shapes;

using System.Collections.ObjectModel;

namespace ExampleListView

{

/// <summary>

/// Interaction logic for ListViewWithGridViewAndCombobox.xaml

/// </summary>

public partial class ListViewWithGridView2 : Window

{

public ListViewWithGridViewAndCombobox()

{

InitializeComponent();

}

ObservableCollection<Category> cateCollection =new ObservableCollection<Category>();

private void Window_Loaded(object sender, RoutedEventArgs e)

{

PetShopDataContext context = new PetShopDataContext();

foreach (Category c in context.Categories)

{

cateCollection.Add(c);

}

}

public ObservableCollection<Category> CateCollection

{

get { return cateCollection; }

}

private void btnAdd_Click(object sender, RoutedEventArgs e)

{

Category c = new Category();

c.CategoryId = txtId.Text;

c.Name = txtName.Text;

c.Descn = txtDes.Text;

cateCollection.Add(c);

}

}

}

Chúc các bạn thành công.

Source code mẫu đầy đủ: http://www.mediafire.com/?ab6aazuebsf2po2

Bài giảng LINQ – Language Integrated Query

Link bài giảng LINQ  bằng Slide Powerpoint:

http://www.mediafire.com/?ee9qnbhfn02m9f6

Topic này Tôi muốn hướng dẫn các bạn cách lập trình với LinQ, toàn bộ bài giảng đều năm hết trong link download ở trên, rất cụ thể, có đính kèm các ví dụ. Các bạn cố gắng đọc hiểu lý thuyết sau đó nhìn vào các ví dụ Tôi đã đưa ra để làm theo từ đó có thể tự làm các project nâng cao. Trong bài giảng này chủ yếu Tôi tập trung vào LINQ to Object và LINQ to SQL. Để giúp thuận tiện cho việc làm theo ví dụ mẫu Tôi đã nhúng cơ sở dữ liệu Petshop vào trong bài giảng Powerpoint, các bạn double click vào biểu tượng để giải nén sau đó attach vào Sql Server 2008.

Cuối mỗi phần đều có bài tập yêu cầu phải thực hiện, các bạn cố gắng hoàn thành.

Chúc các bạn thành công