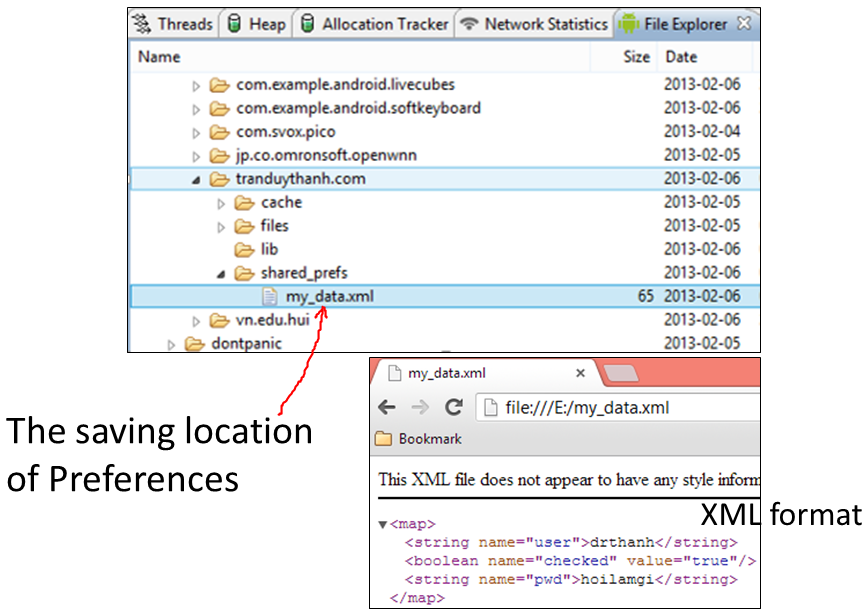
Để làm được bài tập 32 này thì bắt buộc bạn phải đạt Đai Đen bài tập 31 , đồng thời bạn phải rành custom layout, intent … Trong bài tập này Tôi chủ ý không giải thích coding nhiều là để các bạn tự suy luận logic, tự tổng hợp lại các kiến thức đã học được từ các bài tập trước để hoàn thành bài này. Vì thực ra bài tập này là kết hợp của tất cả các kiến thức trước đó.
– Viết chương trình quản lý sách được mô tả như sau:
- Một tác giả sẽ có nhiều cuốn sách, thông tin tác giả gồm: mã , tên
- Mỗi cuốn sách thuộc về một nhà tác giả nào đó, thông tin mỗi cuốn sách gồm: mã sách, tên sách, ngày xuất bản
- Hãy chọn kiểu dữ liệu hợp lý để tạo cơ sở dữ liệu (sử dụng SQLite) cho đúng với mô tả trên
– Thiết kế giao diện như hình bên dưới:
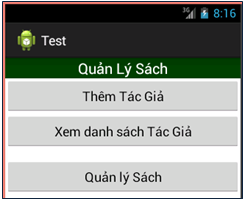
– Phải tạo Tác giả trước khi vào chức năng quản lý Sách
– Khi chọn chức năng thêm Tác giả, chương trình sẽ xuất hiện màn hình dưới đây (chú ý mở dưới dạng Dialog):
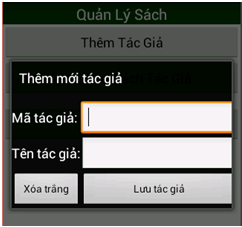
- Chọn “Lưu tác giả” để lưu, chọn xóa trắng để xóa dữ liệu vừa nhập, focus tới mã.
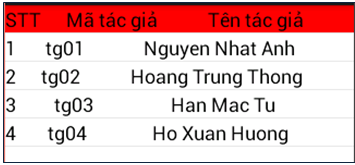
– Khi chọn “xem danh sách Tác giả”, chương trình sẽ mở một màn hình mới để hiển thị danh sách Tác giả đã tạo – chú ý dùng CustomLayout cho ListView:
– Khi chọn từng tác giả trong danh sách, sẽ hiển thị màn hình cho phép chỉnh sửa tác giả:
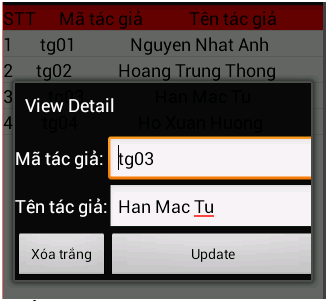
- Chọn Update để cập nhật lại Tác giả
– Khi nhấn Thật Lâu (Long time) vào từng tác giả trong danh sách, chương trình sẽ hiển thị Alert Dialog hỏi xem có muốn xóa Tác giả này hay không?
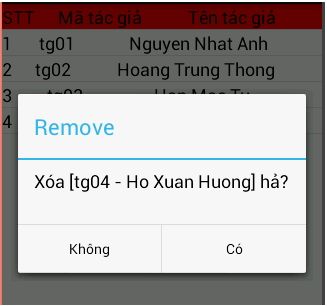
- Chọn Có để xóa tác giả hiện tại,
- Chọn Không để trở về màn hình xem danh sách
– Khi chọn chức năng “quản lý sách” ở màn hình chính chương trình sẽ hiển thị:
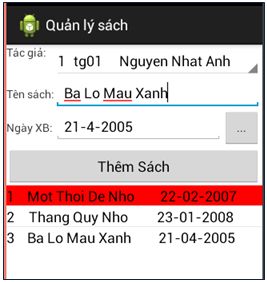
- Load danh sách Tác giả vào Spinner
- Sử dụng DatePickerDialog để chọ ngày xuất bản
- Chọn “Thêm sách” lưu vào CSDL đúng với tác giả chọn trong Spinner, đồng thời cập nhập vào ListView bên dưới.
————————————————————————————————–
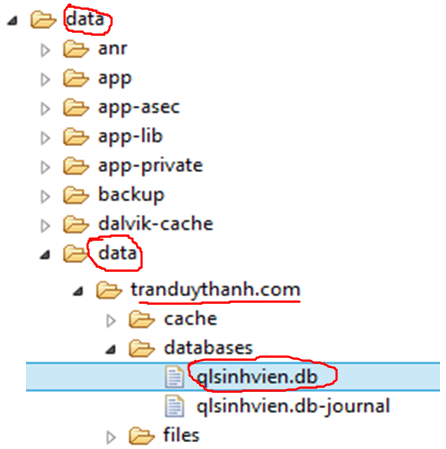
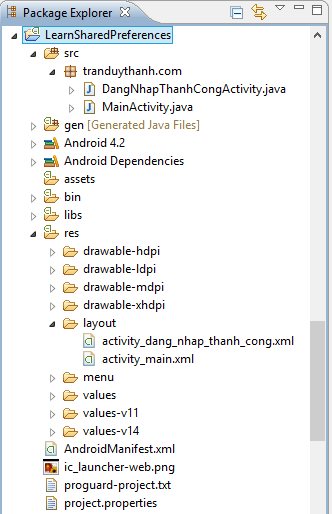
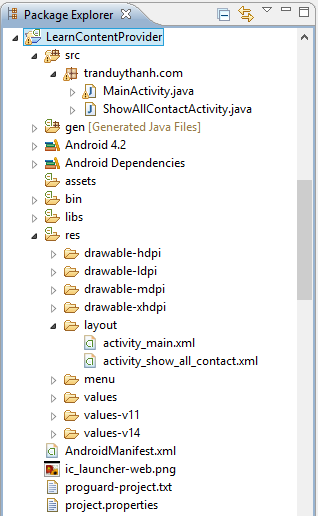
Bạn xem cấu trúc thư mục của ứng dụng:

– Bài này rất phức tạp nên các bạn phải tập trung 12 thành công lực để nghiên cứu + ngồi thiền để tĩnh tâm làm bài nếu không sẽ bị Tẩu Hỏa Nhập Ma.
– Bạn xem activity_main.xml layout – Giao diện chính của chương trình:
[code language=”xml”]
[/code]
và Source code xử lý MainActivity.java:
[code language=”java”]
package tranduythanh.com;
import java.util.Locale;
import android.os.Bundle;
import android.app.Activity;
import android.content.ContentValues;
import android.content.Intent;
import android.database.Cursor;
import android.database.sqlite.SQLiteDatabase;
import android.view.Menu;
import android.view.View;
import android.view.View.OnClickListener;
import android.widget.Button;
import android.widget.Toast;
/**
* hàm hình chính cho phép chọn các thao tác
* @author drthanh
*
*/
public class MainActivity extends Activity {
Button btnCreateDatabase=null;
Button btnInsertAuthor=null;
Button btnShowAuthorList=null;
Button btnShowAuthorList2=null;
Button btnTransaction=null;
Button btnShowDetail=null;
Button btnInsertBook=null;
public static final int OPEN_AUTHOR_DIALOG=1;
public static final int SEND_DATA_FROM_AUTHOR_ACTIVITY=2;
SQLiteDatabase database=null;
@Override
public void onCreate(Bundle savedInstanceState) {
super.onCreate(savedInstanceState);
setContentView(R.layout.activity_main);
btnInsertAuthor=(Button) findViewById(R.id.btnInsertAuthor);
btnInsertAuthor.setOnClickListener(new MyEvent());
btnShowAuthorList=(Button) findViewById(R.id.buttonShowAuthorList);
btnShowAuthorList.setOnClickListener(new MyEvent());
btnInsertBook=(Button) findViewById(R.id.buttonInsertBook);
btnInsertBook.setOnClickListener(new MyEvent());
getDatabase();
}
/**
* hàm kiểm tra xem bảng có tồn tại trong CSDL hay chưa
* @param database – cơ sở dữ liệu
* @param tableName – tên bảng cần kiểm tra
* @return trả về true nếu tồn tại
*/
public boolean isTableExists(SQLiteDatabase database, String tableName) {
Cursor cursor = database.rawQuery(“select DISTINCT tbl_name from sqlite_master where tbl_name = ‘”+tableName+”‘”, null);
if(cursor!=null) {
if(cursor.getCount()>0) {
cursor.close();
return true;
}
cursor.close();
}
return false;
}
/**
* hàm tạo CSDL và các bảng liên quan
* @return
*/
public SQLiteDatabase getDatabase()
{
try
{
database=openOrCreateDatabase(“mydata.db”, SQLiteDatabase.CREATE_IF_NECESSARY, null);
if(database!=null)
{
if(isTableExists(database,”tblAuthors”))
return database;
database.setLocale(Locale.getDefault());
database.setVersion(1);
String sqlAuthor=”create table tblAuthors (”
+”id integer primary key autoincrement,”
+”firstname text, ”
+”lastname text)”;
database.execSQL(sqlAuthor);
String sqlBook=”create table tblBooks (”
+”id integer primary key autoincrement,”
+”title text, ”
+”dateadded date,”
+”authorid integer not null constraint authorid references tblAuthors(id) on delete cascade)”;
database.execSQL(sqlBook);
//Cách tạo trigger khi nhập dữ liệu sai ràng buộc quan hệ
String sqlTrigger=”create trigger fk_insert_book before insert on tblBooks ”
+” for each row ”
+” begin ”
+” select raise(rollback,’them du lieu tren bang tblBooks bi sai’) ”
+” where (select id from tblAuthors where id=new.authorid) is null ;”
+” end;”;
database.execSQL(sqlTrigger);
Toast.makeText(MainActivity.this, “OK OK”, Toast.LENGTH_LONG).show();
}
}
catch(Exception e)
{
Toast.makeText(this, e.toString(), Toast.LENGTH_LONG).show();
}
return database;
}
public void createDatabaseAndTrigger()
{
if(database==null)
{
getDatabase();
Toast.makeText(MainActivity.this, “OK OK”, Toast.LENGTH_LONG).show();
}
}
/**
* hàm mở màn hình nhập Tác giả
*/
public void showInsertAuthorDialog()
{
Intent intent=new Intent(MainActivity.this, CreateAuthorActivity.class);
startActivityForResult(intent, OPEN_AUTHOR_DIALOG);
}
/**
* hàm xem danh sách tác giả dùng Activity
* Tôi làm 2 cách để các bạn ôn tập lại ListView
* bạn gọi hàm nào thì gọi 1 thôi showAuthorList1 hoặc showAuthorList2
*/
public void showAuthorList1()
{
Intent intent=new Intent(MainActivity.this, ShowListAuthorActivity.class);
startActivity(intent);
}
/**
* hàm xem danh sách tác giả dùng ListActivity
* Tôi làm 2 cách để các bạn ôn tập lại ListView
* bạn gọi hàm nào thì gọi 1 thôi showAuthorList1 hoặc showAuthorList2
*/
public void showAuthorList2()
{
Intent intent=new Intent(MainActivity.this, ShowListAuthorActivity2.class);
startActivity(intent);
}
/**
* Tôi cung cấp thêm hàm này để các bạn nghiên cứu thêm về transaction
*/
public void interactDBWithTransaction()
{
if(database!=null)
{
database.beginTransaction();
try
{
//làm cái gì đó tùm lum ở đây,
//chỉ cần có lỗi sảy ra thì sẽ kết thúc transaction
ContentValues values=new ContentValues();
values.put(“firstname”, “xx”);
values.put(“lastname”, “yyy”);
database.insert(“tblAuthors”, null, values);
database.delete(“tblAuthors”, “ma=?”, new String[]{“x”});
//Khi nào hàm này được gọi thì các thao tác bên trên mới thực hiện được
//Nếu nó không được gọi thì mọi thao tác bên trên đều bị hủy
database.setTransactionSuccessful();
}
catch(Exception ex)
{
Toast.makeText(MainActivity.this, ex.getMessage(), Toast.LENGTH_LONG).show();
}
finally
{
database.endTransaction();
}
}
}
/**
* hàm xử lý kết quả trả về
*/
@Override
protected void onActivityResult(int requestCode, int resultCode, Intent data) {
// TODO Auto-generated method stub
super.onActivityResult(requestCode, resultCode, data);
if(resultCode==SEND_DATA_FROM_AUTHOR_ACTIVITY)
{
Bundle bundle= data.getBundleExtra(“DATA_AUTHOR”);
String firstname=bundle.getString(“firstname”);
String lastname=bundle.getString(“lastname”);
ContentValues content=new ContentValues();
content.put(“firstname”, firstname);
content.put(“lastname”, lastname);
if(database!=null)
{
long authorid=database.insert(“tblAuthors”, null, content);
if(authorid==-1)
{
Toast.makeText(MainActivity.this,authorid+” – “+ firstname +” – “+lastname +” ==> insert error!”, Toast.LENGTH_LONG).show();
}
else
{
Toast.makeText(MainActivity.this, authorid+” – “+firstname +” – “+lastname +” ==>insert OK!”, Toast.LENGTH_LONG).show();
}
}
}
}
/**
* class xử lý sự kiện
* @author drthanh
*
*/
private class MyEvent implements OnClickListener
{
@Override
public void onClick(View v) {
// TODO Auto-generated method stub
if(v.getId()==R.id.btnInsertAuthor)
{
showInsertAuthorDialog();
}
else if(v.getId()==R.id.buttonShowAuthorList)
{
showAuthorList1();
}
else if(v.getId()==R.id.buttonInsertBook)
{
Intent intent=new Intent(MainActivity.this, InsertBookActivity.class);
startActivity(intent);
}
}
}
@Override
public boolean onCreateOptionsMenu(Menu menu) {
getMenuInflater().inflate(R.menu.activity_simple_database_main, menu);
return true;
}
}
[/code]
– XML source thêm tác giả activity_create_author.xml:
[code language=”xml”]
[/code]
– Source code xử lý thêm tác giả – CreateAuthorActivity.java:
[code language=”java”]
package tranduythanh.com;
import android.os.Bundle;
import android.app.Activity;
import android.content.Intent;
import android.view.Menu;
import android.view.View;
import android.view.View.OnClickListener;
import android.widget.Button;
import android.widget.EditText;
/**
* class nhập thông tin tác giả
* Mọi thay đổi đều gửi thông tin về MainActivity để xử lý
* @author drthanh
*
*/
public class CreateAuthorActivity extends Activity {
@Override
public void onCreate(Bundle savedInstanceState) {
super.onCreate(savedInstanceState);
setContentView(R.layout.activity_create_author);
final Button btnInsert =(Button) findViewById(R.id.buttonInsert);
final EditText txtFirstname=(EditText) findViewById(R.id.editTextFirstName);
final EditText txtLastname=(EditText) findViewById(R.id.editTextLastName);
final Intent intent= getIntent();
btnInsert.setOnClickListener(new OnClickListener() {
@Override
public void onClick(View v) {
// TODO Auto-generated method stub
Intent intent=new Intent();
Bundle bundle=new Bundle();
bundle.putString(“firstname”, txtFirstname.getText().toString());
bundle.putString(“lastname”, txtLastname.getText().toString());
intent.putExtra(“DATA_AUTHOR”, bundle);
setResult(MainActivity.SEND_DATA_FROM_AUTHOR_ACTIVITY, intent);
CreateAuthorActivity.this.finish();
}
});
final Button btnClear=(Button) findViewById(R.id.buttonClear);
btnClear.setOnClickListener(new OnClickListener() {
@Override
public void onClick(View v) {
// TODO Auto-generated method stub
txtFirstname.setText(“”);
txtLastname.setText(“”);
txtFirstname.requestFocus();
}
});
Bundle bundle= intent.getBundleExtra(“DATA”);
if(bundle!=null && bundle.getInt(“KEY”)==1)
{
String f2=bundle.getString(“getField2”);
String f3=bundle.getString(“getField3”);
txtFirstname.setText(f2);
txtLastname.setText(f3);
btnInsert.setText(“Update”);
this.setTitle(“View Detail”);
/*TableRow row=(TableRow) findViewById(R.id.tableRow3);
row.removeViewAt(0);
row.setGravity(Gravity.RIGHT);*/
}
}
@Override
public boolean onCreateOptionsMenu(Menu menu) {
getMenuInflater().inflate(R.menu.activity_create_author, menu);
return true;
}
}
[/code]
– XML source thêm Sách – activity_insert_book.xml:
[code language=”xml”]
[/code]
– Source code xử lý thêm sách – InsertBookActivity.java:
[code language=”java”]
package tranduythanh.com;
import java.text.SimpleDateFormat;
import java.util.ArrayList;
import java.util.Calendar;
import java.util.List;
import android.os.Bundle;
import android.app.Activity;
import android.app.DatePickerDialog;
import android.app.DatePickerDialog.OnDateSetListener;
import android.app.Dialog;
import android.content.ContentValues;
import android.database.Cursor;
import android.database.sqlite.SQLiteDatabase;
import android.view.Menu;
import android.view.View;
import android.view.View.OnClickListener;
import android.widget.AdapterView.OnItemSelectedListener;
import android.widget.AdapterView;
import android.widget.Button;
import android.widget.DatePicker;
import android.widget.EditText;
import android.widget.ListView;
import android.widget.Spinner;
import android.widget.Toast;
/**
* class hiển thị thông tin Tác giả và Spinner
* và hiển thị thông tin sách vào ListView
* đồng thời cho phép thao tác với sách
* Class này là khó hiểu nhất, nhưng chỉ là tổng hợp của
* các kiến thức đã học trước đó
* @author drthanh
*
*/
public class InsertBookActivity extends Activity {
SQLiteDatabase database=null;
ListlistBook=null;
ListlistAuthor=null;
InforData authorData=null;
MySimpleArrayAdapter adapter=null;
int day,month,year;
@Override
public void onCreate(Bundle savedInstanceState) {
super.onCreate(savedInstanceState);
setContentView(R.layout.activity_insert_book);
Spinner pinner=(Spinner) findViewById(R.id.spinner1);
listAuthor=new ArrayList();
InforData d1=new InforData();
d1.setField1(“_”);
d1.setField2(“Show All”);
d1.setField3(“_”);
listAuthor.add(d1);
//Lệnh xử lý đưa dữ liệu là Tác giả và Spinner
database=openOrCreateDatabase(“mydata.db”, SQLiteDatabase.CREATE_IF_NECESSARY, null);
if(database!=null)
{
Cursor cursor=database.query(“tblAuthors”, null, null, null, null, null, null);
cursor.moveToFirst();
while(cursor.isAfterLast()==false)
{
InforData d=new InforData();
d.setField1(cursor.getInt(0));
d.setField2(cursor.getString(1));
d.setField3(cursor.getString(2));
listAuthor.add(d);
cursor.moveToNext();
}
cursor.close();
}
adapter=new MySimpleArrayAdapter(InsertBookActivity.this, R.layout.my_layout_for_show_list_data,listAuthor);
adapter.setDropDownViewResource(android.R.layout.simple_spinner_dropdown_item);
pinner.setAdapter(adapter);
//Xử lý sự kiện chọn trong Spinner
//chọn tác giả nào thì hiển thị toàn bộ sách của tác giả đó mà thôi
//Nếu chọn All thì hiển thị toàn bộ không phân hiệt tác giả
pinner.setOnItemSelectedListener(new OnItemSelectedListener() {
@Override
public void onItemSelected(AdapterView arg0, View arg1,
int arg2, long arg3) {
// TODO Auto-generated method stub
if(arg2==0)
{
//Hiển thị mọi sách trong CSDL
authorData=null;
loadAllListBook();
}
else
{
//Hiển thị sách theo tác giả chọn trong Spinner
authorData=listAuthor.get(arg2);
loadListBookByAuthor(authorData.getField1().toString());
}
}
@Override
public void onNothingSelected(AdapterView arg0) {
// TODO Auto-generated method stub
authorData=null;
}
});
setCurrentDateOnView();
//lệnh xử lý DatePickerDialog
Button bChangeDate=(Button) findViewById(R.id.buttonDate);
bChangeDate.setOnClickListener(new OnClickListener() {
@Override
public void onClick(View v) {
// TODO Auto-generated method stub
showDialog(113);
}
});
//Lệnh xử lý thêm mới một sản phẩm theo tác giả đang chọn
Button btnInsertBook =(Button) findViewById(R.id.buttonInsertBook);
btnInsertBook.setOnClickListener(new OnClickListener() {
@Override
public void onClick(View v) {
// TODO Auto-generated method stub
if(authorData==null)
{
Toast.makeText(InsertBookActivity.this, “Please choose an author to insert”, Toast.LENGTH_LONG).show();
return;
}
EditText txtTitle=(EditText) findViewById(R.id.editTextTitle);
ContentValues values=new ContentValues();
values.put(“title”, txtTitle.getText().toString());
Calendar c=Calendar.getInstance();
c.set(year, month, day);
SimpleDateFormat dfmt=new SimpleDateFormat(“dd-MM-yyyy”);
values.put(“dateadded”,dfmt.format(c.getTime()));
values.put(“authorid”, authorData.getField1().toString());
long bId=database.insert(“tblBooks”, null, values);
if(bId>0)
{
Toast.makeText(InsertBookActivity.this, “Insert Book OK”, Toast.LENGTH_LONG).show();
loadListBookByAuthor(authorData.getField1().toString());
}
else
{
Toast.makeText(InsertBookActivity.this, “Insert Book Failed”, Toast.LENGTH_LONG).show();
}
}
});
}
/*
* Hàm hiển thị mọi sách trong CSDL
*/
public void loadAllListBook()
{
Cursor cur=database.query(“tblBooks”, null, null, null, null, null, null);
cur.moveToFirst();
listBook=new ArrayList();
while(cur.isAfterLast()==false)
{
InforData d=new InforData();
d.setField1(cur.getInt(0));
d.setField2(cur.getString(1));
d.setField3(cur.getString(2));
listBook.add(d);
cur.moveToNext();
}
cur.close();
adapter=new MySimpleArrayAdapter(InsertBookActivity.this, R.layout.my_layout_for_show_list_data, listBook);
ListView lv=(ListView) findViewById(R.id.listViewBook);
lv.setAdapter(adapter);
}
/**
* hàm hiển thị sách theo tác giả
* @param authorid
*/
public void loadListBookByAuthor(String authorid)
{
Cursor cur=database.query(“tblBooks”, null, “authorid=?”, new String[]{authorid}, null, null, null);
cur.moveToFirst();
listBook=new ArrayList();
while(cur.isAfterLast()==false)
{
InforData d=new InforData();
d.setField1(cur.getInt(0));
d.setField2(cur.getString(1));
d.setField3(cur.getString(2));
listBook.add(d);
cur.moveToNext();
}
cur.close();
adapter=new MySimpleArrayAdapter(InsertBookActivity.this, R.layout.my_layout_for_show_list_data, listBook);
ListView lv=(ListView) findViewById(R.id.listViewBook);
lv.setAdapter(adapter);
}
@Override
protected Dialog onCreateDialog(int id) {
// TODO Auto-generated method stub
if(id==113)
{
return new DatePickerDialog(this, dateChange, year, month, day);
}
return null;
}
/**
* xử lý DatePickerDialog
*/
private DatePickerDialog.OnDateSetListener dateChange= new OnDateSetListener() {
@Override
public void onDateSet(DatePicker view, int year1, int monthOfYear,
int dayOfMonth) {
// TODO Auto-generated method stub
year=year1;
month=monthOfYear;
day=dayOfMonth;
EditText eDate=(EditText) findViewById(R.id.editTextDate);
eDate.setText(day+”-“+(month+1)+”-“+year);
}
};
/**
* thiết lập ngày tháng năm hiện tại
*/
public void setCurrentDateOnView()
{
EditText eDate=(EditText) findViewById(R.id.editTextDate);
Calendar cal=Calendar.getInstance();
day=cal.get(Calendar.DAY_OF_MONTH);
month=cal.get(Calendar.MONTH);
year=cal.get(Calendar.YEAR);
eDate.setText(day+”-“+(month+1)+”-“+year);
}
@Override
public boolean onCreateOptionsMenu(Menu menu) {
getMenuInflater().inflate(R.menu.activity_insert_book, menu);
return true;
}
}
[/code]
– XML Source cho custom layout:
[code language=”xml”]
[/code]
– Source code xử lý Custom layout – InforData.java:
[code language=”java”]
package tranduythanh.com;
/**
* class dùng chung để đọc dữ liệu hiển thị lên ListView Sách và tác giả
* bạn có thể bỏ class này viết class khác
* Ở đây Tôi hơi làm biếng 1 chút là Tôi muốn viết 1 Class có các kiểu Object
* để nó tự hiểu mọi kiểu dữ liệu đỡ phải viết lại nên bạn đọc có vẻ khó hiểu
* Nhưng thôi —> ráng lên
* @author drthanh
*
*/
public class InforData {
private Object field1;
private Object field2;
private Object field3;
public Object getField1() {
return field1;
}
public void setField1(Object field1) {
this.field1 = field1;
}
public Object getField2() {
return field2;
}
public void setField2(Object field2) {
this.field2 = field2;
}
public Object getField3() {
return field3;
}
public void setField3(Object field3) {
this.field3 = field3;
}
@Override
public String toString() {
// TODO Auto-generated method stub
return this.field1 +” – ” +this.field2 +” – “+this.field3;
}
}
[/code]
– Source code xử lý Custom layout – MySimpleArrayAdapter.java:
[code language=”java”]
package tranduythanh.com;
import java.util.List;
import android.app.Activity;
import android.content.Context;
import android.graphics.Color;
import android.view.Gravity;
import android.view.LayoutInflater;
import android.view.View;
import android.view.ViewGroup;
import android.widget.ArrayAdapter;
import android.widget.TextView;
/**
* class dùng để custom layout
* dùng chung cho hiển thị Sách và Tác giả
* @author drthanh
*
*/
public class MySimpleArrayAdapter extends ArrayAdapter {
private Activity context;
private int layout;
private Listlist;
public MySimpleArrayAdapter(Context context, int textViewResourceId,
List objects) {
super(context, textViewResourceId, objects);
// TODO Auto-generated constructor stub
this.context=(Activity) context;
this.layout=textViewResourceId;
this.list=objects;
}
@Override
public View getView(int position, View convertView, ViewGroup parent) {
// TODO Auto-generated method stub
LayoutInflater flater=context.getLayoutInflater();
View row=flater.inflate(layout, parent,false);
TextView txt1=(TextView) row.findViewById(R.id.textView1);
TextView txt2=(TextView) row.findViewById(R.id.textView2);
TextView txt3=(TextView) row.findViewById(R.id.textView3);
/*txt1.setTextAlignment(Gravity.LEFT);
txt2.setTextAlignment(Gravity.LEFT);
txt3.setTextAlignment(Gravity.LEFT);*/
InforData data=list.get(position);
txt1.setText(data.getField1()==null?””:data.getField1().toString());
txt2.setText(data.getField2()==null?””:data.getField2().toString());
txt3.setText(data.getField3()==null?””:data.getField3().toString());
if(position==0)
{
row.setBackgroundColor(Color.RED);
}
return row;
}
}
[/code]
– XML source xem danh sách tác giả – layout_show_data.xml:
[code language=”xml”]
[/code]
– Source code xử lý xem danh sách tác giả:
[code language=”java”]
package tranduythanh.com;
import java.util.ArrayList;
import java.util.List;
import android.app.Activity;
import android.app.AlertDialog;
import android.app.AlertDialog.Builder;
import android.content.ContentValues;
import android.content.DialogInterface;
import android.content.Intent;
import android.database.Cursor;
import android.database.sqlite.SQLiteDatabase;
import android.os.Bundle;
import android.view.View;
import android.view.View.OnClickListener;
import android.widget.AdapterView.OnItemClickListener;
import android.widget.AdapterView;
import android.widget.AdapterView.OnItemLongClickListener;
import android.widget.Button;
import android.widget.ListView;
import android.widget.Toast;
/**
* class xem danh sách tác giả
* @author drthanh
*
*/
public class ShowListAuthorActivity extends Activity{
@Override
protected void onCreate(Bundle savedInstanceState) {
// TODO Auto-generated method stub
super.onCreate(savedInstanceState);
setContentView(R.layout.layout_show_data);
updateUI();
Button btn=(Button) findViewById(R.id.buttonBack);
btn.setOnClickListener(new OnClickListener() {
@Override
public void onClick(View v) {
// TODO Auto-generated method stub
ShowListAuthorActivity.this.finish();
}
});
}
Listlist=new ArrayList();
InforData dataClick=null;
SQLiteDatabase database=null;
MySimpleArrayAdapter adapter=null;
public void updateUI()
{
database=openOrCreateDatabase(“mydata.db”, SQLiteDatabase.CREATE_IF_NECESSARY, null);
if(database!=null)
{
Cursor cursor=database.query(“tblAuthors”, null, null, null, null, null, null);
startManagingCursor(cursor);
InforData header=new InforData();
header.setField1(“STT”);
header.setField2(“Mã tác giả”);
header.setField3(“Tên tác giả”);
list.add(header);
cursor.moveToFirst();
while(!cursor.isAfterLast())
{
InforData data=new InforData();
data.setField1(cursor.getInt(0));
data.setField2(cursor.getString(1));
data.setField3(cursor.getString(2));
list.add(data);
cursor.moveToNext();
}
cursor.close();
adapter=new MySimpleArrayAdapter(ShowListAuthorActivity.this, R.layout.my_layout_for_show_list_data, list);
final ListView lv= (ListView) findViewById(R.id.listViewShowData);
lv.setAdapter(adapter);
lv.setOnItemClickListener(new OnItemClickListener() {
@Override
public void onItemClick(AdapterView arg0, View arg1,
int arg2, long arg3) {
// TODO Auto-generated method stub
Toast.makeText(ShowListAuthorActivity.this,”View –>”+ list.get(arg2).toString(), Toast.LENGTH_LONG).show();
Intent intent=new Intent(ShowListAuthorActivity.this, CreateAuthorActivity.class);
Bundle bundle=new Bundle();
bundle.putInt(“KEY”, 1);
bundle.putString(“getField1”, list.get(arg2).getField1().toString());
bundle.putString(“getField2”, list.get(arg2).getField2().toString());
bundle.putString(“getField3”, list.get(arg2).getField3().toString());
intent.putExtra(“DATA”, bundle);
dataClick=list.get(arg2);
startActivityForResult(intent, MainActivity.OPEN_AUTHOR_DIALOG);
}
});
lv.setOnItemLongClickListener(new OnItemLongClickListener() {
@Override
public boolean onItemLongClick(AdapterView arg0, View arg1,
int arg2, long arg3) {
// TODO Auto-generated method stub
final InforData data=list.get(arg2);
final int pos=arg2;
Toast.makeText(ShowListAuthorActivity.this, “Edit–>”+data.toString(), Toast.LENGTH_LONG).show();
AlertDialog.Builder b=new Builder(ShowListAuthorActivity.this);
b.setTitle(“Remove”);
b.setMessage(“Xóa [“+data.getField2() +” – “+data.getField3() +”] hả?”);
b.setPositiveButton(“Có”, new DialogInterface.OnClickListener() {
@Override
public void onClick(DialogInterface dialog, int which) {
// TODO Auto-generated method stub
int n=database.delete(“tblAuthors”, “id=?”, new String[]{data.getField1().toString()});
if(n>0)
{
Toast.makeText(ShowListAuthorActivity.this, “Remove ok”, Toast.LENGTH_LONG).show();
list.remove(pos);
adapter.notifyDataSetChanged();
}
else
{
Toast.makeText(ShowListAuthorActivity.this, “Remove not ok”, Toast.LENGTH_LONG).show();
}
}
});
b.setNegativeButton(“Không”, new DialogInterface.OnClickListener() {
@Override
public void onClick(DialogInterface dialog, int which) {
// TODO Auto-generated method stub
dialog.cancel();
}
});
b.show();
return false;
}
});
}
}
@Override
protected void onActivityResult(int requestCode, int resultCode, Intent data) {
// TODO Auto-generated method stub
super.onActivityResult(requestCode, resultCode, data);
if(resultCode==MainActivity.SEND_DATA_FROM_AUTHOR_ACTIVITY)
{
Bundle bundle=data.getBundleExtra(“DATA_AUTHOR”);
String f2=bundle.getString(“firstname”);
String f3=bundle.getString(“lastname”);
String f1=dataClick.getField1().toString();
ContentValues values=new ContentValues();
values.put(“firstname”, f2);
values.put(“lastname”, f3);
if(database!=null)
{
int n=database.update(“tblAuthors”, values, “id=?”, new String[]{f1});
if(n>0)
{
Toast.makeText(ShowListAuthorActivity.this, “update ok ok ok “, Toast.LENGTH_LONG).show();
dataClick.setField2(f2);
dataClick.setField3(f3);
if(adapter!=null)
adapter.notifyDataSetChanged();
}
}
}
}
}
[/code]
– Bạn có thể tải source code đầy đủ ở đây: http://www.mediafire.com/download/nf4ghdbr44igpa6/Ex_Module3_Bai6.rar
– Bài tập kế tiếp Tôi sẽ hướng dẫn các bạn cách sử dụng Content Provider để đọc danh bạ trong điện thoại, cách đọc lịch sử cuộc gọi, cách đọc Media trong điện thoại cũng như bookmark. Bạn chú ý theo dõi
– Chúc các bạn thành công.

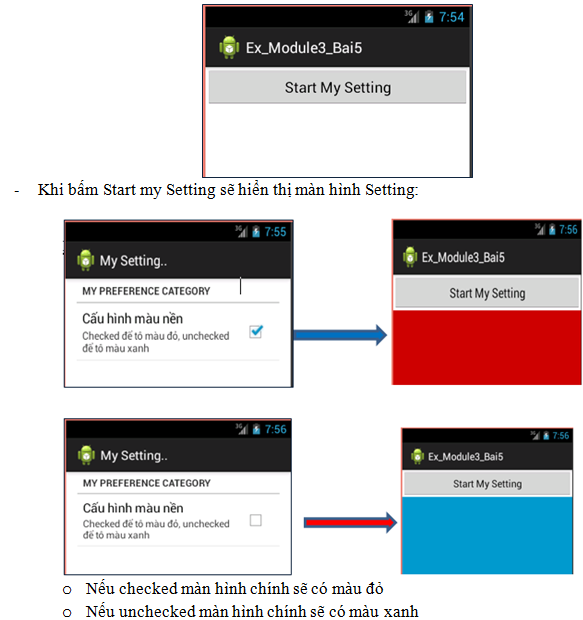
 – Tương tự như vậy bản thử các chức năng còn lại trong ứng dụng.