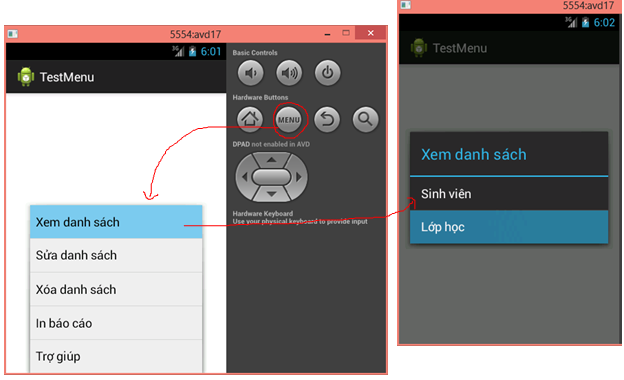
– Bài tập này bạn sẽ được học về Time Selection. Một số bài tập trước đó Tôi cũng đã sử dụng nó rồi, nhưng trong bài tập này Tôi muốn giải thích nó rõ ràng hơn.
– Có nhiều loại Time Selection: AnalogClock, Chronometor, DatePickerDialog, TimePickerDialog. Nhưng Tôi chỉ giới thiệu 2 control cuối mà thôi, các control khác các bạn tự tìm hiểu thêm trên mạng:
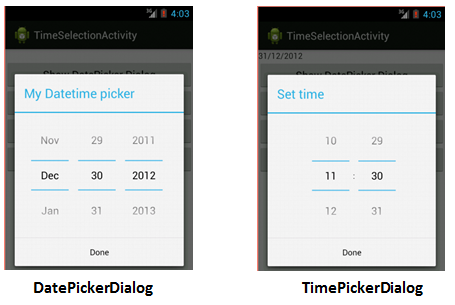 – Hình bên trái là DatePickerDialog (dùng để thiết lập ngày tháng năm), hình bên phải là TimePickerDialog( dùng để thiết lập giờ phút).
– Theo Tôi thì chúng ta không nên kéo thả các control này ra màn hình vì nó chiếm hết không gian của các control khác, với lại màn hình điện thoại quá nhỏ nên nó sẽ không phù hợp tí nào khi bạn cố tình kéo thả nó ra. Vì vậy Tôi khuyên bạn nên viết code động, cho một Button để người sử dụng chọn Ngày tháng hay giờ giấc, khi nhấn vào nó thì mới hiển thị các dialog tương ứng này lên.
– Tôi sẽ có một ví dụ cụ thể để thực hành về 2 control này, bạn hãy chú ý theo dõi và thực hành lại thật tốt.
Yêu cầu ứng dụng như sau:
– Viết chương trình quản lý mục tiêu hoàn thành công việc hàng tuần: Lý do chúng ta làm việc không có quy củ, không nhất quán, gặp đâu làm đó, đang làm việc này thấy việc kia sảy ra lại nhảy qua việc đó làm để dở công việc cũ chưa xong, không theo quy trình định sẵn dẫn đến kết thúc một ngày mà cuối cùng không hoàn thành được việc gì cả.
– Thiết kế giao diện như hình bên dưới và thực hiện một số chức năng:

- Khi chọn nút Date sẽ hiển thị DatePickerDialog – cập nhật Ngày hoàn thành
- Khi chọn nút Time sẽ hiển thị TimePickerDialog – cập nhật giờ hoàn thành
- Khi chọn nút Thêm công việc (Thêm CV), chương trình sẽ cập nhập vào ListView bên dưới màn hình
- Khi nhấn vào phần tử nào thì hiển thị chi tiết Nội Dung công việc phải hoàn thành
- Khi nhấn thật lâu vào phần tử nào trên ListView thì xóa phần tử (công việc) đó.
– Bài tập này Tôi đưa ra là tiền đề để làm phần Android Service cụ thể là Alarm Manager (Khi nào tới phần đó Tôi sẽ nhắc lại bài này). Bạn cứ tưởng tượng phần mềm này nó giống như chương trình báo thức đó bạn. Tới giờ là nó Beeng ! Beeng! la làng lên để nhắc nhở các bạn. Nhưng hiện giờ bạn hãy quên điều đó đi vì chúng ta cần phải đi từ từ và phải hiểu thật thấu đáo các thành phần căn bản trước đã, giờ bạn chỉ cần thao tác được 5 yêu cầu của Tôi nêu bên trên là đã đạt rồi.
– Ta sẽ giải quyết yêu cầu bài toán này như sau:
1) Trước tiên Tôi sẽ ôn tập lại Date, Calendar, SimpleDateFormat cho bạn:
– Cách sử dụng Date để xuất Ngày/Tháng / Năm:
[code language=”java”]
public static void XuatNgayThangNam()
{
//Tạo đối tượng date sẽ lấy date hiện tại
Date date = new Date();
//Muốn xuất Ngày/Tháng/Năm , ví dụ 12/04/2013
String strDateFormat = "dd/MM/yyyy";
//tạo đối tượng SimpleDateFormat;
SimpleDateFormat sdf = new SimpleDateFormat(strDateFormat);
//gọi hàm format để lấy chuỗi ngày tháng năm đúng theo yêu cầu
System.out.println("Ngày hôm nay : " + sdf.format(date));
}
[/code]
– Tại thời điểm này thì Tôi gọi hàm trên sẽ ra kết quả:
Ngày hôm nay : 12/04/2013
– Cách sử dụng Date để xuất Giờ:Phút:Giây :
[code language=”java”]
public static void XuatGioPhutGiay()
{
//Tạo đối tượng date sẽ lấy date hiện tại
Date date = new Date();
//Muốn xuất Giờ:Phút:Giây AM (PM)
String strDateFormat12 = "hh:mm:ss a";
String strDateFormat24 = "HH:mm:ss a";
SimpleDateFormat sdf =null;
//Tạo đối tượng SimpleDateFormat với định dạng 12
sdf= new SimpleDateFormat(strDateFormat12);
//1. gọi hàm format để lấy giờ:phút:giây loại 12
System.out.println("Giờ định dạng 12 : " + sdf.format(date));
//Tạo đối tượng SimpleDateFormat với định dạng 24
sdf = new SimpleDateFormat(strDateFormat24);
//2. gọi hàm format để lấy giờ:phút:giây loại 24
System.out.println("Giờ định dạng 24 : " + sdf.format(date));
}
[/code]
– Khi gọi hàm trên thì Tôi sẽ có kết quả (tính tại thời điểm đó):
Giờ định dạng 12 : 04:35:08 PM
Giờ định dạng 24 : 16:35:08 PM
– Bạn quan sát dòng lệnh số 7 : “hh:mm:ss a”, với hh là viết chữ thường thì bạn sẽ được định dạng giờ 12. ký tự a ở cuối dùng để hiện thị AM hay là PM tùy thuộc vào giờ lúc đó.
– Bạn quan sát dòng lệnh số 8: “HH:mm:ss a”, với HH là viết chữ HOA thì bạn sẽ được định dạng giờ 24. ký tự a ở cuối dùng để hiện thị AM hay là PM tùy thuộc vào giờ lúc đó. Nhưng bạn nhớ một điều là khi sử dụng định dạng giờ là 24 thì chả ai gán kèm theo AM hay PM đằng sau làm gì. (Không biết Tôi có nói đúng không nhỉ? nếu không đúng thì các bạn cứ cho là Tôi nói đúng để an ủi cũng được) Nên đối với định dạng 24 giờ bạn nên bỏ ký tự a đằng sau ra.
– Chú ý bạn có thể kết hợp hiển thị Ngày/Tháng/Năm giờ hiện tại: “dd/MM/yyyy hh:mm:ss a”
– Cách sử dụng Calendar (class này bây giờ rất được ưa chuộng, bạn nên tập làm quen với nó):
[code language=”java”]
public static void SudungCalendar()
{
//Lấy đối tượng Calendar ra, mặc định ngày hiện tại
Calendar now = Calendar.getInstance();
//Muốn xuất Giờ:Phút:Giây AM (PM)
String strDateFormat12 = "hh:mm:ss a";
String strDateFormat24 = "HH:mm:ss";
SimpleDateFormat sdf =null;
//Tạo đối tượng SimpleDateFormat với định dạng 12
sdf= new SimpleDateFormat(strDateFormat12);
//1. gọi hàm format để lấy giờ:phút:giây loại 12
System.out.println("Giờ định dạng 12 : " +
sdf.format(now.getTime()));
//Tạo đối tượng SimpleDateFormat với định dạng 24
sdf = new SimpleDateFormat(strDateFormat24);
//2. gọi hàm format để lấy giờ:phút:giây loại 24
System.out.println("Giờ định dạng 24 : " +
sdf.format(now.getTime()));
String strDateFormat = "dd/MM/yyyy hh:mm:ss a";
sdf = new SimpleDateFormat(strDateFormat);
System.out.println("Bây giờ là: " + sdf.format(now.getTime()));
System.out.println("Năm hiện tại : " + now.get(Calendar.YEAR));
//Tháng tính từ 0 tới 11, nên phải + thêm 1
System.out.println("Tháng hiện tại : " +
(now.get(Calendar.MONTH) + 1 ));
System.out.println("Ngày hiện tại : " +
now.get(Calendar.DATE));
System.out.println("Lấy giờ định dạng 12 là : "
+ now.get(Calendar.HOUR));
System.out.println("Lấy giờ định dạng 24 là : "
+ now.get(Calendar.HOUR_OF_DAY));
System.out.println("Phút hiện tại : " +
now.get(Calendar.MINUTE));
System.out.println("Giây hiện tại : " +
now.get(Calendar.SECOND));
System.out.println("Mili giây hiện tại: " +
now.get(Calendar.MILLISECOND));
}
[/code]
– Nhìn vào giải thích ở trên thì bạn phải hiểu được là khi muốn lấy Năm, Tháng, Ngày, giờ ,Phút , giây …. thì phải sài hằng số nào của Calendar. Ráng đọc và hiểu (Tôi nghĩ là phải hiểu)
– Thực hiện chương trình trên thì bạn sẽ có kết quả như bên dưới (tính tại thời điểm Tôi ví dụ):
Giờ định dạng 12 : 05:02:50 PM
Giờ định dạng 24 : 17:02:50
Bây giờ là: 12/04/2013 05:02:50 PM
Năm hiện tại : 2013
Tháng hiện tại : 4
Ngày hiện tại : 12
Lấy giờ định dạng 12 là : 5
Lấy giờ định dạng 24 là : 17
Phút hiện tại : 2
Giây hiện tại : 50
Mili giây hiện tại: 527
– 2) – Bạn đã biết cách sử dụng Date, Calendar, SimpleDateFormat, Giờ Ta bắt đầu làm ứng dụng:
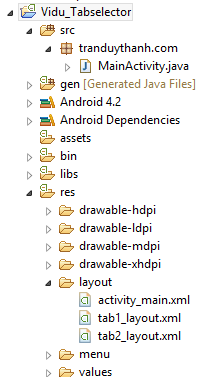
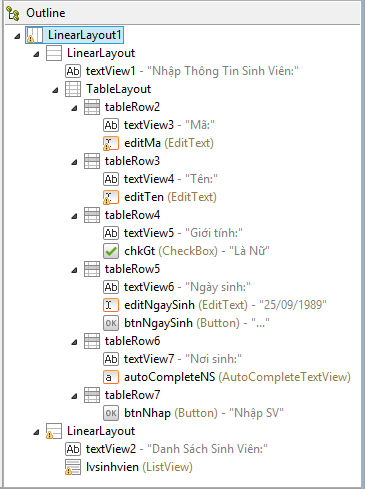
– Tạo Android Project tên tùy thích và thiết kế giao diện giống như yêu cầu bên trên:
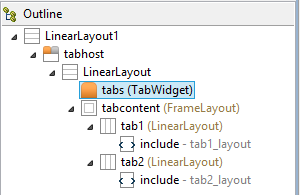
– Bạn xem Outline để dễ tưởng tượng ra giao diện, bạn thích làm kiểu nào là tùy bạn:
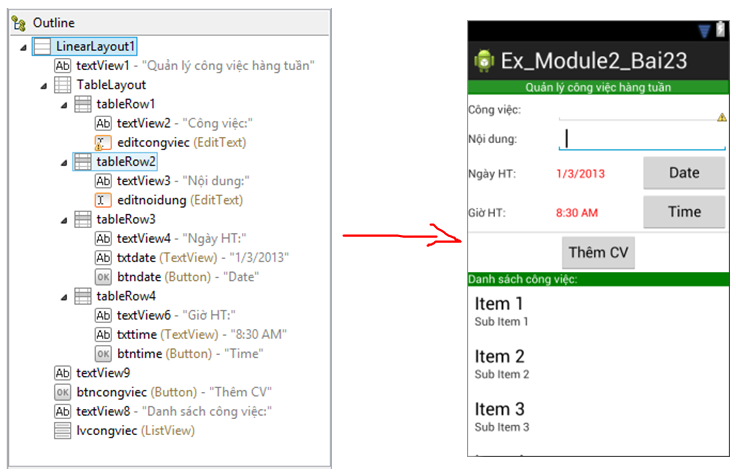 – Còn đây là source XML (activity_main.xml):
[code language=”xml”]
<LinearLayout xmlns:android="http://schemas.android.com/apk/res/android"
xmlns:tools="http://schemas.android.com/tools"
android:id="@+id/LinearLayout1"
android:layout_width="match_parent"
android:layout_height="match_parent"
android:orientation="vertical"
tools:context=".MainActivity" >
<TextView
android:id="@+id/textView1"
android:layout_width="match_parent"
android:layout_height="wrap_content"
android:background="#008000"
android:gravity="center"
android:text="Quản lý công việc hàng tuần"
android:textColor="#FFFFFF" />
<TableLayout
android:layout_width="match_parent"
android:layout_height="wrap_content"
android:stretchColumns="*"
>
<TableRow
android:id="@+id/tableRow1"
android:layout_width="wrap_content"
android:layout_height="wrap_content" >
<TextView
android:id="@+id/textView2"
android:layout_width="wrap_content"
android:layout_height="wrap_content"
android:text="Công việc:" />
<EditText
android:id="@+id/editcongviec"
android:layout_width="wrap_content"
android:layout_height="wrap_content"
android:layout_span="2"
android:ems="10" />
</TableRow>
<TableRow
android:id="@+id/tableRow2"
android:layout_width="wrap_content"
android:layout_height="wrap_content" >
<TextView
android:id="@+id/textView3"
android:layout_width="wrap_content"
android:layout_height="wrap_content"
android:text="Nội dung:" />
<EditText
android:id="@+id/editnoidung"
android:layout_width="wrap_content"
android:layout_height="wrap_content"
android:layout_span="2"
android:ems="10"
android:inputType="textMultiLine" >
<requestFocus />
</EditText>
</TableRow>
<TableRow
android:id="@+id/tableRow3"
android:layout_width="wrap_content"
android:layout_height="wrap_content" >
<TextView
android:id="@+id/textView4"
android:layout_width="wrap_content"
android:layout_height="wrap_content"
android:text="Ngày HT:" />
<TextView
android:id="@+id/txtdate"
android:layout_width="wrap_content"
android:layout_height="wrap_content"
android:text="1/3/2013"
android:textColor="#FF0000" />
<Button
android:id="@+id/btndate"
android:layout_width="wrap_content"
android:layout_height="wrap_content"
android:text="Date" />
</TableRow>
<TableRow
android:id="@+id/tableRow4"
android:layout_width="wrap_content"
android:layout_height="wrap_content" >
<TextView
android:id="@+id/textView6"
android:layout_width="wrap_content"
android:layout_height="wrap_content"
android:text="Giờ HT:" />
<TextView
android:id="@+id/txttime"
android:layout_width="wrap_content"
android:layout_height="wrap_content"
android:text="8:30 AM"
android:textColor="#FF0000" />
<Button
android:id="@+id/btntime"
android:layout_width="wrap_content"
android:layout_height="wrap_content"
android:text="Time" />
</TableRow>
</TableLayout>
<TextView
android:id="@+id/textView9"
android:layout_width="match_parent"
android:layout_height="2dp"
android:background="#E1E1E1" />
<Button
android:id="@+id/btncongviec"
android:layout_width="wrap_content"
android:layout_height="wrap_content"
android:layout_gravity="center"
android:text="Thêm CV" />
<TextView
android:id="@+id/textView8"
android:layout_width="match_parent"
android:layout_height="wrap_content"
android:background="#008000"
android:text="Danh sách công việc:"
android:textColor="#FFFFFF" />
<ListView
android:id="@+id/lvcongviec"
android:layout_width="match_parent"
android:layout_height="wrap_content" >
</ListView>
</LinearLayout>
[/code]
– Sau đây là nội dung xử lý các nghiệp vụ:
 – Class JobInWeek để định nghĩa một công việc phải hoàn thành trong một tuần.
[code language=”java”]
package tranduythanh.com;
import java.text.SimpleDateFormat;
import java.util.Date;
import java.util.Locale;
/**
* Class được định nghĩa công việc phải hoành thành
* trong một tuần
* @author drthanh
*
*/
public class JobInWeek {
private String title;
private String desciption;
private Date dateFinish;
private Date hourFinish;
public String getTitle() {
return title;
}
public void setTitle(String title) {
this.title = title;
}
public String getDesciption() {
return desciption;
}
public void setDesciption(String desciption) {
this.desciption = desciption;
}
public Date getDateFinish() {
return dateFinish;
}
public void setDateFinish(Date dateFinish) {
this.dateFinish = dateFinish;
}
public Date getHourFinish() {
return hourFinish;
}
public void setHourFinish(Date hourFinish) {
this.hourFinish = hourFinish;
}
public JobInWeek(String title, String desciption, Date dateFinish,
Date hourFinish) {
super();
this.title = title;
this.desciption = desciption;
this.dateFinish = dateFinish;
this.hourFinish = hourFinish;
}
public JobInWeek() {
super();
}
/**
* lấy định dạng ngày
* @param d
* @return
*/
public String getDateFormat(Date d)
{
SimpleDateFormat dft=new
SimpleDateFormat("dd/MM/yyyy", Locale.getDefault());
return dft.format(d);
}
/**
* lấy định dạng giờ phút
* @param d
* @return
*/
public String getHourFormat(Date d)
{
SimpleDateFormat dft=new
SimpleDateFormat("hh:mm a", Locale.getDefault());
return dft.format(d);
}
@Override
public String toString() {
return this.title+"-"+
getDateFormat(this.dateFinish)+"-"+
getHourFormat(this.hourFinish);
}
}
[/code]
– Class MainActivity:
[code language=”java”]
package tranduythanh.com;
import java.text.SimpleDateFormat;
import java.util.ArrayList;
import java.util.Calendar;
import java.util.Date;
import java.util.Locale;
import android.os.Bundle;
import android.app.Activity;
import android.app.DatePickerDialog;
import android.app.TimePickerDialog;
import android.app.DatePickerDialog.OnDateSetListener;
import android.app.TimePickerDialog.OnTimeSetListener;
import android.view.View;
import android.view.View.OnClickListener;
import android.widget.AdapterView;
import android.widget.AdapterView.OnItemClickListener;
import android.widget.AdapterView.OnItemLongClickListener;
import android.widget.ArrayAdapter;
import android.widget.Button;
import android.widget.DatePicker;
import android.widget.EditText;
import android.widget.ListView;
import android.widget.TextView;
import android.widget.TimePicker;
import android.widget.Toast;
/**
* Class xử lý nghiệp vụ
* @author drthanh
*
*/
public class MainActivity extends Activity {
TextView txtDate,txtTime;
EditText editCv,editNd;
Button btnDate,btnTime,btnAdd;
//Khai báo Datasource lưu trữ danh sách công việc
ArrayList<JobInWeek>arrJob=new ArrayList<JobInWeek>();
//Khai báo ArrayAdapter cho ListView
ArrayAdapter<JobInWeek>adapter=null;
ListView lvCv;
Calendar cal;
Date dateFinish;
Date hourFinish;
@Override
protected void onCreate(Bundle savedInstanceState) {
super.onCreate(savedInstanceState);
setContentView(R.layout.activity_main);
getFormWidgets();
getDefaultInfor();
addEventFormWidgets();
}
/**
* hàm dùng để load các control theo Id
*/
public void getFormWidgets()
{
txtDate=(TextView) findViewById(R.id.txtdate);
txtTime=(TextView) findViewById(R.id.txttime);
editCv=(EditText) findViewById(R.id.editcongviec);
editNd=(EditText) findViewById(R.id.editnoidung);
btnDate=(Button) findViewById(R.id.btndate);
btnTime=(Button) findViewById(R.id.btntime);
btnAdd=(Button) findViewById(R.id.btncongviec);
lvCv=(ListView) findViewById(R.id.lvcongviec);
//Gán DataSource vào ArrayAdapter
adapter=new ArrayAdapter<JobInWeek>
(this,
android.R.layout.simple_list_item_1,
arrJob);
//gán Adapter vào ListView
lvCv.setAdapter(adapter);
}
/**
* Hàm lấy các thông số mặc định khi lần đầu tiền chạy ứng dụng
*/
public void getDefaultInfor()
{
//lấy ngày hiện tại của hệ thống
cal=Calendar.getInstance();
SimpleDateFormat dft=null;
//Định dạng ngày / tháng /năm
dft=new SimpleDateFormat("dd/MM/yyyy",Locale.getDefault());
String strDate=dft.format(cal.getTime());
//hiển thị lên giao diện
txtDate.setText(strDate);
//Định dạng giờ phút am/pm
dft=new SimpleDateFormat("hh:mm a",Locale.getDefault());
String strTime=dft.format(cal.getTime());
//đưa lên giao diện
txtTime.setText(strTime);
//lấy giờ theo 24 để lập trình theo Tag
dft=new SimpleDateFormat("HH:mm",Locale.getDefault());
txtTime.setTag(dft.format(cal.getTime()));
editCv.requestFocus();
//gán cal.getTime() cho ngày hoàn thành và giờ hoàn thành
dateFinish=cal.getTime();
hourFinish=cal.getTime();
}
/**
* Hàm gán các sự kiện cho các control
*/
public void addEventFormWidgets()
{
btnDate.setOnClickListener(new MyButtonEvent());
btnTime.setOnClickListener(new MyButtonEvent());
btnAdd.setOnClickListener(new MyButtonEvent());
lvCv.setOnItemClickListener(new MyListViewEvent());
lvCv.setOnItemLongClickListener(new MyListViewEvent());
}
/**
* Class sự kiện của các Button
* @author drthanh
*
*/
private class MyButtonEvent implements OnClickListener
{
@Override
public void onClick(View v) {
switch(v.getId())
{
case R.id.btndate:
showDatePickerDialog();
break;
case R.id.btntime:
showTimePickerDialog();
break;
case R.id.btncongviec:
processAddJob();
break;
}
}
}
/**
* Class sự kiện của ListView
* @author drthanh
*
*/
private class MyListViewEvent implements
OnItemClickListener,
OnItemLongClickListener
{
@Override
public boolean onItemLongClick(AdapterView<?> arg0, View arg1,
int arg2, long arg3) {
//Xóa vị trí thứ arg2
arrJob.remove(arg2);
adapter.notifyDataSetChanged();
return false;
}
@Override
public void onItemClick(AdapterView<?> arg0, View arg1, int arg2,
long arg3) {
//Hiển thị nội dung công việc tại vị trí thứ arg2
Toast.makeText(MainActivity.this,
arrJob.get(arg2).getDesciption(),
Toast.LENGTH_LONG).show();
}
}
/**
* Hàm hiển thị DatePicker dialog
*/
public void showDatePickerDialog()
{
OnDateSetListener callback=new OnDateSetListener() {
public void onDateSet(DatePicker view, int year,
int monthOfYear,
int dayOfMonth) {
//Mỗi lần thay đổi ngày tháng năm thì cập nhật lại TextView Date
txtDate.setText(
(dayOfMonth) +"/"+(monthOfYear+1)+"/"+year);
//Lưu vết lại biến ngày hoàn thành
cal.set(year, monthOfYear, dayOfMonth);
dateFinish=cal.getTime();
}
};
//các lệnh dưới này xử lý ngày giờ trong DatePickerDialog
//sẽ giống với trên TextView khi mở nó lên
String s=txtDate.getText()+"";
String strArrtmp[]=s.split("/");
int ngay=Integer.parseInt(strArrtmp[0]);
int thang=Integer.parseInt(strArrtmp[1])-1;
int nam=Integer.parseInt(strArrtmp[2]);
DatePickerDialog pic=new DatePickerDialog(
MainActivity.this,
callback, nam, thang, ngay);
pic.setTitle("Chọn ngày hoàn thành");
pic.show();
}
/**
* Hàm hiển thị TimePickerDialog
*/
public void showTimePickerDialog()
{
OnTimeSetListener callback=new OnTimeSetListener() {
public void onTimeSet(TimePicker view,
int hourOfDay, int minute) {
//Xử lý lưu giờ và AM,PM
String s=hourOfDay +":"+minute;
int hourTam=hourOfDay;
if(hourTam>12)
hourTam=hourTam-12;
txtTime.setText
(hourTam +":"+minute +(hourOfDay>12?" PM":" AM"));
//lưu giờ thực vào tag
txtTime.setTag(s);
//lưu vết lại giờ vào hourFinish
cal.set(Calendar.HOUR_OF_DAY, hourOfDay);
cal.set(Calendar.MINUTE, minute);
hourFinish=cal.getTime();
}
};
//các lệnh dưới này xử lý ngày giờ trong TimePickerDialog
//sẽ giống với trên TextView khi mở nó lên
String s=txtTime.getTag()+"";
String strArr[]=s.split(":");
int gio=Integer.parseInt(strArr[0]);
int phut=Integer.parseInt(strArr[1]);
TimePickerDialog time=new TimePickerDialog(
MainActivity.this,
callback, gio, phut, true);
time.setTitle("Chọn giờ hoàn thành");
time.show();
}
/**
* Hàm xử lý đưa công việc vào ListView khi nhấn nút Thêm Công việc
*/
public void processAddJob()
{
String title=editCv.getText()+"";
String description=editNd.getText()+"";
JobInWeek job=new JobInWeek(title, description, dateFinish, hourFinish);
arrJob.add(job);
adapter.notifyDataSetChanged();
//sau khi cập nhật thì reset dữ liệu và cho focus tới editCV
editCv.setText("");
editNd.setText("");
editCv.requestFocus();
}
}
[/code]
– Như đã nói ở các bài thực hành trước là chúng ta nên tách các hàm ra để dễ xử lý, thì trong bài trên cũng vậy. Tôi cũng đã ghi chú trực tiếp vào coding, càng về sau Tôi sẽ ghi chú ít đi, chỉ ghi chú những cái gì mới mà thôi.
– Trong đoạn code trên ta sẽ sử dụng 2 call back listener- mục đích là lắng nghe sự thay đổi dữ liệu trong Các dialog tương ứng:
+ Interface OnDateSetListener có phương thức trừu tường onDateSet, trong phương thức này ta xử lý sự thay đổi dữ liệu trong DatePickerDialog.
+ Interface OnTimeSetListener có phương thức trừu tượng onTimeSet, trong phương thức này ta xử lý sự thay đổi giờ – phút trong TimePickerDialog.
– 2 call back listener trên rất là hữu dụng, dựa vào nó mà ta luôn kiểm tra được sự thay đổi dữ liệu trong các Dialog.
– Bạn có thể tải đầy đủ code mẫu của chương trình ở đây: http://www.mediafire.com/?layng1pw9v83vqb
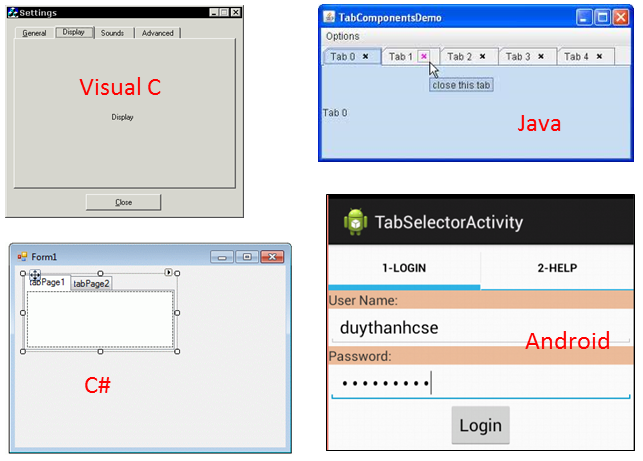
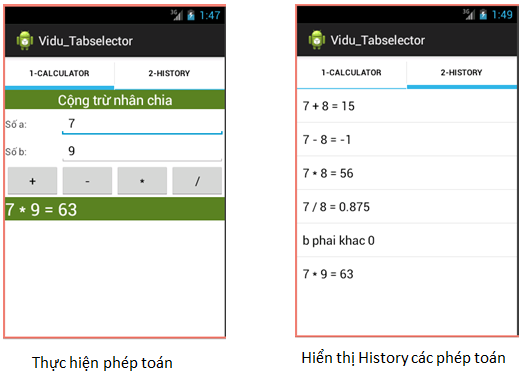
– Bài tập kế tiếp bạn sẽ học về Tab Selector (cũ), một control dùng để chia màn hình thành các phần tương tác khác nhau, nó cũng thú vị không kém. Hoặc bạn có thể tìm hiểu control mới là ActionBar trong Android 3.0 (API 11). Nếu đủ thời gian Tôi sẽ giới thiệu cả 2 loại này cho các bạn tham khảo.
– Chúc bạn thành công.
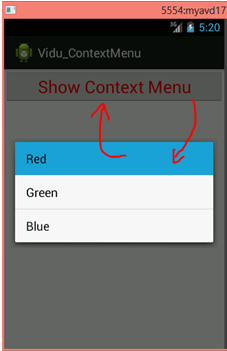 – Ở hình trên là khi Context Menu hiển thị ra, Tôi chọn Red –> Màu của Button sẽ chuyển thành màu đỏ.
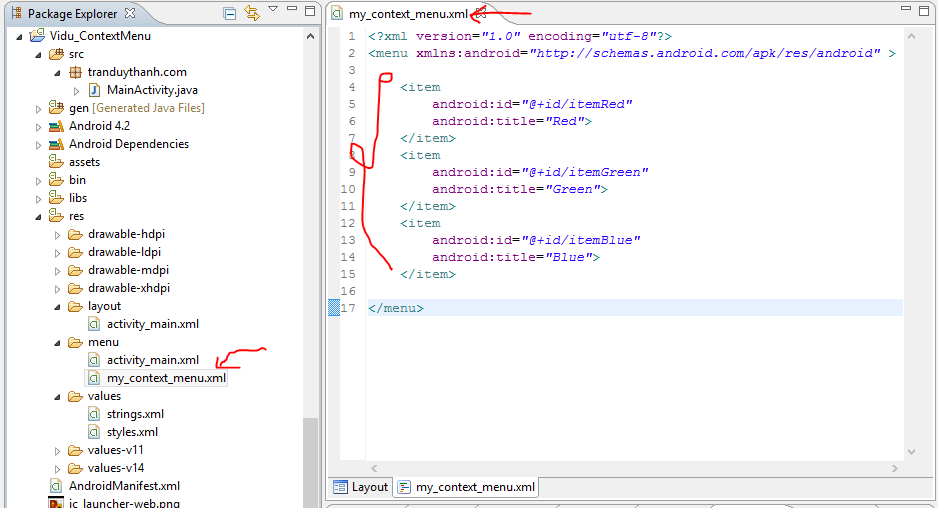 – Tiếp tục bạn Double click vào strings.xml , Tôi có định nghĩa một số color trong này:
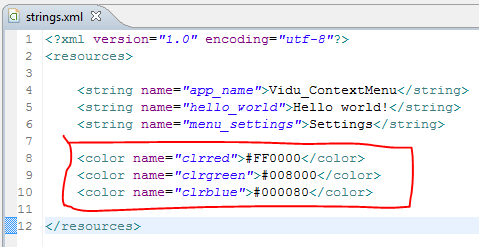 – Ở trong strings.xml , Tôi tạo 3 tag color : Red, Green, Blue; Nội dung bạn phải để dạng Hex Color. 3 màu này sẽ được triệu gọi trong hàm xử lý sự kiện khi người sử dụng chọn từng Menu Item trong Context Menu.