[polldaddy poll=9764234]
– Trong bài tập 17 bạn đã biết cách sử dụng AutocompleteTextView và MultiAutocompleteTextView nhưng DataSource được cố định sẵn trong Coding. Bài tập này Bạn sẽ học cách cập nhật DataSource lúc ứng dụng đang chạy (runtime).
– Tôi sẽ có một ví dụ cụ thể để bạn thực hành về trường hợp này, bạn hãy tập trung theo dõi và thực hành lại. Tôi nghĩ bài này rất thú vị.
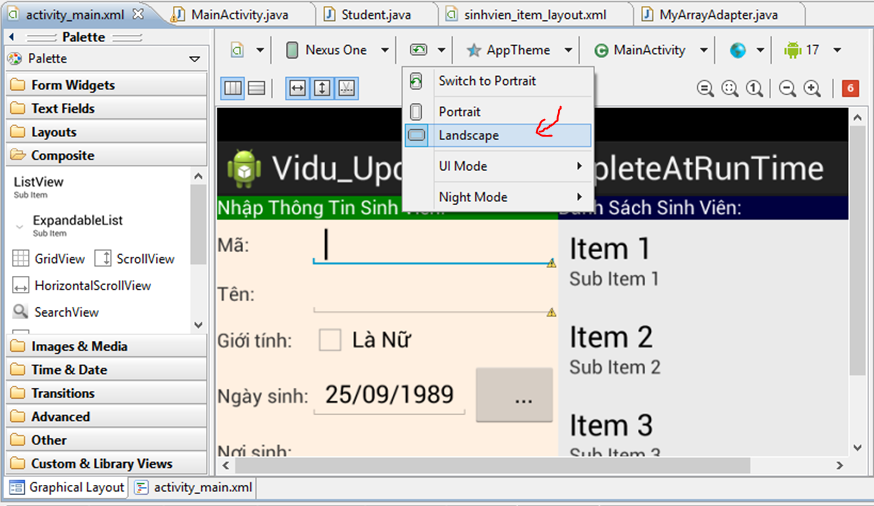
– Bây giờ bạn mở AVD lên và nhấn tổ hợp phím ctrl+ F11 để xoay ngang màn hình, Tôi sẽ làm ví dụ về màn hình nằm ngang.
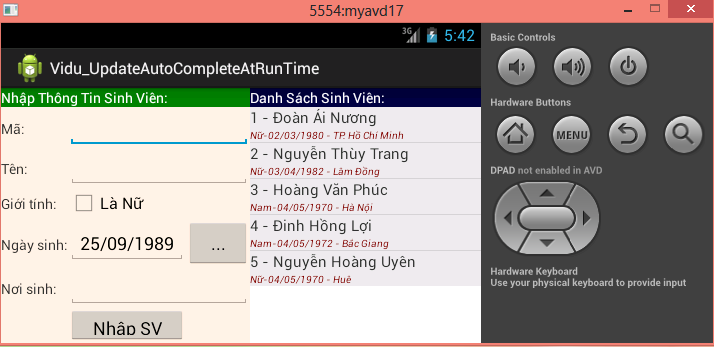 – Bạn xem màn hình trên Tôi chia ra làm 2. Bên trái cho phép nhập thông tin sinh viên, bên phải cho phép hiển thị danh sách sinh viên đã nhập. Bạn chú ý là ListView Tôi làm là Custom Layout (Mỗi dòng Lớn có 2 loại dữ liệu: mã và tên cùng 1 dòng. giới tính, năm sinh, quê quán cùng 1 dòng và chữ nhỏ hơn có màu đó in nghiêng).
– Ngày sinh dùng DatePickerDialog
– Nơi sinh dùng AutoCompleteTextView. Mỗi lần nhấn “Nhập Sv” thì chương trình sẽ cập nhật động nơi sinh vào DataSource của nó, chú ý là không cho phép trùng lắp. Trong các lần nhập nơi sinh tiếp theo thì nó phải tự động lọc giúp người sử dụng nhập lẹ hơn.
– Ta bắt đầu vào chi tiết ứng dụng.
1- Đây là cấu trúc thư mục trong ứng dụng:
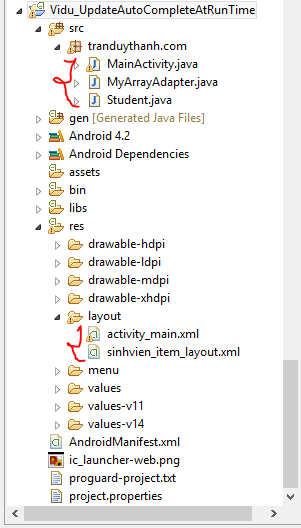 -Nhìn vào cấu trúc thì bạn thấy có 2 Layout, layout chính là activity_main.xml, còn layout sinhvien_item_layout.xml là Tôi dùng để custom lại ListView (nó sẽ được xử lý trong class MyArrayAdapter).
2- Thiết kế giao diện với màn hình nằm ngang (xem hình):
– Dưới đây là Outline activity_main.xml:
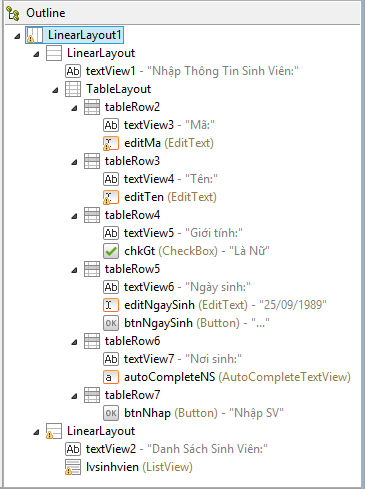 – Nếu như nhìn vào Outline mà bạn có thể thiết kế được giao diện như trên thì Tôi nghĩ bạn đã thật sự hiểu về Layout, tuy nhiên Tôi vẫn cung cấp Source XML, bạn xem tham khảo
[code language=”xml”]
<LinearLayout xmlns:android="http://schemas.android.com/apk/res/android"
xmlns:tools="http://schemas.android.com/tools"
android:id="@+id/LinearLayout1"
android:layout_width="match_parent"
android:layout_height="match_parent"
tools:context=".MainActivity" >
<LinearLayout
android:layout_width="wrap_content"
android:layout_height="wrap_content"
android:background="#FFF0E1"
android:orientation="vertical" >
<TextView
android:id="@+id/textView1"
android:layout_width="match_parent"
android:layout_height="wrap_content"
android:background="#008000"
android:text="Nhập Thông Tin Sinh Viên:"
android:textColor="#FFFFFF" />
<TableLayout
android:layout_width="wrap_content"
android:layout_height="wrap_content"
>
<TableRow
android:id="@+id/tableRow2"
android:layout_width="wrap_content"
android:layout_height="wrap_content" >
<TextView
android:id="@+id/textView3"
android:layout_width="wrap_content"
android:layout_height="wrap_content"
android:text="Mã:" />
<EditText
android:id="@+id/editMa"
android:layout_width="wrap_content"
android:layout_height="wrap_content"
android:layout_span="2" >
<requestFocus />
</EditText>
</TableRow>
<TableRow
android:id="@+id/tableRow3"
android:layout_width="wrap_content"
android:layout_height="wrap_content" >
<TextView
android:id="@+id/textView4"
android:layout_width="wrap_content"
android:layout_height="wrap_content"
android:text="Tên:" />
<EditText
android:id="@+id/editTen"
android:layout_width="wrap_content"
android:layout_height="wrap_content"
android:layout_span="2" />
</TableRow>
<TableRow
android:id="@+id/tableRow4"
android:layout_width="wrap_content"
android:layout_height="wrap_content" >
<TextView
android:id="@+id/textView5"
android:layout_width="wrap_content"
android:layout_height="wrap_content"
android:text="Giới tính:" />
<CheckBox
android:id="@+id/chkGt"
android:layout_width="wrap_content"
android:layout_height="wrap_content"
android:layout_span="2"
android:text="Là Nữ" />
</TableRow>
<TableRow
android:id="@+id/tableRow5"
android:layout_width="wrap_content"
android:layout_height="wrap_content" >
<TextView
android:id="@+id/textView6"
android:layout_width="wrap_content"
android:layout_height="wrap_content"
android:text="Ngày sinh:" />
<EditText
android:id="@+id/editNgaySinh"
android:layout_width="wrap_content"
android:layout_height="wrap_content"
android:inputType="date"
android:text="25/09/1989" />
<Button
android:id="@+id/btnNgaySinh"
android:layout_width="wrap_content"
android:layout_height="wrap_content"
android:text="…" />
</TableRow>
<TableRow
android:id="@+id/tableRow6"
android:layout_width="wrap_content"
android:layout_height="wrap_content" >
<TextView
android:id="@+id/textView7"
android:layout_width="wrap_content"
android:layout_height="wrap_content"
android:text="Nơi sinh:" />
<AutoCompleteTextView
android:id="@+id/autoCompleteNS"
android:layout_width="wrap_content"
android:layout_height="wrap_content"
android:completionThreshold="1"
android:layout_span="2"
android:ems="10" />
</TableRow>
<TableRow
android:id="@+id/tableRow7"
android:layout_width="wrap_content"
android:layout_height="wrap_content" >
<Button
android:id="@+id/btnNhap"
android:layout_width="wrap_content"
android:layout_height="wrap_content"
android:layout_column="1"
android:gravity="center"
android:text="Nhập SV" />
</TableRow>
</TableLayout>
</LinearLayout>
<LinearLayout
android:layout_width="wrap_content"
android:layout_height="wrap_content"
android:layout_weight="1"
android:background="#EAEAEA"
android:orientation="vertical" >
<TextView
android:id="@+id/textView2"
android:layout_width="match_parent"
android:layout_height="wrap_content"
android:background="#000040"
android:text="Danh Sách Sinh Viên:"
android:textColor="#FFFFFF" />
<ListView
android:id="@+id/lvsinhvien"
android:layout_width="match_parent"
android:layout_height="wrap_content"
android:layout_weight="1" >
</ListView>
</LinearLayout>
</LinearLayout>
[/code]
– còn đây là của sinhvien_item_layout.xml:
[code language=”xml”]
<?xml version="1.0" encoding="utf-8"?>
<LinearLayout xmlns:android="http://schemas.android.com/apk/res/android"
android:layout_width="match_parent"
android:layout_height="match_parent"
android:orientation="vertical" >
<TextView
android:id="@+id/txtMaVaTen"
android:layout_width="match_parent"
android:layout_height="wrap_content"
android:textSize="15sp" />
<TextView
android:id="@+id/txtThongTinKhac"
android:layout_width="match_parent"
android:layout_height="wrap_content"
android:textColor="#800000"
android:textSize="10sp"
android:textStyle="italic" />
</LinearLayout>
[/code]
-3 -Bạn xem cấu trúc class xử lý nghiệp vụ:

– class Student:
[code language=”java”]
package tranduythanh.com;
import java.util.Date;
/**
* Class dùng để lưu trữ thông tin của sinh viên
* id: Mã
* name: Tên
* gender: giới tính, true là nữ
* birthday: lưu năm sinh
* placeOfBirth: nơi sinh
* @author drthanh
*
*/
public class Student {
private String id;
private String name;
private boolean gender;
private Date birthday;
private String placeOfBirth;
public String getId() {
return id;
}
public void setId(String id) {
this.id = id;
}
public String getName() {
return name;
}
public void setName(String name) {
this.name = name;
}
public boolean isGender() {
return gender;
}
public void setGender(boolean gender) {
this.gender = gender;
}
public Date getBirthday() {
return birthday;
}
public void setBirthday(Date birthday) {
this.birthday = birthday;
}
public String getPlaceOfBirth() {
return placeOfBirth;
}
public void setPlaceOfBirth(String placeOfBirth) {
this.placeOfBirth = placeOfBirth;
}
public Student(String id, String name, boolean gender, Date birthday,
String placeOfBirth) {
super();
this.id = id;
this.name = name;
this.gender = gender;
this.birthday = birthday;
this.placeOfBirth = placeOfBirth;
}
public Student() {
super();
}
}
[/code]
– 4 class MyArrayAdapter (class dùng để Custom Listview):
[code language=”java”]
package tranduythanh.com;
import java.text.SimpleDateFormat;
import java.util.ArrayList;
import java.util.Locale;
import android.app.Activity;
import android.view.View;
import android.view.ViewGroup;
import android.widget.ArrayAdapter;
import android.widget.TextView;
/**
* Đây là class dùng để custom layout
* Bạn đã được học trước đó
* Class này sẽ lấy layout: sinhvien_item_layout.xml
* @author drthanh
*
*/
public class MyArrayAdapter extends ArrayAdapter<Student> {
Activity context;
int resourceId;
ArrayList<Student>arrStudent;
public MyArrayAdapter(Activity context, int resource,
ArrayList<Student> objects) {
super(context, resource, objects);
this.context=context;
this.resourceId=resource;
this.arrStudent=objects;
}
@Override
public View getView(int position, View convertView, ViewGroup parent) {
if(convertView==null)
{
//gắn Layout vào Activity
convertView= context.getLayoutInflater().inflate(resourceId, null);
}
//Lấy Textview để lưu mã và tên
TextView txtMaTen=(TextView) convertView.findViewById(R.id.txtMaVaTen);
//Lấy TextView để lưu giới tính, năm sinh, nơi sinh
TextView txtKhac=(TextView) convertView.findViewById(R.id.txtThongTinKhac);
//Lấy sinh viên thứ position
Student s=arrStudent.get(position);
txtMaTen.setText(s.getId()+" – "+s.getName());
//Dùng SimpleDateFormat để định dạng ngày tháng dd/MM/YYYY -> 22/12/2012
SimpleDateFormat dft=new SimpleDateFormat("dd/MM/yyyy",Locale.getDefault());
txtKhac.setText((s.isGender()?"Nữ-":"Nam-")+
dft.format(s.getBirthday())+" – "+
s.getPlaceOfBirth());
return convertView;
}
}
[/code]
-5- class MainActivity để xử lý nghiệp vụ:
[code language=”java”]
package tranduythanh.com;
import java.text.ParseException;
import java.text.SimpleDateFormat;
import java.util.ArrayList;
import java.util.Date;
import java.util.Locale;
import android.os.Bundle;
import android.app.Activity;
import android.app.DatePickerDialog;
import android.app.DatePickerDialog.OnDateSetListener;
import android.view.Menu;
import android.view.View;
import android.view.View.OnClickListener;
import android.widget.ArrayAdapter;
import android.widget.AutoCompleteTextView;
import android.widget.Button;
import android.widget.CheckBox;
import android.widget.DatePicker;
import android.widget.EditText;
import android.widget.ListView;
import android.widget.Toast;
public class MainActivity extends Activity {
ListView lvSinhvien;
//Cặp đôi để Custom ListView
MyArrayAdapter adapterSinhvien;
ArrayList<Student> arrSinhvien=new ArrayList<Student>();
EditText editMa,editTen,editNamsinh;
CheckBox chkGender;
Button btnNamsinh,btnNhapsv;
AutoCompleteTextView autoTextNs;
//Cặp đôi để dùng cho AutoCompleteTextView
ArrayList<String>arrAuto=new ArrayList<String>();
ArrayAdapter<String>adapterAuto;
@Override
protected void onCreate(Bundle savedInstanceState) {
super.onCreate(savedInstanceState);
setContentView(R.layout.activity_main);
getFormWidgets();
addEventsForWidgets();
//fakeData();
}
/**
* hàm lấy các widgets
*/
public void getFormWidgets()
{
editMa=(EditText) findViewById(R.id.editMa);
editTen=(EditText) findViewById(R.id.editTen);
editNamsinh=(EditText) findViewById(R.id.editNgaySinh);
chkGender=(CheckBox) findViewById(R.id.chkGt);
autoTextNs=(AutoCompleteTextView) findViewById(R.id.autoCompleteNS);
btnNamsinh=(Button) findViewById(R.id.btnNgaySinh);
btnNhapsv=(Button) findViewById(R.id.btnNhap);
lvSinhvien=(ListView) findViewById(R.id.lvsinhvien);
//Gán DataSource cho Adapter ListView
adapterSinhvien=new MyArrayAdapter(this,
R.layout.sinhvien_item_layout,
arrSinhvien);
//Gán Adapter vào ListView
lvSinhvien.setAdapter(adapterSinhvien);
}
/**
* Hàm thiết lập sự kiện cho Button
*/
public void addEventsForWidgets()
{
btnNamsinh.setOnClickListener(new OnClickListener() {
@Override
public void onClick(View arg0) {
// TODO Auto-generated method stub
processBirthday();
}
});
btnNhapsv.setOnClickListener(new OnClickListener() {
@Override
public void onClick(View v) {
processInput();
}
});
}
/**
* Hàm hiển thị DatePickerDialog để chọn năm sinh
*/
public void processBirthday()
{
OnDateSetListener callBack=new OnDateSetListener() {
@Override
public void onDateSet(DatePicker arg0, int arg1, int arg2, int arg3) {
editNamsinh.setText(arg3+"/"+arg2+"/"+arg1);
}
};
//Ở đây Tôi chưa xử lý lấy ngày tháng năm trên EditText đưa vào DatePicker
//Bạn tự làm
DatePickerDialog dateDialog=new DatePickerDialog(this, callBack, 1989, 9, 25);
dateDialog.setTitle("Birthday");
dateDialog.show();
}
/**
* Hàm xử lý nhập dữ liệu từ giao diện
*/
public void processInput()
{
String ma=editMa.getText()+"";
String ten=editTen.getText()+"";
String ns=editNamsinh.getText()+"";
String nois=autoTextNs.getText()+"";
boolean gt=chkGender.isSelected();
SimpleDateFormat dft=new SimpleDateFormat("dd/MM/yyyy",Locale.getDefault());
try {
Student s=new Student(ma, ten, gt, dft.parse(ns), nois);
arrSinhvien.add(s);
//Thêm mới xong thì gọi hàm dưới cập nhập lại giao diện
adapterSinhvien.notifyDataSetChanged();
//Xử lý cho Autocomplete về nơi sinh
processAutoComplete(nois);
} catch (ParseException e) {
Toast.makeText(this, e.toString(), Toast.LENGTH_LONG).show();
}
}
/**
* Hàm xử lý Autocomplete Nơi sinh
* @param data
*/
public void processAutoComplete(String data)
{
//Chạy từ đầu chí cuối nếu trùng thì thoát khỏi hàm
for(int i=0;i<arrAuto.size();i++)
{
String x=arrAuto.get(i);
if(x.trim().equalsIgnoreCase(data.trim()))
return;
}
//nếu xuống đây được tức là chưa tồn tại-> đừa vào arrAuto
arrAuto.add(data);
//Đưa vào ADapter
adapterAuto=new ArrayAdapter<String>(this,
android.R.layout.simple_list_item_1,
arrAuto);
//đưa Adapter vào AutoComplete
autoTextNs.setAdapter(adapterAuto);
}
public void fakeData()
{
Student s1=new Student("1", "Đoàn Ái Nương", true, new Date(1980-1900, 2, 2), "TP. Hồ Chí Minh");
Student s2=new Student("2", "Nguyễn Thùy Trang", true, new Date(1982-1900, 3, 3), "Lâm Đồng");
Student s3=new Student("3", "Hoàng Văn Phúc", false, new Date(1970-1900, 4, 4), "Hà Nội");
Student s4=new Student("4", "Đinh Hồng Lợi", false, new Date(1972-1900, 4, 4), "Bắc Giang");
Student s5=new Student("5", "Nguyễn Hoàng Uyên", true, new Date(1970-1900, 4, 4), "Huê");
arrSinhvien.add(s1);
arrSinhvien.add(s2);
arrSinhvien.add(s3);
arrSinhvien.add(s4);
arrSinhvien.add(s5);
adapterSinhvien.notifyDataSetChanged();
}
@Override
public boolean onCreateOptionsMenu(Menu menu) {
// Inflate the menu; this adds items to the action bar if it is present.
getMenuInflater().inflate(R.menu.activity_main, menu);
return true;
}
}
[/code]
– Bạn xem Tôi giải thích trong coding luôn rồi.
– Chú ý là bạn có thể yêu cầu ứng dụng chạy theo màn hình nằm ngang trong code (bạn viết trong onCreate):
setRequestedOrientation(ActivityInfo.SCREEN_ORIENTATION_LANDSCAPE);
– Bạn hãy cố gắng làm bài này vì Tôi cảm thấy nó rất hay về ý tưởng thiết kế và kỹ thuật lập trình.
– Bạn có thể Tải code mẫu tại đây: http://www.mediafire.com/?m0jeop2fb83ib3u
– Bài tập tiếp theo bạn sẽ được thực hành về GridView, một control cũng cần phải lưu tâm.
– Chúc bạn thành công
bài này quá thú vị 😀
Cho em hỏi sao e không dùng android:layout_span được vậy thầy,
Đã được, nhưng tự viết, Ctrl+space k tự nhận,
Thầy ơi cái class MyArrayAdapter thật là khó hiểu, e chỉ biết bê nguyên code vào thôi , còn không hiểu cách xây dựng ra nó và nó hoạt động cụ thể như thế nào !
vì thế mỗi lần sử dụng lại phải xem code để chép vào mà không thể tự viết theo cách hiểu được !
Thầy giáo ơi cho em hỏi về cái khởi tạo: “adapterAuto=new ArrayAdapter(this, android.R.layout.simple_list_item_1,
arrAuto);”
và setAdapter cho AutocompleteTextView:
“autoTextNs.setAdapter(adapterAuto); ” Sao thầy lại để nó ở trong Button onClickListener mà không để ở ngoài, trong hàm onCreate ạ? Em không hiểu là khi mà em khai báo luôn ở trong hàm onCreate thì khi thêm nơi sinh nó vẫn cập nhật vào ArrayList (em đã notifyData cho Adapter rồi) nhưng khi gõ vào AutoComplete thì nó không hiện ra gợi ý?
Theo mình nghĩ thì khi ban khai báo method processAutoComplete(nois); trong main method onCreate thì khi đó sự kiện get ở dòng arrauto.get(i) nó sẽ chạy truocs method inputprocess , khi đó đoạn text bạn chuyền vào nó sẽ không chạy trong hàm processAutoComplete được bạn ạ
Do not modify the ArrayList. Modify the ArrayAdapter, using add(), insert(), and remove(). You do not need to worry about notifyDataSetChanged().
(from http://stackoverflow.com/questions/3670500/notifydatasetchanged-doesnt-work)
Khi dùng DatePickerDialog em thấy hơi lạ khi tháng lại bị hụt khi mình nhập. Hóa ra nó ở đây.
http://developer.android.com/reference/android/app/DatePickerDialog.OnDateSetListener.html
Em hiểu hết toàn bộ code của Thầy. Xin cảm ơn Thầy bài giảng Thầy rất hay và chi tiết lắm. Nhưng mà em cũng thắc mắc tại sao khi nhập tháng lại bị hụt mất 1 tháng nhỉ ???
Tháng lấy từ 0–>11. Nên em +1.
Thầy cho em hỏi: Ở lớp Student.class nó có dùng đến cái super(). Thầy có thể giải thích cho em hiểu cái super() được sử dụng trong trường hợp này là có tác dụng gì?
Em cảm ơn!
lên mạng xem cái hàm super(), giải thích khó hiểu quá trời, ráng làm từ từ cho quen thôi bạn ơi,hjx
super là gọi constructor của lớp cha
Không hiểu tại sao khi nhập nơi sinh vào cái autoCompleteTextView thì không thấy chữ hiện lên ở đấy nữa, khi nào click vào để nhập tiếp thì nó mới được. Thầy và các bạn chỉ giúp em cách khắc phục!
thầy cho em hỏi trong class Student lại phải khởi tạo “public Student()” 2 lần vậy.Em không hiểu chỗ này,mà tìm không ra….
public Student(String id, String name, boolean gender, Date birthday,
String placeOfBirth) {
super();
this.id = id;
this.name = name;
this.gender = gender;
this.birthday = birthday;
this.placeOfBirth = placeOfBirth;
}
public Student() {
super();
}
Cảm ơn thầy
Cái này không phải khởi tạo 2 lần, mà mục đích của nó là cho phép lập trình viên có thể tạo đối tượng Student bằng 1 cách. (mặc định và đầy đủ đối số).
Cảm ơn thầy.Giờ thì em hiểu rồi.
Thầy cho em hỏi là:
trong hàm processAutoComplete(), tại sao sau khi đưa phần tử “nơi sinh” mới vào trong danh sách arrAuto, lẽ tự nhiên thì khi đó đối tượng Adapter cho AutoCompete đã có nên chỉ cần gọi autoTextNs.notifyDataSetChanged() để thay đổi cập nhật về dữ liệu là đủ. Sao trong code, thầy phải tạo ra một ArrayAdapter mới rồi lại gọi lại autoTextNs.setAdapter(adapterAuto)?
Cảm ơn thầy.
bạn có thể tham khảo link này:
https://stackoverflow.com/questions/15861017/why-cant-i-update-the-autocompletetextview-dynamically
Em cam on thay rat nhieu.nhung bai demo cua thay rat hay va y nghia,no giup ich em rat nhieu a!
Thầy cho em hỏi hàm fakeData() em không thấy có sử dụng thì làm sao mà gán giá trị vào ArrayList được ạ? em cám ơn
Thầy ơi cho em hỏi tại dòng Student s=new Student(ma, ten, gt, dft.parse(ns), nois); sao nó bị lỗi yêu cầu phải add java.util.date vậy thầy em add vào nó không chạy mong thầy giải đáp
Thưa thầy cho em hỏi trong class Student có phương thức khởi tạo
public Student() {
super();
}
mà Student không kế thừa class nào vậy nếu bỏ lệnh super() đi thì có gì thay đổi không ạ. Cảm ơn thầy và mong thầy giải đáp.
Hi em.
super trong trường hợp này không có ảnh hưởng cũng như không có ý nghĩa gì cả nên em có thể xóa nó, mặc định các lớp sinh ra đều kế thừa từ lớp Object nên super trong trường hợp này là gọi constructor của lớp object (trường hợp này ta không cần dùng). Tuy nhiên nếu lớp Student mà chỉ định rõ kế thừa từ lớp nào (khác Object) thì phải cẩn trọng trong việc xóa super vì nó có thể có ý nghĩa trong quá trình khởi tạo giá trị cho các thuộc tính từ lớp cha.
Cảm ơn thầy nhiều, em học ngành y nhưng yêu thích lập trình. Những bài viết của thầy rất dễ hiểu, em gần như không biết gì về lập trình Android trước khi tìm thấy các bài viết của thầy trên google. Mong thầy tiếp tục viết vì em thấy thích phong cách viết bài của thầy hơn những tác giả khác. Mong Chúa ban cho gia đình thầy sức khỏe và thành công.
Thầy cho em hỏi là:
trong hàm processAutoComplete(), tại sao sau khi đưa phần tử “nơi sinh” mới vào trong danh sách arrAuto, lẽ tự nhiên thì khi đó đối tượng Adapter cho AutoCompete đã có nên chỉ cần gọi autoTextNs.notifyDataSetChanged() để thay đổi cập nhật về dữ liệu là đủ. Sao trong code, thầy phải tạo ra một ArrayAdapter mới rồi lại gọi lại autoTextNs.setAdapter(adapterAuto)?
Cảm ơn thầy.
thầy ơi cho em hỏi cái lỗi java.lang.IllegalStateException: ArrayAdapter requires the resource ID to be a TextView thì sửa thế nào ạ?
Hi em
Trường hợp này xảy ra khi em gặp 1 trong 2 lỗi:
1) Lỗi 1: trong hàm getView em quên return customer view (mặc định là super…)
2) Lỗi 2: trong Activity lúc khai báo em vẫn dùng ArrayAdapter mà lại không dùng lớp CustomAdapter mà em mới tạo
Thầy ơi, ở dòng lệnh 118 (boolean gt=chkGender.isSelected();) của Class MainActivity, ở đây là “isChecked” chứ k phải là “isSelected()”.