[polldaddy poll=9764234]
Ở bài tập 15 bạn đã làm quen được với Spinner, trong bài tập này bạn sẽ làm một ví dụ về cách kết hợp giữa Spinner với ListView. Thường thì 2 control này đi với nhau sẽ tạo thành cặp bài trùng, Spinner dùng để lưu trữ danh mục còn ListView lưu trữ danh sách của từng danh mục. Ở đây Tôi có làm một ví dụ về quản lý sản phẩm, bạn xem hình:
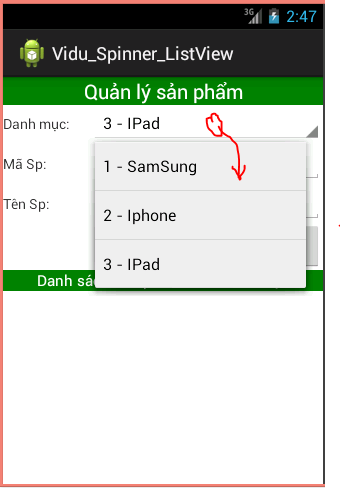 – Bạn quan sát hình Tôi chụp ứng dụng, phần trên cùng là Danh mục các sản phẩm được lưu vào Spinner, Khi bạn chọn vào nó thì sẽ xổ ra danh sách như bên dưới. khi bạn chọn danh mục nào thì nó sẽ load các sản phẩm thuộc danh mục đó.
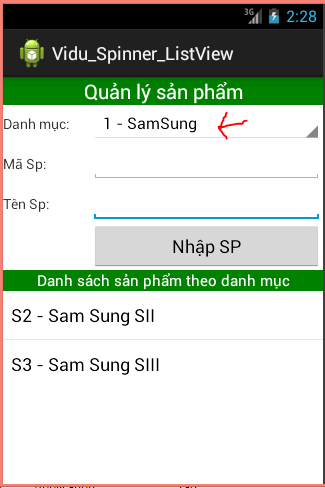
– Ví dụ bây giờ bạn chọn số 1 là SamSung, nó sẽ load toàn bộ sản phẩm là SamSung vào ListView bên dưới:
 – Nếu bạn chọn 2- Iphone thì nó sẽ load toàn bộ sản phẩm là IPhone vào ListView bên dưới:
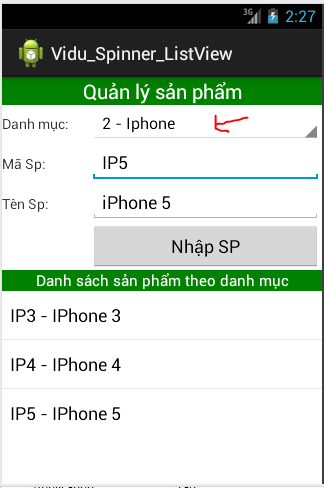 – Chương trình cung cấp nút “Nhập SP“, khi người sử dụng nhập thông tin cho sản phẩm và nhấn nút này thì chương trình sẽ lưu sản phẩm vào đúng với danh mục được chọn trong Spinner đồng thời cập nhật vào ListView bên dưới.
– Bạn cần có ArrayList + ArrayAdapter cho Spinner
– Và cần có ArrayList + ArrayAdapter cho ListView
-> Tức là bạn phải có 2 cặp (4 đối tượng trên)
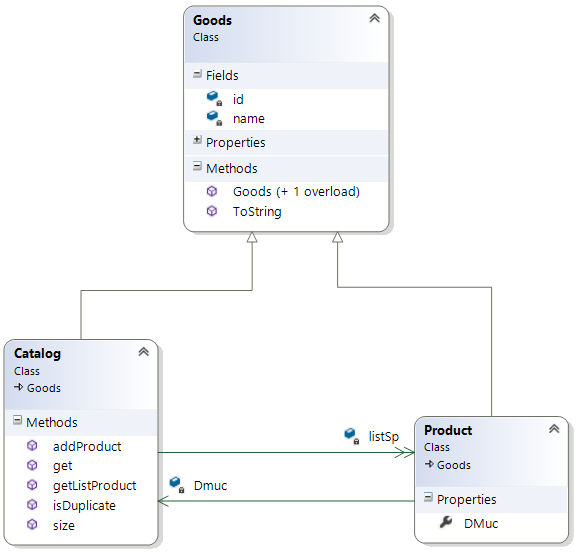
– Ví dụ này Tôi viết thuần hướng đối tượng, và có hơi phá cách một chút so với quy tắc hướng đối tượng thông thường, đó là trong lớp Sản phẩm Tôi cho phép nó tham chiếu trực tiếp tới đối tượng Danh mục chứa nó. Như vậy thì đứng tại danh mục nào cũng có thể lấy được toàn bộ danh sách sản phẩm của nó, và đứng tại một sản phẩm bất kỳ nào cũng biết được nó thuộc danh mục nào.
– Bạn xem cấu trúc chương trình:
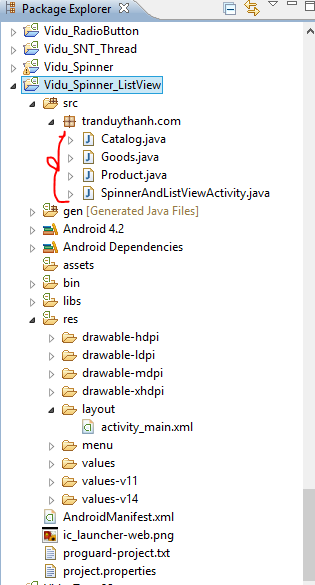 – Ở trên bạn thấy có 3 class: Goods, Product, Catalog: Product và Catalog sẽ kế thừa từ Goods, Goods sẽ có Id và Name. Sản phẩm và danh mục cũng phải có Id và Name nên nó kế thừa từ Goods là đều hợp lý.
– Bạn xem mô hình lớp:
 -Bạn xem cấu trúc XML cho phần giao diện (activity_main.xml):
[code language=”xml”]
<LinearLayout xmlns:android="http://schemas.android.com/apk/res/android"
xmlns:tools="http://schemas.android.com/tools"
android:id="@+id/LinearLayout1"
android:layout_width="match_parent"
android:layout_height="match_parent"
android:orientation="vertical"
tools:context=".MainActivity" >
<TextView
android:id="@+id/textView1"
android:layout_width="match_parent"
android:layout_height="wrap_content"
android:background="#008000"
android:gravity="center"
android:text="Quản lý sản phẩm"
android:textColor="#FFFFFF"
android:textSize="20sp" />
<TableLayout
android:layout_width="match_parent"
android:layout_height="wrap_content"
android:stretchColumns="*"
>
<TableRow
android:id="@+id/tableRow1"
android:layout_width="wrap_content"
android:layout_height="wrap_content" >
<TextView
android:id="@+id/textView2"
android:layout_width="wrap_content"
android:layout_height="wrap_content"
android:text="Danh mục:" />
<Spinner
android:id="@+id/spDanhmuc"
android:layout_width="wrap_content"
android:layout_height="wrap_content" />
</TableRow>
<TableRow
android:id="@+id/tableRow2"
android:layout_width="wrap_content"
android:layout_height="wrap_content" >
<TextView
android:id="@+id/textView3"
android:layout_width="wrap_content"
android:layout_height="wrap_content"
android:text="Mã Sp:" />
<EditText
android:id="@+id/editId"
android:layout_width="wrap_content"
android:layout_height="wrap_content"
android:ems="10" >
<requestFocus />
</EditText>
</TableRow>
<TableRow
android:id="@+id/tableRow3"
android:layout_width="wrap_content"
android:layout_height="wrap_content" >
<TextView
android:id="@+id/textView4"
android:layout_width="wrap_content"
android:layout_height="wrap_content"
android:text="Tên Sp:" />
<EditText
android:id="@+id/editName"
android:layout_width="wrap_content"
android:layout_height="wrap_content"
android:ems="10" />
</TableRow>
<TableRow
android:id="@+id/tableRow4"
android:layout_width="wrap_content"
android:layout_height="wrap_content" >
<Button
android:id="@+id/btnInput"
android:layout_width="wrap_content"
android:layout_height="wrap_content"
android:layout_column="1"
android:text="Nhập SP" />
</TableRow>
</TableLayout>
<TextView
android:id="@+id/textView5"
android:layout_width="match_parent"
android:layout_height="wrap_content"
android:background="#008000"
android:gravity="center"
android:text="Danh sách sản phẩm theo danh mục"
android:textColor="#FFFFFF"
android:textSize="15sp" />
<ListView
android:id="@+id/lvsanpham"
android:layout_width="match_parent"
android:layout_height="wrap_content" >
</ListView>
</LinearLayout>
[/code]
– Tương tự như các bài tập trước, chúng ta phải đặt id cho các control. Bài tập này bạn tự nhìn vào để xem Tôi đặt Id như thế nào, Tôi không nhắc lại nữa.
– Chúng ta lần lượt xem nội dung coding của các class trong phần xử lý nghiệp vụ:
– 1) Class Goods:
[code language=”java”]
package tranduythanh.com;
/**
* Class này là class cha của Product và Catalog
* vì Product và Catalog đều có Id và Name
* nên Tôi tạo class này để sử dụng lại code
* @author drthanh
*
*/
public class Goods {
//Id để lưu mã
//Name để lưu tên
private String id;
private String name;
public String getid() {
return id;
}
public void setid(String id) {
this.id = id;
}
public String getName() {
return name;
}
public void setName(String name) {
this.name = name;
}
public Goods(String id, String name) {
super();
this.id = id;
this.name = name;
}
public Goods() {
super();
}
public String toString() {
return this.id+" – "+this.name;
}
}
[/code]
– 2 – class Product:
[code language=”java”]
package tranduythanh.com;
/**
* Class này để lưu thông tin sản phẩm
* nó kế thừ từ Goods để lấy mã và tên
* Tôi cho nó tham chiếu tới Catalog
* để nó có thể biết được nó thuộc danh mục nào
* @author drthanh
*
*/
public class Product extends Goods{
//Lấy tham chiếu để lập trình cho lẹ
private Catalog Dmuc;
public Catalog getDmuc() {
return Dmuc;
}
public void setDmuc(Catalog dmuc) {
Dmuc = dmuc;
}
public Product(String ma, String name, Catalog dmuc) {
super(ma, name);
Dmuc = dmuc;
}
public Product(String ma, String name) {
super(ma, name);
}
public Product() {
super();
}
}
[/code]
– 3 – class Catalog:
[code language=”java”]
package tranduythanh.com;
import java.util.ArrayList;
/**
* Class dùng để lưu trữ thông tin danh mục
* và danh sách các sản phẩm thuộc danh mục
* @author drthanh
*
*/
public class Catalog extends Goods {
private ArrayList<Product>listSp=null;
public Catalog(String ma, String name) {
super(ma, name);
this.listSp=new ArrayList<Product>();
}
public Catalog() {
super();
this.listSp=new ArrayList<Product>();
}
/**
* kiểm tra sản phẩm đã tồn tại trong danh mục hay chưa
* @param p
* @return true nếu tồn tại
*/
public boolean isDuplicate(Product p)
{
for(Product p1: listSp)
{
if(p1.getid().trim().equalsIgnoreCase(p.getid().trim()))
return true;
}
return false;
}
/**
* thêm 1 sản phẩm vào danh mục
* thêm thành công =true
* @param p
* @return
*/
public boolean addProduct(Product p)
{
boolean isDup=isDuplicate(p);
if(!isDup)
{
p.setDmuc(this);
return listSp.add(p);
}
return !isDup;
}
public ArrayList<Product>getListProduct()
{
return this.listSp;
}
public int size()
{
return listSp.size();
}
public Product get(int i)
{
return listSp.get(i);
}
}
[/code]
– 4 – class SpinnerAndListViewActivity – xử lý nghiệp vụ trong Activity:
[code language=”java”]
package tranduythanh.com;
import java.util.ArrayList;
import android.os.Bundle;
import android.app.Activity;
import android.view.View;
import android.view.View.OnClickListener;
import android.widget.AdapterView;
import android.widget.AdapterView.OnItemSelectedListener;
import android.widget.ArrayAdapter;
import android.widget.Button;
import android.widget.EditText;
import android.widget.ListView;
import android.widget.Spinner;
public class SpinnerAndListViewActivity extends Activity {
Spinner spinDm;
EditText editma,editten;
Button btnNhap;
ListView lvSp;
//cặp đối tượng dùng cho Spinner
ArrayList<Catalog> arraySpinner=new ArrayList<Catalog>();
ArrayAdapter<Catalog>adapterSpinner=null;
//Cặp đối tượng dùng cho ListView
ArrayList<Product>arrayListview=new ArrayList<Product>();
ArrayAdapter<Product>adapterListview=null;
@Override
protected void onCreate(Bundle savedInstanceState) {
super.onCreate(savedInstanceState);
setContentView(R.layout.activity_main);
getWidgetsControl();
fakeDataCatalog();
addEventsForFormWidgets();
}
/**
* Hàm lấy các control theo Id
*/
private void getWidgetsControl()
{
spinDm=(Spinner) findViewById(R.id.spDanhmuc);
editma=(EditText) findViewById(R.id.editId);
editten=(EditText) findViewById(R.id.editName);
btnNhap=(Button) findViewById(R.id.btnInput);
lvSp=(ListView) findViewById(R.id.lvsanpham);
//Cấu hình cho Spinner
adapterSpinner=new ArrayAdapter<Catalog>(this,
android.R.layout.simple_spinner_item,
arraySpinner);
adapterSpinner.setDropDownViewResource
(android.R.layout.simple_spinner_dropdown_item);
spinDm.setAdapter(adapterSpinner);
//Cấu hình cho ListView
adapterListview=new ArrayAdapter<Product>(this,
android.R.layout.simple_list_item_1,
arrayListview);
lvSp.setAdapter(adapterListview);
}
/***
* Hàm giả dữ liệu, tạo 3 danh mục mặc định cho Spinner
*/
private void fakeDataCatalog()
{
Catalog cat1=new Catalog("1", "SamSung");
Catalog cat2=new Catalog("2", "Iphone");
Catalog cat3=new Catalog("3", "IPad");
arraySpinner.add(cat1);
arraySpinner.add(cat2);
arraySpinner.add(cat3);
adapterSpinner.notifyDataSetChanged();
}
/**
* Hàm gán sự kiện cho Button và Spinner
*/
private void addEventsForFormWidgets()
{
btnNhap.setOnClickListener(new OnClickListener() {
@Override
public void onClick(View arg0) {
addProductForCatalog();
}
});
spinDm.setOnItemSelectedListener(new OnItemSelectedListener() {
@Override
public void onItemSelected(AdapterView<?> arg0, View arg1,
int arg2, long arg3) {
//mỗi lần chọn danh mục trong Spinner thì cập nhập ListView
loadListProductByCatalog(arraySpinner.get(arg2));
}
@Override
public void onNothingSelected(AdapterView<?> arg0) {
// TODO Auto-generated method stub
}
});
}
/**
* Hàm thêm một sản phẩm vào cho danh mục được chọn trong Spinner
*/
private void addProductForCatalog()
{
Product p=new Product();
p.setid(editma.getText()+"");
p.setName(editten.getText()+"");
Catalog c= (Catalog) spinDm.getSelectedItem();
c.addProduct(p);
//Mỗi lần thêm xong thì cập nhập lại ListView
loadListProductByCatalog(c);
}
/**
* Lọc danh sách sản phẩm theo danh mục và update lại ListView
* @param c
*/
private void loadListProductByCatalog(Catalog c)
{
//xóa danh sách cũ
arrayListview.clear();
//lấy danh sách mới từ Catalog chọn trong Spinner
arrayListview.addAll(c.getListProduct());
//cập nhật lại ListView
adapterListview.notifyDataSetChanged();
}
}
[/code]
– Tôi đã giải thích ở ngay bên trong mã lệnh, bạn có thể đọc và ráng hiểu coding Tôi viết bên trên.
– Bạn có thể tải code mẫu đầy đủ ở đây: http://www.mediafire.com/?i4lev5ek8944kop
– Bài tập tiếp theo bạn sẽ học AutoCompleteTextview và MultiAutoCompleteTextview. 2 control này bản chất cũng giống như EditText nhưng nó hỗ trợ người sử dụng nhập dữ liệu được nhanh hơn, làm cho ứng dụng trở lên User Friendly hơn, bạn hãy chú ý theo dõi.
– Chúc các bạn thành công.
Thầy ơi em chưa hiểu ý nghĩa chỗ nà,thầy giải thích giúp em với:
for (Sanpham p1:listSp)
vòng lặp for đấy để duyệt qua tất cả các sản phẩm trong list.
nó như là foreach ý
những bài giảng thật dễ hiểu. thank thầy rất nhiều
Rất bổ ích, cám ơn thầy và mong thầy có nhiều bài giảng hay nữa
cám ơn thầy bài viết rất hay
Reblogged this on caotrang1505.
thầy ơi cho em hỏi , cái dòng lệnh super(ma,name) nghĩa là gì ??
super(ma,name) trả về hàm khởi tạo cho lớp cha.
không biết nói như vậy có đúng ko nhỉ.
Bài giảng rất chi tiết. Cảm ơn tác giả.
(Ngay cả dân nghiệp dư như em mà xem cũng dễ dàng)
Thầy ơi, sao cái phương thức toString trên lớp Goods nó ảnh hưởng đến cách hiển thị trên Spinner, mặc dù em ko thấy trong MainActivity gọi toString, phải chăng khi đổ mảng đối tượng vào Spinner thì nó đều tự toString để hiển thị lên?
toString sẽ tự động được gọi khi ta đưa đối tượng lên giao diện
cảm ơn Thầy!
bá đạo cho bài viết, chuẩn 😀
cho em hỏi từ khóa “super” trong class Goods có tác dụng gì thế? vì nó có kế thừa class khác đâu
public Goods(String id, String name) {
super();
this.id = id;
this.name = name;
}
public Goods() {
super();
}
public String toString() {
return this.id+” – “+this.name;
}
mình cũng ko hiểu giống như bạn. hám super()
super –> gọi constructor của lớp cha.
Có bạn sẽ thắc mắc là lớp cha đâu ra vì Goods không extends từ đâu cả???
=> Lớp cha của của Goods là lớp Object nhé. Vì trình biên dịch tự hiểu nên ko cần extends Object
Các bạn có thể viết class Goods extends Object {} cũng đúng
Các bài giảng rất chi tiết, dể hiểu. Cám ơn Thầy nhiều lắm.
thầy cho em hỏi, em muốn áp dụng bài Custom ListView để xóa Product. nhưng sau khi xóa xong, em add thêm product mới chương trình lại add vào tất cả các item vừa đị xóa.
bạn nên xóa item của ArrayList trong class Catalog thông qua hàm getlistProduct() chứ đừng xóa item của ArrayList trong class chính SpinnerAndListViewActivity
thầy cho em hỏi cái đoạn này tra về boolean ,sao trong if nó tra vê array.add(p) thầy ?
public boolean addProduct(Product p) {
boolean test = testSame(p);
if (!test) {
p.setCatalog(this);
return array.add(p);
}
return !test;
}
à em hiểu rồi hhee
khó hiểu thầy ơi
rất hay và cũng rất khó :'(
Em cảm ơn thầy rất nhiều!
bạn nào cho mình hỏi
if(!isDup) có nghĩa là gì thế
bạn nào cho mình hỏi
if(!isDup) có nghĩa là gì thế
if(!isDup) = nếu khác/không duplicate
Của em bị Stop lại ạ 🙁
public String toString() {
return this.id+”- “+this.name;
}
//cho em hỏi hàm này chậm như thế nào ạ??
//em cảm ơn
Mọi người ơi..trong class Catalog không cần dùng mấy hàm này vẫn chạy bình thường..nếu như vậy mấy hàm này có chức năng gì trong bài vậy ạ? em cảm ơn
/* public Catalog() {
super();
listSp=new ArrayList();
}
/**
* kiểm tra sản phẩm đã tồn tại trong danh mục hay chưa
* @param p
* @return true nếu tồn tại
*/
/* public boolean isDanhmuc(Product p)
{
for(Product p1: listSp)
{
if(p1.getid().trim().equalsIgnoreCase(p.getid().trim())) {
return true;
}
}
return false;
}
/**
* thêm 1 sản phẩm vào danh mục
* thêm thành công =true
* @param p
* @return
*/
/* public boolean addProduct(Product p)
{
// boolean isDup=isDanhmuc(p);
//if(!isDup)
//{
p.setDmuc(this);
return listSp.add(p);
}
return !isDup;
} */
/*
public int size()
{
return listSp.size();
}
*/