Topic này Tôi muốn hướng dẫn các bạn cách sử dụng ListView Trong WPF và cách Binding dữ liệu vào ListView
Vẫn sử dụng database mẫu là Petshop
http://www.mediafire.com/?19pyp63h5gzc49x, các bạn load về và Attach PetShop.mdf, chú ý là Tôi sử dụng SQL Server 2008
Trong phần này, các bạn sẽ tìm hiểu 6 cách thức sử dụng ListView trong WPF, lần lượt từ dễ tới khó.
Vì không có nhiều thời gian nên Tôi cũng không có giải thích chi tiết từng dòng lệnh như các Topic khác và lại nó cũng không khó khăn lắm, trong phần Binding dữ liệu lên ListView ( khi bấm vào nút lệnh 5, và 6 ) các bạn phải chú ý tên Cột trong bảng dữ liệu để đưa nó chính xác vào control lúc Binding. Nếu không hiểu phần nào thì các bạn Comment trực tiếp vào Topic này hoặc Email cho Tôi, Tôi sẽ trả lời trong thời gian sớm nhất có thể.
Đây là giao diện chính :
Tương ứng với từng nút lệnh là cách thức sử dụng ListView
Ở đây các bạn cũng sử dụng LINQ to SQL để sử dụng 2 bảng Product và Categories:
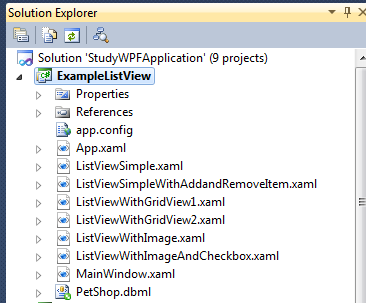
Còn đây là cấu trúc Tập tin và thư mục của Project:
Từ MainWindow.xaml, ta sẽ gọi các cửa sổ khác ứng với chức năng mà ta đã chọn
Các Bạn Bắt đầu đầu quan sát Tôi viết lệnh cho từng chức năng:
0) Cửa sổ MainWindow:
Phần XAML:
| <Window x:Class=”ExampleListView.MainWindow”xmlns=”http://schemas.microsoft.com/winfx/2006/xaml/presentation”
xmlns:x=”http://schemas.microsoft.com/winfx/2006/xaml” Title=”Demo ListView” Height=”280″ Width=”356″> <Window.Resources> <LinearGradientBrush x:Key=”myButtonBrush”> <GradientStop Color=”Lavender” Offset=”0.0″></GradientStop> <GradientStop Color=”Pink” Offset=”0.5″></GradientStop> <GradientStop Color=”LightGray” Offset=”1.0″></GradientStop> </LinearGradientBrush> </Window.Resources> <GroupBox Header=”Ví dụ về ListView” BorderThickness=”4″ BorderBrush=”Red”> <UniformGrid Rows=”2″ Columns=”3″ Height=”200″ Width=”297″> <Button Content=”Simple” Background=”{DynamicResource ResourceKey=myButtonBrush}” Name=”btnSimple” Click=”btnSimple_Click”></Button> <Button Background=”{DynamicResource ResourceKey=myButtonBrush}” Name=”btnAddAndRemoveItem” Click=”btnAddAndRemoveItem_Click”> <TextBlock>Add and<LineBreak/> Remove Item</TextBlock> </Button> <Button Content=”With Image” Background=”{DynamicResource ResourceKey=myButtonBrush}” Name=”btnWithImage” Click=”btnWithImage_Click”></Button> <Button Background=”{DynamicResource ResourceKey=myButtonBrush}” Name=”btnWithImageAndCheckbox” Click=”btnWithImageAndCheckbox_Click”> <TextBlock>Image and <LineBreak/>Checkbox</TextBlock> </Button> <Button Background=”{DynamicResource ResourceKey=myButtonBrush}” Name=”btnWithGridView” Click=”btnWithGridView_Click”> <TextBlock>With GridView<LineBreak/> Binding Coding</TextBlock> </Button> <Button Background=”{DynamicResource ResourceKey=myButtonBrush}” Name=”btnWithGridViewAndCombobox” Click=”btnWithGridViewAndCombobox_Click”> <TextBlock>With GridView<LineBreak/> Binding XAML</TextBlock> </Button> </UniformGrid> </GroupBox> </Window> |
Phần Code behind:
| using System;using System.Collections.Generic;
using System.Linq; using System.Text; using System.Windows; using System.Windows.Controls; using System.Windows.Data; using System.Windows.Documents; using System.Windows.Input; using System.Windows.Media; using System.Windows.Media.Imaging; using System.Windows.Navigation; using System.Windows.Shapes; namespace ExampleListView { /// <summary> /// Interaction logic for MainWindow.xaml /// </summary> public partial class MainWindow : Window { public MainWindow() { InitializeComponent(); } private void btnSimple_Click(object sender, RoutedEventArgs e) { ListViewSimple mylist = new ListViewSimple(); mylist.Show(); } private void btnAddAndRemoveItem_Click(object sender, RoutedEventArgs e) { ListViewSimpleWithAddandRemoveItem mylist = new ListViewSimpleWithAddandRemoveItem(); mylist.Show(); } private void btnWithImage_Click(object sender, RoutedEventArgs e) { ListViewWithImage mylist = new ListViewWithImage(); mylist.Show(); } private void btnWithImageAndCheckbox_Click(object sender, RoutedEventArgs e) { ListViewWithImageAndCheckbox mylist = new ListViewWithImageAndCheckbox(); mylist.Show(); } private void btnWithGridView_Click(object sender, RoutedEventArgs e) { ListViewWithGridView mylist = new ListViewWithGridView(); mylist.Show(); } private void btnWithGridViewAndCombobox_Click(object sender, RoutedEventArgs e) { ListViewWithGridViewAndCombobox mylist = new ListViewWithGridViewAndCombobox(); mylist.Show(); } } } |
1) Cửa sổ ListViewSimple:
Phần XAML:
| <Window x:Class=”ExampleListView.ListViewSimple”xmlns=”http://schemas.microsoft.com/winfx/2006/xaml/presentation”
xmlns:x=”http://schemas.microsoft.com/winfx/2006/xaml” Title=”ListViewSimple” Height=”300″ Width=”300″ Loaded=”Window_Loaded”> <Grid> </Grid> </Window> |
Phần Code Behind:
| using System;using System.Collections.Generic;
using System.Linq; using System.Text; using System.Windows; using System.Windows.Controls; using System.Windows.Data; using System.Windows.Documents; using System.Windows.Input; using System.Windows.Media; using System.Windows.Media.Imaging; using System.Windows.Shapes; namespace ExampleListView { /// <summary> /// Interaction logic for ListViewSimple.xaml /// </summary> public partial class ListViewSimple : Window { public ListViewSimple() { InitializeComponent(); } private void Window_Loaded(object sender, RoutedEventArgs e) { ListView lv = new ListView(); PetShopDataContext context = new PetShopDataContext(); var datas = from p in context.Products select p.Name; lv.ItemsSource = datas; this.Content = lv; } } } |
2) Cửa sổ ListViewSimpleWithAddandRemoveItem:
Phần XAML:
| <Window x:Class=”ExampleListView.ListViewSimpleWithAddandRemoveItem”xmlns=”http://schemas.microsoft.com/winfx/2006/xaml/presentation”
xmlns:x=”http://schemas.microsoft.com/winfx/2006/xaml” Title=”ListViewSimpleWithAddandRemoveItem” Height=”381″ Width=”300″> <StackPanel> <StackPanel Orientation=”Vertical”> <TextBox Width=”204″ Name=”txtName” Height=”21″ Background=”#FFDBA8A8″ AcceptsReturn=”True”></TextBox> <Button Name=”btnAdd” Click=”btnAdd_Click” Height=”27″ Width=”73″>Thêm</Button> <Button Name=”btnRemove” Click=”btnRemove_Click” Height=”32″ Width=”137″>Xóa Item Đang chọn</Button> <Button Name=”btnRemoveAllSelected” Height=”33″ Width=”173″ Click=”btnRemoveAllSelected_Click”>Xóa Các Item Đang chọn</Button> <Button Name=”btnRemoveAll” Height=”33″ Width=”209″ Click=”btnRemoveAll_Click”>Xóa hết luôn</Button> </StackPanel> <ScrollViewer Height=”200″ VerticalScrollBarVisibility=”Auto”> <ListView Name=”lvProduct” SelectionMode=”Multiple”></ListView> </ScrollViewer> </StackPanel> </Window> |
Phần Code Behind:
| using System;using System.Collections.Generic;
using System.Linq; using System.Text; using System.Windows; using System.Windows.Controls; using System.Windows.Data; using System.Windows.Documents; using System.Windows.Input; using System.Windows.Media; using System.Windows.Media.Imaging; using System.Windows.Shapes; namespace ExampleListView { /// <summary> /// Interaction logic for ListViewSimpleWithAddandRemoveItem.xaml /// </summary> public partial class ListViewSimpleWithAddandRemoveItem : Window { public ListViewSimpleWithAddandRemoveItem() { InitializeComponent(); } private void btnAdd_Click(object sender, RoutedEventArgs e) { lvProduct.Items.Add(txtName.Text); txtName.Clear(); txtName.Focus(); } private void btnRemove_Click(object sender, RoutedEventArgs e) { int nRemove=lvProduct.Items.IndexOf(lvProduct.SelectedItem); lvProduct.Items.RemoveAt(nRemove); //lvProduct.Items.Remove(lvProduct.SelectedItem); } private void btnRemoveAllSelected_Click(object sender, RoutedEventArgs e) { while (lvProduct.SelectedItems.Count > 0) { lvProduct.Items.Remove(lvProduct.SelectedItems[0]); } } private void btnRemoveAll_Click(object sender, RoutedEventArgs e) { lvProduct.Items.Clear(); } } } |
3) Cửa sổ ListViewWithImage:
Phần XAML:
| <Window x:Class=”ExampleListView.ListViewWithImage”xmlns=”http://schemas.microsoft.com/winfx/2006/xaml/presentation”
xmlns:x=”http://schemas.microsoft.com/winfx/2006/xaml” Title=”ListViewWithImage” Height=”560″ Width=”456″> <StackPanel> <UniformGrid Rows=”2″ Columns=”2″> <Label> Nhập Tên</Label> <TextBox Name=”txtName”></TextBox> <Label>Chọn hình ảnh</Label> <StackPanel Orientation=”Horizontal”> <TextBox Width=”150″ Height=”29″ Name=”txtPicture”></TextBox> <Button Name=”btnPicture” Click=”btnPicture_Click”>Chọn hình</Button> </StackPanel> </UniformGrid> <Button Name=”btnAdd” Height=”48″ Width=”225″ Click=”btnAdd_Click”> Thêm</Button> <ScrollViewer VerticalScrollBarVisibility=”Auto” Height=”400″> <ListView Name=”lvProduct”></ListView> </ScrollViewer> </StackPanel> </Window> |
Phần Code Behind:
| using System;using System.Collections.Generic;
using System.Linq; using System.Text; using System.Windows; using System.Windows.Controls; using System.Windows.Data; using System.Windows.Documents; using System.Windows.Input; using System.Windows.Media; using System.Windows.Media.Imaging; using System.Windows.Shapes; namespace ExampleListView { /// <summary> /// Interaction logic for ListViewWithImage.xaml /// </summary> public partial class ListViewWithImage : Window { public ListViewWithImage() { InitializeComponent(); } private void btnPicture_Click(object sender, RoutedEventArgs e) { Microsoft.Win32.OpenFileDialog of = new Microsoft.Win32.OpenFileDialog(); of.Filter = “*.*|*.*”; if (of.ShowDialog() == true) { txtPicture.Text = of.FileName; } } private void btnAdd_Click(object sender, RoutedEventArgs e) { ListViewItem lvit = new ListViewItem(); lvit.Background = new SolidColorBrush(Colors.Wheat); if(lvProduct.Items.Count%2==0) lvit.Background = new SolidColorBrush(Colors.Lavender); lvit.Foreground = new SolidColorBrush(Colors.Red); lvit.FontFamily = new FontFamily(“Verdana”); lvit.FontSize = 15; StackPanel sp = new StackPanel(); sp.Orientation = Orientation.Horizontal; Image img = new Image(); img.Source = new BitmapImage(new Uri(txtPicture.Text)); img.Height = 150; img.Width = 150; img.Stretch = Stretch.Fill; TextBlock txt = new TextBlock(); txt.Text = txtName.Text; sp.Children.Add(img); sp.Children.Add(txt); lvit.Content = sp; lvProduct.Items.Add(lvit); } } } |
4) Cửa sổ ListViewWithImageAndCheckbox:
Phần XAML:
| <Window x:Class=”ExampleListView.ListViewWithImageAndCheckbox”xmlns=”http://schemas.microsoft.com/winfx/2006/xaml/presentation”
xmlns:x=”http://schemas.microsoft.com/winfx/2006/xaml” Title=”ListViewWithImageAndCheckbox” Height=”601″ Width=”512″> <StackPanel> <UniformGrid Rows=”2″ Columns=”2″> <Label>Nhập Tên</Label> <TextBox Name=”txtName”></TextBox> <Label>Chọn hình ảnh</Label> <StackPanel Orientation=”Horizontal”> <TextBox Width=”150″ Height=”29″ Name=”txtPicture”></TextBox> <Button Name=”btnPicture” Click=”btnPicture_Click”>Chọn hình</Button> </StackPanel> </UniformGrid> <Button Name=”btnAdd” Height=”48″ Width=”120″ Click=”btnAdd_Click”>Thêm</Button> <Button Name=”btnShow” Height=”47″ Width=”147″ Click=”btnShow_Click”>Kiểm tra Item Checked</Button> <ScrollViewer VerticalScrollBarVisibility=”Auto” Height=”400″> <ListView Name=”lvProduct”></ListView> </ScrollViewer> </StackPanel> </Window> |
Phần Code Behind:
| using System;using System.Collections.Generic;
using System.Linq; using System.Text; using System.Windows; using System.Windows.Controls; using System.Windows.Data; using System.Windows.Documents; using System.Windows.Input; using System.Windows.Media; using System.Windows.Media.Imaging; using System.Windows.Shapes; namespace ExampleListView { /// <summary> /// Interaction logic for ListViewWithImageAndCheckbox.xaml /// </summary> public partial class ListViewWithImageAndCheckbox : Window { public ListViewWithImageAndCheckbox() { InitializeComponent(); } private void btnPicture_Click(object sender, RoutedEventArgs e) { Microsoft.Win32.OpenFileDialog of = new Microsoft.Win32.OpenFileDialog(); of.Filter = “*.*|*.*”; if (of.ShowDialog() == true) { txtPicture.Text = of.FileName; } } private void btnAdd_Click(object sender, RoutedEventArgs e) { ListViewItem lvit = new ListViewItem(); lvit.Background = new SolidColorBrush(Colors.Wheat); if (lvProduct.Items.Count % 2 == 0) lvit.Background = new SolidColorBrush(Colors.Lavender); lvit.Foreground = new SolidColorBrush(Colors.Red); lvit.FontFamily = new FontFamily(“Verdana”); lvit.FontSize = 15; CheckBox chk = new CheckBox(); StackPanel sp = new StackPanel(); sp.Orientation = Orientation.Horizontal; Image img = new Image(); img.Source = new BitmapImage(new Uri(txtPicture.Text)); img.Height = 50; img.Width = 50; img.Stretch = Stretch.Fill; TextBlock txt = new TextBlock(); txt.Text = txtName.Text; sp.Children.Add(img); sp.Children.Add(txt); chk.Content = sp; lvit.Content = chk; lvProduct.Items.Add(lvit); } private void btnShow_Click(object sender, RoutedEventArgs e) { foreach (ListViewItem item in lvProduct.Items) { CheckBox chk = (CheckBox)item.Content; if (chk.IsChecked==true) { StackPanel st = (StackPanel)chk.Content; TextBlock txt = (TextBlock)st.Children[1]; MessageBox.Show(txt.Text); } } } } } |
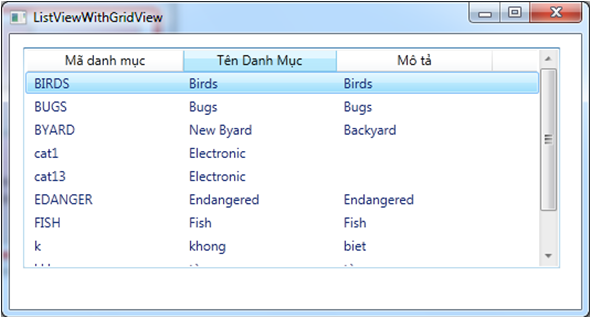
5) Cửa sổ ListViewWithGridView1:
Phần XAML:
| <Window x:Class=”ExampleListView.ListViewWithGridView1″xmlns=”http://schemas.microsoft.com/winfx/2006/xaml/presentation”
xmlns:x=”http://schemas.microsoft.com/winfx/2006/xaml” Title=”ListViewWithGridView” Height=”287″ Width=”533″ Loaded=”Window_Loaded”> <StackPanel> <ScrollViewer VerticalScrollBarVisibility=”Auto” Height=”250″> <ListView Height=”200″ HorizontalAlignment=”Left” Margin=”12,12,0,0″ Name=”listView1″ VerticalAlignment=”Top” Width=”486″> <ListView.View> <GridView> <GridViewColumn Width=”140″ Header=”Mã danh mục” DisplayMemberBinding=”{Binding CategoryId}” /> <GridViewColumn Width=”140″ Header=”Tên Danh Mục” DisplayMemberBinding=”{Binding Name}” /> <GridViewColumn Width=”140″ Header=”Mô tả” DisplayMemberBinding=”{Binding Descn}” /> </GridView> </ListView.View> </ListView> </ScrollViewer> </StackPanel> </Window> |
Phần Code Behind:
| using System;using System.Collections.Generic;
using System.Linq; using System.Text; using System.Windows; using System.Windows.Controls; using System.Windows.Data; using System.Windows.Documents; using System.Windows.Input; using System.Windows.Media; using System.Windows.Media.Imaging; using System.Windows.Shapes; namespace ExampleListView { /// <summary> /// Interaction logic for ListViewWithGridView.xaml /// </summary> public partial class ListViewWithGridView1 : Window { public ListViewWithGridView() { InitializeComponent(); } private void Window_Loaded(object sender, RoutedEventArgs e) { PetShopDataContext context = new PetShopDataContext(); listView1.ItemsSource = context.Categories; } } } |
6) Cửa sổ ListViewWithGridView2:
Phần XAML:
| <Window x:Class=”ExampleListView.ListViewWithGridView2″xmlns=”http://schemas.microsoft.com/winfx/2006/xaml/presentation”
xmlns:x=”http://schemas.microsoft.com/winfx/2006/xaml” Title=”ListViewWithGridView2″ Height=”406″ Width=”532″ DataContext=”{Binding RelativeSource={RelativeSource Self}}” Loaded=”Window_Loaded”> <StackPanel> <ScrollViewer VerticalScrollBarVisibility=”Auto” Height=”250″> <ListView Height=”200″ HorizontalAlignment=”Left” Margin=”12,12,0,0″ Name=”listView1″ VerticalAlignment=”Top” Width=”486″ ItemsSource=”{Binding CateCollection}” > <ListView.View> <GridView> <GridViewColumn Width=”140″ Header=”Mã danh mục” DisplayMemberBinding=”{Binding CategoryId}” /> <GridViewColumn Width=”140″ Header=”Tên Danh Mục” DisplayMemberBinding=”{Binding Name}” /> <GridViewColumn Width=”140″ Header=”Mô tả” DisplayMemberBinding=”{Binding Descn}” /> </GridView> </ListView.View> </ListView> </ScrollViewer> <StackPanel> <UniformGrid Rows=”3″ Columns=”2″> <Label>Mã danh mục</Label> <TextBox Name=”txtId”></TextBox> <Label>Tên danh mục</Label> <TextBox Name=”txtName”></TextBox> <Label>Mô Tả</Label> <TextBox Name=”txtDes”></TextBox> </UniformGrid> <Button Name=”btnAdd” Height=”31″ Width=”175″ Click=”btnAdd_Click”>Thêm Danh mục</Button> </StackPanel> </StackPanel> </Window> |
Phần Code Behind:
| using System;using System.Collections.Generic;
using System.Linq; using System.Text; using System.Windows; using System.Windows.Controls; using System.Windows.Data; using System.Windows.Documents; using System.Windows.Input; using System.Windows.Media; using System.Windows.Media.Imaging; using System.Windows.Shapes; using System.Collections.ObjectModel; namespace ExampleListView { /// <summary> /// Interaction logic for ListViewWithGridViewAndCombobox.xaml /// </summary> public partial class ListViewWithGridView2 : Window { public ListViewWithGridViewAndCombobox() { InitializeComponent(); } ObservableCollection<Category> cateCollection =new ObservableCollection<Category>(); private void Window_Loaded(object sender, RoutedEventArgs e) { PetShopDataContext context = new PetShopDataContext(); foreach (Category c in context.Categories) { cateCollection.Add(c); } } public ObservableCollection<Category> CateCollection { get { return cateCollection; } } private void btnAdd_Click(object sender, RoutedEventArgs e) { Category c = new Category(); c.CategoryId = txtId.Text; c.Name = txtName.Text; c.Descn = txtDes.Text; cateCollection.Add(c); } } } |
Chúc các bạn thành công.
Source code mẫu đầy đủ: http://www.mediafire.com/?ab6aazuebsf2po2


link death rùi thầy ơi thầy úp lại được không ạ