Bài 2. Tạo dự án với Vertx trong IntelliJ IDEA

bài 1, Tui đã giới thiệu sơ qua về VertX. Bây giờ ta thử tạo 1 Project trong IntelliJ IDEA rồi gọi Vertx cho nó có cảm giác trước nhé.

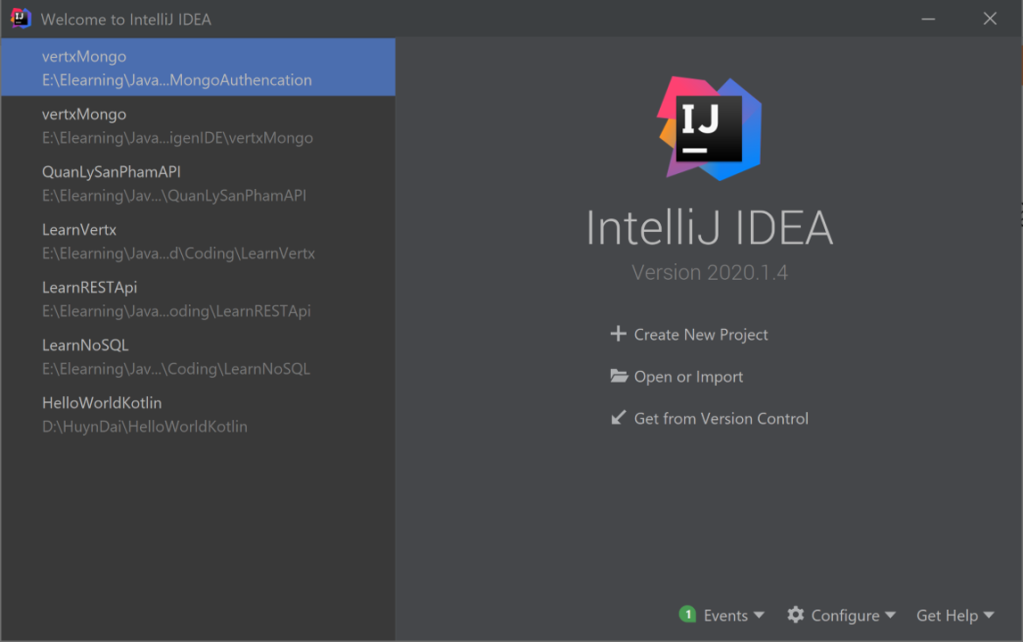
Khởi động “IntelliJ IDEA” (chưa cài đặt thì xem tại đây):

Từ màn hình khởi động của IntelliJ IDEA/ chọn Create New Project

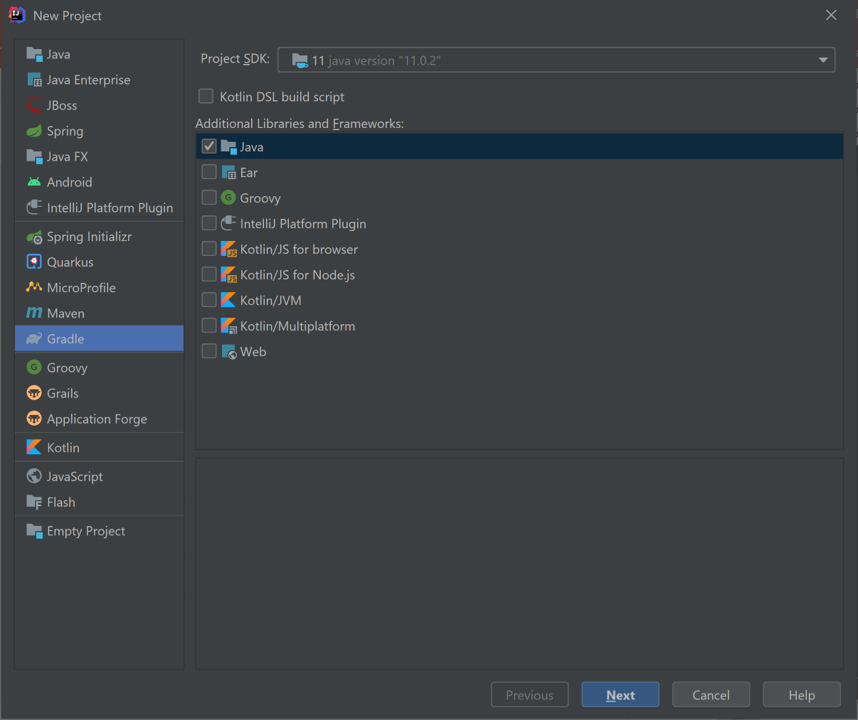
Danh mục bên trái: Chọn Gradle

Bên Trái tick chọn Java

Cấu hình như trên rồi bấm Next.

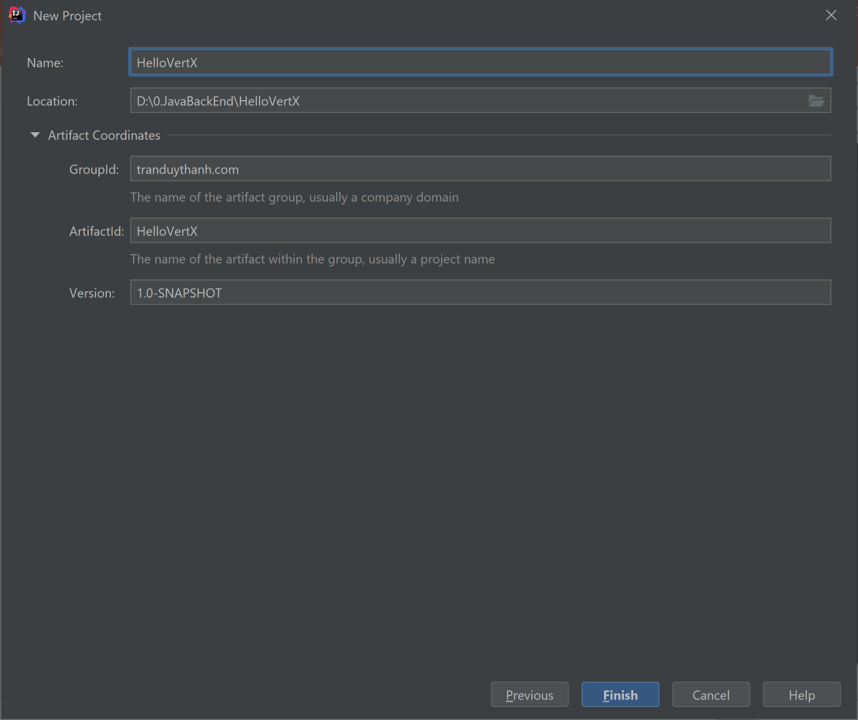
Name: Đặt tên dự án “HelloVertX

Location: chọn nơi lưu trữ dự án

Các mục dưới chọn tương tự

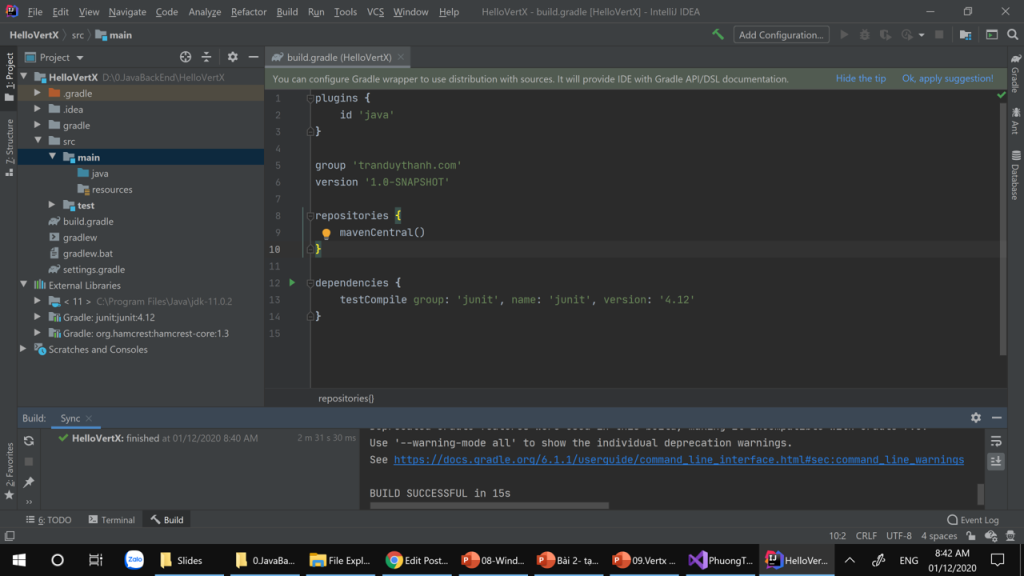
Nhấn Finish để tạo dự án, màn hình của dự án mới sẽ xuất hiện như dưới đây:

Tiếp theo ta khai báo Vert.X cho dự án:

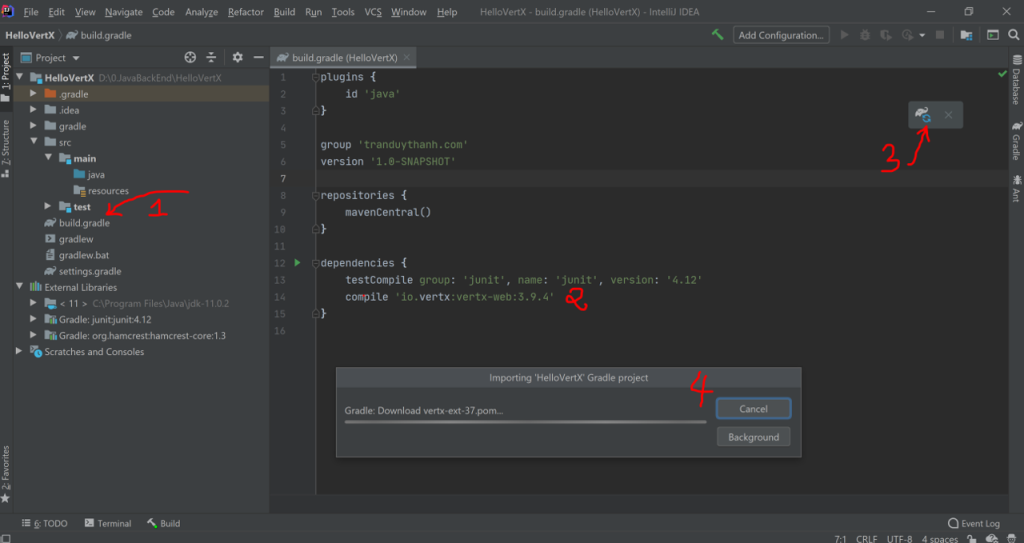
Bước 1: Vào build.gradle

Bước 2: Vào dependencies khai báo bổ sung thêm:

compile 'io.vertx:vertx-web:3.9.4'

hoặc:

implementation 'io.vertx:vertx-web:3.9.4'

Bước 3: Nhấn biểu tượng con Voi để load lại Gradle khi có sự thay đổi

Bước 4: chờ cho phần mềm tải xong Vert.X

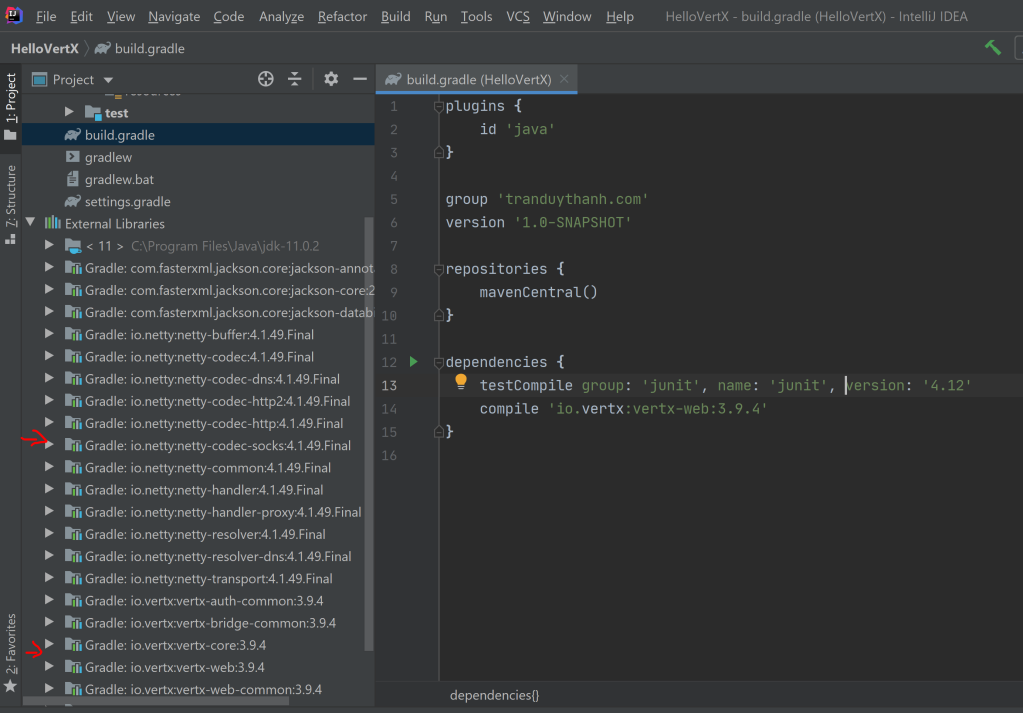
Sau khi tải xong ta thấy 1 nùi thư viện được đưa vào như hình dưới đây:

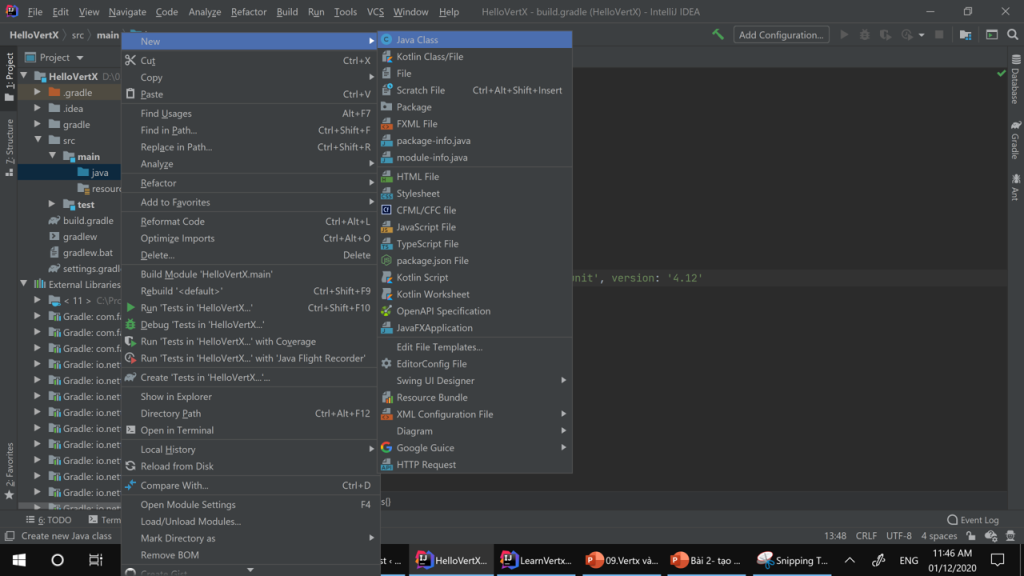
Tiếp theo ta bấm chuột phải vào java/chọn New / chọn Java Class:

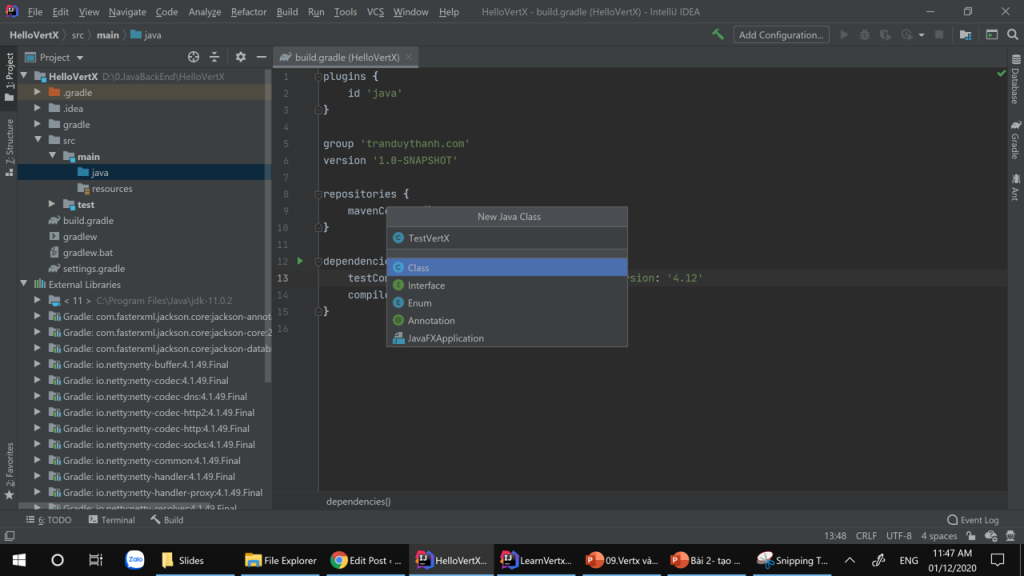
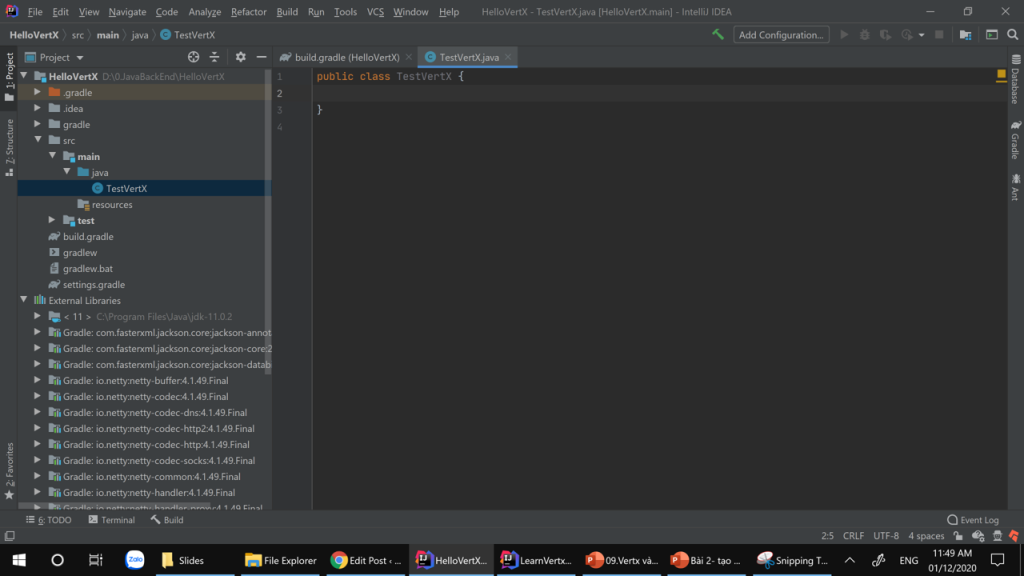
Ta tạo class tên “TestVertX”:

Đặt tên xong, double-click vào Class để tạo Class TestVertX:

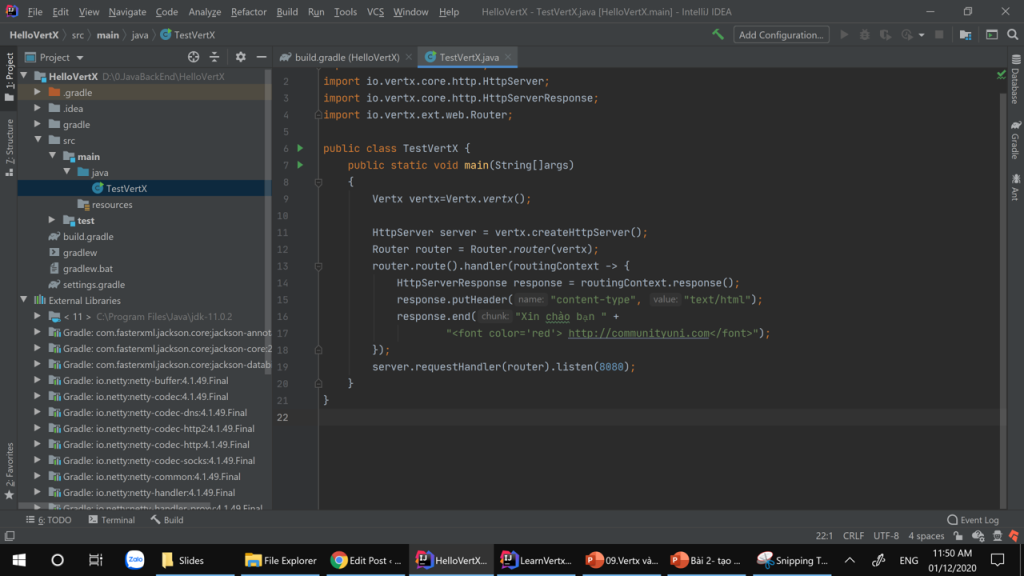
Ta bổ sung hàm main, với các lệnh như dưới đây:

Chi tiết code như dưới đây:

[code language=”java”]
import io.vertx.core.Vertx;
import io.vertx.core.http.HttpServer;
import io.vertx.core.http.HttpServerResponse;
import io.vertx.ext.web.Router;

public class TestVertX {
public static void main(String[]args)
{
Vertx vertx=Vertx.vertx();

HttpServer server = vertx.createHttpServer();
Router router = Router.router(vertx);
router.route().handler(routingContext -> {
HttpServerResponse response = routingContext.response();
response.putHeader(“content-type”, “text/html”);
response.end(“Xin chào bạn ” +
http://communityuni.com“);
});
server.requestHandler(router).listen(8080);
}
}
[/code]

Các mã lệnh trên sẽ build 1 một ứng dụng Web chạy ở port 8080 (chi tiết Tui sẽ trình bày ở các bài sau, bài này chỉ là chạy lên cho nó có cảm giác Vert.X).

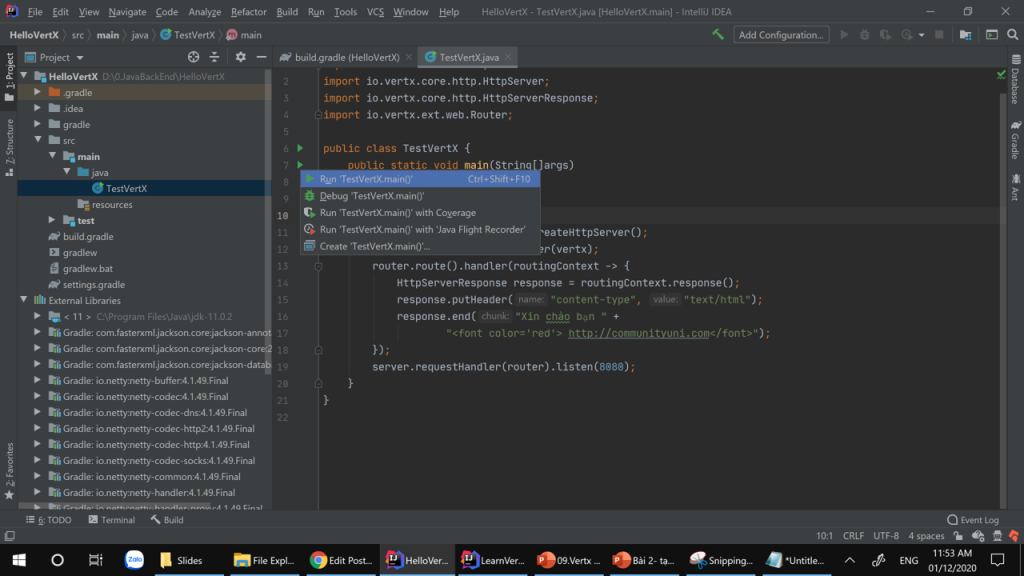
Để chạy ứng dụng từ công cụ ta làm như sau:

Từ Lớp TestVertX.java-> nhìn thấy dòng số 7 có biểu tượng hình tam giác màu xanh–>nhấn biểu tượng này–>chọn Run “TestVertX.main()”:

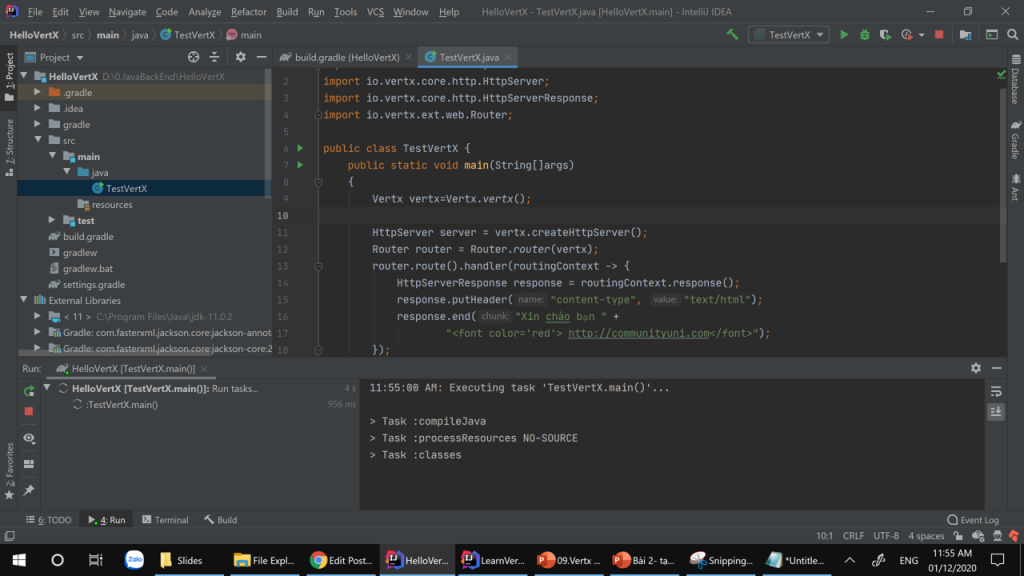
Tình trạng như trên là chương trình đang chạy.

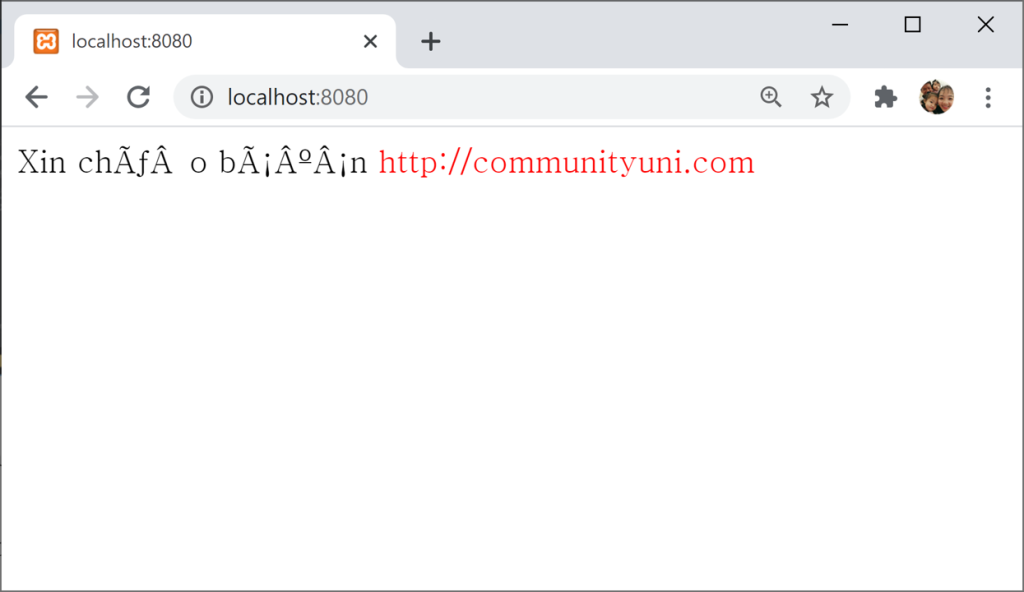
Bây giờ mở trình duyệt lên, ta gõ: http://localhost:8080/ . Được kết quả:

Ta được kết quả như trên là đã thành công khi chạy dự án bằng Vert.X.

Coding bài này ở đây: https://www.mediafire.com/file/93tawoepmduth3q/HelloVertX.rar/file

Các bài sau Tui sẽ đi vào chi tiết từng thành phần của Vert.X.

Chúc các bạn thành công.

Bài 1. Giới thiệu Vert.X lập trình Java Backend

Vì nhiều học viên đề nghị Tui làm khóa học về Java Backend, nhưng vì chưa sắp xếp được thời gian để quay chi tiết Video khóa học về nó. Nên Tui tạo chuỗi các bài blog về Java Back End, trong này Tui sẽ trình bày một ít lý thuyết và các kỹ thuật để giúp các bạn có thể làm hoàn chỉnh Java Backend bằng VERT.X cho một hệ thống nào đó. Sắp tới Tui sẽ quay khóa học về nó nếu sắp xếp được thời gian.

Trước tiên Ta đi vào một số lý thuyết cơ bản (mấy cái này có đầy rẫy trên mạng, Tui chỉ tóm lược lại cho các bạn đỡ chết đuối vì quá nhiều thông tin).

1. BackEnd là gì?

Back End dùng để xử lý mọi logic nghiệp vụ phức tạp ở ẩn ở phía sau, giúp cho hệ thống hoạt động trơn tru. Dữ liệu của người dùng, thuật toán phân ích … đều nằm ở back-end.

2. Tại sao phải lập trình BackEnd?

  • BackEnd viết phía Server nên thường được hệ thống máy chủ xử lý nhanh chóng mà mạnh mẽ
  • Chia sẻ nguồn tài nguyên máy chủ
  • Giúp chạy đa nền tảng khi triển khai Web API

3. Ngôn ngữ, cơ sở dữ liệu, cộng cụ để viết BackEnd

  • Hiện nay rất nhiều ngôn ngữ lập trình có khả năng giúp chúng ta xử lý phía Back End. Chúng tạo nên một hệ Sinh thái Backend vô cùng phong phú.
  • Việc nắm được các kỹ thuật xử lý BackEnd theo các ngôn ngữ khác nhau giúp chúng ta dễ dàng thích ứng trong công việc cũng như có nhiều lựa chọn trong quá trình xử lý kỹ thuật phức tạp.
  • Tui liệt kê 7 ngôn ngữ có thể giúp chúng ta triển khai BackEnd dễ dàng:
    • PHP
    • Python
    • Ruby
    • C#
    • Node.js
    • Java
    • RxJava
  • Các cơ sở dữ liệu quan hệ cần quan tâm: Oracle, Microsoft SQL Server, Mysql…
  • Các cơ sở dữ liệu NoSQL: MongoDB, PostgreSql, ReThinkDB, Neo4j…

Cơ sở dư liệu trong chuỗi các Blog này sẽ sử dụng MongoDB, một trong những NoSQL phổ biến nhất hiện nay.

Ta lập trình Java BackEnd nên bước đầu tiên bạn phải có kiến thức về OOP Java trước, có thể tham khảo khóa học bằng Video này ở đây

Có rất nhiều công cụ lập trình Java BackEnd, chẳng hạn như:

  • Eclipse
  • Netbeans
  • IntelliJ IDEA (để lập trình Java BackEnd)
  • PostMan (để test API)

Blog sẽ sử dụng IntelliJ IDEA .

Như vậy mọi người cần cài các phần mềm sau vào máy:

  1. Java JDK
  2. IntelliJ IDEA
  3. PostMan
  4. MongoDB

Chuỗi Blog sẽ tập trung vào Vert.X java để viết Backend, các bước cài đặt người học tự làm.

4. Vert.x framework

4. 1. Giới thiệu Vertx

Vert.X là một Framework, hỗ trợ rất nhiều ngôn ngữ như Java, RxJava, Kotlin, Javascript, Groovy, Ruby, Ceylon, Scala. Có rất nhiều loại component trên Vert.X ta có thể sử dụng và tùy biến dễ dàng.

Mọi tài nguyên học liệu, mã nguồn, thư viện, hướng dẫn sử dụng đều nằm trên trang https://vertx.io

Vert.X – Ta có thể dễ dàng dựng và dùng bất kì component hoặc library nào mà ta muốn.

Vert.X chạy trên JVM – Java Virtual Machine – cho phép bạn test code và scale tức thì. Nên cần cài đặt JDK trước.

Vert.X hỗ trợ rất nhiều chủng loại lập trình khác nhau, trong đó hỗ trợ lập trình Back End viết các API cực tốt. Còn hỗ trợ mở rộng xây dựng các ứng dụng MicroService.

Vert.X – được rất nhiều hãng công nghệ lớn trên thế giới đang sử dụng:

4. 2. Cách nhúng thư viện Vertx vào ứng dụng

Để nhúng Vert.X ta thêm dòng lệnh sau vào nhóm depencies trong tập tin build.gradle:

dependencies {
compile ‘io.vertx:vertx-web:3.9.4’
}

3.9.4 là phiên bản mới nhất tính tới ngày 30/11/2020

Ta có thể xem chi tiết tại đây: https://vertx.io/docs/vertx-web/java/

Bài học sau Tui sẽ trình bày chi tiết cách thức sử dụng Vert.X trong IntelliJ IDEA.

Chúc các bạn thành công

Tự động tạo các thành phần cho Class bằng Lombok trong Eclipse

Java cũng như các ngôn ngữ lập trình hướng đối tượng khác, lúc khai báo Lớp và các thuộc tính ta cần viết các getter/setter, constructor… những thao tác này hầu như là nhàm chán và phải bắt buộc làm.

có rất nhiều thư viện giúp chúng ta giảm thiểu công đoạn này. Lombok là một trong các công cụ đó, nó giúp ta tự động tạo ra các thành phần của class. Với Lombok, ta chỉ cần khai báo cấu trúc dữ liệu của 1 Class, còn mọi thứ trong class đã có Lombok lo.

Dưới đây là các bước hướng dẫn chi tiết quá trình sử dụng Lombok trong Eclipse, chỉ cần cài plug-in lần đầu, các lần sau các bạn sẽ sử dụng nó một cách nhanh chóng.

Đầu tiên các bạn vào menu Help/chọn Install New Software… như hình dưới đây:

Màn hình Install hiển thị ra như dưới đây:

ta nhập https://projectlombok.org/p2 để cài đặt. nhìn thấy nút “Add”–>bấm vào nó:

Name: nhập https://projectlombok.org/p2

Location: nhập https://projectlombok.org/p2

Sau đó nhấn Add, các bạn chờ cho Eclipse tải xong Plug-in thì thấy thư viện Lombok như hình bên dưới:

Nhấn Next để tiếp tục, Tiếp tục chờ Eclipse cài đặt, sẽ thấy thông báo như dưới đây:

Nhấn Next để tiếp tục:

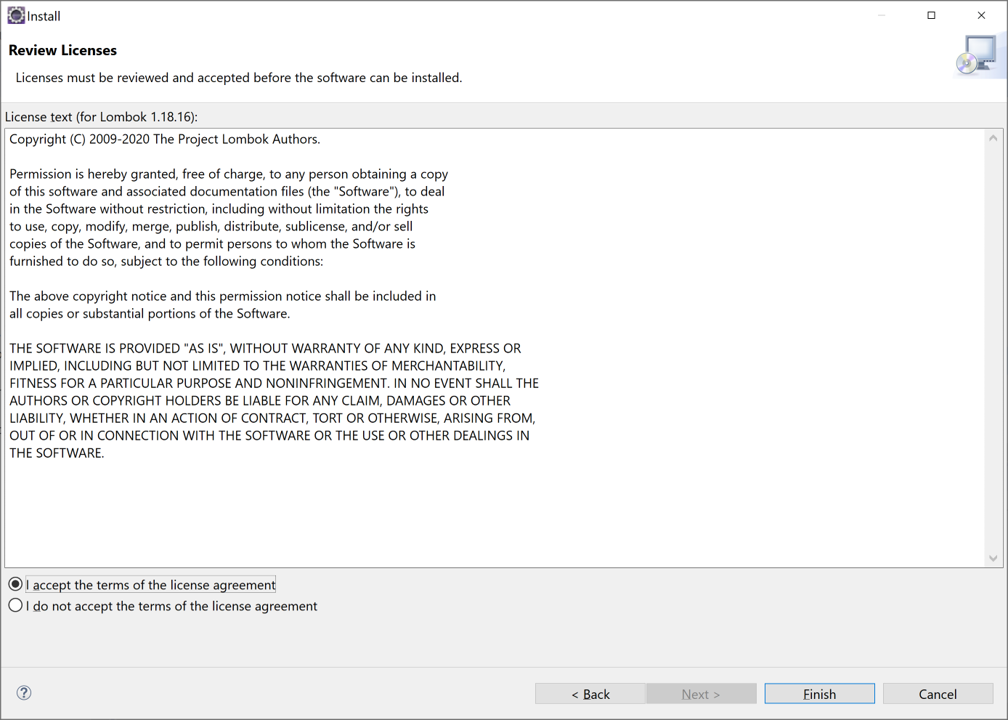
Chọn “I accept the terms of the license agreement” rồi bấm Finish

Nếu Eclipse có hỏi um xùm gì đó thì cứ bấm “Accept selected”

rồi khởi động lại Eclipse như chương trình yêu cầu:

Bước tiếp theo ta tải thư viện “lombok.jar” về để tham chiếu vào phần mềm, làm như sau:

Vào https://projectlombok.org/download tải bản mới nhất:

tải trực tiếp: https://projectlombok.org/downloads/lombok.jar

Lưu thư viện này vào máy tính để xíu nữa tham chiếu vào dự án.

Tạo dự án tên “TestLombok” như hình dưới đây:

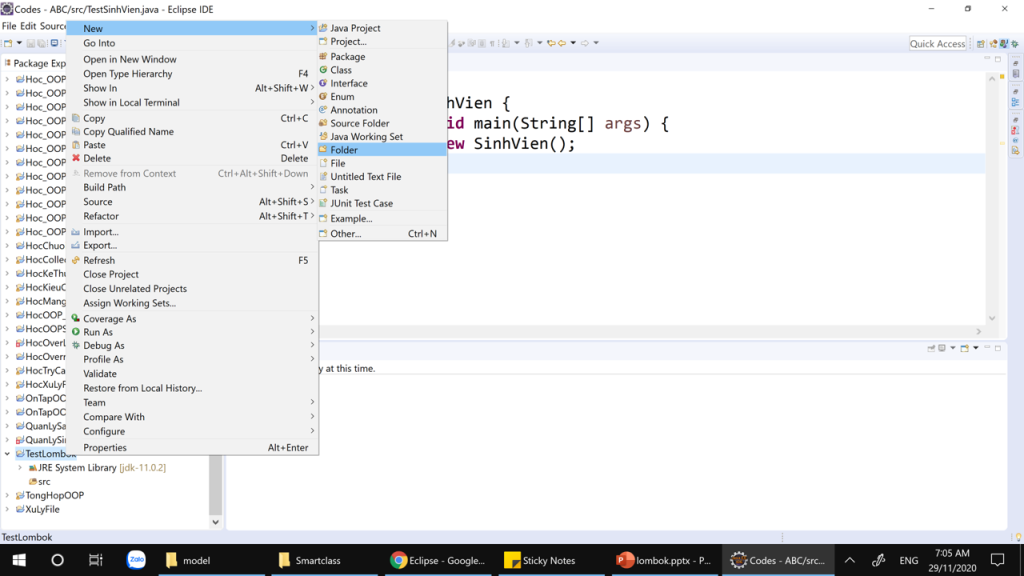
Với mỗi dự án, bạn muốn dùng Lombok thì cứ Tạo một thư mục tên là “libs” rồi sao chép thư viện đó vào libs (bấm chuột phải vào Project / chọn New / chọn Folder):

Rồi đặt thư mục là libs:

Mục Folder name: đặt tên là libs

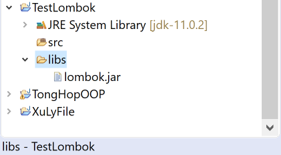
Sau đó nhấn Finish, ta thấy thư mục libs sẽ được đưa vào dự án như hình dưới đây:

Bây giờ các bạn copy thư viện “lombok.jar” đã tải vào thư mục libs (chỉ cần control+C và control+V thôi).

Tiếp theo ta cần tham chiếu lombok.jar và dự án:

Bấm chuột phải vào lombok.jar/ chọn Build Path / chọn Add to Build Path

Sau khi bấm xong thì thư viện sẽ được tham chiếu vào như sau, nó có rất nhiều lớp:

Tiếp theo tạo package và class cho dự án, ví dụ dưới này Tui có tạo:

Package name: tranduythanh.com.model

class name: SanPham

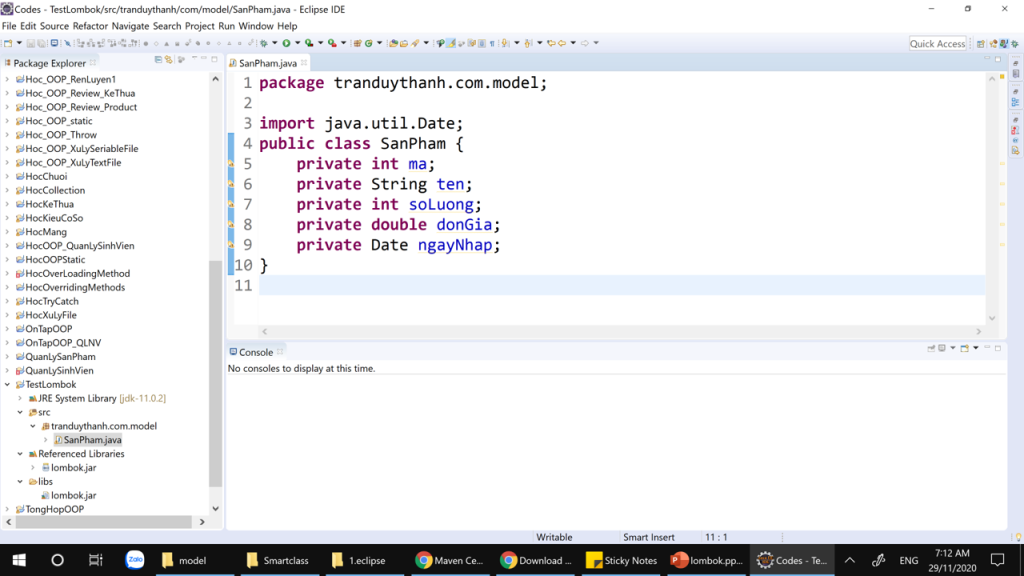
Ở trên các bạn thấy, lớp SanPham có 5 thuộc tính: ma, ten,soLuong,donGia, và ngayNhap:

[code language=”java”]
package tranduythanh.com.model;

import java.util.Date;
public class SanPham {
private int ma;
private String ten;
private int soLuong;
private double donGia;
private Date ngayNhap;
}

[/code]

thông thường, các bạn phải làm đầy đủ getter/setter, constructor…

với Lombok thì mọi thứ đơn giản, ta chỉ cần khai báo các notation cho nó là đủ:

Ở trên ta thấy:

@AllArgsConstructor tự động tạo ra constructor đầy đủ đổi số.

@NoArgsConstructor tự động tạo ra constructor mặc định

@Data tự động tạo mọi getter/setter cho class

[code language=”java”]
package tranduythanh.com.model;
import java.util.Date;
import lombok.AllArgsConstructor;
import lombok.Builder;
import lombok.Data;
import lombok.NoArgsConstructor;
@AllArgsConstructor
@NoArgsConstructor
@Data
@Builder
public class SanPham {
private int ma;
private String ten;
private int soLuong;
private double donGia;
private Date ngayNhap;
}

[/code]

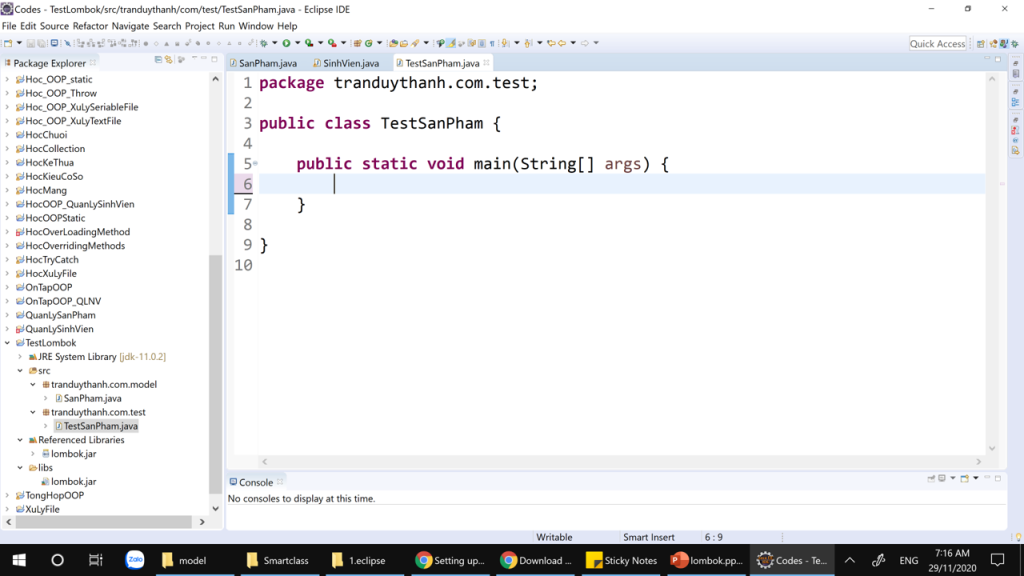
Tiếp theo, ta thử test lớp SanPham bằng cách tạo ra lớp TestSanPham:

Tạo package tên “tranduythanh.com.test”, trong này tạo 1 lớp tên là “TestSanPham”.

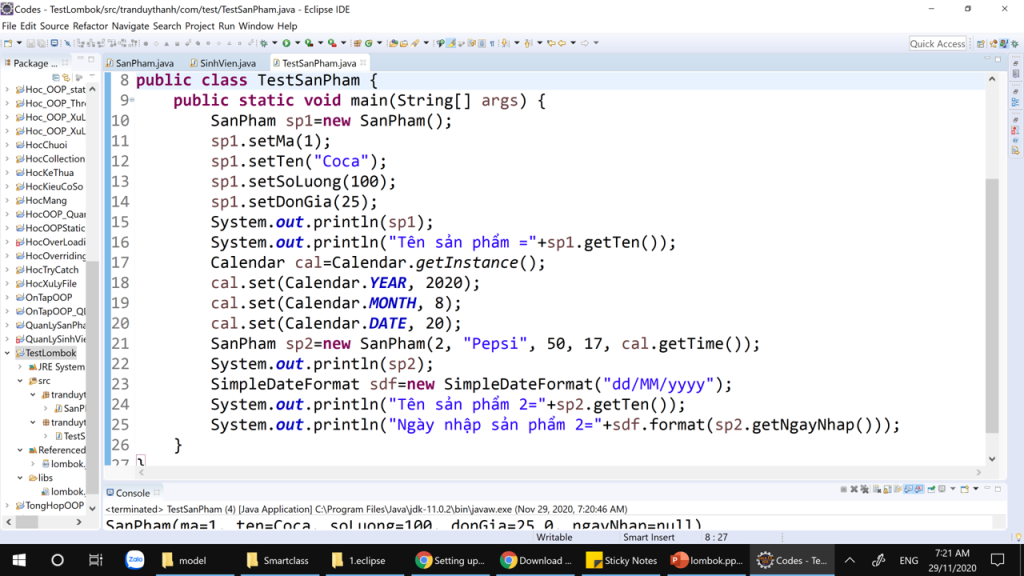
Code mẫu chi tiết như sau:

Rõ ràng ta Sản phẩm tự động có các getter/setter, constructor… tiết kiệm rất nhiều thời gian cho Lập trình viên khi phải viết dự án với rất nhiều lớp.

code chi tiết:

[code language=”java”]
package tranduythanh.com.test;

import java.text.SimpleDateFormat;
import java.util.Calendar;

import tranduythanh.com.model.SanPham;

public class TestSanPham {
public static void main(String[] args) {
SanPham sp1=new SanPham();
sp1.setMa(1);
sp1.setTen(“Coca”);
sp1.setSoLuong(100);
sp1.setDonGia(25);
System.out.println(sp1);
System.out.println(“Tên sản phẩm =”+sp1.getTen());
Calendar cal=Calendar.getInstance();
cal.set(Calendar.YEAR, 2020);
cal.set(Calendar.MONTH, 8);
cal.set(Calendar.DATE, 20);
SanPham sp2=new SanPham(2, “Pepsi”, 50, 17, cal.getTime());
System.out.println(sp2);
SimpleDateFormat sdf=new SimpleDateFormat(“dd/MM/yyyy”);
System.out.println(“Tên sản phẩm 2=”+sp2.getTen());
System.out.println(“Ngày nhập sản phẩm 2=”+sdf.format(sp2.getNgayNhap()));
}
}

[/code]

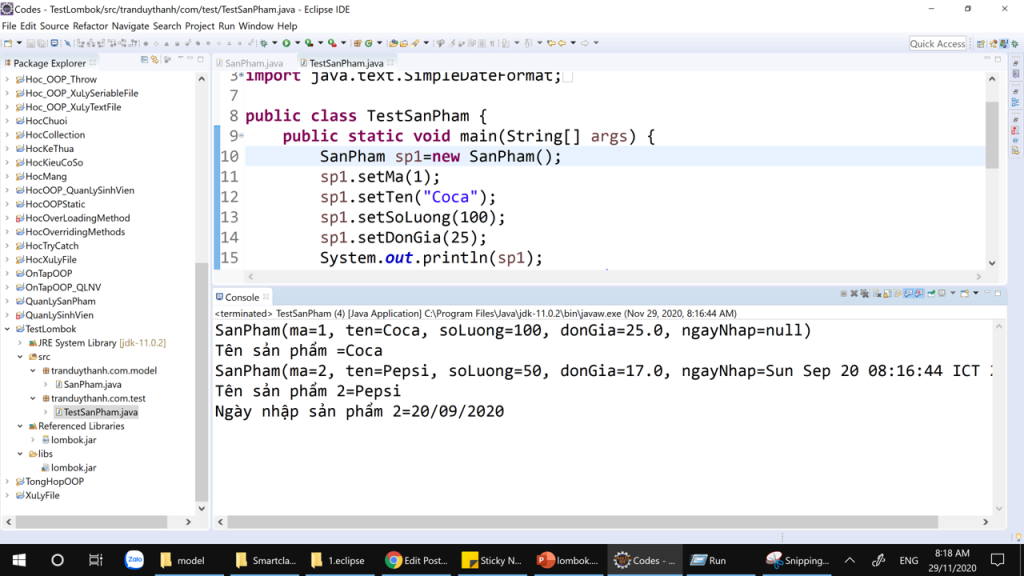
kết quả khi chạy chương trình:

Như vậy Tui đã hướng dẫn xong các bạn cách dùng thư viện Lombok trong Eclipse để tự động tạo ra các thành phần cho Class nhằm tránh nhàm chán và tiết kiệm thời gian.

Các bạn chỉ cần cài plug-in 1 lần là xong, các lần sau chỉ cần tham chiếu tới thư viện lombok.jar nếu muốn dự án đó làm theo lombok.

Dưới đây là coding mẫu của bài: http://www.mediafire.com/file/oiehylc20gxp4li/TestLombok.rar/file

Chúc bạn thành công.

Bài 1- BackEnd là gì? Tại sao phải lập trình BackEnd

Theo thông tin từ Marketing thì hiện nay nhu cầu tuyển dụng lập trình viên BackEnd đang ngày càng mở rộng, đặc biệt là Java BackEnd, kết hợp với Microservice.

Vì vậy Tui làm chuỗi các bài hướng dẫn trên blog này cũng như sẽ sớm ra mắt khóa học bằng Video trên http://communityuni.com, hi vọng sẽ tạo thêm được nhiều cơ hội việc làm cho người học.

Chuỗi các bài hướng dẫn này sẽ tập trung vào:

  • Giới thiệu về lập trình BackEnd, JavaBackEnd và những JDK, công cụ hỗ trợ
  • Thư viện Vertx, một trong những thư viện được đánh giá là tốt nhất hiện này để triển khai BackEnd, đặc biệt hỗ trợ đắc lực cho MicroService
  • NoSQL và hệ sinh thái, trong đó tập trung chính yếu vào MongoDB
  • Cách triển khai JavaBackEnd với NoSQL
  • Cải tiến JavaBackEnd với Annotation
  • Authentication và Authorisation trong Java BackEnd
  • Cách Deploy JavaBackend

Các kiến thức trên sẽ lần lượt được làm rõ ở các bài viết tiếp theo.

Còn ở bài này Tui sẽ trình bày BackEnd, lý do vì sao lập trình BackEnd mà cụ thể là JavaBackEnd, cũng như hệ sinh thái của BackEnd, các thư viện và công cụ cần cài đặt

Các lý thuyết về BackEnd các bạn có thể tìm hiểu trên mạng, các Website đã giải thích khá chi tiết và về cơ bản thì nó giống nhau (vì là cơ sở lý thuyết). Tui tóm tắt lại như sau (Biết rồi thì khỏi đọc, đỡ hư chuột):

1. BackEnd là gì?

Back End dùng để xử lý mọi logic nghiệp vụ phức tạp ở ẩn ở phía sau, giúp cho hệ thống hoạt động hiệu quả hơn. Dữ liệu của người dùng, thuật toán phân tích … đều nằm ở back-end.

2.Tại sao phải lập trình BackEnd?

Có rất nhiều lý do khác nhau, mỗi một Công ty, tộc trưởng trong nhóm phát triển dự án sẽ có như lý do riêng để giải thích cho vấn đề này. Tuy nhiên đại khái nó như sau:

  • BackEnd viết phía Server nên thường được hệ thống máy chủ xử lý nhanh chóng và mạnh mẽ, client chỉ cần nhận kết quả
  • Chia sẻ nguồn tài nguyên máy chủ nên tiết kiệm được nhiều thứ
  • Giúp chạy đa nền tảng khi triển khai Web API: Viết 1 lần thôi nhưng có thể sử dụng trên bất kỳ nền tảng nào. Ví dụ khi ta viết Web API xong thì ta có thể dùng Mobile, Desktop, Web hay bất kỳ 1 nền tảng nào khác đều có thể sử dụng chung cái Web API đó.

3.Hệ sinh thái BackEnd

Hiện nay rất nhiều ngôn ngữ lập trình có khả năng giúp chúng ta xử lý phía Back End. Chúng tạo nên một hệ Sinh thái Backend vô cùng phong phú.
Việc nắm được các kỹ thuật xử lý BackEnd theo các ngôn ngữ khác nhau giúp chúng ta dễ dàng thích ứng trong công việc cũng như có nhiều lựa chọn trong quá trình xử lý kỹ thuật phức tạp.
Tui liệt kê 7 ngôn ngữ có thể giúp chúng ta triển khai BackEnd dễ dàng:

  • PHP
  • Python
  • Ruby
  • C#
  • Node.js
  • Java
  • RxJava

Cùng với nó là các Cơ sở dữ liệu đi kèm, chẳng hạn như:

  • Các cơ sở dữ liệu quan hệ cần quan tâm: Oracle, Microsoft SQL Server, Mysql…
  • Các cơ sở dữ liệu NoSQL: MongoDB, PostgreSql, ReThinkDB, Neo4j…

Các bài học Tui sẽ sử dụng MongoDB, một trong những NoSQL phổ biến nhất hiện nay.

4. Thư viện và công cụ lập trình cần cài đặt để làm việc với JavaBackEnd

Ta lập trình Java BackEnd nên bước đầu tiên bắt buộc phải cài đặt JDK , sẽ được hướng dẫn chi tiết ở bài học sau

Có rất nhiều công cụ lập trình Java BackEnd, chẳng hạn như:

  • Eclipse
  • Netbeans
  • IntelliJ IDEA

Các bài học sẽ sử dụng IntelliJ IDEA và được hướng dẫn chi tiết ở các bài học sau

Như vậy ta cần cài: JDK + IntelliJ IDEA

Hẹn gặp lại các bạn ở các bài hướng dẫn tiếp theo nhé!

Chúc các bạn thành công

Ví dụ đa tiến trình trong Java – thuật toán sắp xếp

Trong ví dụ này Tôi muốn demo cho các bạn các thuật toán sắp xếp bằng ngôn ngữ Java

Nếu như không dùng đa tiến trình thì giao diện của bạn sẽ bị “Đơ”

Source code: http://www.mediafire.com/?oee8cznyolwng5g

File Jar để chạy: http://www.mediafire.com/?03sxkpwa40icrp3

Ở đây Tôi đã làm xong thuật toán Bubble Sort, các thuật toán khác Tôi viết sẵn hàm, các bạn bắt chước Tôi làm để sửa lại cho đúng thuật toán sắp xếp khác.

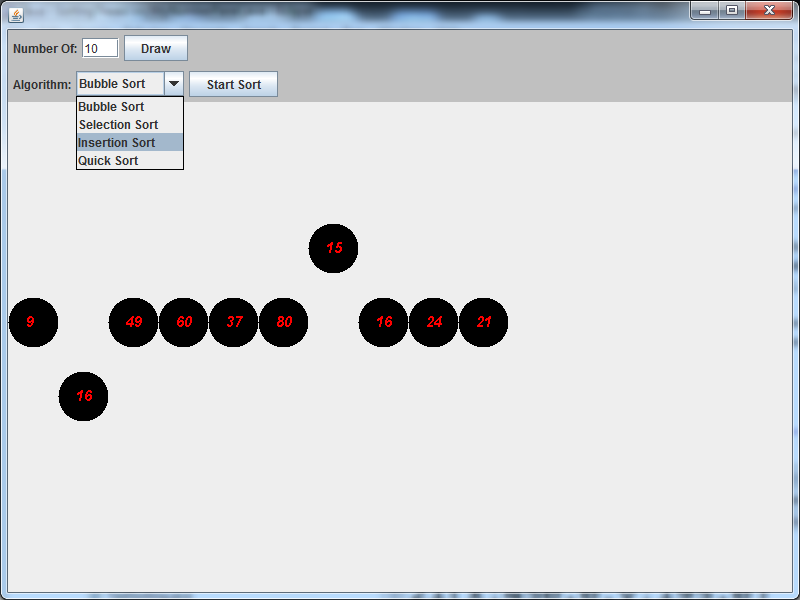
Hình minh hoạ thuật toán đang tiến hành :

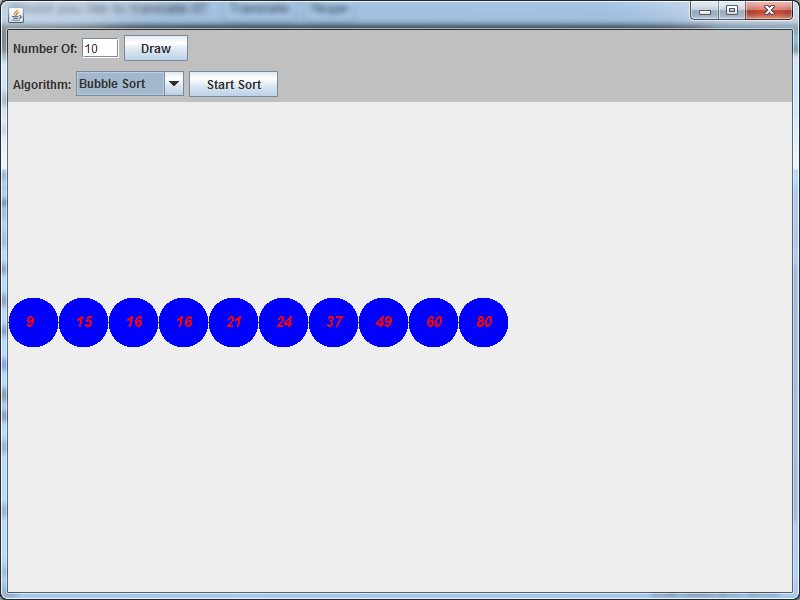
Hình minh họa đã hoàn thành thuật toán:

Các thuật toán Tôi đang để trống là:

public synchronized void doSelectionSort()
{

}
public synchronized void doInsertionSort()
{

}
public synchronized void doQuickSort()
{

}

Các bạn viết code trong này, việc xử lý khi người sử dụng chọn kiểu sắp xếp Tôi đã làm trong MyNumberFrame

Good luck!

Phần 1 – Kết nối các hệ cơ sở dữ liệu bằng Java

Yêu cầu: Các bạn phải rành về lập trình hướng đối tượng, tính kế thừa, tính đa hình thì mới hiểu được các phần hướng dẫn bên dưới. Tức là bạn phải khá về lập trình Java 1, nếu đọc mà vẫn không hiểu thì có thể email tới tranduythanh@hui.edu.vn Tôi sẽ giải thích những phần các bạn chưa hiểu.

———————————————————————————————————————

Phần 1: Kết nối Microsoft Access bằng Java

Phần 2: Kết nối Microsoft SQL Server 2008 bằng Java

Phần 3: Kết nối MySql bằng Java

———————————————————————————————————————

Topic này Tôi muốn hướng dẫn các bạn cách kết nối tới nhiều cơ sở dữ liệu khác nhau bằng ngôn ngữ lập trình Java

Các bạn sẽ được học đầy đủ trong môn Lập Trình Java 2.

Trong Topic này Tôi đặt ra một trường hợp là: Chúng ta có nhiều hệ cơ sở dữ liệu khác nhau ví dụ như Ms Access, SqlServer, MySQL… làm cách nào để viết các class Java thành các thư viện để kết nối tới các hệ cơ sở dữ liệu này?

Có rất nhiều mô hình, ở đây Tôi chỉ nhấn mạnh vào cách viết class để kết nối tới các CSDL mà thôi (không đề cập mô hình nào cả). Khi bạn rành rồi thì có thể sử dụng ORM hibernate để coding hoặc bất cứ loại nào. Nhưng trước tiên các bạn phải biết những kỹ thuật căn bản trước đã.

——————————————————————————————————————————————

Phần 1: Kết nối Microsoft Access bằng Java

Nếu bạn sử dụng MS Access 2003(đuôi là .mdb) thì không phải cài đặt thêm Driver

Còn nếu như bạn sử dụng MS Access 2007, 20120 (đuôi là .accdb)  thì các bạn cài đặt thêm:

2007 Office System Driver: Data Connectivity Components :

http://www.microsoft.com/download/en/details.aspx?id=23734

Những class nào bạn cần quan tâm trong phần 1 này:

Trong Connector bạn quan tâm tới classs CMsAccessConnector

Trong UI bạn quan tâm tới ConnectMsAccessUI

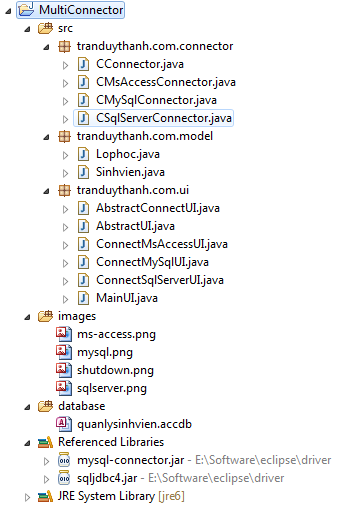
Tôi có chụp cấu trúc thư mục Project này như sau:

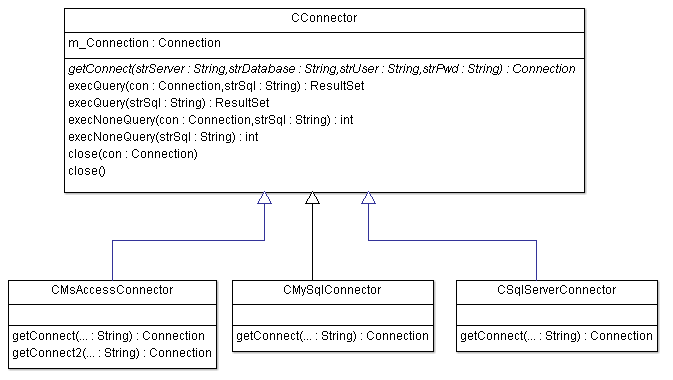
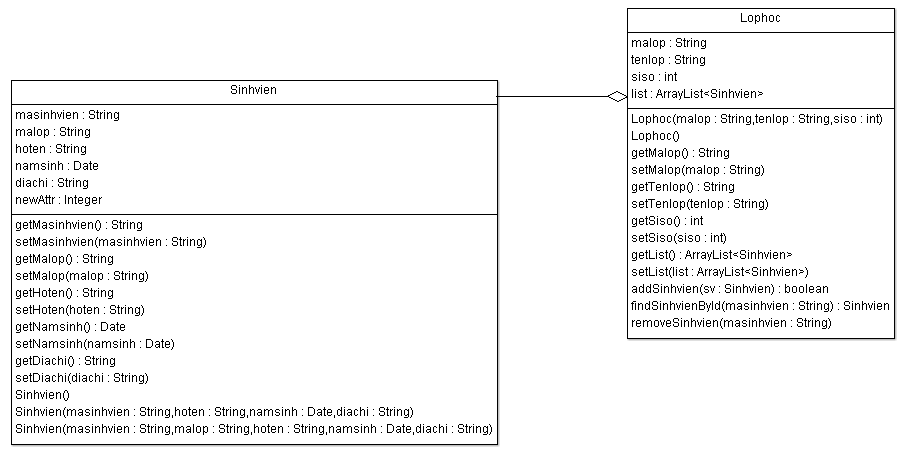
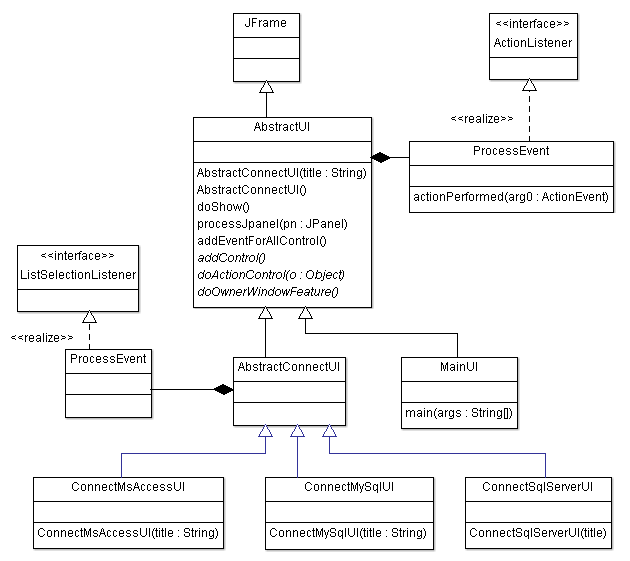
Mô hình class: Ở đây tôi tách làm 3 package để cho dễ quản lý.

– package Connector bao gồm các class kết nối và tương tác với các hệ cơ sở dữ liệu

– package Model dùng để mô hình hóa bảng dữ liệu thành các đối tượng.

– package UI cung cấp giao diện cho người sử dụng để tương tác với dữ liệu.

Mô hình của package Connector:

Mô hình của package Model:

Mô hình của package UI:

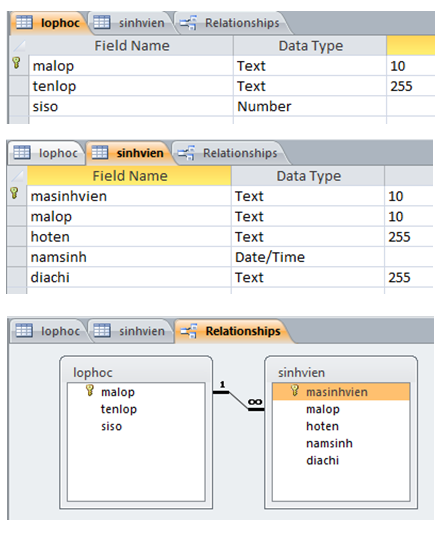
Cơ sở dữ liệu mẫu, ở đây Tôi làm 2 bảng lophoc và sinhvien ( các bạn chú ý là kiểu dữ liệu và kích thước là tương ứng cho cả 3 hệ cơ sở dữ liệu: Ms access, MySql và SqlServer…). Tôi muốn Demo sơ sơ chương trình quản lý sinh viên – lớp học.

Các bạn xem mô tả:

Trên đây là Tôi dùng Ms Access. Tương tự bạn làm cho Mysql, SqlServer. Có thể các bạn chưa thao tác với MySql bao giờ, Tôi sẽ hướng dẫn cách bạn download, cài đặt, cấu hình, sử dụng MySql Workbrench ở phần kế tiếp. Hiện tại bây giờ các bạn theo dõi Tôi hướng dẫn MS Access

Giao diện chính của chương trình như sau:

Tương ứng với mỗi nút lệnh “MS Access”, “SQL Server” , “My Sql” thì chương trình của chúng ta sẽ kết nối tới các hệ cơ sở dữ liệu đó.

Tôi sẽ giải thích chi tiết cách kết nối, cách tương tác với dữ liệu: Lấy dữ liệu, thêm, sửa, xóa, xử lý thống kê (in ấn dữ liệu)

Topic tương đối dài nên Tôi sẽ chia ra từng loại hệ cơ sở dữ liệu khác nhau. Chỉ cần các bạn cố gắng hiểu được cách tương tác tới 1 hệ cơ sở dữ liệu nào đó thì các hệ khác cũng tương tự, vấn đề chỉ nằm ở Logic lập trình của các bạn.

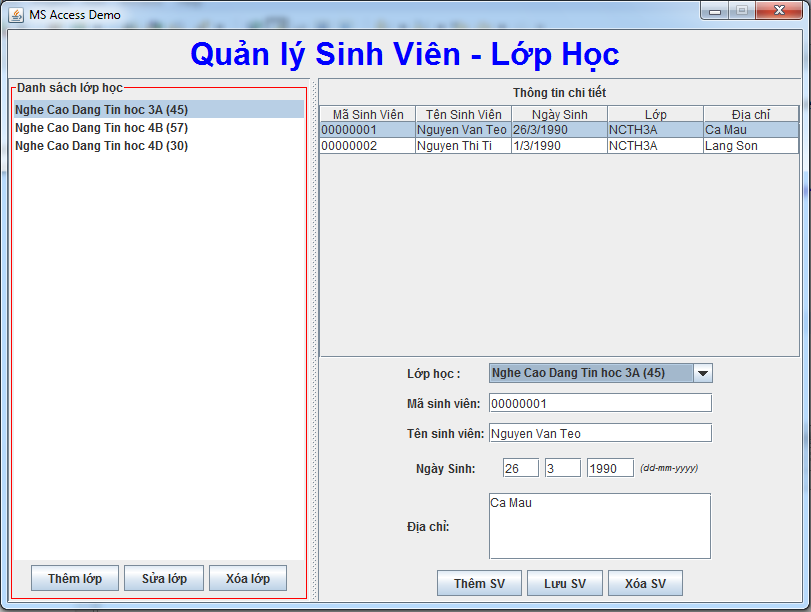
– Trong trường hợp kết nối tới MS Access, khi các bạn click chuột vào “Ms Access” thì sẽ có giao diện bên dưới:

Các bạn chú ý rằng. Giao diện trên được làm hết trong class AbstractConnectUI, Kể cả việc hiển thị dữ liệu.

Các bạn nhớ rằng. Vì chúng ta đang cố gắng tương tác với các hệ cơ sở dữ liệu khác nhau, tức là chỉ khác nhau ở nơi lưu trữ dữ liệu, còn giao diện và các nghiệp vụ thì hoàn toàn giống nhau.

Như vậy ứng với Ms Access thì trong ConnectMsAccessUI, bạn sẽ gọi các class Connector liên quan tới Ms Accesss.

hoặc là ứng với MySQL thì trong ConnectMySqlUI, bạn sẽ gọi các clsss Connector liên quan tới MySQL

Tức là chúng ta chỉ làm GIAO DIỆN 1 lần mà thôi, tùy vào việc sử dụng hệ cơ sở dữ liệu nào mà ta thay đổi hành vi khác nhau.

Các bạn phải rành về lập trình hướng đối tượng, tính kế thừa, tính đa hình thì việc tiếp thu sẽ nhanh chóng hơn.

Tôi đính kèm coding dưới này để các bạn tham khảo, Nếu như các bạn hiểu cách lấy dữ liệu từ Access rồi thì MySQl, SQL Server cũng sẽ tương tự. Topic này chỉ dừng lại ở việc truy suất dữ liệu. Trong ConnectMySqlUI, ConnectSqlServerUI Tôi cũng đã viết sẵn Code để truy vấn tới dữ liệu. Nếu bạn nào khá về Logic thì cố gắng đưa lên giao diện như trong Access, vài ngày nữa Tôi sẽ làm tiếp phần: Thêm, Sửa, Xóa, In ấn.

=================================================================

Package: tranduythanh.com.connector

=================================================================

class CConnector

package tranduythanh.com.connector;import java.sql.Connection;

import java.sql.ResultSet;

import java.sql.SQLException;

import java.sql.Statement;

public abstract class CConnector

{

protected Connection m_Connection=null;

/**Hàm này dùng để kết nối tới các hệ sở dữ liệu

* Tùy vào từng Hệ CSDL chúng ta coding khác nhaucác lớp kế thừa từ

*/

public abstract Connection getConnect(String strServer,String strDatabase,String strUser,String strPwd);

/** Hàm này dùng để truy vấn dữ liệu,

* Connection con: đối tượng connnection

* String strSql: câu truy vấn

* Trả về ResultSet

*/

public ResultSet execQuery(Connection con,String strSql)

{

ResultSet rs=null;

try

{

Statement st=con.createStatement();

rs =st.executeQuery(strSql);

}

catch(SQLException ex)

{

ex.printStackTrace();

}

return rs;

}

/** Hàm này dùng để truy vấn dữ liệu,

* String strSql: câu truy vấn

* Trả về ResultSet

*/

public ResultSet execQuery(String strSql)

{

ResultSet rs=null;

try

{

Statement st=m_Connection.createStatement();

rs =st.executeQuery(strSql);

}

catch(SQLException ex)

{

ex.printStackTrace();

}

return rs;

}

/** Hàm này dùng cập nhật dữ liệu,

* Connection con: đối tượng connnection

* String strSql: câu truy vấn

* Nếu cập nhật thành công thì kết quả >0

*/

public int execNoneQuery(Connection con,String strSql)

{

int rec=0;

try

{

Statement st=con.createStatement();

rec=st.executeUpdate(strSql);

}

catch(SQLException ex)

{

ex.printStackTrace();

}

return rec;

}

/** Hàm này dùng cập nhật dữ liệu,

* String strSql: câu truy vấn

* Nếu cập nhật thành công thì kết quả >0

*/

public int execNoneQuery(String strSql)

{

int rec=0;

try

{

Statement st=m_Connection.createStatement();

rec=st.executeUpdate(strSql);

}

catch(SQLException ex)

{

ex.printStackTrace();

}

return rec;

}

/** Hàm này dùng đóng kết nối,

* Connection con: đối tượng connnection

*/

public void close(Connection con)

{

try

{

if(con!=null)

con.close();

}

catch(SQLException ex)

{

ex.printStackTrace();

}

}

/** Hàm này dùng đóng kết nối,

*/

public void close()

{

try

{

if(m_Connection!=null)

m_Connection.close();

}

catch(SQLException ex)

{

ex.printStackTrace();

}

}

}

class CMsAccessConnector

package tranduythanh.com.connector;import java.sql.Connection;

import java.sql.DriverManager;

public class CMsAccessConnector extends CConnector

{

/**

* Hàm dùng để kết nối tới MS Access

* strDatabase: tên CSDL

* Trả về Connection

**/

public Connection getConnect(String strServer,String strDatabase,String strUser,String strPwd)

{

try

{

String strConnect=”jdbc:odbc:Driver={Microsoft Access Driver (*.mdb, *.accdb)};DBQ=”+strDatabase;

Class.forName(“sun.jdbc.odbc.JdbcOdbcDriver”);

m_Connection= DriverManager.getConnection(strConnect);

}

catch(Exception e)

{

e.printStackTrace();

}

return m_Connection;

}

}

class CMySqlConnector

package tranduythanh.com.connector;import java.sql.Connection;import java.sql.SQLException;import java.util.Properties;

import com.mysql.jdbc.Driver;

public class CMySqlConnector  extends CConnector

{

/**

* Hàm dùng để kết nối tới MySQL

* strDatabase: tên CSDL

* Trả về Connection

**/

public Connection getConnect(String strServer,String strDatabase,String strUser,String strPwd)

{

String strConnect=”jdbc:mysql://”+strServer+”/”+strDatabase;

Properties pro=new Properties();

pro.put(“user”, strUser);

pro.put(“password”, strPwd);

try

{

com.mysql.jdbc.Driver driver=new Driver();

m_Connection=driver.connect(strConnect, pro);

}

catch(SQLException ex)

{

ex.printStackTrace();

}

return m_Connection;

}

}

class CSqlServerConnector

package tranduythanh.com.connector;import java.sql.Connection;

import java.sql.DriverManager;

import java.sql.SQLException;

public class CSqlServerConnector extends CConnector

{

/**

* Hàm dùng để kết nối tới SQL Server

* strDatabase: tên CSDL

* Trả về Connection

**/

public Connection getConnect(String strServer,String strDatabase,String strUser,String strPwd)

{

try {

Class.forName(“com.microsoft.sqlserver.jdbc.SQLServerDriver”);

String connectionUrl = “jdbc:sqlserver://”+strServer+”;” +

“databaseName=”+strDatabase+”;user=”+strUser+”;password=”+strPwd+”;”;

System.out.println(“Successful”);

m_Connection= DriverManager.getConnection(connectionUrl);

System.out.println(“Successful”);

} catch (SQLException e) {

System.out.println(“SQL Exception: “+ e.toString());

} catch (ClassNotFoundException cE) {

System.out.println(“Class Not Found Exception: “+ cE.toString());

}

return m_Connection;

}

}

=================================================================

Package: tranduythanh.com.model

=================================================================

class Lophoc

package tranduythanh.com.model;import java.util.ArrayList;

public class Lophoc {

private String malop;

private String tenlop;

private int siso;

private ArrayList<Sinhvien> list=new ArrayList<Sinhvien>();

/**

* @return the list

*/

public ArrayList<Sinhvien> getList() {

return list;

}

public boolean addSinhvien(Sinhvien sv)

{

return list.add(sv);

}

public Sinhvien findSinhvienById(String masinhvien)

{

for(Sinhvien s: list)

{

if(s.getMasinhvien().equalsIgnoreCase(masinhvien))

return s;

}

return null;

}

public void removeSinhvien(String masinhvien)

{

Sinhvien sv=findSinhvienById(masinhvien);

list.remove(sv);

}

/**

* @param list the list to set

*/

public void setList(ArrayList<Sinhvien> list) {

this.list = list;

}

public Lophoc(String malop, String tenlop, int siso) {

super();

this.malop = malop;

this.tenlop = tenlop;

this.siso = siso;

}

public Lophoc() {

super();

}

/**

* @return the malop

*/

public String getMalop() {

return malop;

}

/**

* @param malop the malop to set

*/

public void setMalop(String malop) {

this.malop = malop;

}

/**

* @return the tenlop

*/

public String getTenlop() {

return tenlop;

}

/**

* @param tenlop the tenlop to set

*/

public void setTenlop(String tenlop) {

this.tenlop = tenlop;

}

/**

* @return the siso

*/

public int getSiso() {

return siso;

}

/**

* @param siso the siso to set

*/

public void setSiso(int siso) {

this.siso = siso;

}

@Override

public String toString() {

// TODO Auto-generated method stub

return this.tenlop +” (“+this.siso+”)”;

}

}

class Sinhvien

package tranduythanh.com.model;import java.sql.Date;

public class Sinhvien {

private String masinhvien;

private String malop;

private String hoten;

private Date namsinh;

private String diachi;

/**

* @return the masinhvien

*/

public String getMasinhvien() {

return masinhvien;

}

/**

* @param masinhvien the masinhvien to set

*/

public void setMasinhvien(String masinhvien) {

this.masinhvien = masinhvien;

}

/**

* @return the malop

*/

public String getMalop() {

return malop;

}

/**

* @param malop the malop to set

*/

public void setMalop(String malop) {

this.malop = malop;

}

/**

* @return the hoten

*/

public String getHoten() {

return hoten;

}

/**

* @param hoten the hoten to set

*/

public void setHoten(String hoten) {

this.hoten = hoten;

}

/**

* @return the namsinh

*/

public Date getNamsinh() {

return namsinh;

}

/**

* @param namsinh the namsinh to set

*/

public void setNamsinh(Date namsinh) {

this.namsinh = namsinh;

}

/**

* @return the diachi

*/

public String getDiachi() {

return diachi;

}

/**

* @param diachi the diachi to set

*/

public void setDiachi(String diachi) {

this.diachi = diachi;

}

public Sinhvien(String masinhvien, String malop, String hoten,

Date namsinh, String diachi) {

super();

this.masinhvien = masinhvien;

this.malop = malop;

this.hoten = hoten;

this.namsinh = namsinh;

this.diachi = diachi;

}

public Sinhvien() {

super();

}

public Sinhvien(String masinhvien, String hoten, Date namsinh, String diachi) {

super();

this.masinhvien = masinhvien;

this.hoten = hoten;

this.namsinh = namsinh;

this.diachi = diachi;

}

}

=================================================================

Package: tranduythanh.com.ui

=================================================================

class AbstractUI

package tranduythanh.com.ui;importjava.awt.Component;

import java.awt.Container;

import java.awt.event.ActionEvent;

import java.awt.event.ActionListener;

import javax.swing.JButton;

import javax.swing.JFrame;

import javax.swing.JPanel;

public abstract class AbstractUI extends JFrame {

private static final long serialVersionUID = 1L;

public AbstractUI(String title)

{

super(title);

}

public AbstractUI()

{

super(“Default …”);

}

public void doShow()

{

addControl();

addEventForAllControl();

doOwnerWindowFeature();

setVisible(true);

}

private void processJpanel(JPanel pn)

{

for(Component cp : pn.getComponents())

{

if(cp instanceof JButton)

{

((JButton) cp).addActionListener(new ProcessEvent());

}

else if(cp instanceof JPanel)

{

processJpanel((JPanel)cp);

}

}

}

public void addEventForAllControl()

{

Container con=getContentPane();

for(Component cp: con.getComponents())

{

if(cp instanceof JPanel)

{

processJpanel((JPanel)cp);

}

}

}

public abstract void addControl();

public abstract void doActionControl(Object o);

public abstract void doOwnerWindowFeature();

private class ProcessEvent implements ActionListener

{

@Override

public void actionPerformed(ActionEvent arg0) {

doActionControl(arg0.getSource());

}

}

}

class AbstractConnectUI

package tranduythanh.com.ui;importjava.awt.BorderLayout;

import java.awt.Color;

import java.awt.Container;

import java.awt.Dimension;

import java.awt.FlowLayout;

import java.awt.Font;

import java.awt.event.MouseEvent;

import java.awt.event.MouseListener;

import java.util.ArrayList;

import java.util.Vector;

import javax.swing.BorderFactory;

import javax.swing.BoxLayout;

import javax.swing.JButton;

import javax.swing.JComboBox;

import javax.swing.JLabel;

import javax.swing.JList;

import javax.swing.JPanel;

import javax.swing.JScrollPane;

import javax.swing.JSplitPane;

import javax.swing.JTable;

import javax.swing.JTextArea;

import javax.swing.JTextField;

import javax.swing.border.TitledBorder;

import javax.swing.event.ListSelectionEvent;

import javax.swing.event.ListSelectionListener;

import javax.swing.table.DefaultTableModel;

import tranduythanh.com.connector.CConnector;

import tranduythanh.com.model.Lophoc;

import tranduythanh.com.model.Sinhvien;

public abstract class  AbstractConnectUI extends AbstractUI{

/**

*

*/

private static final long serialVersionUID = 1L;

protected static JList lstData;

protected JTable tblData;

protected DefaultTableModel dtmData;

protected JButton btnXoaLop,btnThemLop,btnSuaLop,btnThemSinhvien,btnLuuSinhvien,btnXoaSinhvien;

protected JTextField txtMasinhvien,txtTenSinhvien,txtNgaysinh,txtThangsinh,txtNamsinh;

protected JTextArea txtDiachi;

protected static JComboBox cboDanhsachlop;

protected static ArrayList<Lophoc> listLophoc;

protected static ArrayList<Sinhvien> listSinhvien;

protected static Lophoc lophocSelected;

protected static Sinhvien sinhvienSelected;

protected CConnector m_connector;

public AbstractConnectUI(String title)

{

super(title);

}

public AbstractConnectUI()

{

super(“Default …”);

}

@Override

public void addControl() {

// TODO Auto-generated method stub

JPanel pnBorder=new JPanel();

pnBorder.setLayout(new BorderLayout());

JPanel pnNorth=new JPanel();

JLabel lblTitle=new JLabel(“Quản lý Sinh Viên – Lớp Học”);

Font ftTitle=new Font(“arial”, Font.BOLD, 32);

lblTitle.setFont(ftTitle);

lblTitle.setForeground(Color.BLUE);

pnNorth.add(lblTitle);

pnBorder.add(pnNorth,BorderLayout.NORTH);

JPanel pnListLop=new JPanel();

JPanel pnListSinhvien=new JPanel();

JSplitPane slitPane=new JSplitPane(JSplitPane.HORIZONTAL_SPLIT, pnListLop, pnListSinhvien);

pnBorder.add(slitPane,BorderLayout.CENTER);

pnListLop.setLayout(new BorderLayout());

lstData=new JList();

TitledBorder cateborder=new TitledBorder(BorderFactory.createLineBorder(Color.RED), “Danh sách lớp học”);

pnListLop.setBorder(cateborder);

pnListLop.setPreferredSize(new Dimension(300, 0));

pnListLop.add(lstData,BorderLayout.CENTER);

JPanel pnListLopSouth=new JPanel();

btnThemLop =new JButton(“Thêm lớp”);

pnListLopSouth.add(btnThemLop);

btnSuaLop =new JButton(“Sửa lớp”);

pnListLopSouth.add(btnSuaLop);

btnXoaLop =new JButton(“Xóa lớp”);

pnListLopSouth.add(btnXoaLop);

pnListLop.add(pnListLopSouth,BorderLayout.SOUTH);

pnListSinhvien.setLayout(new BorderLayout());

JPanel pnSinhvienTitle=new JPanel();

JLabel lblSinhvienTitle=new JLabel(“Thông tin chi tiết”);

pnSinhvienTitle.add(lblSinhvienTitle);

pnListSinhvien.add(pnSinhvienTitle,BorderLayout.NORTH);

JPanel pnSinhvienTable=new JPanel();

pnSinhvienTable.setLayout(new BorderLayout());

pnListSinhvien.add(pnSinhvienTable,BorderLayout.CENTER);

dtmData =new DefaultTableModel();

dtmData.addColumn(“Mã Sinh Viên”);

dtmData.addColumn(“Tên Sinh Viên”);

dtmData.addColumn(“Ngày Sinh”);

dtmData.addColumn(“Lớp”);

dtmData.addColumn(“Địa chỉ”);

tblData=new JTable(dtmData);

JScrollPane sctblsinhvien=new JScrollPane(tblData);

pnSinhvienTable.add(sctblsinhvien,BorderLayout.CENTER);

JPanel pnSinhvienDetail=new JPanel();

pnListSinhvien.add(pnSinhvienDetail,BorderLayout.SOUTH);

pnSinhvienDetail.setLayout(new BoxLayout(pnSinhvienDetail, BoxLayout.Y_AXIS ));

JPanel pnLopList=new JPanel();

JLabel lblLopId=new JLabel(“Lớp học :”);

cboDanhsachlop=new JComboBox();

pnLopList.add(lblLopId);

pnLopList.add(cboDanhsachlop);

pnSinhvienDetail.add(pnLopList);

JPanel pnSinhvienId=new JPanel();

JLabel lblSinhvienId=new JLabel(“Mã sinh viên:”);

txtMasinhvien=new JTextField(20);

pnSinhvienId.add(lblSinhvienId);

pnSinhvienId.add(txtMasinhvien);

pnSinhvienDetail.add(pnSinhvienId);

JPanel pnSinhvienName=new JPanel();

JLabel lblSinhvienName=new JLabel(“Tên sinh viên:”);

txtTenSinhvien=new JTextField(20);

pnSinhvienName.add(lblSinhvienName);

pnSinhvienName.add(txtTenSinhvien);

pnSinhvienDetail.add(pnSinhvienName);

JPanel pnNgaysinh=new JPanel();

JLabel lblNgaysinh=new JLabel(“Ngày Sinh: “);

txtNgaysinh=new JTextField(3);

txtThangsinh=new JTextField(3);

txtNamsinh=new JTextField(4);

pnNgaysinh.add(lblNgaysinh);

JPanel pnNgaySinhChitiet=new JPanel();

pnNgaySinhChitiet.setLayout(new FlowLayout(FlowLayout.LEFT));

pnNgaySinhChitiet.add(txtNgaysinh);

pnNgaySinhChitiet.add(txtThangsinh);

pnNgaySinhChitiet.add(txtNamsinh);

JLabel lblNtnsFormat=new JLabel(“(dd-mm-yyyy)”);

lblNtnsFormat.setFont(new Font(“arial”,Font.ITALIC,10));

pnNgaySinhChitiet.add(lblNtnsFormat);

pnNgaysinh.add(pnNgaySinhChitiet);

pnSinhvienDetail.add(pnNgaysinh);

JPanel pnSinhvienDescription=new JPanel();

JLabel lblDescription=new JLabel(“Địa chỉ:”);

txtDiachi=new JTextArea(4, 20);

JScrollPane scare=new JScrollPane(txtDiachi);

pnSinhvienDescription.add(lblDescription);

pnSinhvienDescription.add(scare);

pnSinhvienDetail.add(pnSinhvienDescription);

JPanel pnButton=new JPanel();

btnThemSinhvien=new JButton(“Thêm SV”);

btnLuuSinhvien=new JButton(“Lưu SV”);

btnXoaSinhvien=new JButton(“Xóa SV”);

pnButton.add(btnThemSinhvien);

pnButton.add(btnLuuSinhvien);

pnButton.add(btnXoaSinhvien);

pnSinhvienDetail.add(pnButton);

cboDanhsachlop.setPreferredSize(txtMasinhvien.getPreferredSize());

lblLopId.setPreferredSize(lblSinhvienName.getPreferredSize());

lblDescription.setPreferredSize(lblSinhvienName.getPreferredSize());

lblNgaysinh.setPreferredSize(lblSinhvienName.getPreferredSize());

lblSinhvienId.setPreferredSize(lblSinhvienName.getPreferredSize());

Container con=getContentPane();

con.add(pnBorder);

lstData.addListSelectionListener(new ProcessEvent());

tblData.addMouseListener(new ProcessEvent());

}

@Override

public void doActionControl(Object o) {

// TODO Auto-generated method stub

if(o.equals(lstData))

{

showLopAndSinhvien();

}

else if(o.equals(tblData))

{

showChitietSinhvien();

}

}

private class ProcessEvent implements ListSelectionListener,MouseListener

{

@Override

public void valueChanged(ListSelectionEvent arg0) {

// TODO Auto-generated method stub

doActionControl(arg0.getSource());

}

@Override

public void mouseClicked(MouseEvent e) {

// TODO Auto-generated method stub

doActionControl(e.getSource());

}

@Override

public void mouseEntered(MouseEvent e) {

// TODO Auto-generated method stub

}

@Override

public void mouseExited(MouseEvent e) {

// TODO Auto-generated method stub

}

@Override

public void mousePressed(MouseEvent e) {

// TODO Auto-generated method stub

}

@Override

public void mouseReleased(MouseEvent e) {

// TODO Auto-generated method stub

}

}

@Override

public void doOwnerWindowFeature() {

// TODO Auto-generated method stub

setSize(800, 600);

setLocationRelativeTo(null);

setDefaultCloseOperation(DISPOSE_ON_CLOSE);

setResizable(false);

}

public abstract ArrayList<Lophoc> getListLop();

public abstract ArrayList<Sinhvien> getListSinhvienByIdLop(String malop);

public void showLopAndSinhvien()

{

Lophoc lh=(Lophoc ) lstData.getSelectedValue();

listSinhvien= getListSinhvienByIdLop(lh.getMalop());

lh.setList(listSinhvien);

lophocSelected=lh;

showListSinhvienIntoTable();

}

public void showListSinhvienIntoTable()

{

dtmData.setRowCount(0);

for(Sinhvien s: lophocSelected.getList())

{

Vector<String> vec=new Vector<String>();

vec.add(s.getMasinhvien());

vec.add(s.getHoten());

vec.add(s.getNamsinh().getDate()+”/”+(s.getNamsinh().getMonth()+1)+”/”+(s.getNamsinh().getYear()+1900));

vec.add(s.getMalop());

vec.add(s.getDiachi());

dtmData.addRow(vec);

}

}

public void showChitietSinhvien()

{

int row=tblData.getSelectedRow();

sinhvienSelected =listSinhvien.get(row);

txtMasinhvien.setText(sinhvienSelected.getMasinhvien());

txtTenSinhvien.setText(sinhvienSelected.getHoten());

txtDiachi.setText(sinhvienSelected.getDiachi());

txtNgaysinh.setText(sinhvienSelected.getNamsinh().getDate()+””);

txtThangsinh.setText((sinhvienSelected.getNamsinh().getMonth()+1)+””);

txtNamsinh.setText((sinhvienSelected.getNamsinh().getYear()+1900)+””);

cboDanhsachlop.setSelectedItem(lophocSelected);

}

public void updateLopList()

{

lstData.removeAll();

ArrayList<Lophoc> listlop=getListLop();

lstData.setListData(listlop.toArray());

lstData.updateUI();

cboDanhsachlop.removeAllItems();

for(Lophoc lh : listlop)

{

cboDanhsachlop.addItem(lh);

}

}

public void doComboboxSelected()

{

lophocSelected=(Lophoc) cboDanhsachlop.getSelectedItem();

}

}

class MainUI

package tranduythanh.com.ui;importjava.awt.BorderLayout;

import java.awt.Color;

import java.awt.Container;

import javax.swing.BorderFactory;

import javax.swing.BoxLayout;

import javax.swing.ImageIcon;

import javax.swing.JButton;

import javax.swing.JLabel;

import javax.swing.JOptionPane;

import javax.swing.JPanel;

import javax.swing.border.TitledBorder;

public class MainUI extends AbstractUI{

private static final long serialVersionUID = 1L;

JButton btnMsAcces,btnSqlServer,btnMysql,btnShutdown;

public MainUI(String title)

{

super(title);

}

public void addControl()

{

JPanel pnButton=new JPanel();

TitledBorder bor1=new TitledBorder(BorderFactory.createEtchedBorder(Color.RED, Color.BLUE), “Chọn loại kết nối”);

pnButton.setBorder(bor1);

JPanel pnAccess=new JPanel();

pnAccess.setLayout(new BoxLayout(pnAccess, BoxLayout.Y_AXIS));

ImageIcon icon=new ImageIcon(“images/ms-access.png”);

btnMsAcces=new JButton();

btnMsAcces.setIcon(icon);

pnAccess.add(btnMsAcces);

JLabel lblAccess=new JLabel(“Ms Access”);

pnAccess.add(lblAccess);

pnButton.add(pnAccess);

JPanel pnSqlServer=new JPanel();

pnSqlServer.setLayout(new BoxLayout(pnSqlServer, BoxLayout.Y_AXIS));

icon=new ImageIcon(“images/sqlserver.png”);

btnSqlServer=new JButton();

btnSqlServer.setIcon(icon);

pnSqlServer.add(btnSqlServer);

JLabel lblSqlServer=new JLabel(“Sql Server”);

pnSqlServer.add(lblSqlServer);

pnButton.add(pnSqlServer);

JPanel pnMysql=new JPanel();

pnMysql.setLayout(new BoxLayout(pnMysql, BoxLayout.Y_AXIS));

icon=new ImageIcon(“images/mysql.png”);

btnMysql=new JButton();

btnMysql.setIcon(icon);

pnMysql.add(btnMysql);

JLabel lblMysql=new JLabel(“My Sql”);

pnMysql.add(lblMysql);

pnButton.add(pnMysql);

Container con=getContentPane();

con.setLayout(new BorderLayout());

con.add(pnButton,BorderLayout.CENTER);

btnShutdown=new JButton();

icon=new ImageIcon(“images/shutdown.png”);

btnShutdown.setIcon(icon);

JPanel pnShutdown=new JPanel();

pnShutdown.setBackground(Color.PINK);

pnShutdown.add(btnShutdown);

TitledBorder bor2=new TitledBorder(BorderFactory.createEtchedBorder(Color.RED, Color.BLUE), “Thoát khỏi chương trình”);

bor2.setTitleColor(Color.BLUE);

bor2.setTitleJustification(TitledBorder.RIGHT);

pnShutdown.setBorder(bor2);

con.add(pnShutdown,BorderLayout.SOUTH);

btnMsAcces.setToolTipText(“Click vào đây để kết nối tới CSDL MS Access!”);

btnSqlServer.setToolTipText(“Click vào đây để kết nối tới CSDL SQL Server!”);

btnMysql.setToolTipText(“Click vào đây để kết nối tới CSDL My SQL!”);

btnShutdown.setToolTipText(“Click vào đây để thoát chương trình!”);

}

@Override

public void doActionControl(Object o) {

if(o.equals(btnMsAcces))

{

JOptionPane.showMessageDialog(null, “MS Access”);

ConnectMsAccessUI msAccessUI=new ConnectMsAccessUI(“MS Access Demo”);

msAccessUI.doShow();

}

else if(o.equals(btnMysql))

{

JOptionPane.showMessageDialog(null, “MySQL”);

ConnectMySqlUI mysqlUI=new ConnectMySqlUI(“MySQl Demo”);

mysqlUI.doShow();

}

else if(o.equals(btnSqlServer))

{

JOptionPane.showMessageDialog(null, “MS SqlServer”);

ConnectSqlServerUI ui=new ConnectSqlServerUI(“SQL server”);

ui.doShow();

}

else if(o.equals(btnShutdown))

{

int ret=JOptionPane.showConfirmDialog(this, “Muốnt thoát hả?”,”Thoát”,JOptionPane.YES_NO_OPTION);

if(ret==JOptionPane.YES_OPTION)

{

System.exit(0);

}

}

}

public static void main(String[] args) {

MainUI ui=new MainUI(“Demo Kết nối nhiều CSDL”);

ui.doShow();

}

@Override

public void doOwnerWindowFeature() {

// TODO Auto-generated method stub

setSize(400, 250);

setLocationRelativeTo(null);

setDefaultCloseOperation(EXIT_ON_CLOSE);

setResizable(false);

}

}

class ConnectMsAccessUI

package tranduythanh.com.ui;importjava.sql.ResultSet;

import java.util.ArrayList;

import tranduythanh.com.connector.CMsAccessConnector;

import tranduythanh.com.model.Lophoc;

import tranduythanh.com.model.Sinhvien;

public class ConnectMsAccessUI extends AbstractConnectUI

{

/**

*

*/

private static final long serialVersionUID = 1L;

public ConnectMsAccessUI(String title)

{

super(title);

m_connector=new CMsAccessConnector();

}

@Override

public void addControl() {

// TODO Auto-generated method stub

super.addControl();

updateLopList();

}

@Override

public void doActionControl(Object o) {

// TODO Auto-generated method stub

super.doActionControl(o);

}

@Override

public void doOwnerWindowFeature() {

super.doOwnerWindowFeature();

}

@Override

public ArrayList<Lophoc> getListLop() {

// TODO Auto-generated method stub

ArrayList<Lophoc>listLop=new ArrayList<Lophoc>();

m_connector.getConnect(“”, “database\\quanlysinhvien.accdb”, “”, “”);

ResultSet rs= m_connector.execQuery(“select * from lophoc”);

try

{

while(rs.next())

{

Lophoc lh=new Lophoc(rs.getString(1), rs.getString(2), rs.getInt(3));

listLop.add(lh);

}

}

catch(Exception ex)

{

ex.printStackTrace();

}

return listLop;

}

@Override

public ArrayList<Sinhvien> getListSinhvienByIdLop(String malop) {

// TODO Auto-generated method stub

ArrayList<Sinhvien>listSv=new ArrayList<Sinhvien>();

m_connector.getConnect(“”, “database\\quanlysinhvien.accdb”, “”, “”);

ResultSet rs= m_connector.execQuery(“select * from sinhvien where malop='”+malop+”‘”);

try

{

while(rs.next())

{

Sinhvien sv=new Sinhvien(rs.getString(1), rs.getString(2), rs.getString(3), rs.getDate(4), rs.getString(5));

listSv.add(sv);

}

}

catch(Exception ex)

{

ex.printStackTrace();

}

return listSv;

}

}

class ConnectMySqlUI

package tranduythanh.com.ui;importjava.sql.ResultSet;

import java.util.ArrayList;

import tranduythanh.com.connector.CMySqlConnector;

import tranduythanh.com.model.Lophoc;

import tranduythanh.com.model.Sinhvien;

public class ConnectMySqlUI extends AbstractConnectUI{

private static final long serialVersionUID = 1L;

public ConnectMySqlUI(String title)

{

super(title);

CMySqlConnector con=new CMySqlConnector();

con.getConnect(“localhost”, “dbtest”, “root”, “hoilamgi”);

ResultSet rs= con.execQuery(“select * from tblemployee”);

try

{

while(rs.next())

{

System.out.println(rs.getInt(1) +” – “+rs.getString(2));

}

}

catch(Exception ex)

{

}

}

@Override

public void addControl() {

// TODO Auto-generated method stub

super.addControl();

}

@Override

public void doActionControl(Object o) {

// TODO Auto-generated method stub

}

@Override

public void doOwnerWindowFeature() {

// TODO Auto-generated method stub

super.doOwnerWindowFeature();

}

@Override

public ArrayList<Lophoc> getListLop() {

// TODO Auto-generated method stub

return null;

}

@Override

public ArrayList<Sinhvien> getListSinhvienByIdLop(String malop) {

// TODO Auto-generated method stub

return null;

}

}

class ConnectSqlServerUI

package tranduythanh.com.ui;importjava.sql.ResultSet;

importjava.util.ArrayList;

import tranduythanh.com.connector.CSqlServerConnector;

import tranduythanh.com.model.Lophoc;

import tranduythanh.com.model.Sinhvien;

public class ConnectSqlServerUI extends AbstractConnectUI{

/**

*

*/

private static final long serialVersionUID = 1L;

public ConnectSqlServerUI(String title)

{

CSqlServerConnector con=new CSqlServerConnector();

con.getConnect(“fithui”, “dbexample”, “sa”, “hoilamgi”);

ResultSet rs=con.execQuery(“select * from tblCustomer”);

try

{

while(rs.next())

{

System.out.println(rs.getString(2)+” – “+ rs.getString(4));

}

}

catch(Exception ex)

{

ex.printStackTrace();

}

}

@Override

public void addControl() {

// TODO Auto-generated method stub

super.addControl();

}

@Override

public void doActionControl(Object o) {

// TODO Auto-generated method stub

}

@Override

public void doOwnerWindowFeature() {

super.doOwnerWindowFeature();

}

@Override

public ArrayList<Lophoc> getListLop() {

// TODO Auto-generated method stub

return null;

}

@Override

public ArrayList<Sinhvien> getListSinhvienByIdLop(String malop) {

// TODO Auto-generated method stub

return null;

}

}

Các bạn ráng cài đặt để chạy được chương trình.

Chúc các bạn thành công.

Coding mẫu đầy đủ: http://www.mediafire.com/download.php?thpatqs1f0lpn2n (tham khảo chứ đừng copy paste code)

Link download thư viện kết nối tới MySQL: http://www.mediafire.com/?6cz23q7fmhmq1a1

Link download thư viện kết nối tới SQL Server: http://www.mediafire.com/?eiw554aacw2h4j9

Ví dụ mẫu mở các JFrame hay JDialog khác trong Java1

Trong topic này Tôi muốn hướng dẫn các bạn cách mở các cửa sổ windows khác trong Java .

Tình huống: Bạn quan sát hình Tôi chụp bên dưới, từ 1 cửa sổ chính chứa 2 JButton, mỗi JButton sẽ có chức năng mở các cửa sổ khác nhau. Ở đây Tôi muốn hướng dẫn 2 tình huống đó là mở 1 JFrame và 1 JDialog khác để từ đó các bạn có thể tham khảo áp dụng cho các chương trình tương tự. Bạn phải biết được sự khác biết giữa JFrame và JDialog (mặc định Tôi cho là các bạn đã biết  )

———————————————————————————————————————————————-

Tôi cung cấp cho các bạn 3 class:

class MyMainUI sẽ chứa 2 JButton : Open MyUI1 và Open MyUI2

class MyUI1 kế thừa từ JFrame

class MyUI2 kế thừa từ JDialog

Các bạn quan sát sự kiện tôi gán cho 2 JButton trong class MyMainUI để thấy được sự khác biệt.

———————————————————————————————————————————————-

Dưới đây là Coding mẫu:

=========================================================================

class MyMainUI

=========================================================================

import java.awt.Container;

import java.awt.event.ActionEvent;

import java.awt.event.ActionListener;

import javax.swing.JButton;

import javax.swing.JFrame;

import javax.swing.JPanel;

public class MyMainUI extends JFrame{

private static final long serialVersionUID = 1L;

public MyMainUI(String title)

{

setTitle(title);

}

public void doShow()

{

setSize(400,200);

setLocationRelativeTo(null);

setDefaultCloseOperation(EXIT_ON_CLOSE);

addControl();

setVisible(true);

}

public void addControl()

{

JPanel pnBox=new JPanel();

JButton btn1=new JButton(“Open MyUI1”);

JButton btn2=new JButton(“Open MyUI2”);

pnBox.add(btn1);

pnBox.add(btn2);

btn1.addActionListener(new ActionListener() {

public void actionPerformed(ActionEvent arg0) {

MyUI1 ui1=new MyUI1(“Hello Teo!”);

ui1.setVisible(true);

}

});

btn2.addActionListener(new ActionListener() {

public void actionPerformed(ActionEvent arg0) {

MyUI2 ui2=new MyUI2(“Hello Teo!”);

ui2.setModal(true);

ui2.setVisible(true);

}

});

Container con=getContentPane();

con.add(pnBox);

}

public static void main(String[] args) {

MyMainUI mainUI=new MyMainUI(“Demo OPen Another Windows”);

mainUI.doShow();

}

}

=========================================================================

class MyUI1

=========================================================================

import java.awt.Container;

import javax.swing.JButton;

import javax.swing.JFrame;

import javax.swing.JPanel;

import javax.swing.JTextField;

public class MyUI1 extends JFrame{

private static final long serialVersionUID = 1L;

public MyUI1(String title)

{

setTitle(“My JFrame”);

doAddSomeControl();

}

public void doAddSomeControl()

{

JPanel pn=new JPanel();

JButton btn1=new JButton(“Hello I’m JFrame”);

JTextField txt1=new JTextField(15);

pn.add(btn1);

pn.add(txt1);

Container con=getContentPane();

con.add(pn);

setSize(300, 200);

setLocationRelativeTo(null);

}

}

=========================================================================

class MyUI2

=========================================================================

import java.awt.Container;

import java.awt.event.ActionEvent;

import java.awt.event.ActionListener;

import javax.swing.JButton;

import javax.swing.JDialog;

import javax.swing.JLabel;

import javax.swing.JOptionPane;

import javax.swing.JPanel;

import javax.swing.JTextField;

public class MyUI2 extends JDialog{

private static final long serialVersionUID = 1L;

public MyUI2(String title)

{

setTitle(“My JDialog”);

doAddSomeControl();

}

public void doAddSomeControl()

{

JPanel pn=new JPanel();

JButton btn1=new JButton(“Hi ! My name is JDialog”);

JButton btn2=new JButton(“Click me!”);

JTextField txt1=new JTextField(15);

JLabel lbl1=new JLabel(“Hello! Hello!”);

pn.add(btn1);

pn.add(txt1);

pn.add(lbl1);

pn.add(btn2);

btn2.addActionListener(new ActionListener() {

public void actionPerformed(ActionEvent e) {

JOptionPane.showMessageDialog(null, “Click tui hả?”);

}

});

Container con=getContentPane();

con.add(pn);

setSize(300, 200);

setLocationRelativeTo(null);

}

}

Chúc các bạn thành công

Chương trình mẫu java: quản lý sản phẩm

Bài tập này mang tính tham khảo cho các sinh viên đang học Java1

Trong chương trình mẫu này Tôi muốn giới thiệu một số chức năng:

– Các control : JMenuBar, JSplitPane, JList, JTable, JCombobox

– Các collections: ArrayList, Vector

– JFileChooser

-Cho phép lưu đối tượng xuống ổ cứng và đọc đối tượng lên giao diện

Mô tả:

Cho phép nhập xuất danh sách các danh mục sản phẩm, các sản phẩm của từng danh mục, các chức năng thêm sửa xóa, lưu tập tin

Các em tham khảo và tiếp tục hoàn thiện những phần Thầy chưa làm.

Cũng như các ví dụ trước, Thầy không ghi chú, các em ráng đọc hiểu, vì cách sử dụng control Thầy đã hướng dẫn kỹ trên lớp

Cấu trúc file chương trình gồm có:

Product.java : dùng để lưu thông tin của từng sản phẩm

Category.java: dùng để lưu danh mục sản phẩm và lưu danh sách các sản phẩm của từng danh mục

ListCategory.java: dùng để lưu danh sách các danh mục

MyProcessFile.java: dùng để xử lý tập tin: lưu và đọc đối tượng trên ổ cứng

MainManagerUI.java: lớp giao diện chính của chương trình

CategoryManagerUI.java: lớp giao diện phụ để cập nhật thông tin của danh mục

TestMain.java: dùng để chạy chương trình chính

Giao diện chính của chương trình như sau:

Khi bấm vào nút New của danh mục sẽ hiển thị màn hình cập nhật danh mục:

Coding mẫu:

Product.java

importjava.io.Serializable;public class Product implements Serializable {

       private static final long serialVersionUID = 1L;

private String productId;

private String productName;

private String description;

private double unitPrice;

private int quantity;

public String getProductId() {

return productId;

}

public void setProductId(String productId) {

this.productId = productId;

}

public String getProductName() {

return productName;

}

public void setProductName(String productName) {

this.productName = productName;

}

public String getDescription() {

return description;

}

public void setDescription(String description) {

this.description = description;

}

public double getUnitPrice() {

return unitPrice;

}

public void setUnitPrice(double unitPrice) {

this.unitPrice = unitPrice;

}

public int getQuantity() {

return quantity;

}

public void setQuantity(int quantity) {

this.quantity = quantity;

}

public Product(String productId, String productName,

String description, double unitPrice, int quantity) {

super();

this.productId = productId;

this.productName = productName;

this.description = description;

this.unitPrice = unitPrice;

this.quantity = quantity;

}

public Product() {

super();

}

}

Category.java:

import java.io.Serializable;

import java.util.ArrayList;

public class Category implements Serializable {

private static final long serialVersionUID = 1L;

private String cateId;

private String cateName;

private ArrayList<Product>listPro=new ArrayList<Product>();

public String getCateId() {

return cateId;

}

public void setCateId(String cateId) {

this.cateId = cateId;

}

public String getCateName() {

return cateName;

}

public void setCateName(String cateName) {

this.cateName = cateName;

}

public Category(String cateId, String cateName) {

super();

this.cateId = cateId;

this.cateName = cateName;

}

public Category() {

super();

}

public Product findProductById(String id)

{

for(Product p: listPro)

if(p.getProductId().equalsIgnoreCase(id))

return p;

return null;

}

public boolean addProduct(Product p)

{

Product pFind=findProductById(p.getProductId());

if(pFind!=null)

{

System.err.println(“Duplicate product ID!”);

return false;

}

listPro.add(p);

return true;

}

public ArrayList<Product> getListPro() {

return listPro;

}

public void setListPro(ArrayList<Product> listPro) {

this.listPro = listPro;

}

public void removeProductById(String id)

{

Product pFind=findProductById(id);

if(pFind!=null)

listPro.remove(pFind);

}

public void removeProductByIndex(String index)

{

listPro.remove(index);

}

public int numberOfProduct()

{

return listPro.size();

}

public String toString() {

return this.cateName;

}

}

ListCategory.java:

import java.io.Serializable;

import java.util.ArrayList;

public class ListCategory implements Serializable {

private static final long serialVersionUID = 1L;

private ArrayList<Category>listCate=new  ArrayList<Category>();

public Category findCateById(String id)

{

for(Category cate: listCate)

{

if(cate.getCateId().equalsIgnoreCase(id))

return cate;

}

return null;

}

public void addCate(Category cate)

{

Category cateFind=  findCateById(cate.getCateId());

if(cateFind!=null)

cateFind=cate;

else

listCate.add(cate);

}

public void removeCateById(String id)

{

Category cateFind=  findCateById(id);

if(cateFind!=null)

listCate.remove(cateFind);

}

public ArrayList<Category>getList()

{

return listCate;

}

}

MyProcessFile.java:

import java.io.FileInputStream;

import java.io.FileOutputStream;

import java.io.ObjectInputStream;

import java.io.ObjectOutputStream;

public class MyProcessFile {

public static void saveData(Object list,String fileName)

{

try

{

FileOutputStream fOut=new FileOutputStream(fileName);

ObjectOutputStream oOut=new ObjectOutputStream(fOut);

oOut.writeObject(list);

}

catch(Exception ex)

{

ex.printStackTrace();

}

}

public static Object openData(String fileName)

{

try

{

FileInputStream fIn=new FileInputStream(fileName);

ObjectInputStream oIn=new ObjectInputStream(fIn);

return oIn.readObject();

}

catch(Exception ex)

{

ex.printStackTrace();

}

return null;

}

}

MainManagerUI.java:

import java.awt.BorderLayout;

import java.awt.Color;

import java.awt.Container;

import java.awt.Dimension;

import java.awt.Font;

import java.awt.event.ActionEvent;

import java.awt.event.ActionListener;

import java.util.Vector;

import javax.swing.BorderFactory;

import javax.swing.BoxLayout;

import javax.swing.JButton;

import javax.swing.JComboBox;

import javax.swing.JFileChooser;

import javax.swing.JFrame;

import javax.swing.JLabel;

import javax.swing.JList;

import javax.swing.JMenu;

import javax.swing.JMenuBar;

import javax.swing.JMenuItem;

import javax.swing.JOptionPane;

import javax.swing.JPanel;

import javax.swing.JScrollPane;

import javax.swing.JSplitPane;

import javax.swing.JTable;

import javax.swing.JTextArea;

import javax.swing.JTextField;

import javax.swing.border.TitledBorder;

import javax.swing.event.ListSelectionEvent;

import javax.swing.event.ListSelectionListener;

import javax.swing.table.DefaultTableModel;

public class MainManagerUI extends JFrame {

private static final long serialVersionUID = 1L;

private static JList lstCate;

private JTable tblProduct;

private DefaultTableModel dtmProduct;

private JButton btnCateRemove,btnCateNew,btnCateUpdate,btnNew,btnSave,btnRemove;

private JTextField txtId,txtName,txtUnitprice,txtQuantity;

private JTextArea txtDescription;

private static JComboBox cboCateList;

JMenuBar menubar;

JMenu mnuFile;

JMenuItem mnuFileOpenDataFromDisk,mnuFileWritetodisk,mnuFileExit;

public static ListCategory listData;

public static Category selectedCate;

public MainManagerUI(String title)

{

super(title);

listData=new ListCategory();

}

public void doShow()

{

setDefaultCloseOperation(EXIT_ON_CLOSE);

setSize(800, 550);

addControl();

setLocationRelativeTo(null);

setVisible(true);

}

public void addMenu()

{

menubar=new JMenuBar();

mnuFile=new JMenu(“File”);

mnuFileWritetodisk=new JMenuItem(“Write Data to disk”);

mnuFileOpenDataFromDisk=new JMenuItem(“Open Data from disk”);

mnuFileExit =new JMenuItem(“Exit”);

menubar.add(mnuFile);

mnuFile.add(mnuFileWritetodisk);

mnuFile.add(mnuFileOpenDataFromDisk);

mnuFile.addSeparator();

mnuFile.add(mnuFileExit);

setJMenuBar(menubar);

}

public void addControl()

{

addMenu();

JPanel pnBorder=new JPanel();

pnBorder.setLayout(new BorderLayout());

JPanel pnNorth=new JPanel();

JLabel lblTitle=new JLabel(“Quản lý sản phẩm”);

Font ftTitle=new Font(“arial”, Font.BOLD, 32);

lblTitle.setFont(ftTitle);

lblTitle.setForeground(Color.BLUE);

pnNorth.add(lblTitle);

pnBorder.add(pnNorth,BorderLayout.NORTH);

JPanel pnListCate=new JPanel();

JPanel pnListProduct=new JPanel();

JSplitPane slitPane=new JSplitPane(JSplitPane.HORIZONTAL_SPLIT, pnListCate, pnListProduct);

pnBorder.add(slitPane,BorderLayout.CENTER);

pnListCate.setLayout(new BorderLayout());

lstCate=new JList();

TitledBorder cateborder=new TitledBorder(BorderFactory.createLineBorder(Color.RED), “Danh mục sản phẩm”);

lstCate.setBorder(cateborder);

pnListCate.setPreferredSize(new Dimension(300, 0));

pnListCate.add(lstCate,BorderLayout.CENTER);

JPanel pnListCateSouth=new JPanel();

btnCateNew =new JButton(“New”);

pnListCateSouth.add(btnCateNew);

btnCateUpdate =new JButton(“Update”);

pnListCateSouth.add(btnCateUpdate);

btnCateRemove =new JButton(“Remove”);

pnListCateSouth.add(btnCateRemove);

pnListCate.add(pnListCateSouth,BorderLayout.SOUTH);

pnListProduct.setLayout(new BorderLayout());

JPanel pnProductTitle=new JPanel();

JLabel lblProductTitle=new JLabel(“Thông tin chi tiết”);

pnProductTitle.add(lblProductTitle);

pnListProduct.add(pnProductTitle,BorderLayout.NORTH);

JPanel pnProductTable=new JPanel();

pnProductTable.setLayout(new BorderLayout());

pnListProduct.add(pnProductTable,BorderLayout.CENTER);

dtmProduct =new DefaultTableModel();

dtmProduct.addColumn(“Product ID”);

dtmProduct.addColumn(“Product Name”);

dtmProduct.addColumn(“UnitPrice”);

dtmProduct.addColumn(“Quantity”);

dtmProduct.addColumn(“Description”);

tblProduct=new JTable(dtmProduct);

JScrollPane sctblproduct=new JScrollPane(tblProduct );

pnProductTable.add(sctblproduct,BorderLayout.CENTER);

JPanel pnProductDetail=new JPanel();

pnListProduct.add(pnProductDetail,BorderLayout.SOUTH);

pnProductDetail.setLayout(new BoxLayout(pnProductDetail, BoxLayout.Y_AXIS ));

JPanel pnCateList=new JPanel();

JLabel lblCateId=new JLabel(“Category :”);

cboCateList=new JComboBox();

pnCateList.add(lblCateId);

pnCateList.add(cboCateList);

pnProductDetail.add(pnCateList);

JPanel pnProductId=new JPanel();

JLabel lblProId=new JLabel(“Product ID:”);

txtId=new JTextField(20);

pnProductId.add(lblProId);

pnProductId.add(txtId);

pnProductDetail.add(pnProductId);

JPanel pnProductName=new JPanel();

JLabel lblProName=new JLabel(“Product Name:”);

txtName=new JTextField(20);

pnProductName.add(lblProName);

pnProductName.add(txtName);

pnProductDetail.add(pnProductName);

JPanel pnProductUnitPrice=new JPanel();

JLabel lblUnitPrice=new JLabel(“Unit Price:”);

txtUnitprice=new JTextField(20);

pnProductUnitPrice.add(lblUnitPrice);

pnProductUnitPrice.add(txtUnitprice);

pnProductDetail.add(pnProductUnitPrice);

JPanel pnProductQuantity=new JPanel();

JLabel lblQuantity=new JLabel(“Quantity:”);

txtQuantity=new JTextField(20);

pnProductQuantity.add(lblQuantity);

pnProductQuantity.add(txtQuantity);

pnProductDetail.add(pnProductQuantity);

JPanel pnProductDescription=new JPanel();

JLabel lblDescription=new JLabel(“Description:”);

txtDescription=new JTextArea(4, 20);

JScrollPane scare=new JScrollPane(txtDescription);

pnProductDescription.add(lblDescription);

pnProductDescription.add(scare);

pnProductDetail.add(pnProductDescription);

JPanel pnButton=new JPanel();

btnNew=new JButton(“New”);

btnSave=new JButton(“Save”);

btnRemove=new JButton(“Remove”);

pnButton.add(btnNew);

pnButton.add(btnSave);

pnButton.add(btnRemove);

pnProductDetail.add(pnButton);

cboCateList.setPreferredSize(txtId.getPreferredSize());

lblCateId.setPreferredSize(lblProName.getPreferredSize());

lblDescription.setPreferredSize(lblProName.getPreferredSize());

lblQuantity.setPreferredSize(lblProName.getPreferredSize());

lblUnitPrice.setPreferredSize(lblProName.getPreferredSize());

lblProId.setPreferredSize(lblProName.getPreferredSize());

Container con=getContentPane();

con.add(pnBorder);

btnCateNew.addActionListener(new processButtonEvent());

btnNew.addActionListener(new processButtonEvent());

btnSave.addActionListener(new processButtonEvent());

btnRemove.addActionListener(new processButtonEvent());

cboCateList.addActionListener(new processButtonEvent());

mnuFileWritetodisk.addActionListener(new processButtonEvent());

mnuFileOpenDataFromDisk.addActionListener(new processButtonEvent());

lstCate.addListSelectionListener(new ListSelectionListener() {

@Override

public void valueChanged(ListSelectionEvent arg0) {

selectedCate=(Category) lstCate.getSelectedValue();

showListProductIntoTable();

}

});

}

private void showListProductIntoTable()

{

dtmProduct.setRowCount(0);

for(Product p: selectedCate.getListPro())

{

Vector<String> vec=new Vector<String>();

vec.add(p.getProductId());

vec.add(p.getProductName());

vec.add(p.getUnitPrice()+””);

vec.add(p.getQuantity()+””);

vec.add(p.getDescription());

dtmProduct.addRow(vec);

}

}

public static void updateCateList()

{

lstCate.removeAll();

lstCate.setListData(listData.getList().toArray());

lstCate.updateUI();

cboCateList.removeAllItems();

for(Category cate : listData.getList())

{

cboCateList.addItem(cate);

}

}

private void doCreateNewCate()

{

CategoryManagerUI cateUI=new CategoryManagerUI(“Cate information”);

cateUI.doShow();

}

private void doSaveProduct()

{

if(selectedCate!=null)

{

Product p=new Product();

p.setProductId(txtId.getText());

p.setProductName(txtName.getText());

p.setQuantity(Integer.parseInt(txtQuantity.getText()));

p.setUnitPrice(Double.parseDouble(txtUnitprice.getText()));

p.setDescription(txtDescription.getText());

selectedCate.addProduct(p);

}

}

private void doComboboxSelected()

{

selectedCate=(Category) cboCateList.getSelectedItem();

}

private void doWriteDataToDisk()

{

JFileChooser fc=new JFileChooser(“.”);

if(fc.showSaveDialog(null)==JFileChooser.APPROVE_OPTION)

{

MyProcessFile.saveData(listData, fc.getSelectedFile().getAbsolutePath());

}

}

private void doReadDataFromDisk()

{

JFileChooser fc=new JFileChooser(“.”);

if(fc.showOpenDialog(null)==JFileChooser.APPROVE_OPTION)

{

listData=(ListCategory)      MyProcessFile.openData(fc.getSelectedFile().getAbsolutePath());

updateCateList();

}

}

private class processButtonEvent implements ActionListener

{

@Override

public void actionPerformed(ActionEvent e) {

Object o=e.getSource();

if(o.equals(btnCateNew))

{

doCreateNewCate();

}

else if(o.equals(btnNew))

{

txtDescription.setText(“”);

txtId.setText(“”);

txtName.setText(“”);

txtUnitprice.setText(“”);

txtQuantity.setText(“”);

txtId.requestFocus();

}

else if(o.equals(btnSave))

{

doSaveProduct();

}

else if(o.equals(cboCateList))

{

doComboboxSelected();

}

else if(o.equals(mnuFileWritetodisk))

{

doWriteDataToDisk();

}

else if(o.equals(mnuFileOpenDataFromDisk))

{

doReadDataFromDisk();

}

}

}

}

CategoryManagerUI.java:

import java.awt.Container;

import java.awt.event.ActionEvent;

import java.awt.event.ActionListener;

import javax.swing.BoxLayout;

import javax.swing.JButton;

import javax.swing.JFrame;

import javax.swing.JLabel;

import javax.swing.JPanel;

import javax.swing.JTextField;

public class CategoryManagerUI extends JFrame{

private static final long serialVersionUID = 1L;

private JTextField txtId,txtName;

private JButton btnOk;

public CategoryManagerUI(String title)

{

setTitle(title);

}

public void doShow()

{

setDefaultCloseOperation(DISPOSE_ON_CLOSE);

setSize(300, 150);

addControl();

setLocationRelativeTo(null);

setAlwaysOnTop(true);

setVisible(true);

}

public void addControl()

{

JPanel pnBox=new JPanel();

pnBox.setLayout(new BoxLayout(pnBox, BoxLayout.Y_AXIS));

JPanel pnId=new JPanel();

txtId=new JTextField(15);

txtName=new JTextField(15);

JLabel lblId=new JLabel(“Cate Id:”);

JLabel lblName=new JLabel(“Cate Name:”);

pnId.add(lblId);

pnId.add(txtId);

pnBox.add(pnId);

JPanel pnName=new JPanel();

pnName.add(lblName);

pnName.add(txtName);

pnBox.add(pnName);

JPanel pnButton=new JPanel();

btnOk=new JButton(“OK”);

pnButton.add(btnOk);

pnBox.add(pnButton);

lblId.setPreferredSize(lblName.getPreferredSize());

Container con=getContentPane();

con.add(pnBox);

btnOk.addActionListener(new ActionListener() {

public void actionPerformed(ActionEvent arg0) {

Category cate=new Category(txtId.getText(), txtName.getText());

MainManagerUI.listData.addCate(cate);

MainManagerUI.updateCateList();

dispose();

}

});

}

}

TestMain.java:

 public class TestMain {

public static void main(String[] args) {

MainManagerUI uiProduct=new MainManagerUI(“Quản lý sản phẩm!”);

uiProduct.doShow();

}

}

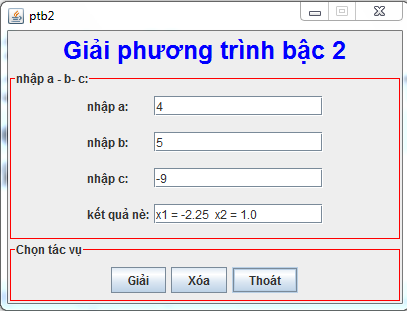
Ví dụ giải phương trình bậc 2 – Java UI

Trong ví dụ này Tôi sẽ cung cấp 2 class.

Class 1 tên là PTB2UI dùng để thiết kế giao diện

class 2 tên là PTB2Engine dùng để giải phương trình bậc 2, có 3 thông số được truyền vào là a,b,c lấy từ giao diện

Ví dụ này có kiểm tra tính hợp lệ của dữ liệu nhập vào, các bạn xem các dòng lệnh try…catch

Tôi không có giải thích nhiều về code nữa, vì đã giải thích trong các bài giảng rồi, hi vọng các em cố gắng đọc hiểu. Có rất nhiều cách làm!

===========================================================================

class PTB2UI

===========================================================================

import java.awt.*;

import java.awt.event.*;

import javax.swing.*;

import javax.swing.border.*;

public class PTB2UI extends JFrame {

private static final long serialVersionUID = 1L;

public PTB2UI(String title)

{

setTitle(title);

}

public void doShow()

{

setSize(400, 300);

setLocationRelativeTo(null);

setDefaultCloseOperation(EXIT_ON_CLOSE);

addControl();

setResizable(false);

setVisible(true);

}

public void addControl()

{

JPanel pnBorder=new JPanel();

pnBorder.setLayout(new BorderLayout());

JPanel pnNorth=new JPanel();

JLabel lblTitle=new JLabel(“Giải phương trình bậc 2”);

pnNorth.add(lblTitle);

pnBorder.add(pnNorth,BorderLayout.NORTH);

lblTitle.setForeground(Color.BLUE);

Font ft=new Font(“arial”, Font.BOLD, 25);

lblTitle.setFont(ft);

JPanel pnSouth=new JPanel();

JButton btnGiai=new JButton(“Giải”);

JButton btnXoa=new JButton(“Xóa”);

JButton btnThoat=new JButton(“Thoát”);

pnSouth.add(btnGiai);

pnSouth.add(btnXoa);

pnSouth.add(btnThoat);

pnBorder.add(pnSouth,BorderLayout.SOUTH);

pnSouth.setBackground(Color.LIGHT_GRAY);

Border  southborder

=BorderFactory.createLineBorder(Color.RED);

TitledBorder southTitleBorder=

new TitledBorder(southborder, “Chọn tác vụ”);

pnSouth.setBorder(southTitleBorder);

JPanel pnCenter=new JPanel();

pnCenter.setLayout(new BoxLayout(pnCenter, BoxLayout.Y_AXIS));

pnBorder.add(pnCenter,BorderLayout.CENTER);

Border  centerborder

=BorderFactory.createLineBorder(Color.RED);

TitledBorder centerTitleBorder=

new TitledBorder(centerborder, “nhập a – b- c:”);

pnCenter.setBorder(centerTitleBorder);

JPanel pna=new JPanel();

JLabel lbla=new JLabel(“nhập a:”);

final JTextField txta=new  JTextField(15);

pna.add(lbla);

pna.add(txta);

pnCenter.add(pna);

JPanel pnb=new JPanel();

JLabel lblb=new JLabel(“nhập b:”);

final JTextField txtb=new  JTextField(15);

pnb.add(lblb);

pnb.add(txtb);

pnCenter.add(pnb);

JPanel pnc=new JPanel();

JLabel lblc=new JLabel(“nhập c:”);

final JTextField txtc=new  JTextField(15);

pnc.add(lblc);

pnc.add(txtc);

pnCenter.add(pnc);

JPanel pnkq=new JPanel();

JLabel lblkq=new JLabel(“kết quả nè:”);

final JTextField txtkq=new  JTextField(15);

pnkq.add(lblkq);

pnkq.add(txtkq);

pnCenter.add(pnkq);

lbla.setPreferredSize(lblkq.getPreferredSize());

lblb.setPreferredSize(lblkq.getPreferredSize());

lblc.setPreferredSize(lblkq.getPreferredSize());

btnThoat.addActionListener(new ActionListener() {

public void actionPerformed(ActionEvent arg0) {

int ret=JOptionPane.showConfirmDialog(null, “Muốn thoát hả?”, “Thoát”, JOptionPane.YES_NO_OPTION);

if(ret==JOptionPane.YES_OPTION)

System.exit(0);

}

});

btnXoa.addActionListener(new ActionListener() {

public void actionPerformed(ActionEvent arg0) {

txtb.setText(“”);

txtc.setText(“”);

txtkq.setText(“”);

txta.requestFocus();

}

});

btnGiai.addActionListener(new ActionListener() {

public void actionPerformed(ActionEvent arg0) {

String sa=txta.getText();

int a=0,b=0,c=0;

try

{

a=Integer.parseInt(sa);

}

catch(Exception ex)

{

JOptionPane.showMessageDialog(null, “Nhập sai định dạng!”);

txta.selectAll();

txta.requestFocus();

return;

}

String sb=txtb.getText();

try

{

b=Integer.parseInt(sb);

}

catch(Exception ex)

{

JOptionPane.showMessageDialog(null, “Nhập sai định dạng!”);

txtb.selectAll();

txtb.requestFocus();

return;

}

String sc=txtc.getText();

try

{

c=Integer.parseInt(sc);

}

catch(Exception ex)

{

JOptionPane.showMessageDialog(null, “Nhập sai định dạng!”);

txtc.selectAll();

txtc.requestFocus();

return;

}

String kq=””;

PTB2Engine engine=new PTB2Engine(a, b, c);

kq=engine.compute();

txtkq.setText(kq);

}

});

Container con=getContentPane();

con.add(pnBorder);

}

public static void main(String[] args) {

PTB2UI ui=new PTB2UI(“ptb2”);

ui.doShow();

}

}


===========================================================================

class PTB2Engine 

===========================================================================

public classPTB2Engine {private inta;private intb;private int c;

public PTB2Engine(int a,int b,int c)

{

this.a=a;

this.b=b;

this.c=c;

}

public String compute()

{

String kq=””;

if(this.a==0)

{

if(this.b==0)

{

if(this.c==0)

{

kq=”Vô số nghiệm”;

}

else

{

kq=”Vô nghiệm”;

}

}

else

{

kq=”Pt co 1 no x1=”+(-this.c/this.b);

}

}

else

{

double delta=this.b*this.b-4*this.a*this.c;

if(delta<0)

kq=”Vô nghiệm”;

else if(delta==0)

kq=”No kép x1=x2=”+(-this.b/(2*this.a));

else

{

kq=”x1 = “+((-this.b-Math.sqrt(delta))/(2*this.a));

kq+=”  x2 = “+((-this.b+Math.sqrt(delta))/(2*this.a));

}

}

return kq;

}

}