[polldaddy poll=9764234]
Tiếp tục bài 55, bài 54, bài 53 bạn đã cơ bản lập trình được với Google Map. Trong bài này Tui sẽ hướng dẫn các bạn cách dùng các đối tượng Shape để tương tác với Google Map, chẳng hạn như:
- Polyline
- Polygons
- Circle
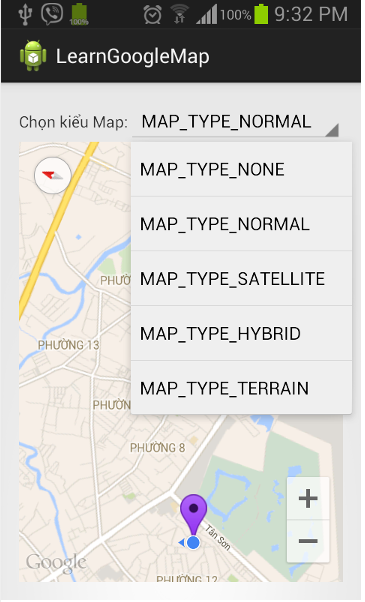
Hay cách hiển thị kiểu Map tùy thích (hiện nay Google Map cung cấp các chế độ: NONE, NORMAL, SATELLITE, HYBRID và TERRAIN).
Trước tiên bạn bổ sung thêm Spinner để cho phép hiển thị kiểu Map theo yêu cầu của người sử dụng:
 Tiếp tục với Project LearnGoogleMap, bạn tiến hành chỉnh sửa Layout main Activity như sau:
[code language=”xml”]
<LinearLayout xmlns:android="http://schemas.android.com/apk/res/android"
xmlns:tools="http://schemas.android.com/tools"
android:id="@+id/LinearLayout1"
android:layout_width="match_parent"
android:layout_height="match_parent"
android:orientation="vertical"
android:paddingBottom="@dimen/activity_vertical_margin"
android:paddingLeft="@dimen/activity_horizontal_margin"
android:paddingRight="@dimen/activity_horizontal_margin"
android:paddingTop="@dimen/activity_vertical_margin"
tools:context="tranduythanh.com.learngooglemap.MainActivity" >
<LinearLayout
android:layout_width="match_parent"
android:layout_height="wrap_content" >
<TextView
android:id="@+id/textView1"
android:layout_width="wrap_content"
android:layout_height="wrap_content"
android:text="Chọn kiểu Map:" />
<Spinner
android:id="@+id/spinner_map_type"
android:layout_width="wrap_content"
android:layout_height="wrap_content"
android:layout_weight="1" />
</LinearLayout>
<fragment
android:id="@+id/map"
android:layout_width="match_parent"
android:layout_height="match_parent"
class="com.google.android.gms.maps.MapFragment"
/>
</LinearLayout>
[/code]
Tiếp tục bổ sung string-array cho strings.xml để lưu trữ các cách hiển thị Map, đặt tên array này là maps_type:
[code language=”xml”]
<string-array name="maps_type">
<item >MAP_TYPE_NONE</item>
<item >MAP_TYPE_NORMAL</item>
<item >MAP_TYPE_SATELLITE</item>
<item >MAP_TYPE_HYBRID</item>
<item >MAP_TYPE_TERRAIN</item>
</string-array>
[/code]
Cuối cùng trong MainActivity, tiến hành hiệu chỉnh coding để tương tác với Spinner, tương ứng với kiểu chọn lựa nào thì hiển thị Map với chế độ đó:
[code language=”java”]
Spinner spinner_maps_type=(Spinner) findViewById(R.id.spinner_map_type);
String arrMap[]=getResources().getStringArray(R.array.maps_type);
ArrayAdapter<String> adapterMap=new ArrayAdapter<>
(this, android.R.layout.simple_spinner_item, arrMap);
adapterMap.setDropDownViewResource(android.R.layout.simple_spinner_dropdown_item);
spinner_maps_type.setAdapter(adapterMap);
spinner_maps_type.setOnItemSelectedListener(new OnItemSelectedListener() {
@Override
public void onItemSelected(AdapterView<?> arg0, View arg1,
int arg2, long arg3) {
int type=GoogleMap.MAP_TYPE_NORMAL;
switch(arg2)
{
case 0:
type=GoogleMap.MAP_TYPE_NONE;
break;
case 1:
type=GoogleMap.MAP_TYPE_NORMAL;
break;
case 2:
type=GoogleMap.MAP_TYPE_SATELLITE;
break;
case 3:
type=GoogleMap.MAP_TYPE_TERRAIN;
break;
case 4:
type=GoogleMap.MAP_TYPE_HYBRID;
break;
}
map.setMapType(type);
}
@Override
public void onNothingSelected(AdapterView<?> arg0) {
}
});
[/code]
Khi chạy ứng dụng lên ta sẽ có các kết quả sau: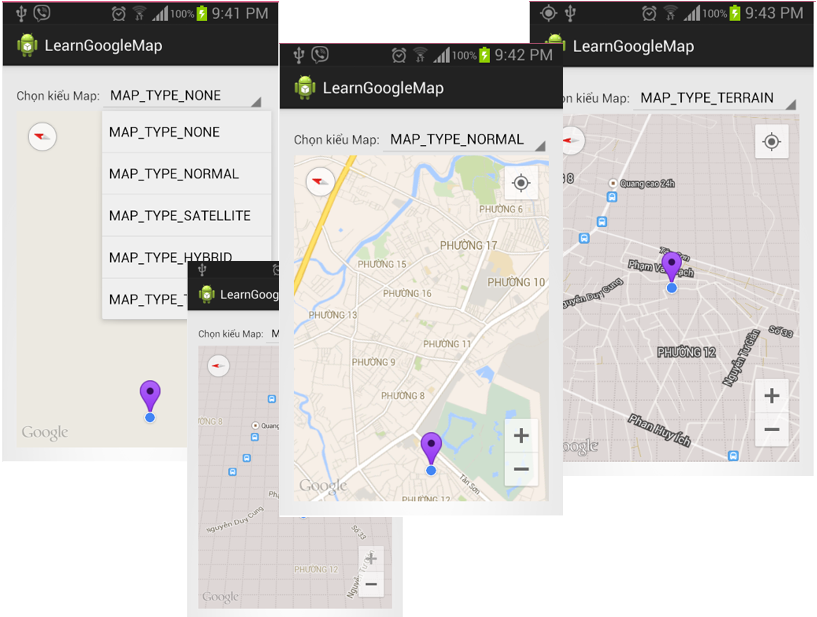 – Tiến hành vẽ các đối tượng Shape lên Google Map: Tui sẽ hướng dẫn cách vẽ Polyline, Polygons, Circle trên Map, dưới đây là một số hình minh họa:
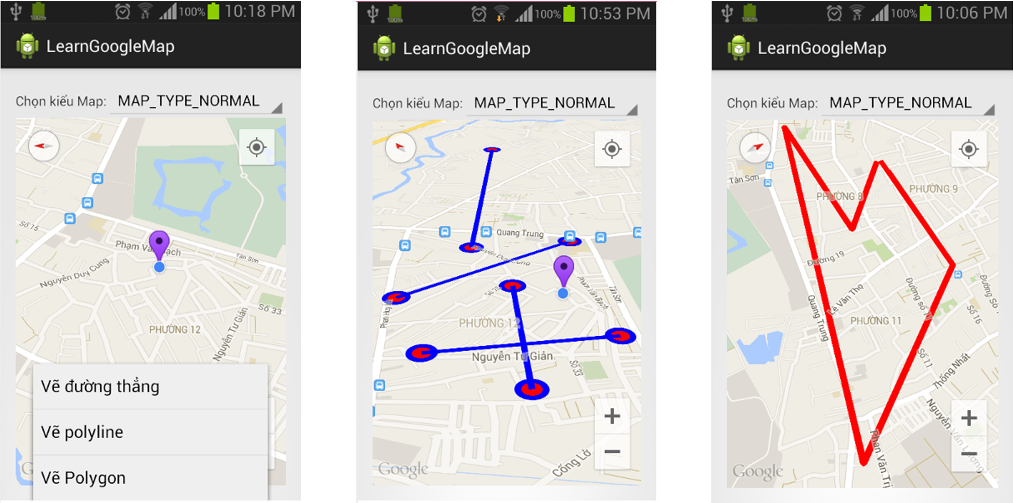
*polyline:
– Để vẽ và đường polyline (những đường thẳng liên tục những không khép kín)
Ta khai báo đối tượng PolylineOptions :
PolylineOptions plOption=new PolylineOptions();
Sau đó đưa tất cả các tọa độ vào PolylineOptions rồi đẩy vào hàm :
Polyline polyline= map.addPolyline(plOption);
Hàm addPolyline sẽ trả về 1 Polyline, ta có thể hiệu chỉnh đối tượng này như sau:
– Thiết lập màu đường kẻ: polyline.setColor(Color.RED);
– Thiết lập độ dày đường kẻ: polyline.setWidth(5)
– Thiết lập độ chồng lấp: polyline.setZIndex(1);
*Polygon:
Vẽ các đường line liên tục và khép kín
Tương tự ta tạo đối tượng : PolygonOptions
PolygonOptions pgOption=new PolygonOptions();
Đẩy tất cả tọa độ vào PolygonOptions sau đó đưa vào hàm:
Polygon polyGon= map.addPolygon(pgOption);
Hàm addPolygon trả về một đối tượng Polygon , ta có thể hiệu chỉnh:
– Thiết lập màu đường viền:polyGon.setStrokeColor(Color.BLUE);
– Thiết lập màu nền: polyGon.setFillColor(Color.YELLOW);
– Thiết lập độ dày: polyGon.setStrokeWidth(5);
*Circle:
Vẽ đường tròn
tương tự ta khai báo đối tượng CircleOptions:
CircleOptions optionCircle=new CircleOptions();
Thiết lập tọa độ trung tâm và bán kính:
optionCircle.center(latCenter).radius(50);
Sau đó đưa vào hàm:
Circle cir=map.addCircle(optionCircle);
addCircle trả về một Circle, ta có thể thiết lập:
– Màu đường viền:cir.setStrokeColor(Color.BLUE);
– Màu nền : cir.setFillColor(Color.RED);
*** Bây giờ ta bổ sung Menu gồm 3 phần tử:
[code language=”xml”]
<menu xmlns:android="http://schemas.android.com/apk/res/android"
xmlns:tools="http://schemas.android.com/tools"
tools:context="tranduythanh.com.learngooglemap.MainActivity" >
<item android:id="@+id/mnuveduongthang" android:title="Vẽ đường thẳng"></item>
<item android:id="@+id/mnuvepolyline" android:title="Vẽ polyline"></item>
<item android:id="@+id/mnuvepolygon" android:title="Vẽ Polygon"></item>
</menu>
[/code]
Xử lý coding chọn menu Item trong MainActivity:
[code language=”java”]
PolylineOptions plOption=new PolylineOptions();
int typedraw;
public boolean onCreateOptionsMenu(Menu menu) {
// Inflate the menu; this adds items to the action bar if it is present.
getMenuInflater().inflate(R.menu.main, menu);
return true;
}
public boolean onOptionsItemSelected(MenuItem item) {
if(item.getItemId()==R.id.mnuveduongthang)
typedraw=0;
else if(item.getItemId()==R.id.mnuvepolyline)
typedraw=1;
else
typedraw=2;
latPrevious=null;
return super.onOptionsItemSelected(item);
}
[/code]
Tiếp theo bổ sung sự kiện OnMapClickListener cho Map:
[code language=”java”]
map.setOnMapClickListener(new OnMapClickListener() {
@Override
public void onMapClick(LatLng arg0) {
if(typedraw==0)
{
CircleOptions optionCircle=new CircleOptions();
optionCircle.center(arg0).radius(50);
Circle cir=map.addCircle(optionCircle);
cir.setFillColor(Color.RED);
cir.setStrokeColor(Color.BLUE);
if(latPrevious==null)
latPrevious=arg0;
//xử lý vẽ đường thẳng
else if(latPrevious!=null)
{
PolylineOptions optionLine=new PolylineOptions();
optionLine.add(latPrevious);
optionLine.add(arg0);
Polyline line=map.addPolyline(optionLine);
line.setColor(Color.BLUE);
line.setWidth(1);
latPrevious=null;
}
}
else if(typedraw==1)
{
if(latPrevious==null)
plOption=new PolylineOptions();
if(latPrevious!=null)
{
plOption.add(latPrevious);
plOption.add(arg0);
Polyline polyline= map.addPolyline(plOption);
polyline.setColor(Color.RED);
}
latPrevious=arg0;
}
else if(typedraw==2)
{
PolygonOptions pgOption=new PolygonOptions();
double h1=0.5;
double h2=0.25;
LatLng center=arg0;
LatLng p1=new LatLng(center.latitude-h1, center.longitude);
LatLng p2=new LatLng(center.latitude-h2, center.longitude-h2);
LatLng p3=new LatLng(center.latitude-h2, center.longitude-h1);
LatLng p4=new LatLng(center.latitude+h2, center.longitude-h2);
LatLng p5=new LatLng(center.latitude+h1, center.longitude-h1);
LatLng p6=new LatLng(center.latitude+h2, center.longitude);
LatLng p7=new LatLng(center.latitude+h1, center.longitude+h1);
LatLng p8=new LatLng(center.latitude+h2, center.longitude+h2);
LatLng p9=new LatLng(center.latitude-h2, center.longitude+h1);
LatLng p10=new LatLng(center.latitude-h2, center.longitude+h2);
pgOption.add(p1);
pgOption.add(p2);
pgOption.add(p3);
pgOption.add(p4);
pgOption.add(p5);
pgOption.add(p6);
pgOption.add(p7);
pgOption.add(p8);
pgOption.add(p9);
pgOption.add(p10);
pgOption.add(p1);
Polygon polyGon= map.addPolygon(pgOption);
polyGon.setFillColor(Color.YELLOW);
polyGon.setStrokeColor(Color.BLUE);
polyGon.setStrokeWidth(5);
}
}
});
}
[/code]
Chạy lên ta có kết quả như hình mẫu ở trên.
Bạn có thể tải source code mẫu ở đây:
http://www.mediafire.com/download/zr21zmt87eo51i0/LearnGoogleMap_shape.rar
Chúc các bạn thành công!
Em muốn lấy về vị trí hiện tại của mình dưới dạng String để hiển thị lên textview thì làm thế nào ạ? Em cảm ơn thầy.
private String getCompleteAddressString(double LATITUDE, double LONGITUDE) {
String strAdd = “”;
Geocoder geocoder = new Geocoder(this, Locale.getDefault());
try {
List addresses = geocoder.getFromLocation(LATITUDE, LONGITUDE, 1);
if (addresses != null) {
Address returnedAddress = addresses.get(0);
StringBuilder strReturnedAddress = new StringBuilder(“”);
for (int i = 0; i < returnedAddress.getMaxAddressLineIndex(); i++) {
strReturnedAddress.append(returnedAddress.getAddressLine(i)).append("\n");
}
strAdd = strReturnedAddress.toString();
Log.e("My Current loction address", "" + strReturnedAddress.toString());
} else {
Log.e("My Current loction address", "No Address returned!");
}
} catch (Exception e) {
e.printStackTrace();
Log.w("My Current loction address", "Canont get Address!");
}
return strAdd;
}
Thưa thầy!!!
Thầy có thể giúp em về đưa 1button trên marker được không ạ,khi kich vao marker sẽ hiển thị ra một button, và truyền một activity nào đó cho button
EM cảm ơn!!!
Khi sử dụng Android Studio để Import mẫu của thầy nó báo thiếu thư viện như hình
https://drive.google.com/open?id=0BzNEr9qNUWuiUENQczQ0RDZNVEk