[polldaddy poll=9764234]
Trong bài này Tui sẽ đưa ra 1 ví dụ cuối cùng về cách xử lý đa tiến trình, bài này tương đối phức tạp, bạn phải tập trung làm đi làm lại để hiểu thêm.
Giao diện chính của chương trình như sau:
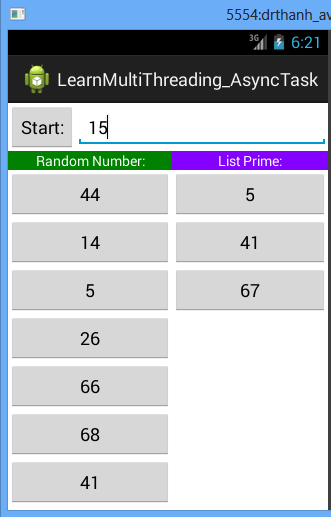 – Mô tả sơ sơ: Khi nhấn nút Start, chương trình sẽ vẽ bên màn hình bên trái điện thoại là danh sách các số ngẫu nhiên, sau khi vẽ xong (hoặc là đồng thời) chương trình sẽ vẽ danh sách các số là số nguyên tố nằm bên màn hình trái vào màn hình bên phải.
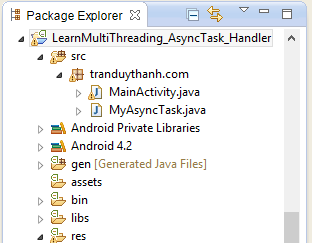
– Bạn tạo project như hình dưới đây:
– Giao diện hơi phức tạp 1 xíu, ở đây Tui chia màn hình ra làm hai, bạn xem XML Resource:
[code language=”xml”]
<LinearLayout xmlns:android="http://splashurl.com/ot4qqf8
xmlns:tools="http://splashurl.com/qzxkn3a
android:id="@+id/LinearLayout1"
android:layout_width="match_parent"
android:layout_height="match_parent"
android:orientation="vertical"
tools:context=".MainActivity" >
<LinearLayout
android:layout_width="match_parent"
android:layout_height="wrap_content" >
<Button
android:id="@+id/btnstart"
android:layout_width="wrap_content"
android:layout_height="wrap_content"
android:text="Start:" />
<EditText
android:id="@+id/editnumber"
android:layout_width="wrap_content"
android:layout_height="wrap_content"
android:layout_weight="1"
android:ems="10"
android:hint="enter number of here"
android:inputType="number" >
<requestFocus />
</EditText>
</LinearLayout>
<TableLayout
android:layout_width="fill_parent"
android:layout_height="wrap_content" >
<TableRow
android:id="@+id/tableRow1"
android:layout_width="fill_parent"
android:layout_height="wrap_content" >
<TextView
android:id="@+id/textView1"
android:layout_width="wrap_content"
android:layout_height="wrap_content"
android:layout_weight="1"
android:background="#008000"
android:gravity="center"
android:text="Random Number:"
android:textColor="#FFFFFF" />
<TextView
android:id="@+id/textView2"
android:layout_width="wrap_content"
android:layout_height="wrap_content"
android:layout_weight="1"
android:background="#8000FF"
android:gravity="center"
android:text="List Prime:"
android:textColor="#FFFFFF" />
</TableRow>
<TableRow
android:id="@+id/tableRow2"
android:layout_width="wrap_content"
android:layout_height="wrap_content" >
<ScrollView
android:id="@+id/scrollView1"
android:layout_width="wrap_content"
android:layout_weight="1"
android:layout_height="wrap_content" >
<LinearLayout
android:id="@+id/llrandomnumber"
android:layout_width="match_parent"
android:layout_height="match_parent"
android:orientation="vertical" >
</LinearLayout>
</ScrollView>
<ScrollView
android:id="@+id/scrollView2"
android:layout_width="wrap_content"
android:layout_weight="1"
android:layout_height="wrap_content" >
<LinearLayout
android:id="@+id/llprimenumber"
android:layout_width="match_parent"
android:layout_height="match_parent"
android:orientation="vertical" >
</LinearLayout>
</ScrollView>
</TableRow>
</TableLayout>
</LinearLayout>
[/code]
– Xử lý coding, bạn xem MyAsyncTask:
Class này Tui kế thừa từ: AsyncTask<Integer, Integer, ArrayList<Integer>>
Integer ở đối số 1: Được truyền vào khi ta thực thi tiến trình.
Integer ở đối số 2: Được truyền vào để tiến hành cập nhật giao diện trong hàm publishProgress
ArrayList<Integer>: Kết quả trả về sau khi thực hiện xong tiến trình.
Việc đưa control động cũng tương tự như các bài trước.
[code language=”java”]
package tranduythanh.com;
import java.util.ArrayList;
import java.util.Random;
import android.app.Activity;
import android.os.AsyncTask;
import android.os.Handler;
import android.os.SystemClock;
import android.widget.Button;
import android.widget.EditText;
import android.widget.LinearLayout;
import android.widget.Toast;
public class MyAsyncTask extends
AsyncTask<Integer, Integer, ArrayList<Integer>>
{
private LinearLayout llrandom,llprime;
private Random rd=new Random();
private Activity context;
public MyAsyncTask(Activity context)
{
//lấy các control trong MainThread
this.llrandom=(LinearLayout)
context.findViewById(R.id.llrandomnumber);
this.llprime=(LinearLayout)
context.findViewById(R.id.llprimenumber);;
this.context=context;
}
//Begin – can use UI thread here
protected void onPreExecute() {
super.onPreExecute();
Toast.makeText(context, "Start here",
Toast.LENGTH_SHORT).show();
//khi bắt đầu thực thi tiến trình thì tiến hành xóa toàn bộ control bên trong
this.llrandom.removeAllViews();
this.llprime.removeAllViews();
}
protected ArrayList<Integer> doInBackground(Integer… params) {
int step=1;
ArrayList<Integer>list=new ArrayList<Integer>();
//vòng lặp chạy hết n số button truyền vào
int n=params[0];
while(isCancelled()==false && step<=n)
{
step++;
SystemClock.sleep(100);
//lấy số ngẫu nhiên
int x=rd.nextInt(100)+1;
//gọi cập nhật giao diện
publishProgress(x);
//nếu là số nguyên tố thì lưu vào danh sách
if(isPrime(x))
list.add(x);
}
//trả về danh sách số nguyên tố
return list;
}
@Override
protected void onProgressUpdate(Integer… values) {
super.onProgressUpdate(values);
//lấy giá trị truyền vào trong doinbackground
Integer item=values[0];
//tạo Button với Text có giá trị là số ngẫu nhiên
Button btn=new Button(context);
btn.setWidth(100);
btn.setHeight(30);
btn.setText(item+"");
//đưa button lên view bên trái màn hình
this.llrandom.addView(btn);
}
public void doRawPrime(int x)
{
//hàm vẽ các Button là chứac các số nguyên tố
Button btn=new Button(context);
btn.setWidth(100);
btn.setHeight(30);
btn.setText(x+"");
//đưa Button vào view bên phải màn hình
this.llprime.addView(btn);
}
//hàm kiểm tra số nguyên tố
public boolean isPrime(int x)
{
if(x<2)return false;
for(int i=2;i<=Math.sqrt(x);i++){
if(x%i==0)return false;}
return true;
}
@Override
protected void onPostExecute(ArrayList<Integer> result) {
super.onPostExecute(result);
//sau khi tiến trình kết thúc thì hàm này sẽ được thực thi
//lấy về danh sách các số nguyên tố
final ArrayList<Integer>list=result;
//tiến hành dùng Handler class để thực hiện
final Handler handler=new Handler();
Thread th=new Thread(new Runnable() {
public void run() {
//lặp để vẽ các Button là số nguyên tố
for(int i=0;i <list.size();i++){
final int x=list.get(i);
SystemClock.sleep(100);
handler.post(new Runnable() {
public void run() {
doRawPrime(x);}
});
}
handler.post(new Runnable() {
public void run() {
Toast.makeText(context, "Finish",
Toast.LENGTH_SHORT).show();
}
});
}
});
th.start();
}}//end MyAsyncTask
[/code]
Mục đích của bài này là Tui muốn nói rằng chúng ta có thể kết hợp các kỹ thuật xử lý đa tiến trình với nhau.
Ở đây Tui có 1 câu hỏi nhỏ là, nếu trong hàm onPostExecute Tui muốn sử dụng lại MyAsyncTask thì viết coding như thế nào là hớp lý (ý của tui là chỉ sử dụng 1 class MyAsyncTask, nhưng ta có thể thông qua nó để tạo nhiều tiến trình khác nhau với những chức năng khác nhau). Bạn hãy suy nghĩ và làm thử.
Tiếp tục xem MainActivity:
[code language=”java”]
package tranduythanh.com;
import android.os.Bundle;
import android.app.Activity;
import android.view.Menu;
import android.view.View;
import android.widget.Button;
import android.widget.EditText;
public class MainActivity extends Activity {
Button btnstart;
MyAsyncTask task;
protected void onCreate(Bundle savedInstanceState) {
super.onCreate(savedInstanceState);
setContentView(R.layout.activity_main);
btnstart=(Button) findViewById(R.id.btnstart);
btnstart.setOnClickListener(new
View.OnClickListener() {
public void onClick(View arg0) {
doStart();
}
});
}
public void doStart()
{
String s=((EditText)
this.findViewById(R.id.editnumber))
.getText().toString();
//lấy số lượng từ EditText
int n=Integer.parseInt(s);
task=new MyAsyncTask(this);
task.execute(n);
}
}
[/code]
– Bài này có 1 chút phức tạp, bạn cố gắng đọc hiểu.
– Bạn có thể tải coding mẫu ở đây: http://www.mediafire.com/download/1m270fb1zpdw628/LearnMultiThreading_AsyncTask_Handler.rar
– Bài kết tiếp Tui sẽ trình bày về BroadCastReceiver và cách xử lý khi có tin nhắn gửi tới, bạn có thể ứng dụng nó để viết phần mềm Xử Lý Tin Nhắn Rác. Bạn chú ý theo dõi.
– Chúc các bạn thành công.
cảm ơn những chia sẻ quý báu của thày, chúng em luôn mong những bài giảng của thày 😀
e k hiểu chỗ
handler.post(new Runnable() {
public void run() {
doRawPrime(x);}
});
tại sao ở trong public void run(){} e k thể gọi layout prime đc,e tính định viết thế cho nhanh nhưng lại buộc làm theo cách của thầy 🙁
MyAsyncTask.this.llprime.addView(btn);
Có ai trả lời đc câu hỏi dưới đây mà thầy nêu ra chưa ?
Ở đây Tui có 1 câu hỏi nhỏ là, nếu trong hàm onPostExecute Tui muốn sử dụng lại MyAsyncTask thì viết coding như thế nào là hớp lý (ý của tui là chỉ sử dụng 1 class MyAsyncTask, nhưng ta có thể thông qua nó để tạo nhiều tiến trình khác nhau với những chức năng khác nhau). Bạn hãy suy nghĩ và làm thử.
Em xin thầy trả lời dùm chúng em, Em cám ơn thầy nhiều ạ
Theo mình thì muốn làm được điều này, ta sẽ khai báo 1 biến trong lớp MyAsyncTask gọi là int Mode. Giá trị của biến này chính là giúp ta xác định được mục đích gọi AsyncTask, ví dụ Mode=0 thì thực hiện Random số, Mode=1 thì thực hiện tìm số nguyên tố. Trong các method, ta chỉ cần kiểm tra Mode là có thể biết được cần phải làm gì
Theo mình là sẽ dùng 1 interface để thực hiện thao tác dữ liệu tại một class khác. Interface đó sẽ được thực hiện trong onPostExecute. Lợi thế của interface là có cơ chế đa hình. Mỗi class sẽ thực hiện những chức năng khác nhau do dữ liệu trả về khác nhau. Tại mỗi class khác nhau thì ta sẽ implements interface đó để thực hiện lại thao tác cần làm. P/s: Đừng quên khai báo class đó trong hàm khởi tạo của asynctask nhé 😀
Xin cảm ơn bài chia sẽ thầy, cho em xin hỏi là ‘tại sao mình phải cập nhật IU cho random numbers và Prime ở 2 chỗ khác nhau ạ? Nếu em gom để chung 1 hàm onProgressUpdate thì sao?’
isCancled==false. Ở đây ý nghĩa này là gì vậy mọi người
Kiểm tra xem AsyncTask có bị cancel không đó bạn. Thân 🙂