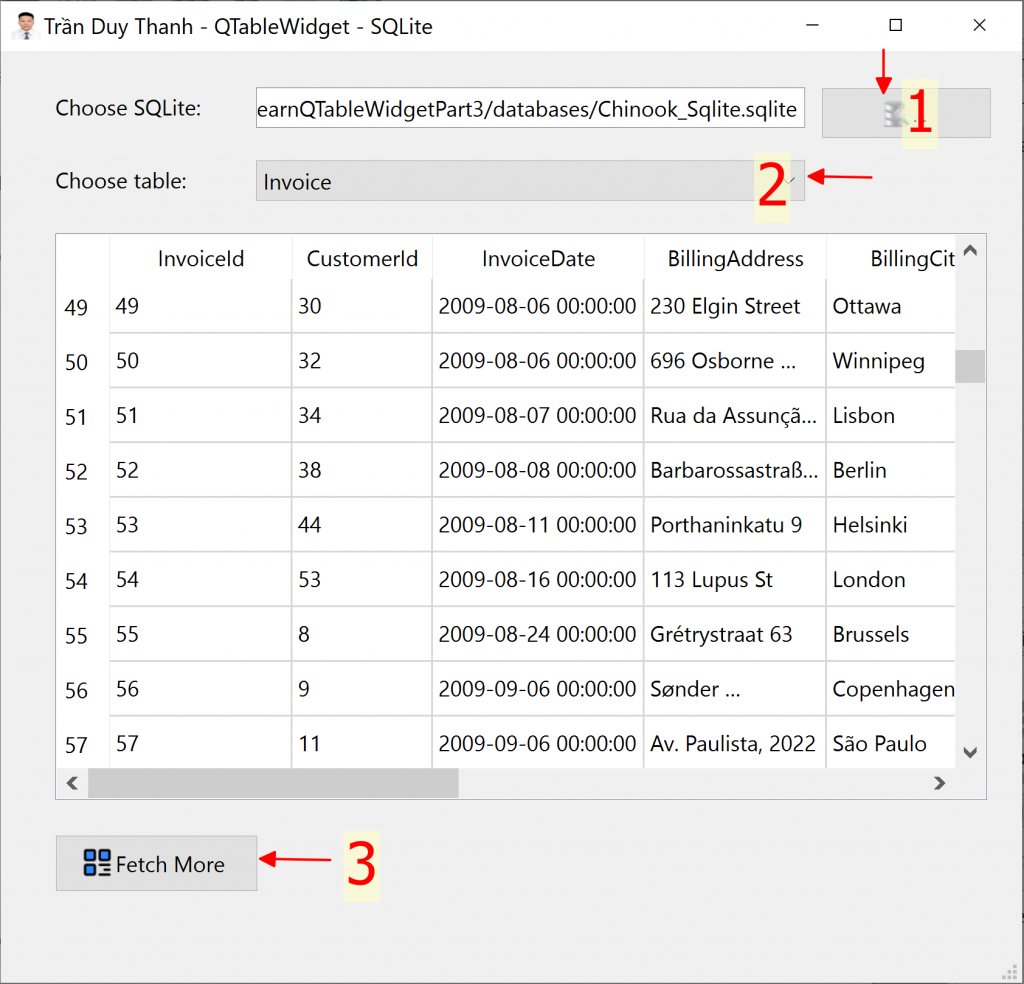
Trong chuỗi các bài học về BarGraph để trực quan hóa dữ liệu Tui sẽ trình bày 6 bài về các kỹ thuật liên quan tới BarGraph, để tùy từng tình huống hay nhu cầu sử dụng khác nhau mà các bạn có thể áp dụng.
Đối tượng PlotWidget cũng như các kỹ thuật liên quan chúng ta đã học rất chi tiết và đầy đủ ở phần 2, ở phần này Tui không nói lại PlotWidget mà Tui chỉ sử dụng lại PlotWidget để vẽ các BarGraph biểu độ dạng cột, một trong những loại trực quan quá phổ biến.
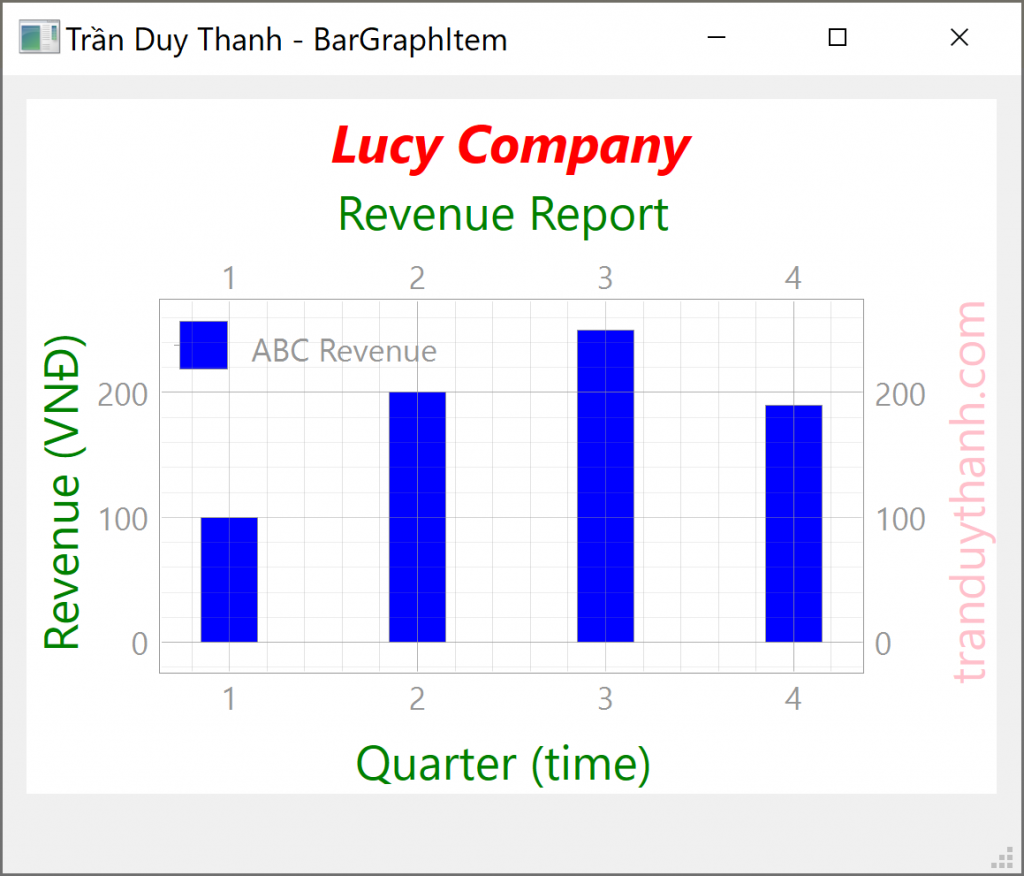
Mô tả tập dữ liệu cho bài này:
Công ty Lucy có dữ liệu doanh thu trung bình theo quý của năm 2023 như sau:
Quý
Trung bình doanh thu
1
100
2
200
3
250
4
190
Hãy trực quan hóa dữ liệu bằng biểu đồ cột. Hình dưới đây minh họa kỹ thuật đầu tiên trong chuỗi 6 bài về BarGraphItem này:
Chúng ta lưu ý là toàn bộ các bài liên quan tới trực quan hóa dữ liệu, Chúng ta sẽ sử dụng PlotWidget, các hàm phổ biến liên quan đã được học ở các bài trước đều được tái sử dụng. Còn loại Chart hiển thị như thế nào thì tùy từng trường hợp mà ta sẽ gọi các hàm hiển thị khác nhau.
Ta từng bước thực hiện bài này như sau:
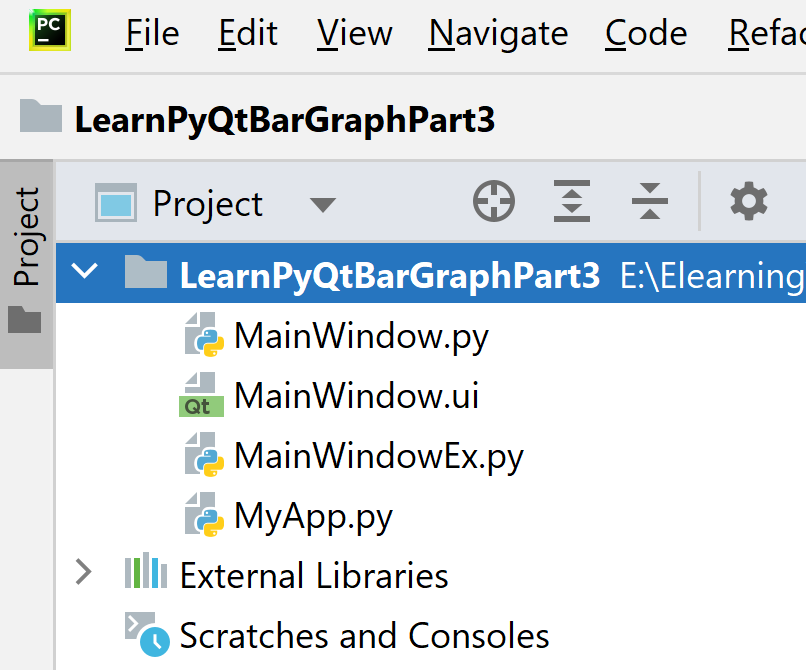
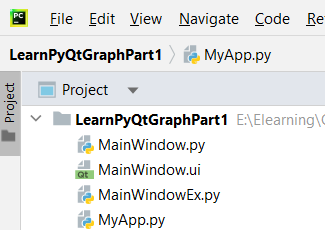
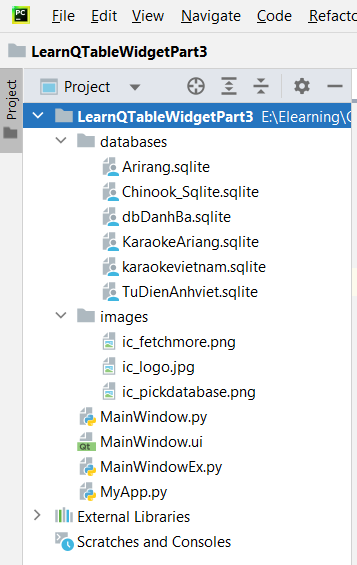
Bước 1: Tạo dự án “LearnPyQtBarGraphPart3” có cấu trúc như hình dưới đây:
“MainWindow.ui” là giao diện thiết kế tương tác người dùng bằng Qt Designer
“MainWindow.py” là Generate Python code cho giao diện “MainWindow.ui”
“MainWindowEx.py” là file mã lệnh kế thừa từ Generate Python Code để xử lý: Nạp giao diện, hiển thị chart, gán sự kiện và không bị lệ thuộc vào giao diện bị thay đổi sau này khi Generate lại code
“MyApp.py” là file mã lệnh thực thi chương trình.
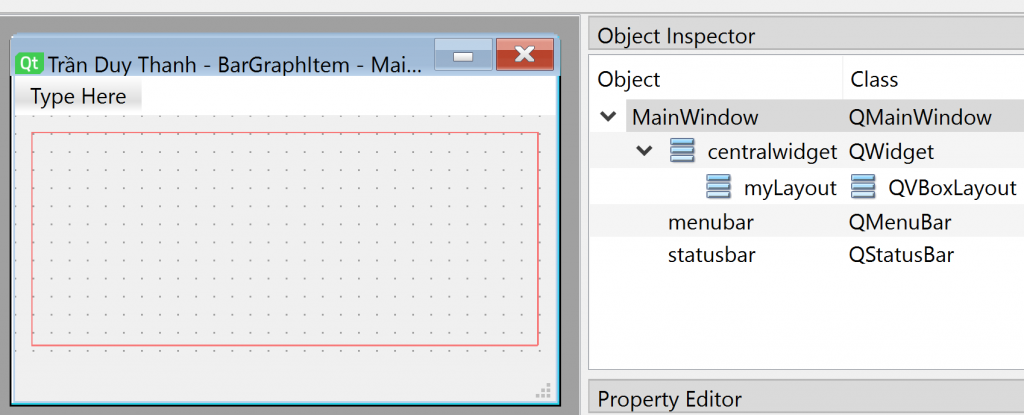
Bước 2: Thiết kế giao diện “MainWindow.ui” và đặt tên cho Widget/layout như hình dưới đây:
Bước 3: Generate Python Code cho “MainWindow.ui”, lúc này mã lệnh “MainWindow.py” tự động được tạo ra:
# Form implementation generated from reading ui file 'MainWindow.ui'
#
# Created by: PyQt6 UI code generator 6.5.2
#
# WARNING: Any manual changes made to this file will be lost when pyuic6 is
# run again.  Do not edit this file unless you know what you are doing.


from PyQt6 import QtCore, QtGui, QtWidgets


class Ui_MainWindow(object):
    def setupUi(self, MainWindow):
        MainWindow.setObjectName("MainWindow")
        MainWindow.resize(434, 352)
        self.centralwidget = QtWidgets.QWidget(parent=MainWindow)
        self.centralwidget.setObjectName("centralwidget")
        self.verticalLayout_2 = QtWidgets.QVBoxLayout(self.centralwidget)
        self.verticalLayout_2.setObjectName("verticalLayout_2")
        self.myLayout = QtWidgets.QVBoxLayout()
        self.myLayout.setObjectName("myLayout")
        self.verticalLayout_2.addLayout(self.myLayout)
        MainWindow.setCentralWidget(self.centralwidget)
        self.menubar = QtWidgets.QMenuBar(parent=MainWindow)
        self.menubar.setGeometry(QtCore.QRect(0, 0, 434, 22))
        self.menubar.setObjectName("menubar")
        MainWindow.setMenuBar(self.menubar)
        self.statusbar = QtWidgets.QStatusBar(parent=MainWindow)
        self.statusbar.setObjectName("statusbar")
        MainWindow.setStatusBar(self.statusbar)

        self.retranslateUi(MainWindow)
        QtCore.QMetaObject.connectSlotsByName(MainWindow)

    def retranslateUi(self, MainWindow):
        _translate = QtCore.QCoreApplication.translate
        MainWindow.setWindowTitle(_translate("MainWindow", "Trần Duy Thanh - BarGraphItem"))
Bước 4: Viết mã lệnh cho “MainWindowEx.py”
Lớp MainWindowEx kế thừa lớp Ui_MainWindow (lớp được Generate Python code ở bước trước)
Tui định nghĩa 1 constructor __init__() gọi lại constructor ở lớp cha, tạm thời trong bài tập này chưa xử lý gì khác.
from MainWindow import Ui_MainWindow
import pyqtgraph as pg

class MainWindowEx(Ui_MainWindow):
    def __init__(self):
        super().__init__()
    def setupUi(self, MainWindow):
        super().setupUi(MainWindow)
        self.MainWindow=MainWindow
        self.setupBarGraph()
Hàm setupUi() được override để nạp giao diện, lưu lại biến MainWindow để sử dụng cho quá trình xử lý trong tương lai. Đồng thời nó cũng gọi hàm setupBarGraph() để hiển thị Chart, Hàm này ta viết như sau:
Ta thấy rằng tất cả các phương thức thường sử dụng của PlotWidget trình bày ở bài học trước đều được dùng lại ở đây, nên Tui không có trình bày lại các kiến thức cũ.
Mà các bạn hãy để ý các dòng lệnh mới liên quan tới BarGraphItem thôi:
Khai bao và khởi tạo giá trị cho biến width, biến này là độ rộng của cột Bar :
width = 0.3
Khai báo mảng lưu 4 quý vào biến quarter:
quarter = [1, 2, 3, 4]
Khai báo mảng doanh thu tương ứng với mảng quarter:
revenue = [100, 200, 250, 190]
Cuối cùng là hàm vẽ biểu đồ BarGraph bằng cách khai báo đối tượng BarGraphItem:
Bước 5: Viết mã lệnh “MyApp.py” để thực thi chương trình:
from PyQt6.QtWidgets import QApplication, QMainWindow

from MainWindowEx import MainWindowEx

app=QApplication([])
myWindow=MainWindowEx()
myWindow.setupUi(QMainWindow())
myWindow.show()
app.exec()
Chạy “MyApp.py” ta có kết quả như mong muốn, các biểu đồ cột, các nhãn của các cột, tiêu đề chart… được hiển thị:
Như vậy tới đây Tui đã trình bày xong cách lập trình xử lý trực quan hóa dữ liệu với BarGraph. Các bạn đã biết cách khai báo các mảng tương ứng với các trục, biết cách gọi các hàm liên quan tới BarGraphItem để hiển thị Chart. Cũng như ôn tập lại được toàn bộ kiến thức liên quan tới PlotWidget, một trong các đối tượng quan trọng và thường sử dụng trong trực quan hóa dữ liệu.
Tui tóm tắt sơ lược ý nghĩa chức năng của một số phương thức của PlotWidget
Phương thức
Ý nghĩa chức năng
setTitle(title)
Thiết lập tiêu đề cho Chart Ví dụ: self.graphWidget.setTitle(“My Chart Title”)
setTitle(title, color, size)
Thiết lập tiêu đề cho Chart cùng với định dạng màu chữ và cỡ chữ. Ví dụ: self.graphWidget.setTitle(“My Chart Title”, color=”b”, size=”30pt”)
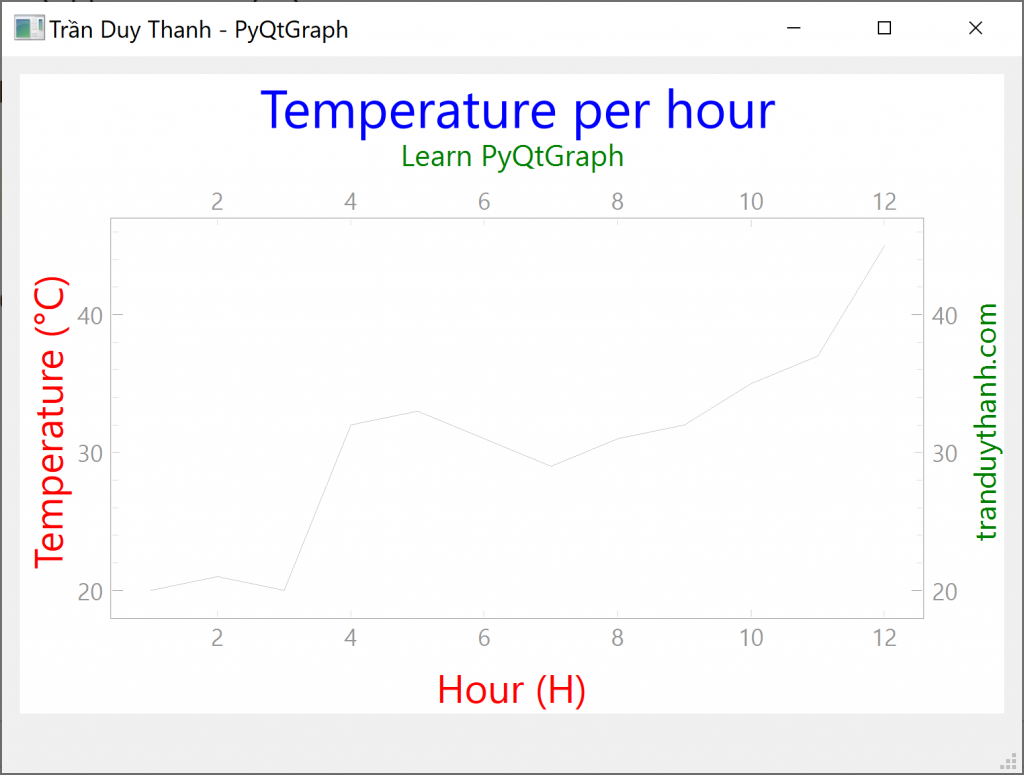
setLabel(position,text)
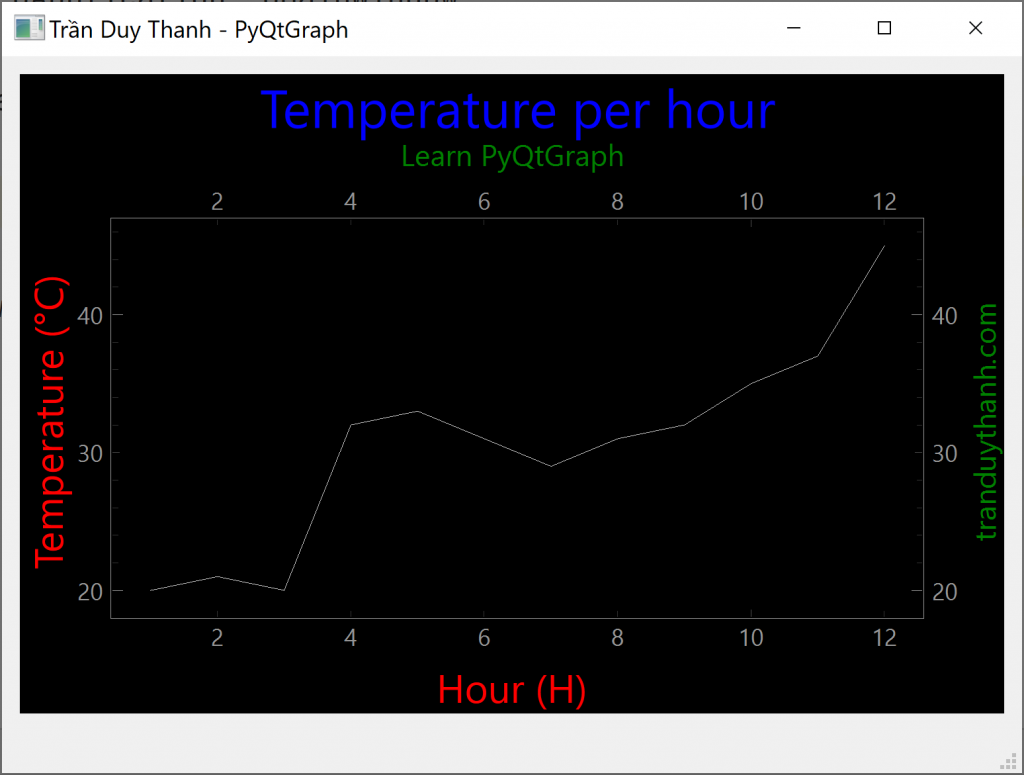
Thiết lập tiêu đề cho các trục. position có 4 giá trị: ‘left,’right’,’top’,’bottom’ Ví dụ: styles = {‘color’:’r’, ‘font-size’:’30pt’} self.graphWidget.setLabel(‘left’, ‘Temperature (°C)’, **styles) self.graphWidget.setLabel(‘bottom’, ‘Hour (H)’, **styles)
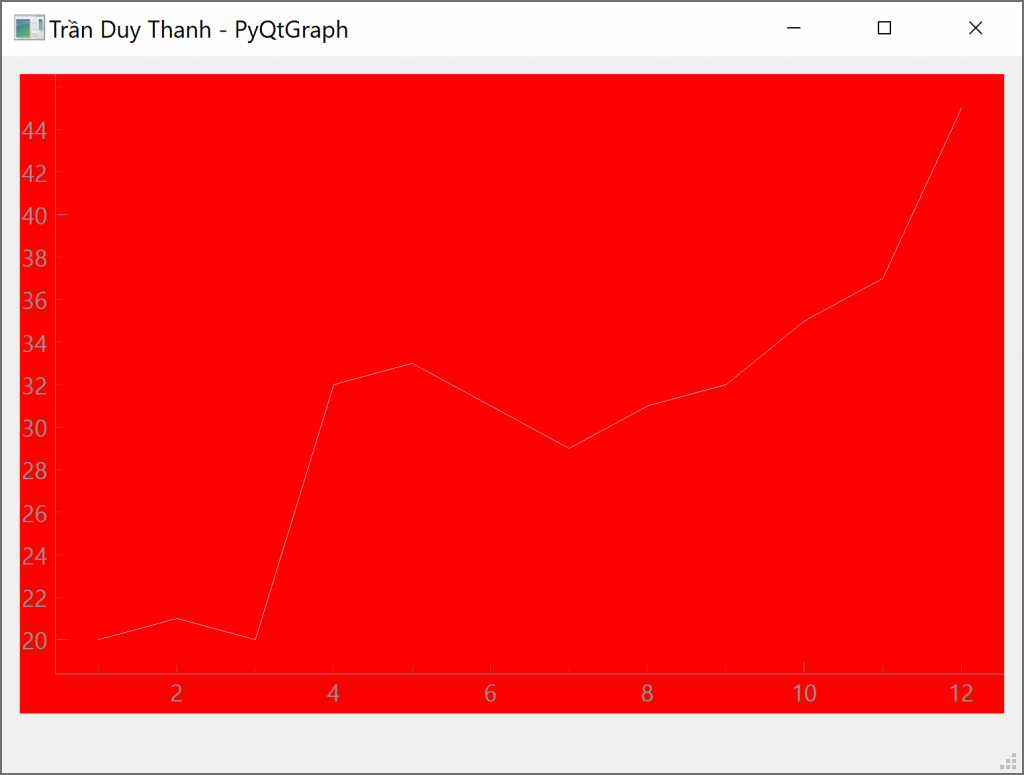
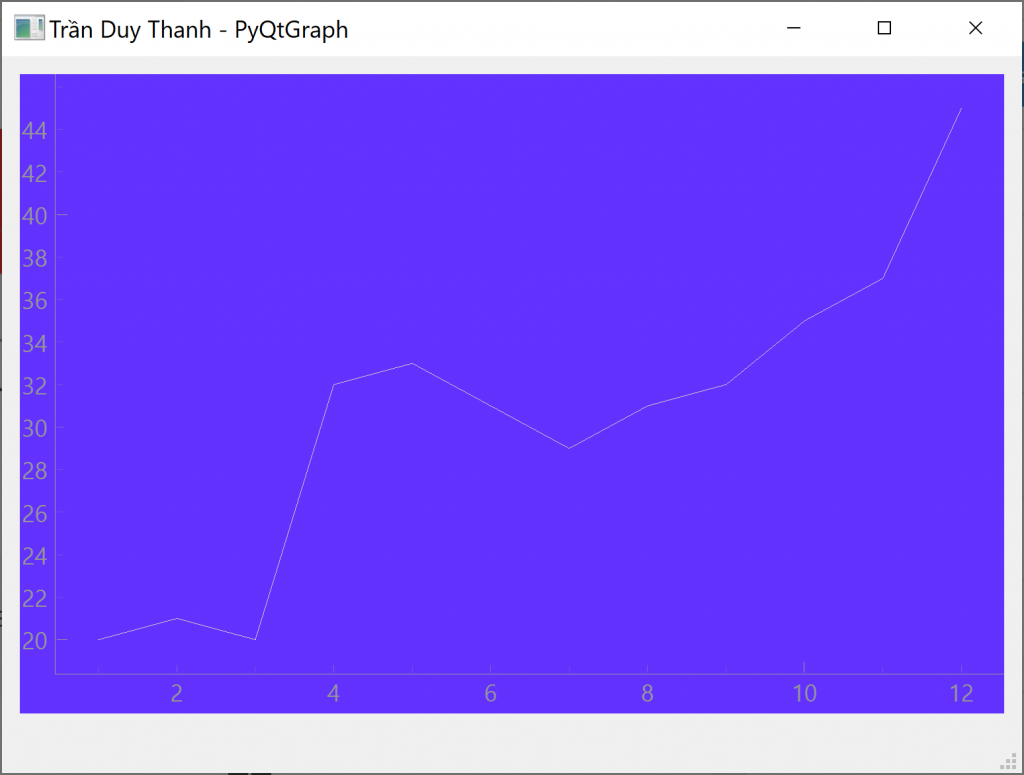
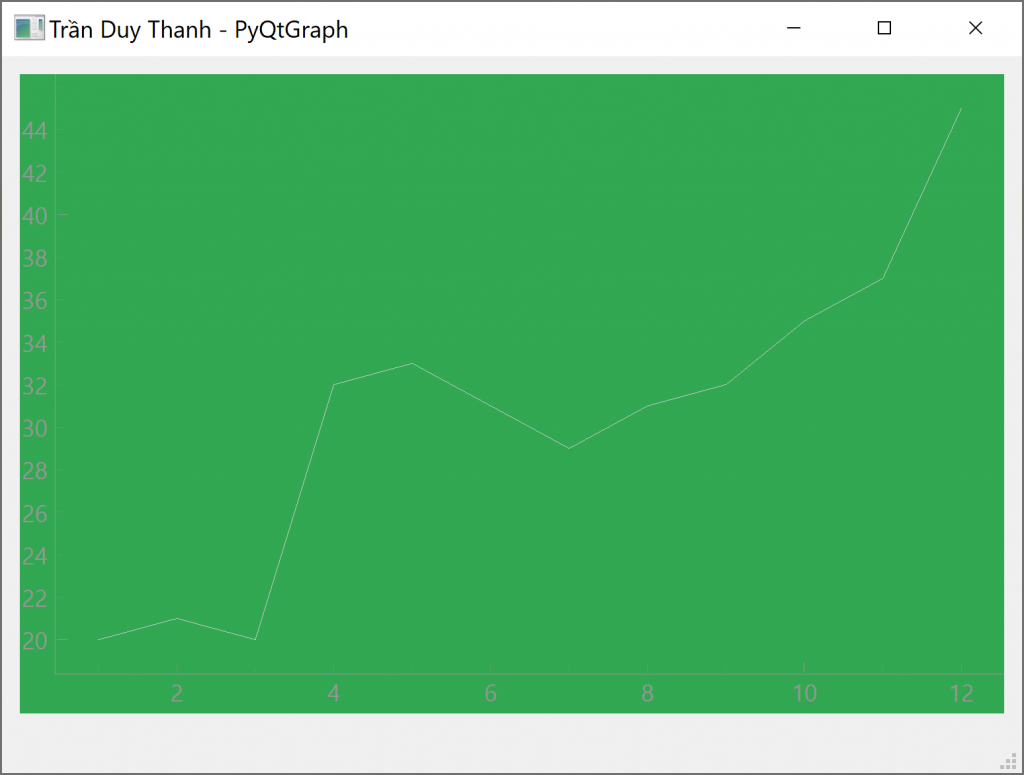
setBackground(background)
Phương thức này dùng để thiết lập màu nền cho Chart. Ví dụ: import pyqtgraph as pg self.graphWidget=pg.PlotWidget() self.graphWidget.setBackground(“y”)
Hàm để vẽ Chart có sử dụng Pen để định dạng đường vẽ như màu đường kẻ, kiểu đường kẻ, độ dày đường kẻ, biểu tượng. Ví dụ: pen = pg.mkPen(color=(255, 0, 0)) self.graphWidget.plot(hour, temperature, pen=pen)
addLegend()
Hàm hiển thị Legend cho Chart
setXRange(5, 20, padding=0)
Thiết lập giới hạn cho trục X
setYRange(30, 40, padding=0)
Thiết lập giới hạn cho trục Y
clear()
Xóa các plot trên Chart
data_line= graphWidget.plot(x, y)
data_line.setData(new x, new y)
Cập nhật dữ liệu cho Plot
Tui trình bày chi tiết các chức năng dưới này, vừa kết hợp lý thuyết và thực hành, các bạn nhớ thực hiện theo.
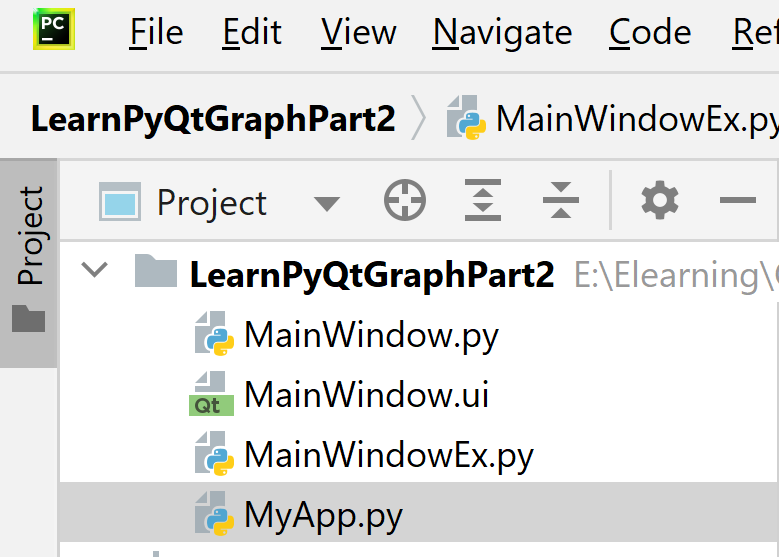
Tạo dự án “LearnPyQtGraphPart2” thiết kế giao diện và dữ liệu mẫu giống như bài trước. Bạn có thể copy y chang toàn bộ các file .py, .ui của bài trước vào “LearnPyQtGraphPart2” để sử dụng luôn
“MainWindow.ui” là giao diện được thiết kế bằng Qt Designer
“MainWindow.py” là generate python code của “MainWindow.ui”
“MainWindowEx.py” là file mã lệnh kế thừa từ “MainWindow.py” để xử lý nạp giao diện, gán Chart và các sự kiện, lớp này sẽ không lệ thuộc vào sự thay đổi của giao diện cũng như generate code
“MyApp.py” là file mã lệnh thực thi chương trình
Giao diện “MainWindow.ui” và dữ liệu mẫu trong “MainWidowEx.py” là y chang như bài trước nên Tui không chụp hình lại, các bạn tự chuyển qua. Còn dưới đây Tui sẽ lần lượt hướng dẫn từng chức năng cụ thể, các bạn bổ sung vào “MainWindowEx.py“:
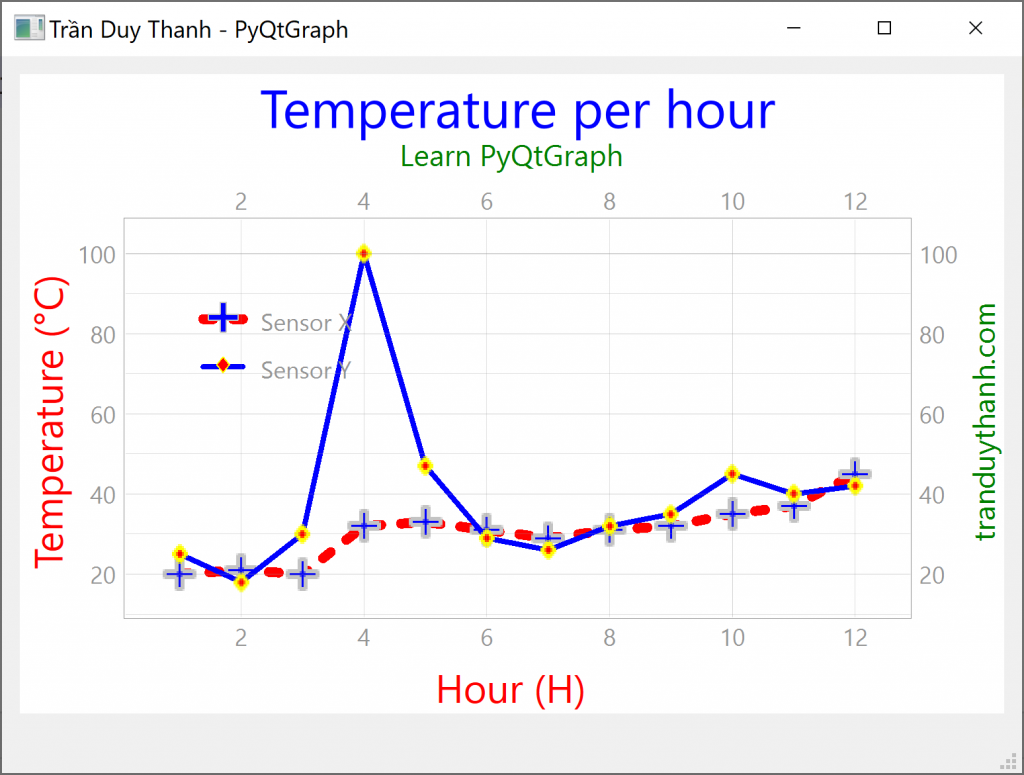
1. Thiết lập tiêu đề cho Chart
Ta thiết lập tiêu đề cho Chart bằng hàm setTitle(title)
self.graphWidget.setTitle("Chart Title Here")
Ngoài ra ta có thể định dạng style cho title như màu tiêu đề, cỡ chữ tiêu đề, in đậm, in nghiêng.
Style
Cách dùng
color
‘CCFF00’ , ‘b’
size
’10pt’
bold
True/False
italic
True/False
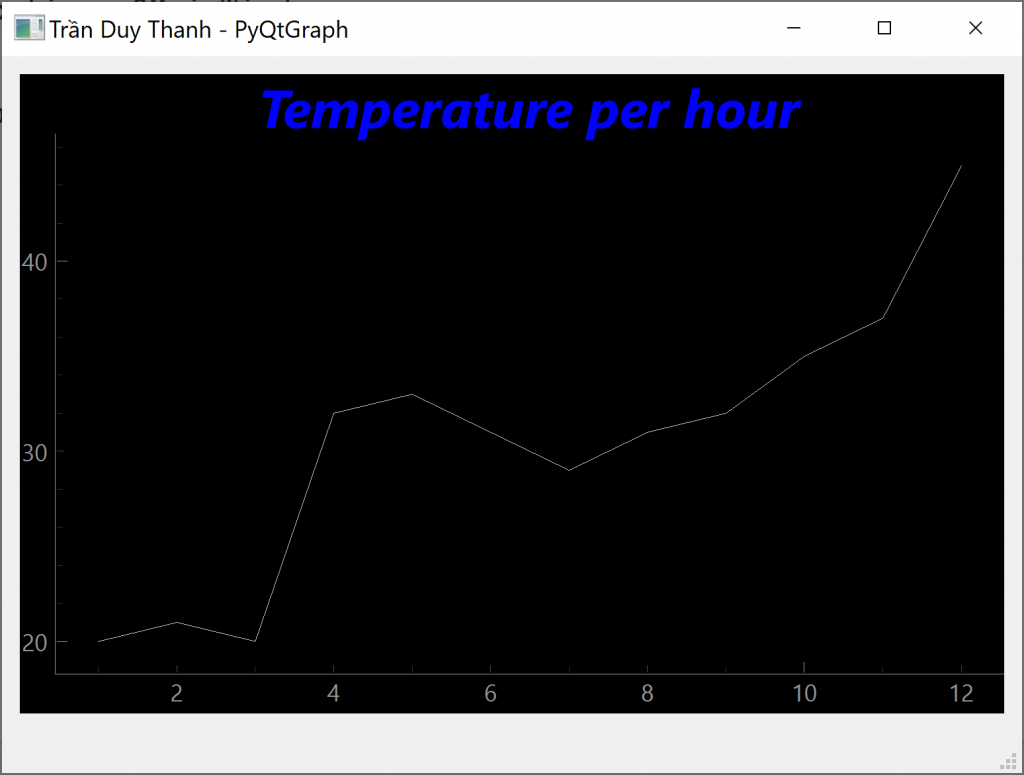
self.graphWidget.setTitle("Temperature per hour", color="b", size="30pt",bold=True,italic=True)
Dưới đây là chi tiết mã lệnh của MainWindowEx.py cho phần tiêu đề:
#Step 1: import pyqtgraph
import pyqtgraph as pg
from MainWindow import Ui_MainWindow

class MainWindowEx(Ui_MainWindow):
    def __init__(self):
        super().__init__()
    def setupUi(self, MainWindow):
        super().setupUi(MainWindow)
        self.MainWindow=MainWindow
        #Step 2: call pg.PlotWidget()
        self.graphWidget = pg.PlotWidget()
        #self.graphWidget.setTitle("Temperature per hour")
        #self.graphWidget.setTitle("Temperature per hour", color="b", size="30pt")
        self.graphWidget.setTitle("Temperature per hour", color="b", size="20pt",bold=True,italic=True)
        #Step 3: Create plot data
        hour = [1, 2, 3, 4, 5, 6, 7, 8, 9, 10,11,12]
        temperature = [20, 21, 20, 32, 33, 31, 29,31, 32, 35,37, 45]
        # Step 4: call plot method
        self.graphWidget.plot(hour, temperature)
        #Step 5: add graphWidget into Layout:
        self.myLayout.addWidget(self.graphWidget)
    def show(self):
        self.MainWindow.show()
Chạy “MyApp.py” ta có kết quả:
Ngoài ra ta cũng có thể thiết lập title bằng cấu trúc HTML như dưới đây:
self.graphWidget.setTitle("<span style=\"color:blue;font-size:20pt\">Temperature per hour</span>")
2. Thiết lập tiêu đề cho các Trục
Chúng ta dùng hàm setLabel(position,text,style) để thiết lập tiêu đề cho các trục. position có ‘left,’right’,’top’,’bottom’. Ví dụ:
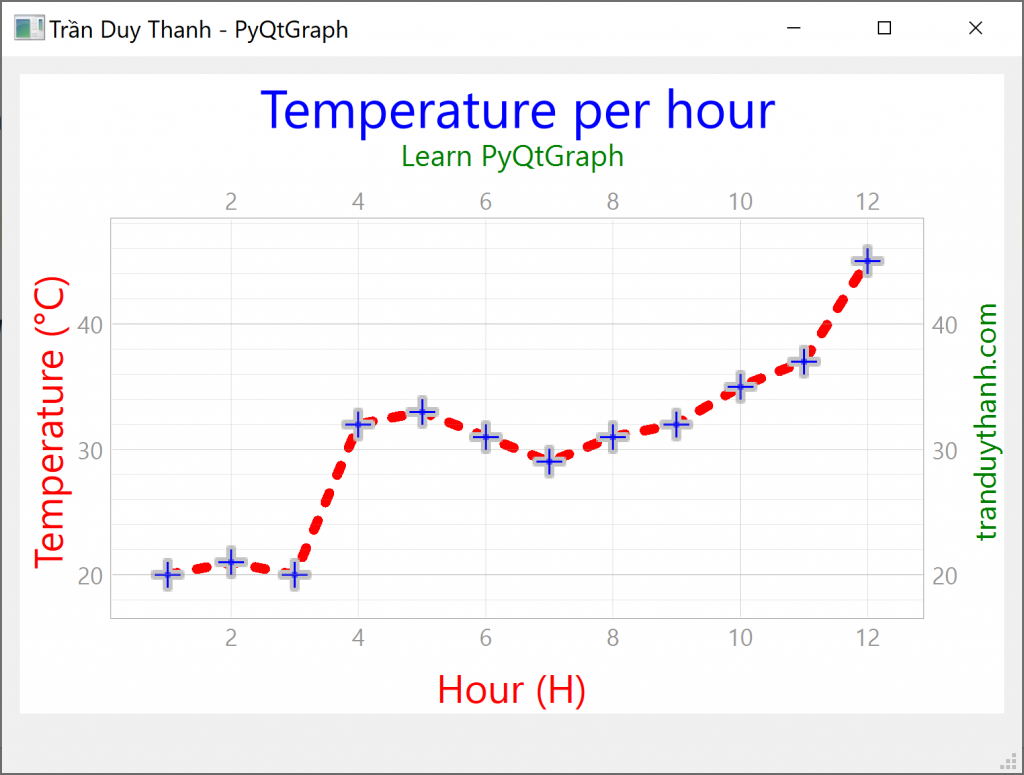
Ta thấy Marker có màu xanh (symbolBrush) và màu viền là xám (symbolPen), biểu tượng + (symbol), kích thước của marker (symbolSize). Ta thử thay thế các symbol khác nhau rồi quan sát so sánh kết quả.
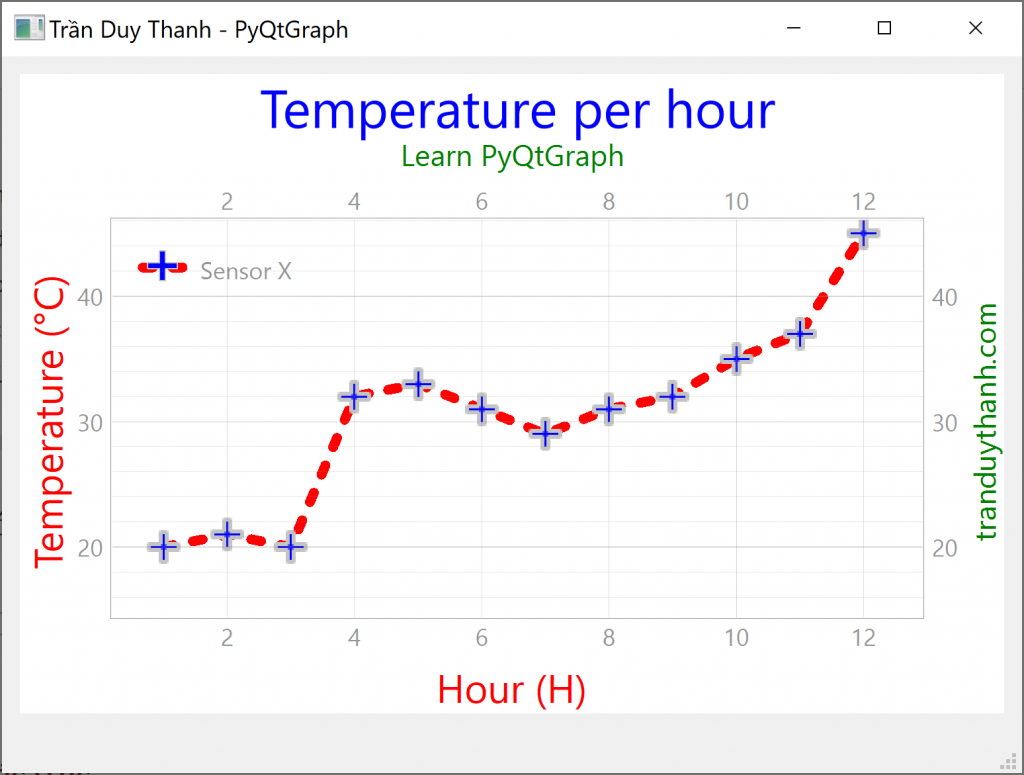
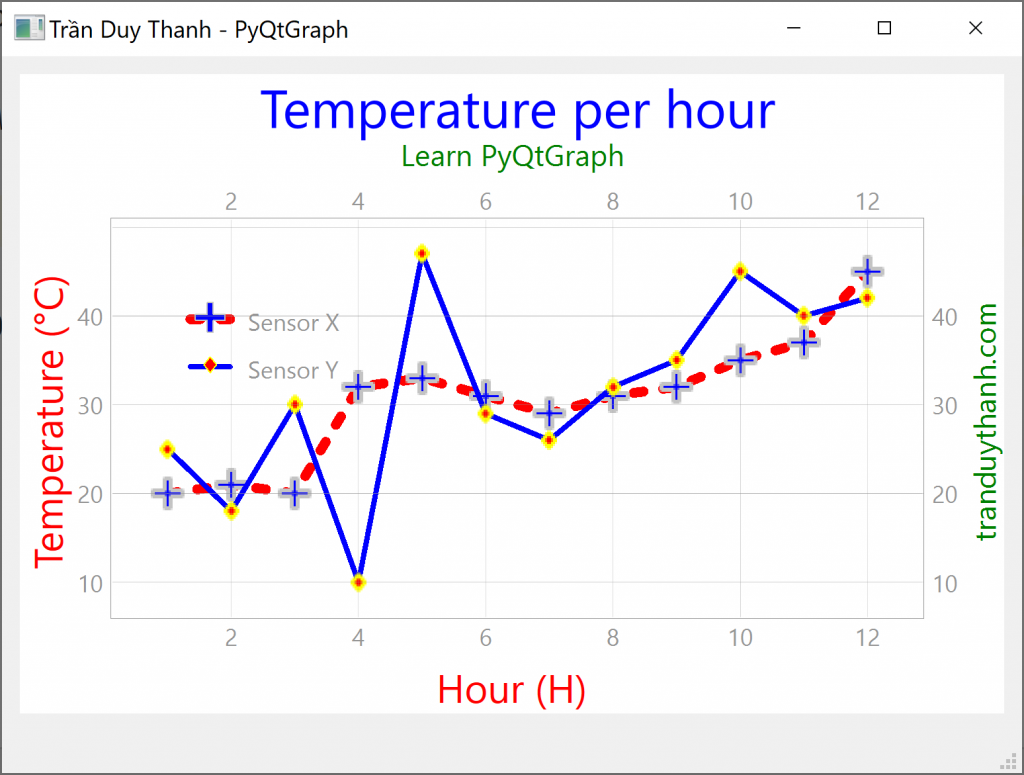
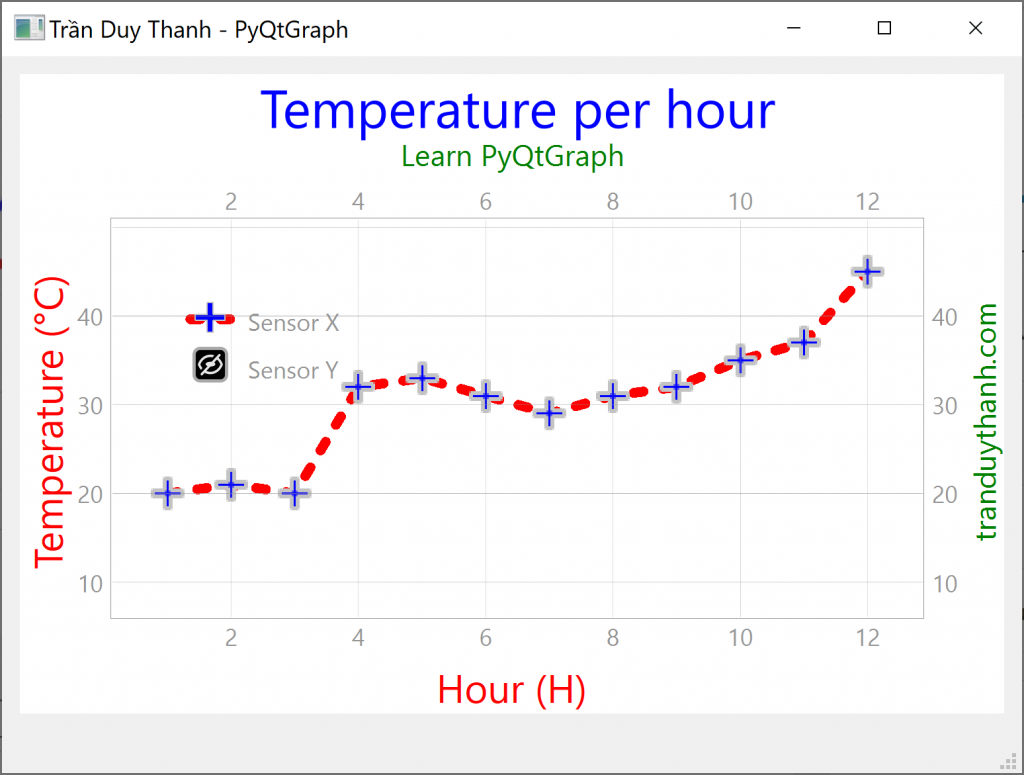
7. Thiết lập Legends
Để thiết lập Legends cho Chart, trước tiên các Line/plot cần được đặt tên khi gọi phương thức plot() của PlotWidget.
Sau đó ta gọi phương thức addLegend() của PlotWidget.
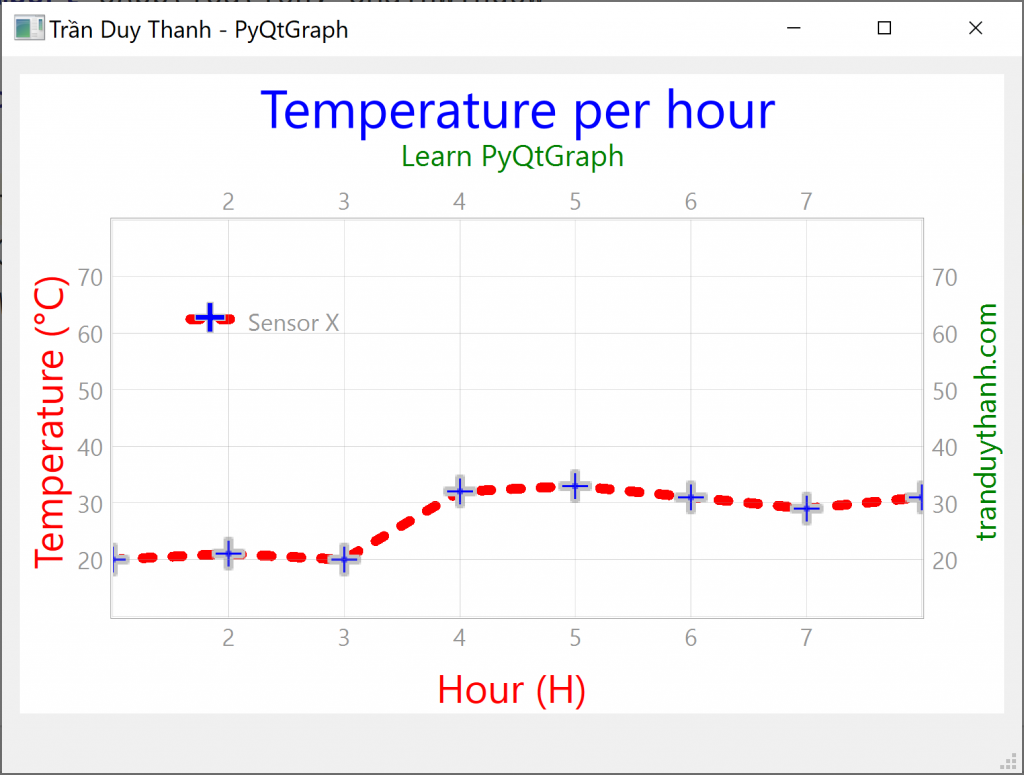
Ta có thể ẩn/hiển thị các Plot bằng cách nhấn vào Legend, ví dụ như muốn ẩn Sensor Y:
Ta có thể áp dụng kỹ thuật của Multiple Line để tự động nạp nhiều Plot cho 1 Chart. Ví dụ như hãy vẽ biểu đồ doanh thu từng tháng của 10 chi nhánh trong năm 2023.
10. Xóa và cập nhật Plot
Để xóa Plot trên Chart ta gọi lệnh:
self.graphWidget.clear()
Trong quá trình hiển thị Chart, đặc biệt là liên quan tới Realtime data thì rõ ràng ta muốn Chart được cập nhật tự động.
Bước 1: Khai báo đối tượng lưu trữ lại Plot, ví dụ ta khai báo plot 2 cho Sensor Y
Bước 2: Thay đổi giá trị trong mảng temperature2, ví dụ:
temperature2[3]=100
Ở bước 2 này tức là nếu trong quá trình vận hành trực quan hóa, mà bất cứ khi nào đó mảng dữ liệu bị thay đổi. Ở đây là Tui minh họa 1 trường hợp phần tử thứ 3 bị đổi dữ liệu
Bước 3: Gọi hàm setData() của plot2 để cập nhật Plot
plot2.setData(hour, temperature2)
Code đầy đủ của MainWindowEx.py cho phần cập nhật Plot:
Chạy MyApp.py ta thấy temperature2[3]=100 được update.
Dựa vào tính năng nay ta có thể viết code tự động update dữ liệu theo thời gian.
Như vậy tới Tui đã hướng dẫn đầy đủ và chi tiết các chức năng quan trọng và thường dùng của PlotWidget trong trực quan hóa dữ liệu. Các bạn chú ý làm lại nhiều lần và hiểu thật rõ, áp dụng thật tốt từng kỹ thuật để giúp cho trực quan hóa được tốt nhất.
PyQt6 cung cấp gói thư viện PyQtGraph, QGraphicScene để trực quan hóa dữ liệu dưới dạng biểu đồ một cách hiệu quả. Đặc biệt đối với Live Data, cũng như cung cấp khả năng tương tác và khả năng dễ dàng tùy chỉnh các loại biểu đồ bằng các tiện ích đồ họa trong Qt.
Bài học này Chúng ta sẽ tìm hiểu cách tải thư viện và vẽ một chart đơn giản bằng PyQtGraph. Bài học sau Tui sẽ trình bày chi tiết các thành phần bên trong PyQtGraph, và hướng dẫn cách customize màu đường kẻ, loại đường kẻ, các tiêu đề của các trục, màu nền, cũng như cách vẽ nhiều biểu đồ trong cùng một màn hình.
Bước 2: Tạo một dự án tên “LearnPyQtGraphPart1” trong Pycharm. Thiết kế giao diện và tạo các lớp cho dự án có cấu trúc như dưới đây:
“MainWindow.ui” là giao diện được thiết kế bằng Qt Designer
“MainWindow.py” là generate python code của “MainWindow.ui”
“MainWindowEx.py” là file mã lệnh kế thừa từ “MainWindow.py” để xử lý nạp giao diện, gán Chart và các sự kiện, lớp này sẽ không lệ thuộc vào sự thay đổi của giao diện cũng như generate code
“MyApp.py” là file mã lệnh thực thi chương trình
Bước 3: Thiết kế Giao diện “MainWindow.ui” như dưới đây
Trong giao diện ta chỉ cần kéo một QVBoxLayout vào MainWindow và đặt tên là “myLayout“
Bước 4: Generate Python code “MainWindow.py” cho “MainWindow.ui”
# Form implementation generated from reading ui file 'MainWindow.ui'
#
# Created by: PyQt6 UI code generator 6.4.2
#
# WARNING: Any manual changes made to this file will be lost when pyuic6 is
# run again.  Do not edit this file unless you know what you are doing.


from PyQt6 import QtCore, QtGui, QtWidgets


class Ui_MainWindow(object):
    def setupUi(self, MainWindow):
        MainWindow.setObjectName("MainWindow")
        MainWindow.resize(441, 322)
        self.centralwidget = QtWidgets.QWidget(parent=MainWindow)
        self.centralwidget.setObjectName("centralwidget")
        self.verticalLayout_2 = QtWidgets.QVBoxLayout(self.centralwidget)
        self.verticalLayout_2.setObjectName("verticalLayout_2")
        self.myLayout = QtWidgets.QVBoxLayout()
        self.myLayout.setObjectName("myLayout")
        self.verticalLayout_2.addLayout(self.myLayout)
        MainWindow.setCentralWidget(self.centralwidget)
        self.menubar = QtWidgets.QMenuBar(parent=MainWindow)
        self.menubar.setGeometry(QtCore.QRect(0, 0, 441, 26))
        self.menubar.setObjectName("menubar")
        MainWindow.setMenuBar(self.menubar)
        self.statusbar = QtWidgets.QStatusBar(parent=MainWindow)
        self.statusbar.setObjectName("statusbar")
        MainWindow.setStatusBar(self.statusbar)

        self.retranslateUi(MainWindow)
        QtCore.QMetaObject.connectSlotsByName(MainWindow)

    def retranslateUi(self, MainWindow):
        _translate = QtCore.QCoreApplication.translate
        MainWindow.setWindowTitle(_translate("MainWindow", "Trần Duy Thanh - PyQtGraph"))
Bước 5: Viết lớp python kế thừa trong “MainWindowEx.py“
Trong bước 5 ta có một số bước nhỏ để tạo Chart bằng PyQtGraph. Chúng ta làm theo các ghi chú mà Tui để ở trong code.
Bước 5.1: Khai báo thư viện PyQtGraph và đặt lại tên thư viện pg (ta có thể đặt tên khác hoặc không đặt)
Bước 5.2: Tạo đối tượng PlotWidget bằng cách gọi pg.PlotWidget() và lưu đối tượng này vào biến graphWidget
Bước 5.3: Khai báo 2 mảng dữ liệu cho hour và temperature, 2 mảng này phải cùng số lượng phần tử
Bước 5.4: Gọi phương thức plot(hour,temperature) của đối tượng graphWidget
Bước 5.5: Đưa đối tượng graphWidget vào layout
Bước 6: Viết “MyApp.py” để thực thi chương trình
from PyQt6.QtWidgets import QApplication, QMainWindow

from MainWindowEx import MainWindowEx

app=QApplication([])
myWindow= MainWindowEx()
myWindow.setupUi(QMainWindow())
myWindow.show()
app.exec()
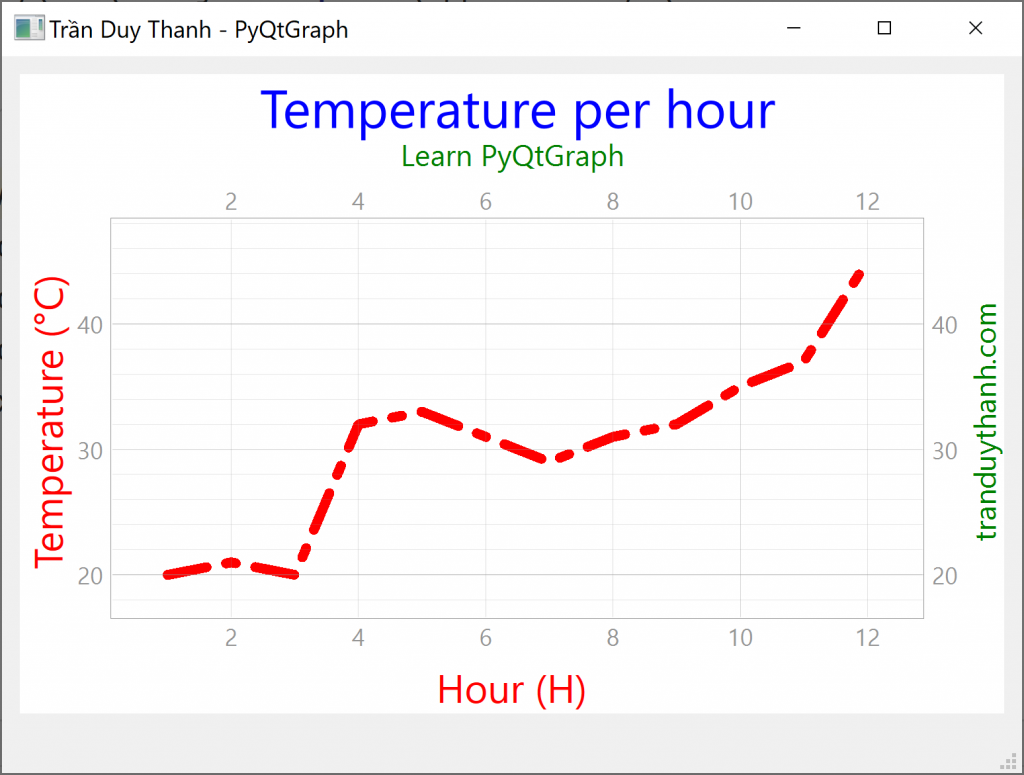
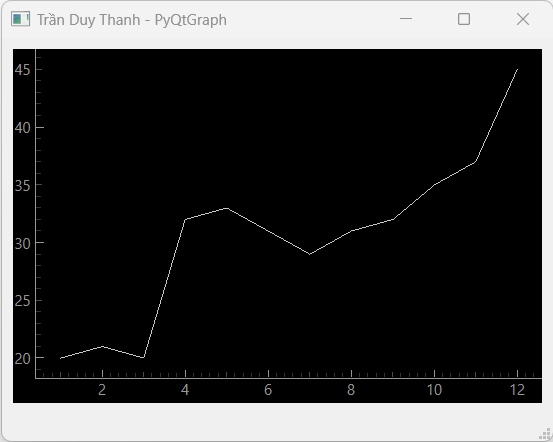
Chạy chương trình MyApp.py ta có Chart như dưới đây:
Ta thấy trục Temperature hiển thị: 20, 25, 30, 35, 40, 45
Trục Hour, hiển thị: 2, 4, 6, 8, 10, 12
Bạn thực hành lại bài này để hiểu được cách sử dụng thư viện PyQtGraph một cách đơn giản nhất nhé. Khoan hãy đi vào chi tiết, chỉ cần biết cách gọi và sử dụng thư viện này để hiển thị Chart là thành công.
Bài học sau Tui sẽ trình bày chi tiết các thành phần bên trong PyQtGraph, và hướng dẫn cách customize màu đường kẻ, loại đường kẻ, các tiêu đề của các trục, màu nền, cũng như cách vẽ nhiều biểu đồ trong cùng một màn hình. Các bạn chú ý theo dõi.
Bài này Tui sẽ trình bày về ứng dụng kiến trúc Model View trong tương tác và hiển thị cơ sở dữ liệu dạng SQL, cụ thể là SQLite Database, cung cấp tính năng lọc dữ liệu theo dòng, lọc dữ liệu theo cột, cũng như cập nhật dữ liệu ngay trong QTableView khi có sự thay đổi, bạn có thể áp dụng để làm các loại cơ sở dữ liệu khác như PostGreSQL, MySQL…
Khi sử dụng PyQt để kết nối tới các loại cơ sở dữ liệu khác nhau ta cần kiểm tra xem PyQt đã có các loại Drivers nào rồi, nếu chưa có ta cần cài đặt.
Để kiểm tra các loại Drivers này ta dùng lệnh dưới đây:
from PyQt6.QtSql import QSqlDatabase

drivers=QSqlDatabase.drivers()

print(drivers)
Giả sử khi chạy lệnh trên, bạn có mảng các Driver sau trong máy tính:
Máy tính có Driver nào thì ta mới sử dụng được Driver đó. Như vậy tùy vào nhu cầu sử dụng mà ta cần cài Driver phù hợp nếu PyQt chưa support trong máy của bạn.
Để kết nối tới các Remote Server ví dụ như MYSQL, Microsoft SQL Server… thì bạn dùng tập các mã lệnh đưới đây:
db = QSqlDatabase('<driver>')
db.setHostName('<localhost>')
db.setPort('<port number>')
db.setDatabaseName('<databasename>')
db.setUserName('<username>')
db.setPassword('<password>')
db.open()
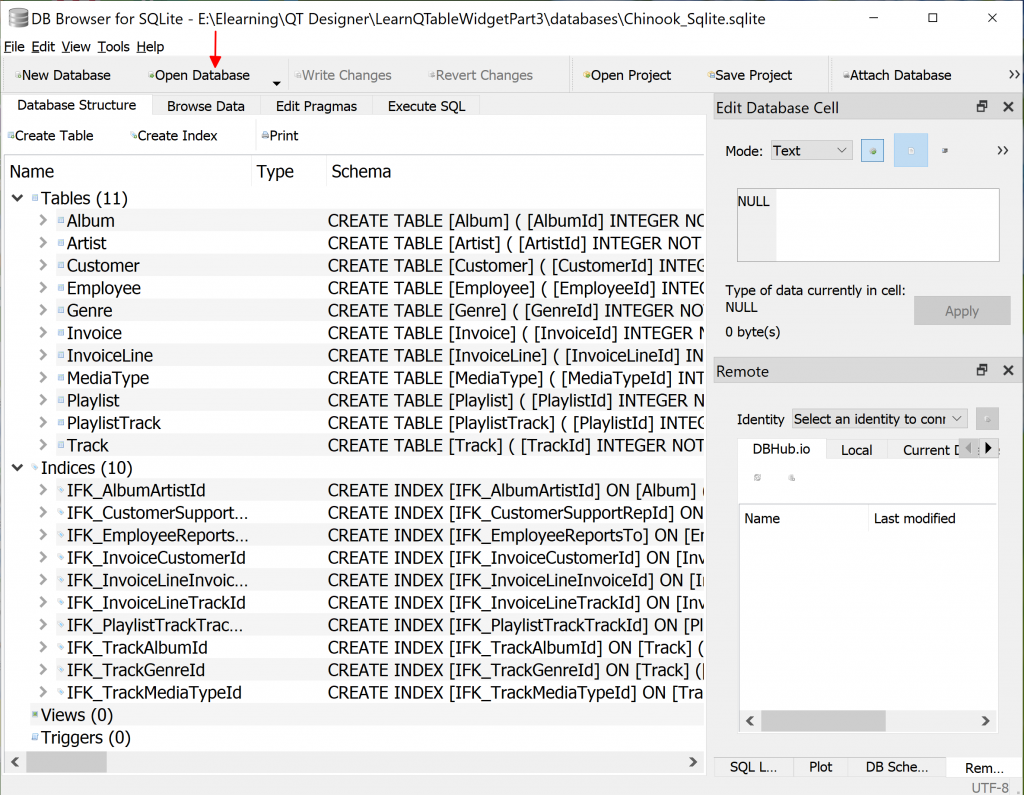
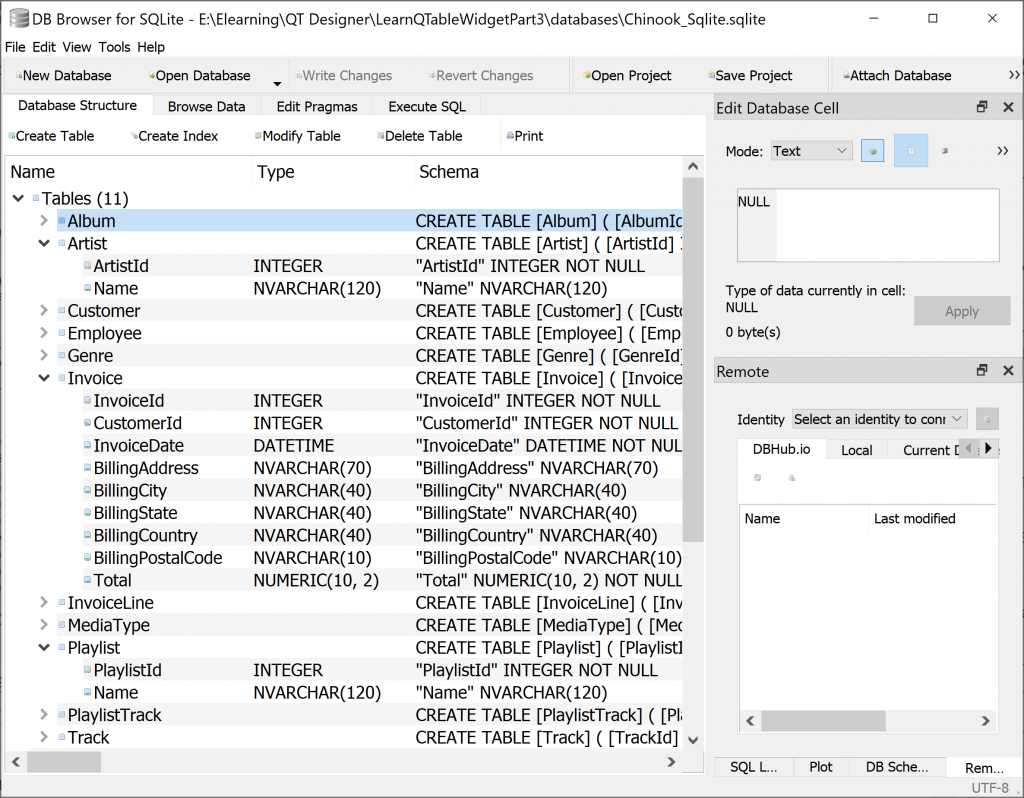
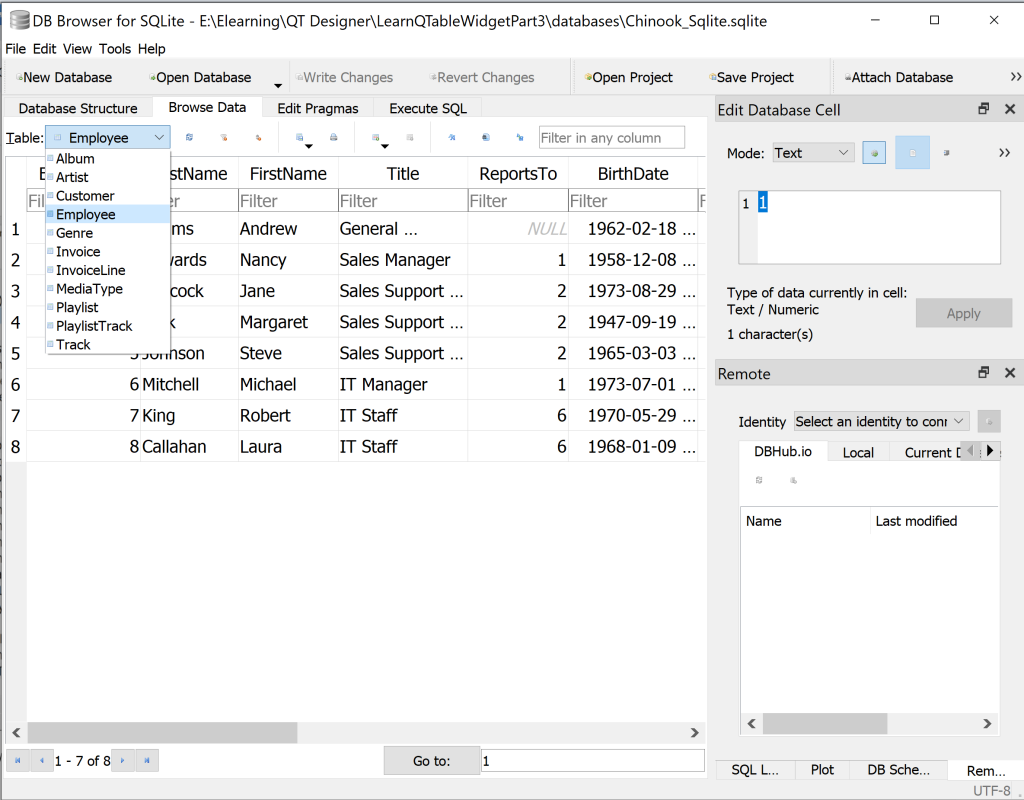
Trong bài học này chúng ta kết nối với Local server, cụ thể là SQLite Database. Ví dụ ta muốn kết nối tới cơ sở dữ liệu “Chinook_Sqlite.sqlite” đặt trong cùng thư mục dự án, thì chúng ta sẽ sử dụng các lệnh sau:
Sau khi kết nối tới SQLite Database thành công, ta có thể tạo đối tượng QSqlTableModel để truy suất tới bảng dữ liệu trong SQLite Database, ví dụ bảng “Employee“:
Hàm setEditStrategy() nhận vào enum để xác định cách thức cập nhật dữ liệu trên model:
Enum
Ý nghĩa chức năng
QSqlTableModel.EditStrategy.OnFieldChange
Mô hình sẽ tự động cập nhật dữ liệu khi người dùng di chuyển ra khỏi ô nhập liệu
QSqlTableModel.EditStrategy.OnRowChange
Mô hình sẽ tự động cập nhật dữ liệu khi người dùng di chuyển ra khỏi dòng nhập liệu
QSqlTableModel.EditStrategy.OnManualSubmit
Chương trình không tự động cập nhật dữ liệu ngay, mà nó lưu những dòng dữ liệu được chỉnh sửa vào caches. Và khi muốn cập nhật thì ta gọi hàm submitAll() hoặc nếu hủy sự thay đổi thì ta gọi hàm revertAll()
Để hiển thị dữ liệu lên QTableView ta gọi lệnh sau:
self.tableView.setModel(self.model)
Để filter dữ liệu theo các thuộc tính ta viết lệnh:
def processFilterName(self,s):
filter_str = 'LastName LIKE "%{}%" or FirstName LIKE "%{}%"'.format(s,s)
self.model.setFilter(filter_str)
Ví dụ mã lệnh ở trên là filter dữ liệu theo LastName và FirstName. Chẳng hạn như lọc ra các Employee mà FirstName và LastName có chứa từ “an”.
Dưới đây là bảng ý nghĩa cú pháp của Filter:
Cú pháp(Pattern)
Ý nghĩa chức năng
columnName=“{}”
Lọc chính xác dữ liệu mà thuộc tính
columnName LIKE “{}%”
Lọc các dòng dữ liệu mà nó chứa chuỗi so khớp đằng trước nó
columnName LIKE “%{}”
Lọc các dòng dữ liệu mà nó chứa chuỗi so khớp đằng sau nó
columnName LIKE “%{}%”
Lọc ra các dòng dữ liệu mà nó có chứa chuỗi so khớp
Trong mỗi pattern ở trên, {} là chuỗi tìm kiếm mà ta phải viết:
“{}”.format(search_str)
Ngoài ra chúng ta có thể dùng QSqlQuery để lọc dữ liệu theo cột:
Mã lệnh ở trên sẽ giúp truy vấn dữ liệu nhưng chỉ lọc ra các cột EmployeeId, FirstName, LastName
Bây giờ ta đi vào chi tiết từng bước để ứng dụng kiến trúc Model View, sử dụng QSqlTableModel để truy vấn/mapping bảng dữ liệu và hiển thị Lên QTableView.
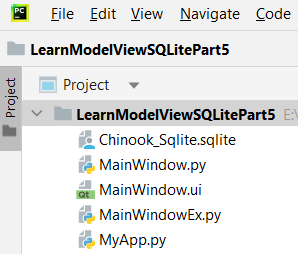
Bước 1: Tạo dự án “LearnModelViewSQLitePart5” có cấu trúc như dưới đây:
“Chinook_Sqlite.sqlite” là cơ sở dữ liệu SQLite mẫu để giới thiệu ở bài học trước
“MainWindow.ui” là file thiết kế giao diện bằng Qt Designer
“MainWindow.py” là file Generate Python code của MainWindow.ui
“MainWindowEx.py” là mã lệnh kế thừa từ Generate Python code để xử lý sự kiện người dùng, nạp giao diện, gán model
“MyApp.py” là file mã lệnh để thực thi chương trình
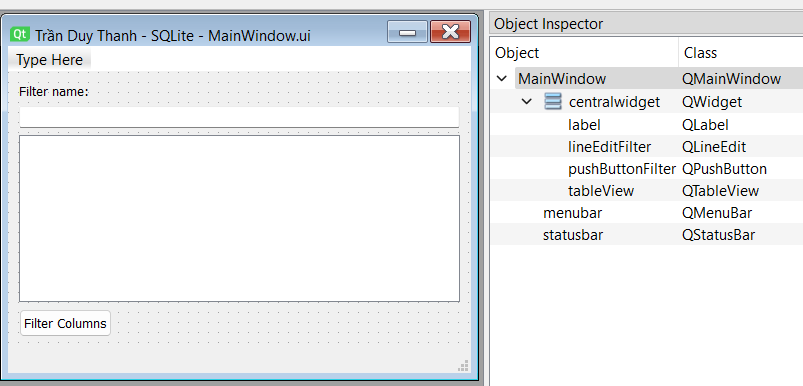
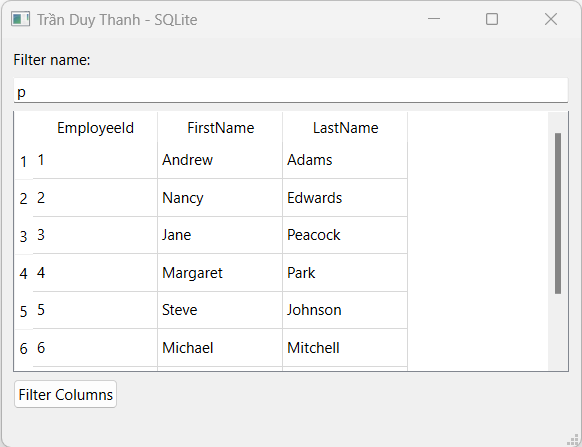
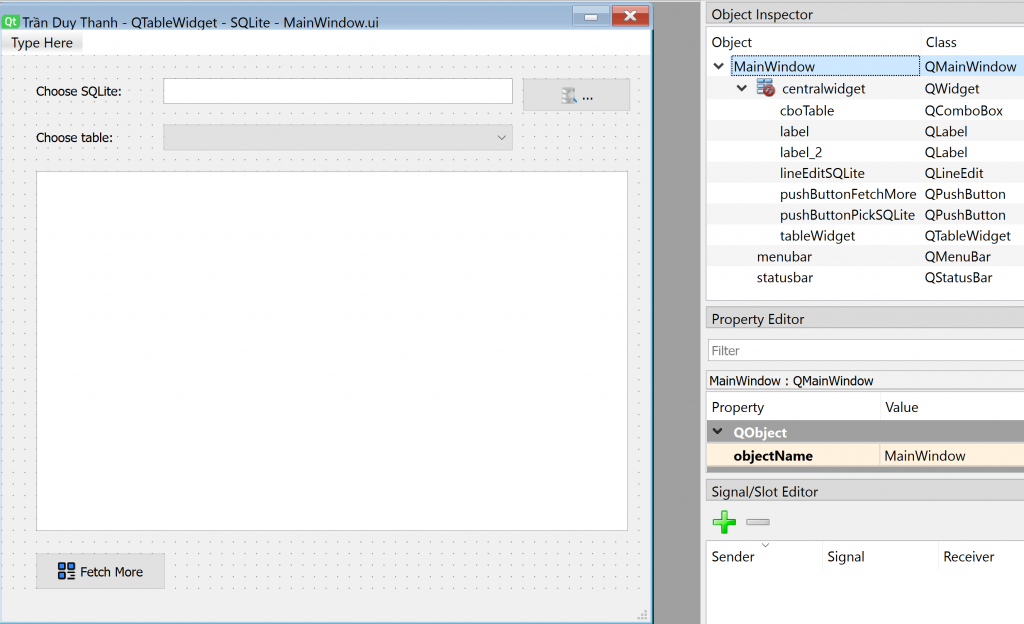
Bước 2: Thiết kế giao diện “MainWindow.ui” như hình dưới đây:
Ta kéo thả và đặt tên cho các Widget như trên
Bước 3: Generate Python code cho MainWindow.ui, đặt tên MainWindow.py:
# Form implementation generated from reading ui file 'MainWindow.ui'
#
# Created by: PyQt6 UI code generator 6.4.2
#
# WARNING: Any manual changes made to this file will be lost when pyuic6 is
# run again. Do not edit this file unless you know what you are doing.
from PyQt6 import QtCore, QtGui, QtWidgets
class Ui_MainWindow(object):
def setupUi(self, MainWindow):
MainWindow.setObjectName("MainWindow")
MainWindow.resize(463, 327)
self.centralwidget = QtWidgets.QWidget(parent=MainWindow)
self.centralwidget.setObjectName("centralwidget")
self.verticalLayout = QtWidgets.QVBoxLayout(self.centralwidget)
self.verticalLayout.setObjectName("verticalLayout")
self.label = QtWidgets.QLabel(parent=self.centralwidget)
self.label.setObjectName("label")
self.verticalLayout.addWidget(self.label)
self.lineEditFilter = QtWidgets.QLineEdit(parent=self.centralwidget)
self.lineEditFilter.setObjectName("lineEditFilter")
self.verticalLayout.addWidget(self.lineEditFilter)
self.tableView = QtWidgets.QTableView(parent=self.centralwidget)
self.tableView.setObjectName("tableView")
self.verticalLayout.addWidget(self.tableView)
self.pushButtonFilter = QtWidgets.QPushButton(parent=self.centralwidget)
self.pushButtonFilter.setObjectName("pushButtonFilter")
self.verticalLayout.addWidget(self.pushButtonFilter, 0, QtCore.Qt.AlignmentFlag.AlignLeft)
MainWindow.setCentralWidget(self.centralwidget)
self.menubar = QtWidgets.QMenuBar(parent=MainWindow)
self.menubar.setGeometry(QtCore.QRect(0, 0, 463, 26))
self.menubar.setObjectName("menubar")
MainWindow.setMenuBar(self.menubar)
self.statusbar = QtWidgets.QStatusBar(parent=MainWindow)
self.statusbar.setObjectName("statusbar")
MainWindow.setStatusBar(self.statusbar)
self.retranslateUi(MainWindow)
QtCore.QMetaObject.connectSlotsByName(MainWindow)
def retranslateUi(self, MainWindow):
_translate = QtCore.QCoreApplication.translate
MainWindow.setWindowTitle(_translate("MainWindow", "Trần Duy Thanh - SQLite"))
self.label.setText(_translate("MainWindow", "Filter name:"))
self.pushButtonFilter.setText(_translate("MainWindow", "Filter Columns"))
Bước 5: Tạo “MainWindowEx.py“, kế thừa từ Generate Python code để nạp giao diện, xử lý nghiệp vụ, gán mô hình:
import os.path
from PyQt6.QtSql import QSqlDatabase, QSqlTableModel, QSqlQuery
from MainWindow import Ui_MainWindow
class MainWindowEx(Ui_MainWindow):
def setupUi(self, MainWindow):
super().setupUi(MainWindow)
self.MainWindow=MainWindow
self.loadDatabase()
self.lineEditFilter.textChanged.connect(self.processFilterName)
self.pushButtonFilter.clicked.connect(self.processFilterColumns)
Ta overrice setupUi() để nạp giao diện, gọi hiển thị dữ liệu cũng như xử lý các signal cho widget.
Tiếp theo ta viết hàm loadDatabase(), hàm này sẽ đọc SQLite Database và truy vấn bảng “Empoyee” rồi hiển thị lên QTableView, sử dụng kiến trúc Model View:
import os.path
from PyQt6.QtSql import QSqlDatabase, QSqlTableModel, QSqlQuery
from MainWindow import Ui_MainWindow
class MainWindowEx(Ui_MainWindow):
def setupUi(self, MainWindow):
super().setupUi(MainWindow)
self.MainWindow=MainWindow
self.loadDatabase()
self.lineEditFilter.textChanged.connect(self.processFilterName)
self.pushButtonFilter.clicked.connect(self.processFilterColumns)
def loadDatabase(self):
baseDir=os.path.dirname(__file__)
databasePath=os.path.join(baseDir,"Chinook_Sqlite.sqlite")
self.db=QSqlDatabase("QSQLITE")
self.db.setDatabaseName(databasePath)
self.db.open()
self.model = QSqlTableModel(db=self.db)
self.model.setTable("Employee")
self.model.select()
self.model.setEditStrategy(QSqlTableModel.EditStrategy.OnFieldChange)
self.tableView.setModel(self.model)
def processFilterName(self,s):
    filter_str = 'LastName LIKE "%{}%" or FirstName LIKE "%{}%"'.format(s,s)
    self.model.setFilter(filter_str)
def processFilterColumns(self):
    query = QSqlQuery("SELECT EmployeeId, FirstName, LastName FROM Employee ", db=self.db)
    self.model.setQuery(query)
def show(self):
self.MainWindow.show()
Bước 6: Cuối cùng ta viết mã lệnh “MyApp.py”
from PyQt6.QtWidgets import QApplication, QMainWindow

from MainWindowEx import MainWindowEx

app=QApplication([])
myWindow=MainWindowEx()
myWindow.setupUi(QMainWindow())
myWindow.show()
app.exec()
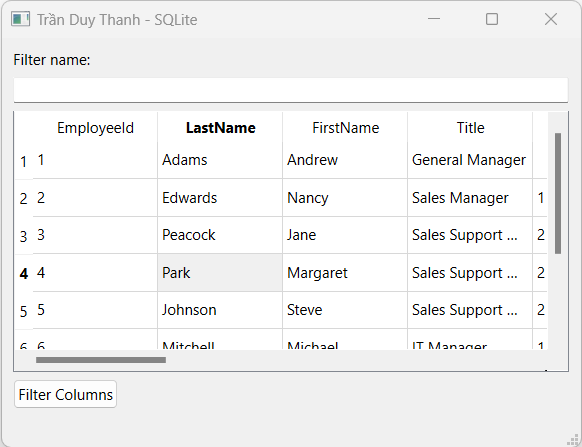
Chạy MyApp.Py ta có kết quả như mong muốn:
Như vậy là Tui đã hướng dẫn xong cách ứng dụng kiến trúc Model View trong tương tác và hiển thị cơ sở dữ liệu dạng SQL, cụ thể là SQLite Database, cung cấp tính năng lọc dữ liệu theo dòng, lọc dữ liệu theo cột, cũng như cập nhật dữ liệu ngay trong QTableView khi có sự thay đổi, bạn có thể áp dụng để làm các loại cơ sở dữ liệu khác.
Bài học sau Tui hướng dẫn các bạn cách trực quan hóa dữ liệu bằng các Chart, đây là một trong các thư viện phổ biến và quan trọng trong trình bày trực quan dữ liệu để đưa ra các đồ thị, biểu đồ. Các bạn chú ý theo dõi
Bài này Tui nâng cấp bài 28, tiếp tục ứng dụng kiến trúc Model View và bổ sung các chức năng cho QTableView:
Nạp ma trận “data” lên QTableView cùng với các cột được lưu trong mảng “columns“? Đồng thời nếu giá <100 thì tô chữ đỏ, nếu tên rỗng thì tô nền vàng:
Thêm, Sửa, Xóa dữ liệu ngay trên giao diện QTableView thông qua việc cập nhật mã lệnh mới cho TableModel.py.
Xử lý signal item selection change
Cách khai báo và sử dụng Enum trong Python
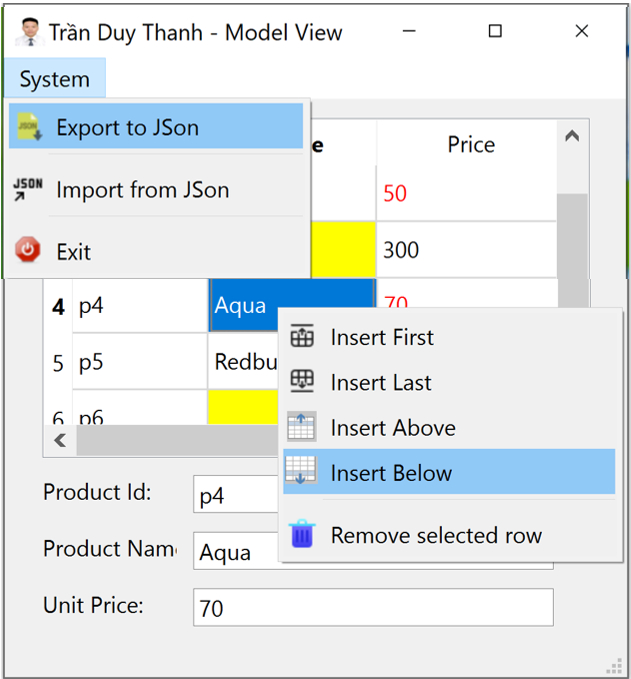
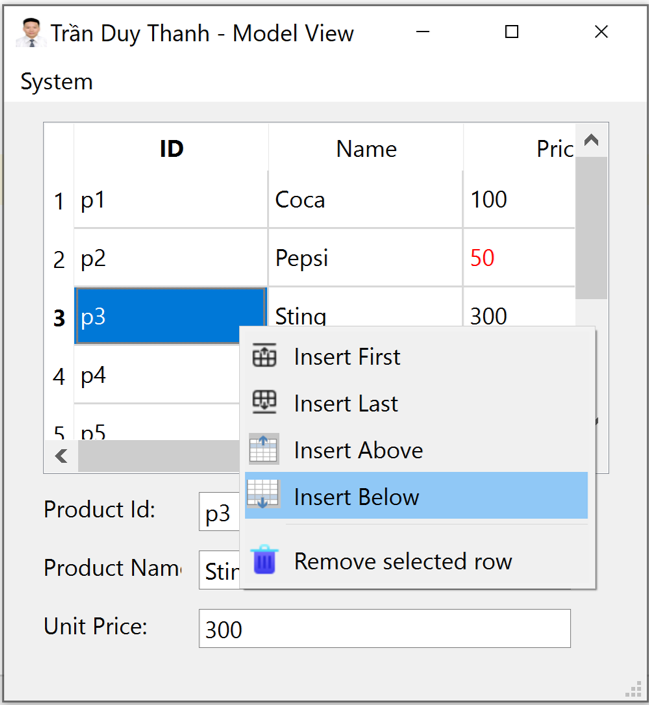
Xử lý Context Menu cho Widget để Chèn Đầu, Chèn Cuối, Chèn Trước, Chèn Sau dữ liệu vào trong QTableView, cũng như thao tác xóa dữ liệu ra khỏi QTableView.
Dùng partial function để triệu gọi các signals/slots có parameter
Import và Export dữ liệu trong model ra JSON ARRAY
Bài này nhiều chức năng, khá khó và tuy nhiên nó có tính ứng dụng cao trong thực tế. Các bạn có gắng thực hành theo từng bước để sau náy có thể áp dụng nó và các tình huống khác nhau.
Bước 1: Tạo dự án “LearnModelViewPart4” có cấu trúc như hình dưới đây:
Thư mục “images” chứa các hình ảnh và biểu tượng cho các QAction và Window Icon
Mã lệnh “InsertBehavior.py” là enum để định nghĩa các kiểu insert trước, sau, đầu, cuối
Mã lệnh “TableModel.py” là lớp Model View, lớp trung tâm của dự án
“MainWindow.ui” là giao diện thiết kế phần mềm
Mã lệnh “MainWindow.py” là Generate Python code từ giao diện
“MainWindowEx.py” là mã lệnh kế thừa từ lớp Generate Python code để xử lý nạp giao diện cũng như xử lý sự kiện người dùng, gán Model.
“MyApp.py” là mã lệnh thực thi chương trình
Bước 2: Tạo mã lệnh enum “InsertBehavior.py”
from enum import Enum

class InsertBehavior(Enum):
        INSERT_FIRST = 0
        INSERT_LAST = 1
        INSERT_ABOVE = 2
        INSERT_BELOW=3
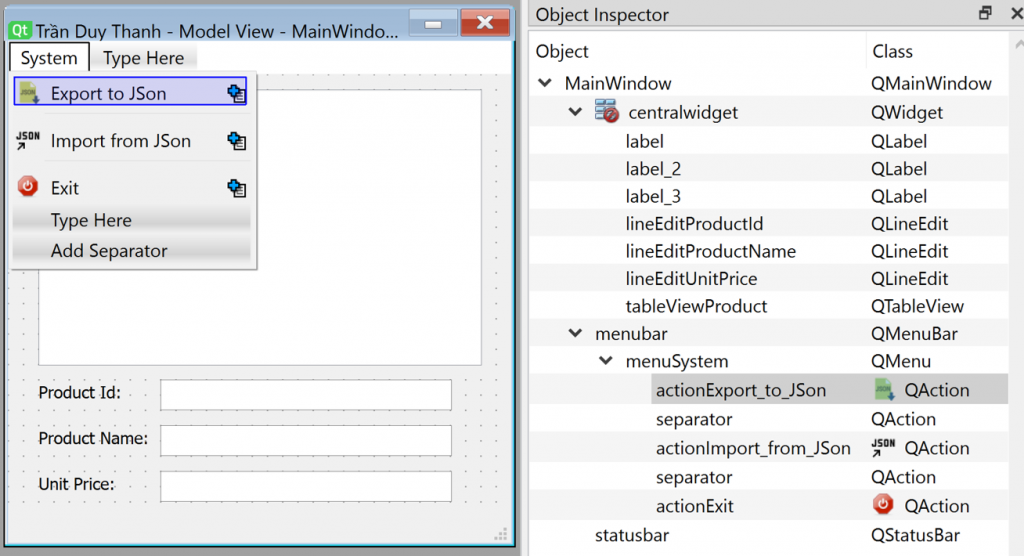
Trong InsertBehavior Tui định nghĩa 4 enum, và nó sẽ được dùng cho xử lý Context Menu trên QTableView.
Context Menu trên QTableView (nhấn chuột phải vào QTableView), chương trình sẽ hiển thị lên Context Menu ở trên. Có chức năng tương ứng với enum:
Insert First (INSERT_FIRST = 0), chương trình sẽ thêm một dòng trống ở đầu QTableView
Insert Last (INSERT_LAST = 1), chương trình sẽ thêm một dòng trống ở cuối QTableView
Insert Above (INSERT_ABOVE = 2), chương trình sẽ thêm một dòng trống ở trước dòng đang lựa chọn
Insert Below (INSERT_BELOW=3), chương trình sẽ thêm một dòng trống ở sau dòng đang lựa chọn
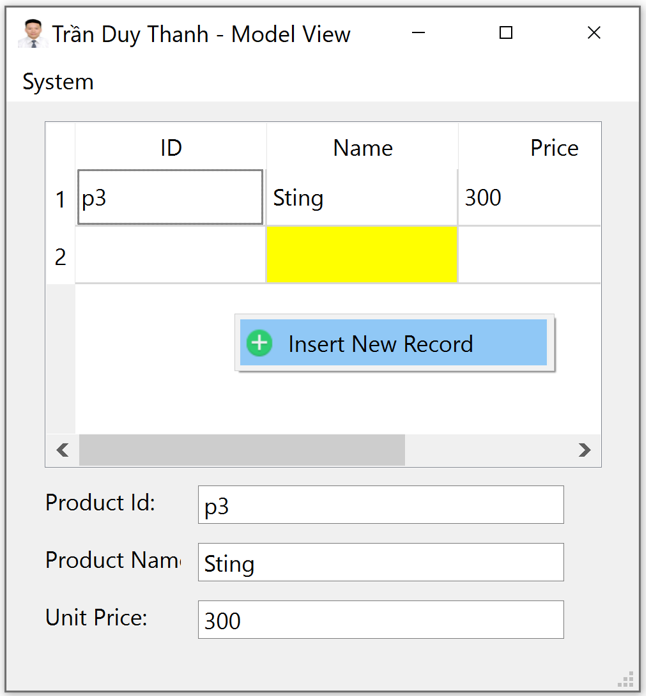
Ngoài ra Tui cũng bổ sung thêm 1 Context Menu khi người dùng nhấn chuột phải vào QTableView nhưng không nhấn vào dòng nào:
Trong trường hợp này thì chỉ có duy nhất một QAction là “Insert New Record” và nó dùng chung enum (INSERT_FIRST = 0)
Bước 3: Viết mã lệnh “TableModel.py“, đây là lớp mã lệnh trung tâm của dự án liên quan tới kiến trúc Model View.
Lớp TableModel kế thừa từ QAbstractTableModel, Tui định nghĩa constructor có 2 đối số nhận vào đó là ma trận dữ liệu (data) và mảng tên cột (columns)
from PyQt6 import QtGui
from PyQt6.QtCore import Qt, QAbstractTableModel, QModelIndex

class TableModel(QAbstractTableModel):
    def __init__(self, data,columns):
        super().__init__()
        self.data = data
        self.columns=columns
Tiếp theo ta override hàm data() để hiển thị dữ liệu và định dạng dữ liệu như mong muốn:
def data(self, index, role):
    value = self.data[index.row()][index.column()]
    if role == Qt.ItemDataRole.DisplayRole:
        return value
    if role==Qt.ItemDataRole.EditRole:
        return value
    if role == Qt.ItemDataRole.BackgroundRole:
        if index.column() == 1 and value == "":
            return QtGui.QColor(Qt.GlobalColor.yellow)
    if role == Qt.ItemDataRole.ForegroundRole:
        if index.column() == 2 and  value!="" and float(value) < 100:
            return QtGui.QColor(Qt.GlobalColor.red)
Thông qua hàm data() này, chương trình sẽ tô chữ đỏ với dòng dữ liệu có giá <100, tô nền vàng với dòng dữ liệu có tên rỗng.
Tiếp theo ta cần override hàm rowCount() và columnCount() để Model nhận dạng được số dòng và số cột trong giao diện:
Để tạo tiêu đề cột và tiêu đề dòng, ta cần override phương thức headerData():
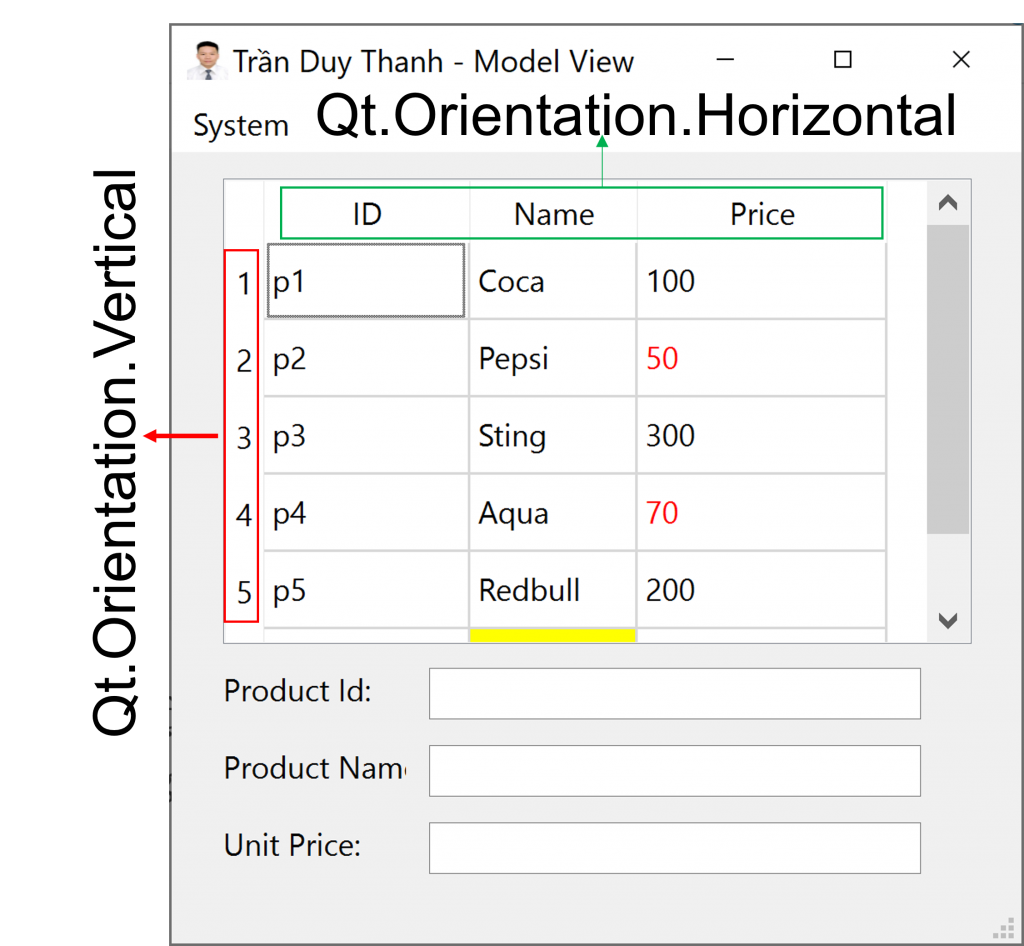
def headerData(self, section, orientation, role):
if role == Qt.ItemDataRole.DisplayRole:
if orientation == Qt.Orientation.Horizontal:
return str(self.columns[section])
if orientation==Qt.Orientation.Vertical:
return str(section+1)
Qt.Orientation.Horizontal là enum dùng để định nghĩa tiêu đề cột
Qt.Orientation.Vertical là enum dùng để định nghĩa tiêu đề dòng
Tiếp theo ta override 2 hàm flags() và setData():
def flags(self, index):
if not index.isValid():
return Qt.ItemFlag.ItemIsEnabled
return super().flags(index) | Qt.ItemFlag.ItemIsEditable # add editable flag.
def setData(self, index, value, role):
if role == Qt.ItemDataRole.EditRole:
# Set the value into the frame.
self.data[index.row()][index.column()] = value
return True
return False
Hàm flags() dùng để customize tính năng cho người dùng chỉnh sửa dữ liệu trực tiếp trên từng ô dữ liệu
Hàm setData() dùng để bổ sung cho tính năng flags() đó là khi nhấn vào ô nào thì hiển thị chức năng cập nhật (Ô textbox) đồng thời hiển thị lại dữ liệu hiện hành). Cũng như khi người dùng đổi dữ liệu mới thì dữ liệu này sẽ được cập nhật vào ma trận: self.data[index.row()][index.column()] = value
Tiếp theo ta override hàm insertRows() để hỗ trợ việc chèn mới dòng dữ liệu cho Model:
Mã lệnh bên trong hàm insertRows() chương trình sẽ tạo thêm 1 dòng dữ liệu trên QTableView đồng thời cũng chèn dữ liệu rỗng cho ma trận trong biến data.
Hàm insertRows() sẽ dùng cho các chức năng: Chèn đầu, chèn cuối, chèn trước và chèn sau.
Để thực hiện chức năng xóa dữ liệu ta override hàm removeRows():
Đồng thời ta cũng khai báo các signal để xử lý sự kiện selectionChange và đăng ký các Context Menu trên Cho QTableView (khi nhấn chuột phải vào các ô bên trong QTableView hoặc nhấn chuột phải vào tiêu đề dòng).
Hàm processItemSelection() sẽ xử lý lấy dữ liệu đang chọn tại dòng hiện hành và hiển thị thông tin chi tiết lên QLineEdit:
def processItemSelection(self):
index=self.tableViewProduct.currentIndex()
if index.row()>-1:
item=self.data[index.row()]
self.lineEditProductId.setText(item[0])
self.lineEditProductName.setText(item[1])
self.lineEditUnitPrice.setText(str(item[2]))
Ta viết mã lệnh cho hàm onCustomContextMenuRequested() để khởi tạo QMenu context menu:
Bước 7: Cuối cùng ta tạo “MyApp.py” để thực thi chương trình
from PyQt6.QtWidgets import QApplication, QMainWindow
from MainWindowEx import MainWindowEx
app=QApplication([])
myWindow=MainWindowEx()
myWindow.setupUi(QMainWindow())
myWindow.show()
app.exec()
Chạy chương trình lên ta có kết quả như mong muốn:
Như vậy là tới đây Tui đã hướng dẫn đầy đủ và chi tiết kiến trúc Model View và áp dụng cho QTableView trong quản lý Product. Với đầy đủ tính năng: Xem, thêm, sửa, xóa. Đặc biệt là các chức năng Context Menu để hỗ trợ việc chèn dữ liệu cũng như xóa dữ liệu khởi QTableView, và Menu để Export và Import dữ liệu với định dạng JSon Array.
Ở các bài trước chúng ta đã ứng dụng thành thạo kiến trúc Model View để tương tác dữ liệu Employee trên QListview. Trong bài này Tui tiếp tục hướng dẫn các bạn cách dùng Model View cho QTableView để hiển thị dữ liệu dạng bảng. Bạn có thể nạp Ma trận dữ liệu vào QTableView hoặc nạp Danh sách dữ liệu đối tượng dạng List vào QTableView. Sự khác biệt giữa QListView và QTableView là QListView không cần dùng các cột dữ liệu, còn QTableView cần dùng các cột dữ liệu để chi tiết hóa các thuộc tính của đối tượng.
Trong bài này Tui minh họa ví dụ đơn giản về nạp Ma trận Product lên QTableView dùng kiến trúc Model View. Giả sử ta có Ma trận dữ liệu như dưới đây:
Làm thế nào để nạp ma trận “data” lên QTableView cùng với các cột được lưu trong mảng “columns“? Đồng thời nếu giá <100 thì tô chữ đỏ, nếu tên rỗng thì tô nền vàng:
Nếu hiểu và triển khai được bài này thì bạn có thể dễ dàng nạp ma trận dữ liệu cần phân tích lên giao diện, ví dụ ma trận về lịch sử kinh doanh.
Các bạn tiến hành làm từng bước như Tui hướng dẫn dưới đây.
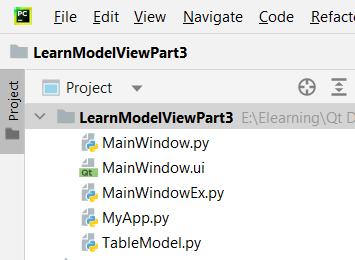
Bước 1: Tạo dự án “LearnModelViewPart3” trong Pycharm có cấu trúc như dưới đây:
Trung tâm của dự án chính là lớp “TableModel.py“. Lớp này kế thừa từ “QAbstractTableModel” để thực hiện kiến trúc Model View. Tui sẽ trình bày chi tiết ở bước sau
“MainWindow.ui” là giao diện thiết kế của phần mềm bằng Qt Designer
“MainWindow.py” là generate python code của giao diện “MainWindow.ui”
“MainWindowEx.py” là lớp kế thừa từ generate python code “MainWindow.py” nó được dùng để nạp giao diện, xử lý sự kiện người dùng, gán model view mà không bị ảnh hưởng khi ta tiếp tục generate code từ giao diện khi thay đổi.
“MyApp.py” là file mã lệnh thực thi chương trình
Bước 2: Tạo lớp mã lệnh “TableModel.py” như dưới đây:
from PyQt6 import QtGui
from PyQt6.QtCore import Qt, QAbstractTableModel
class TableModel(QAbstractTableModel):
def __init__(self, data,columns):
super().__init__()
self.data = data
self.columns=columns
def data(self, index, role):
value=self.data[index.row()][index.column()]
if role == Qt.ItemDataRole.DisplayRole:
return value
if role==Qt.ItemDataRole.BackgroundRole:
if index.column()==1 and value=="":
return QtGui.QColor(Qt.GlobalColor.yellow)
if role==Qt.ItemDataRole.ForegroundRole:
if index.column() == 2 and value<100:
return QtGui.QColor(Qt.GlobalColor.red)
def rowCount(self, index):
    return len(self.data)

def columnCount(self, index):
    return len(self.columns)
def headerData(self, section, orientation, role):
    if role == Qt.ItemDataRole.DisplayRole:
        if orientation == Qt.Orientation.Horizontal:
            return str(self.columns[section])
        if orientation==Qt.Orientation.Vertical:
            return  str(section+1)
Tui giải thích chi tiết các hàm của TableModel.py như sau:
Constructor __init__(self, data,columns) nhận vào 2 đối số. Đối số data là ma trận dữ liệu Product đã mô tả ở trên, đối số columns là mảng các cột của Product.
Hàm data(self, index, role) được override để hiển thị dữ liệu cũng như các định dạng dữ liệu (màu nền, màu chữ). Trong hàm này Tui có sử dụng 3 Role:
Qt.ItemDataRole.DisplayRole (dùng để hiển thị dữ liệu thông thường)
Qt.ItemDataRole.BackgroundRole (để hiển thị màu nền, trong trường hợp này là nếu dữ liệu của cột tên Product là rỗng thì ta tô nền vàng)
Qt.ItemDataRole.ForegroundRole (để hiển thị màu chữ, trong trường hợp này là nếu dữ liệu của cột giá Product nhỏ hơn 100 thì tô chữ đỏ)
Hàm rowCount(self, index) được override để trả về số dòng dữ liệu trong model
Hàm columnCount(self, index) được override để trả về số cột trong model
Hàm headerData(self, section, orientation, role) được override để vẽ tiêu đề của Cột nằm đứng và header của dòng nằm ngang.
5 Hàm bắt buộc cần được định nghĩa đối với TableModel ở trên. Tương tự cho các loại dữ liệu khác thì bạn cũng tạo 5 hàm này, và điều chỉnh mã lệnh theo nhu cầu sử dụng khác nhau. Còn những hàm nâng cao khác để hỗ trợ thêm mới, chỉnh sửa, cũng như xóa dữ liệu Tui sẽ trình bày chi tiết ở bài học sau.
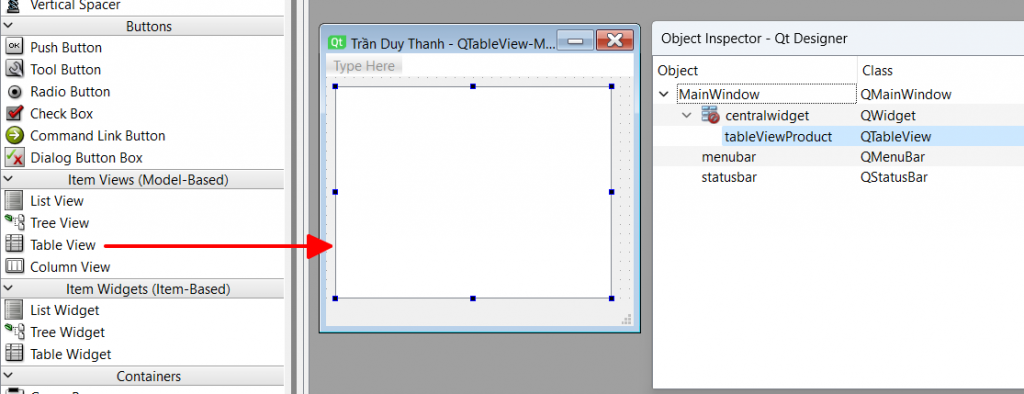
Bước 3: Thiết kế giao diện “MainWindow.ui” và đặt tên cho widget như hình dưới đây:
Bài này thì ta chỉ cần kéo 1 QTableView ra mà thôi.
Bước 4: Generate python code “MainWindow.py” cho giao diện “MainWindow.ui”
# Form implementation generated from reading ui file 'MainWindow.ui'
#
# Created by: PyQt6 UI code generator 6.4.2
#
# WARNING: Any manual changes made to this file will be lost when pyuic6 is
# run again. Do not edit this file unless you know what you are doing.
from PyQt6 import QtCore, QtGui, QtWidgets
class Ui_MainWindow(object):
def setupUi(self, MainWindow):
MainWindow.setObjectName("MainWindow")
MainWindow.resize(335, 297)
self.centralwidget = QtWidgets.QWidget(parent=MainWindow)
self.centralwidget.setObjectName("centralwidget")
self.tableViewProduct = QtWidgets.QTableView(parent=self.centralwidget)
self.tableViewProduct.setGeometry(QtCore.QRect(10, 10, 301, 231))
self.tableViewProduct.setObjectName("tableViewProduct")
MainWindow.setCentralWidget(self.centralwidget)
self.menubar = QtWidgets.QMenuBar(parent=MainWindow)
self.menubar.setGeometry(QtCore.QRect(0, 0, 335, 26))
self.menubar.setObjectName("menubar")
MainWindow.setMenuBar(self.menubar)
self.statusbar = QtWidgets.QStatusBar(parent=MainWindow)
self.statusbar.setObjectName("statusbar")
MainWindow.setStatusBar(self.statusbar)
self.retranslateUi(MainWindow)
QtCore.QMetaObject.connectSlotsByName(MainWindow)
def retranslateUi(self, MainWindow):
_translate = QtCore.QCoreApplication.translate
MainWindow.setWindowTitle(_translate("MainWindow", "Trần Duy Thanh - QTableView-ModelView"))
Bước 5: Tạo “MainWindowEx.py” kế thừa từ Generate Python code ở trên để nạp giao diện và gán Model View
Dòng lệnh 18 này dùng để khởi tạo đối tượng tableModel, nó nhận vào Ma trận Product và mảng columns
Dòng lệnh 19:
self.tableViewProduct.setModel(self.model)
Dòng lệnh 19 gán model cho QTableView.
Lúc này các hàm trong TableModel sẽ tự động được thực hiện, rất chuyên nghiệp và ảo ma canada.
Bước 6: Tạo file lệnh “MyApp.py” để thực thi chương trình
from PyQt6.QtWidgets import QApplication, QMainWindow

from MainWindowEx import MainWindowEx

app=QApplication([])
myWindow=MainWindowEx()
myWindow.setupUi(QMainWindow())
myWindow.show()
app.exec()
Chạy MyApp.py ta có kết quả như mong muốn:
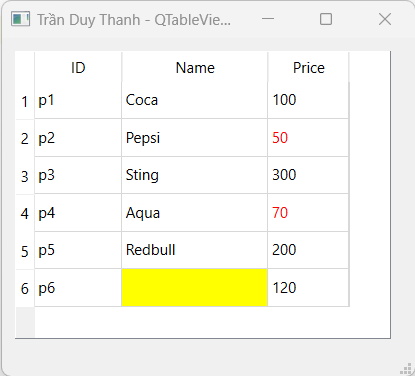
Bạn quan sát thấy cột Price sẽ tô màu đỏ những Price nào <100, như vậy giá 50 và 70 tự động được tô màu đỏ. Và cột Name có dữ liệu nào rỗng sẽ tô nền vàng.
Như vậy Tui đã trình bày xong cách ứng dụng kiến trúc Model View vào quản lý và hiển thị dữ liệu dạng Ma trận, đã trình bày kỹ cách tạo TableModel kế thừa từ QAbstractTableModel. Cũng như đã trình bày chi tiết ý nghĩa và cách lập trình các hàm quan trọng trong lớp này để ta có thể dễ dàng tùy chỉnh cách thức mà dữ liệu hiển thị trên giao diện như mong muốn.
Bài học sau Tui sẽ mở rộng bài này bằng cách bổ sung các chức năng: Thêm, Sửa, Xóa dữ liệu ngay trên giao diện QTableView để các bạn củng cố hơn nữa cách ứng dụng kiến trúc Model View cũng như nhìn thấy được lợi ích của mô hình này. Các bạn chú ý theo dõi
Bài 26 Tui đã trình bày chi tiết về kiến trúc Model View trong PyQt6 cùng với một minh họa về hiển thị danh sách Employee lên QListView. Trong bài này Tui sẽ tiếp tục mở rộng bài minh họa về Employee, bằng cách bổ sung các chức năng: Thêm, Sửa, Xóa model cũng như viết mã lệnh hiệu chỉnh định dạng font chữ, màu chữ cho các item trên QListView bằng kiến trúc Model View. Đặc biệt Tui cung cấp thêm 3 menu item để serialize và deserialize dữ liệu JSon Array cho danh sách Employee, và menu item Exit.
Mô tả chi tiết chức năng của phần mềm:
Chương trình dùng để quản lý Employee, thông tin của Employee bao gồm: id, name, age. Chương trình sử dụng kiến trúc Model View
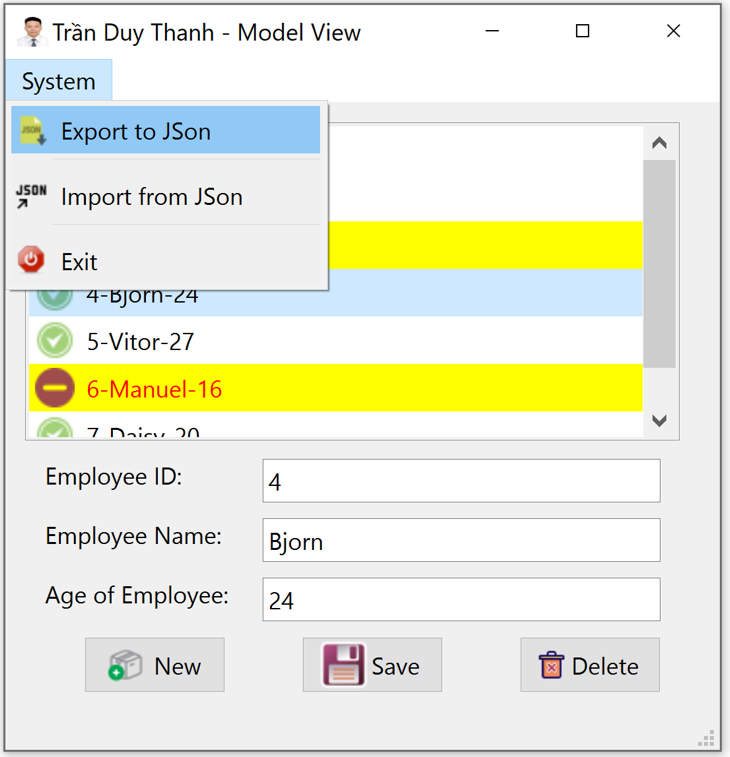
Dữ liệu hiển thị lên QListView có 2 dạng: Nếu Employee có age>=18 thì có biểu tượng icon màu xanh. Nếu age<18 thì có biểu tượng icon màu đỏ, chữ đỏ và nền vàng.
Nút “New”: Chương trình sẽ xóa dữ liệu trên QLineEdit và focus tới ô ID
Nút “Save”: Có 2 chức năng là lưu mới và lưu cập nhật, nếu Employee đang chọn trên QListView thì chương trình sẽ cập nhật, còn nếu không chọn Employee trên QListView thì chương trình sẽ lưu mới. Nếu lưu thành công dữ liệu sẽ hiển thị lên QListView
Nút “Delete”: Chương trình sẽ xóa Employee đang chọn trên QListView, có hiển thị cửa sổ xác nhận muốn xóa hay không.
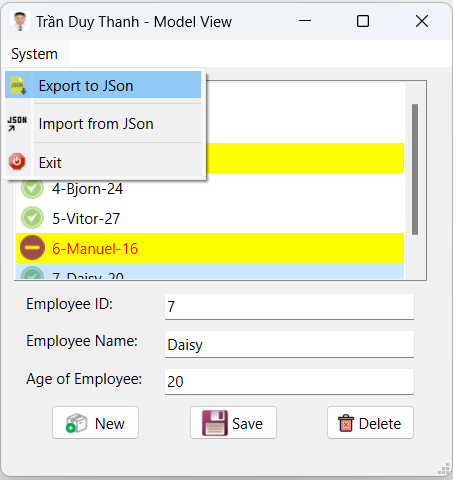
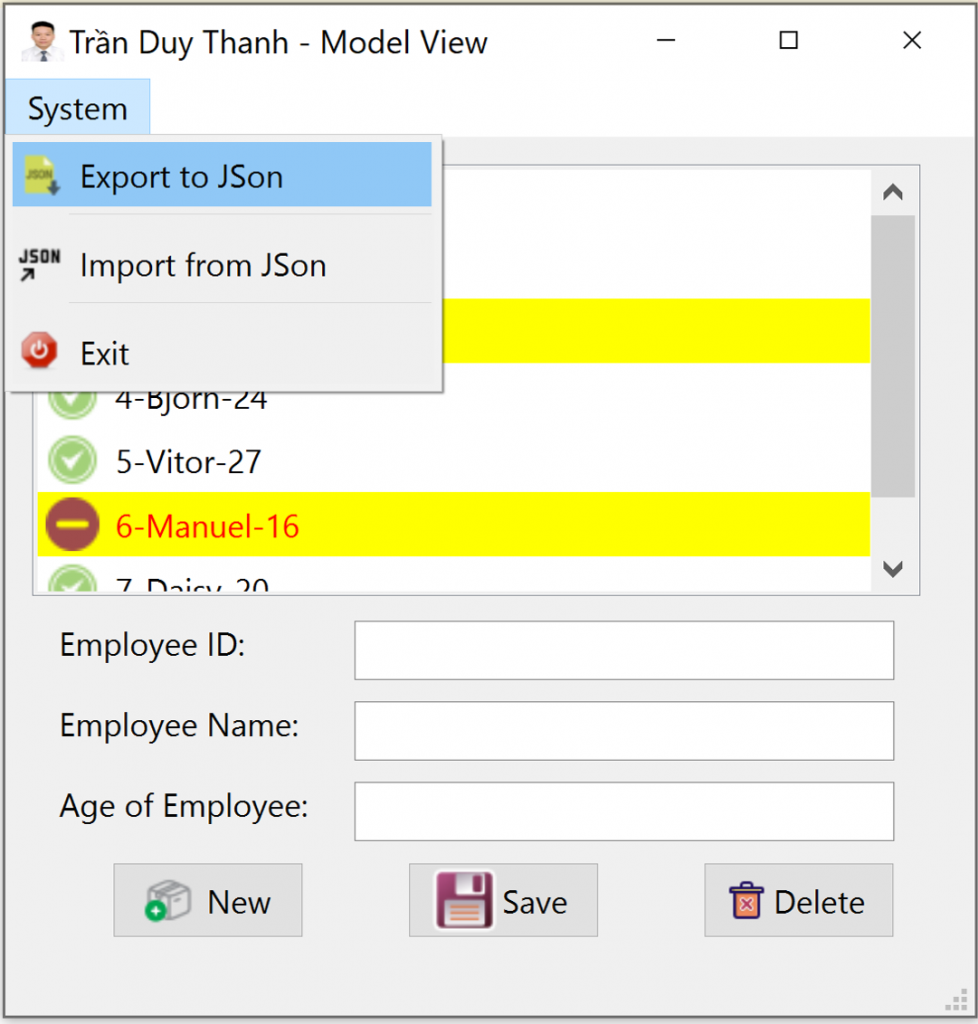
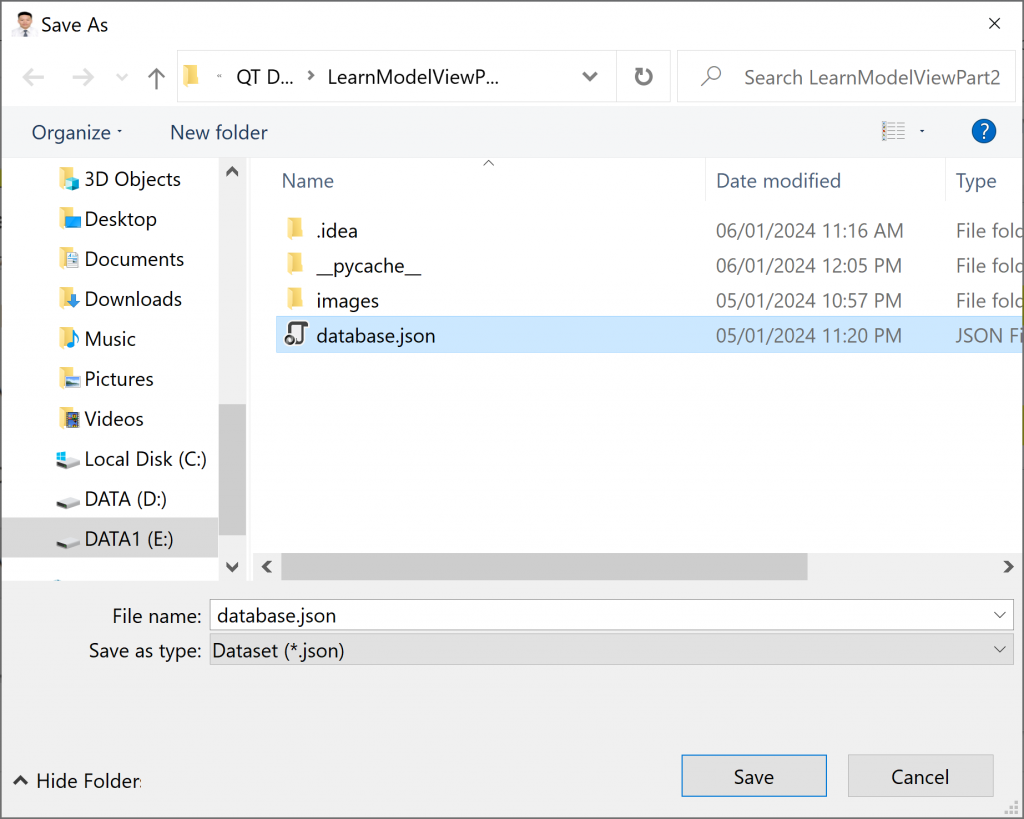
Menu item “Export to Json”: Chương trình sẽ mở cửa sổ SaveFileDialog để người dùng xuất dữ liệu Employee có định dạng JSON ARRY ra ổ cứng bất kỳ
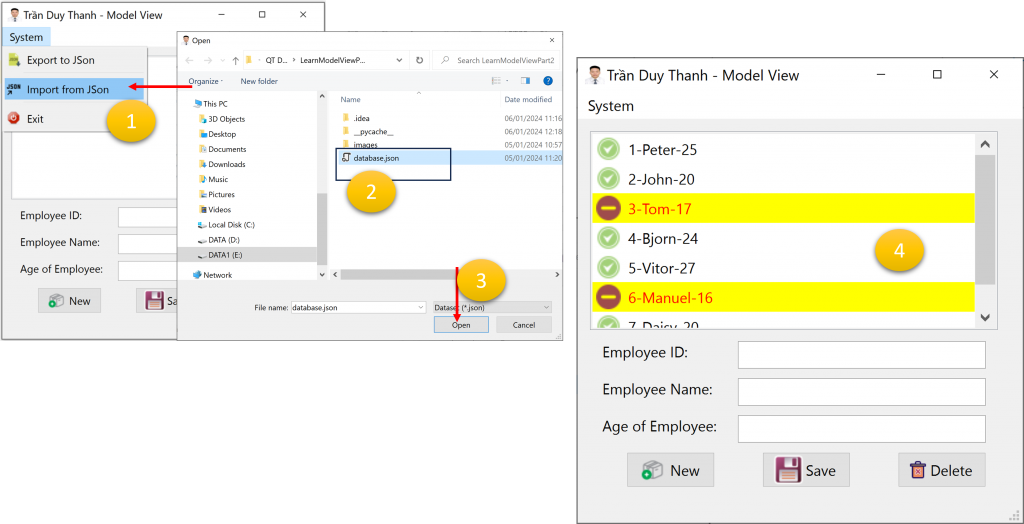
Menu item “Import from Json”: Chương trình sẽ mở cửa sổ OpenFileDialog để người dùng chọn file JSON ARRAY đã lưu và hiểu thị danh sách Employee trong file này lên QListView.
Menu item “Exit”: Chương trình sẽ thoát
Bây giờ chúng ta đi vào chi tiết từng bước:
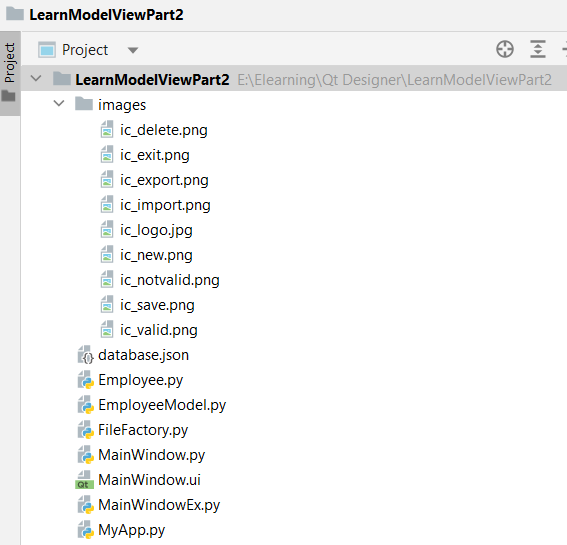
Bước 1: Tạo dự án “LearnModelViewPart2” trong Pycharm như cấu trúc dưới đây:
Thư mục “images” lưu trữ các hình ảnh và icon của phần mềm
“Employee.py” là file mã lệnh python cho mô hình lớp Employee có các thuộc tính id, name và age
“EmployeeModel.py” là lớp Model kế thừa từ QAbstractListModel để sử dụng trong mô hình Model View nhằm hiển thị dữ liệu danh sách Employee.
“FileFactory.py” là file mã lệnh Python để Serialize và Deserialize dữ liệu Employee với định dạng Json Array
“MainWindow.ui” là file giao diện của phần mềm, sử dụng Qt Designer tích hợp trong Pycharm để thiết kế.
“MainWindow.py” là file Generate Python code của giao diện MainWindow.ui
“MainWindowEx.py” là file mã lệnh python để xử lý sự kiện người dùng cũng như gán Model View
“MyApp.py” là file mã lệnh python để thực thi chương trình.
Lớp Employee ở trên có 3 thuộc tính: id, name và age
hàm __str__ để hiển thị chuỗi dữ liệu format cho đối tượng Employee, tùy nhu cầu mà bạn có thể chỉnh sửa hàm này.
Bước 3: Viết mã lệnh cho “EmployeeModel.py”
import typing
from PyQt6 import QtGui
from PyQt6.QtCore import QAbstractListModel, Qt, QModelIndex
from PyQt6.QtGui import QImage
class EmployeeModel(QAbstractListModel):
def __init__(self,employees=None):
super().__init__()
self.employees=employees
def data(self, index: QModelIndex, role: int = ...) -> typing.Any:
emp = self.employees[index.row()]
if role == Qt.ItemDataRole.DisplayRole:
return str(emp)
if role==Qt.ItemDataRole.DecorationRole:
if emp.age<18:
return QImage("images/ic_notvalid.png")
else:
return QImage("images/ic_valid.png")
if role==Qt.ItemDataRole.ForegroundRole:
if emp.age < 18:
return QtGui.QColor(Qt.GlobalColor.red)
if role==Qt.ItemDataRole.BackgroundRole:
if emp.age < 18:
return QtGui.QColor(Qt.GlobalColor.yellow)
def rowCount(self, parent: QModelIndex = ...) -> int:
return len(self.employees)
Nếu Employee có age>=18 thì có biểu tượng icon màu xanh. Nếu age<18 thì có biểu tượng icon màu đỏ, chữ đỏ và nền vàng.
Ở đây Tui giải thích thêm hàm override data(), nó dùng để hiển thị dữ liệu theo từng trường hợp đặc biệt:
Role
Value
Ý nghĩa chức năng
Qt.ItemDataRole.DisplayRole
0
Dùng để hiển thị dữ liệu, kiểu QString.
Qt.ItemDataRole.DecorationRole
1
Dùng để hiển thị định dạng trang trí, biểu tượng, kiểu QColor, QIcon hoặc QPixmap
Qt.ItemDataRole.EditRole
2
Dùng để hiển thị khi dữ liệu chỉnh sửa, kiểu QString
Qt.ItemDataRole.ToolTipRole
3
Dùng để hiển thị Tooltip, kiểu QString
Qt.ItemDataRole.StatusTipRole
4
Dùng để hiển thị cho staus bar, kiểu QString
Qt.ItemDataRole.WhatsThisRole
5
Dùng để hiển thị “What’s this”, kiểu QString
Qt.ItemDataRole.FontRole
6
Dùng để hiển thị Font chữ
Qt.ItemDataRole.TextAlignmentRole
7
Dùng để căn lề chữ
Qt.ItemDataRole.BackgroundRole
8
Dùng để hiển thị màu nền
Qt.ItemDataRole.ForegroundRole
9
Dùng để hiển thị màu chữ
Qt.ItemDataRole.CheckStateRole
10
Dùng để kiểm tra trạng thái
Qt.ItemDataRole.AccessibleTextRole
11
Dùng để truy suất text
Qt.ItemDataRole.AccessibleDescriptionRole
12
Dùng để truy suất mô tả
Qt.ItemDataRole.SizeHintRole
13
Dùng để thiết lập size hint cho item
Qt.ItemDataRole.InitialSortOrderRole
14
Dùng để khởi tạo sắp xếp
Qt.ItemDataRole.UserRole
15
Dùng để xử lý dữ liệu object trong item
Bước 3: Viết mã lệnh cho FileFactory.py
import json
import os
class FileFactory:
#path: path to serialize array of Employee
#arrData: array of Employee
def writeData(self,path,arrData):
jsonString = json.dumps([item.__dict__ for item in arrData],default=str)
jsonFile = open(path, "w")
jsonFile.write(jsonString)
jsonFile.close()
#path: path to deserialize array of Employee
#ClassName: Employee
def readData(self,path,ClassName):
if os.path.isfile(path) == False:
return []
file = open(path, "r")
# Reading from file
self.arrData = json.loads(file.read(), object_hook=lambda d: ClassName(**d))
file.close()
return self.arrData
Lớp FileFactory này các bạn đã làm quen nhiều lần ở các bài học trước, nhiệm vụ của writeData là Serialize danh sách Employee xuống ổ cứng với định dạng JSON Array. Hàm readData để Deserialize chuỗi JSON Array dưới ổ cứng lên bộ nhớ bằng mô hình hóa hướng đối tượng các Employee.
Bước 4: Thiết kế giao diện MainWindow.ui bằng Qt Designer (Hoặc Qt Creator)
Ta kéo thả các Widget và đặt tên cho chúng như hình tổng quan dưới đây:
Các widget QLineEdit, QPushButton, QListView các bạn đã làm nhiều lần rồi nên Tui không trình bày lại, các bạn chỉ cần kéo thả ra giao diện và đặt tên như trên là được.
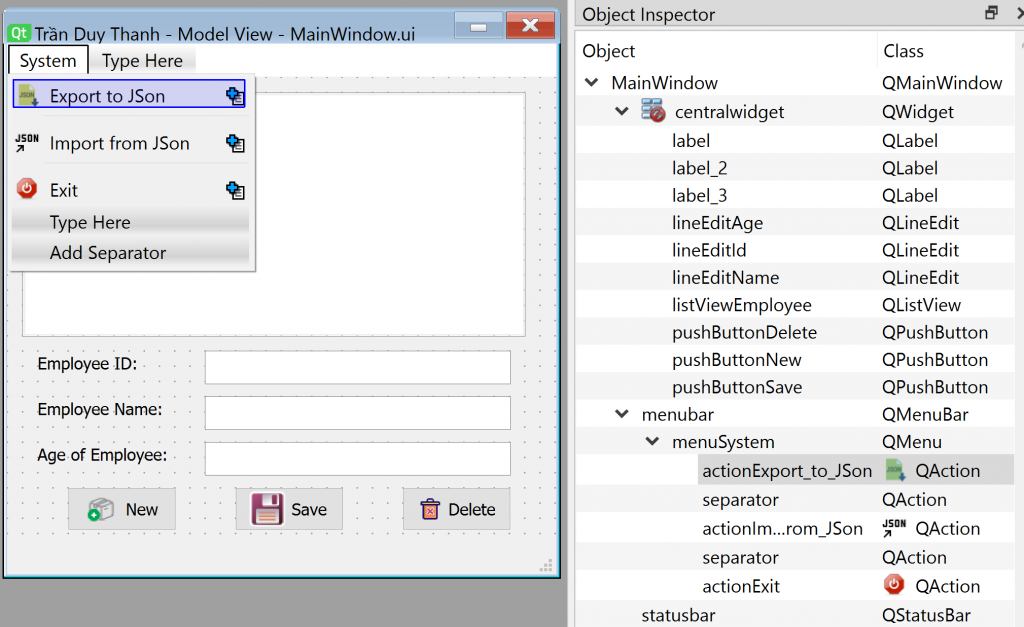
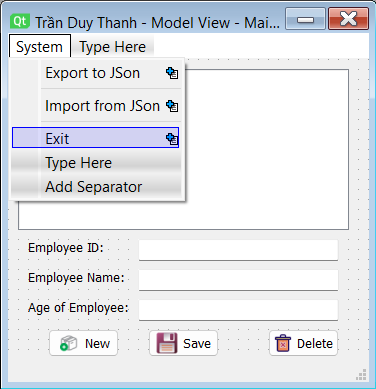
Tui sẽ trình bày Menu vì bạn chưa được học. Cấu trúc Menu của PyQt6 gồm:
Thanh nằm ngang chứa các menu gọi là QMenuBar
Bên trong QMenu chứa các Menu được gọi là QMenu
Bên trong QMenu khi nhấn vào nó xổ danh sách xuống gọi là các QAction
Tức với giao diện ở trên thì:
Thanh nằm ngang ở trên cùng là QMenuBar
“System” là QMenu
“Export to JSon” là QAction
“Import from JSon” là QAction
“Exit” là QAction
Và signal ta dùng cho các QAction là triggered
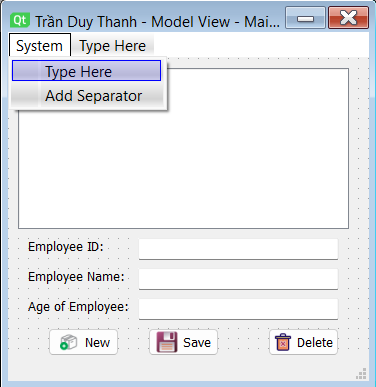
Ta tiếp tục thiết kế QMenuBar nhé. Nhìn vào nhóm Menu Bar ở bên trên giao diện, ngay chỗ “Type Here” bạn gõ vào System và nhấn Enter thì ta có kết quả như hình bên dưới:
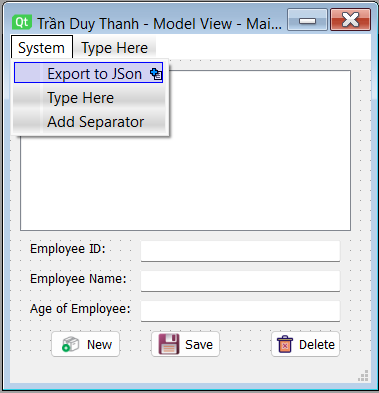
Tiếp tục chỗ “Type Here” ở hình trên ta gõ vào “Export to JSon” rồi nhấn Enter để tạo QAction, ta có kết quả:
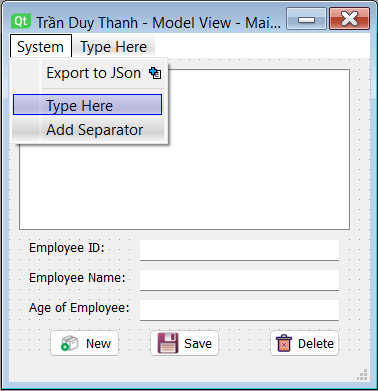
Để tạo thanh nằm ngang ngăn cách các QAction ta nhấn “Add Separator”, kết quả sẽ xuất hiện đường nằm ngang:
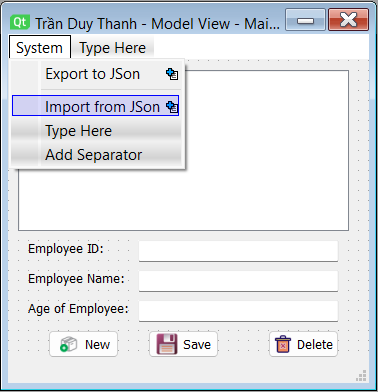
Tiếp tục, chỗ “Type Here” ta gõ “Import from JSon” để tạo QAction rồi nhấn Enter, kết quả:
Để tạo thêm đường ngang giữa các QAction ta nhấn “Add Separator”, kết quả:
Cuối cùng ta gõ “Exit” vào mục Type Here, kết quả:
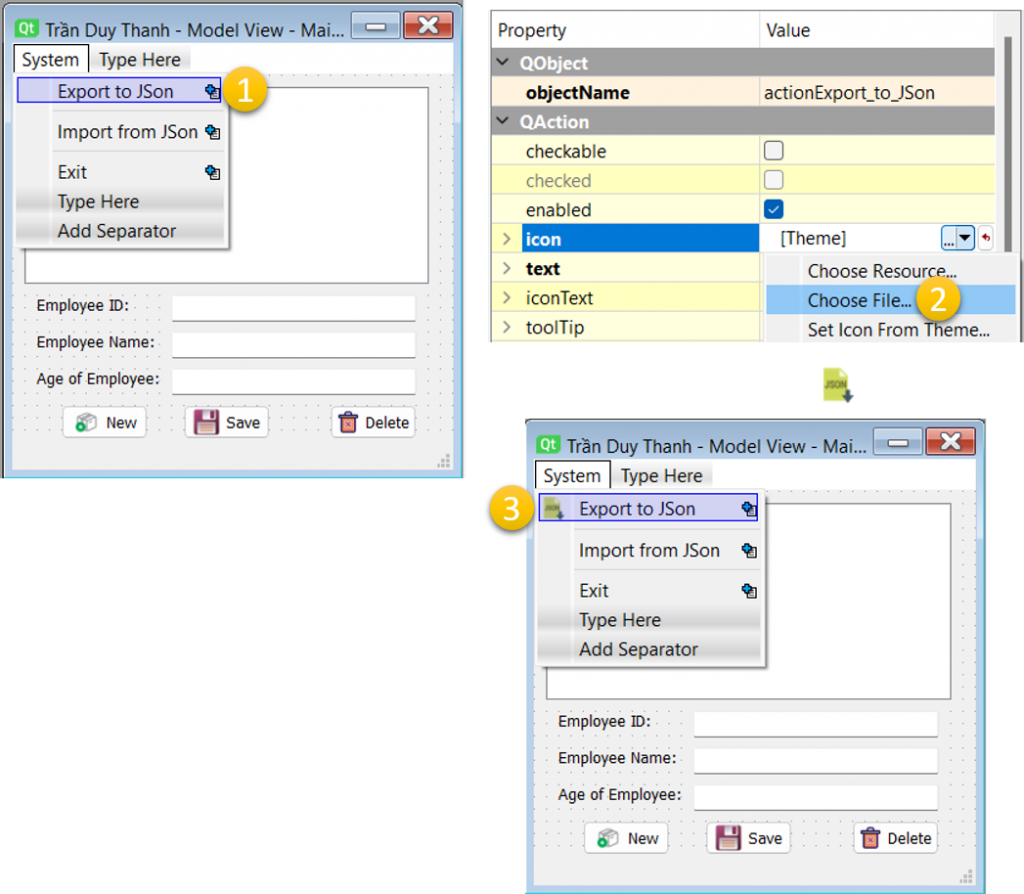
Sau khi tạo xong các QAction cho QMenu ta tiến hành gán các Icon cho các QAction để nó thẩm mỹ hơn, để tạo Icon thì ta cứ chọn QAction trước, sau đó trong thuộc tính Icon ta chọn “Choose File…” để trỏ tới hình mình mong muốn:
Cứ như vậy, các bạn lặp lại thao tác gán Icon cho các QAction còn lại, kết quả cuối cùng:
Bước 5: Generate Python code “MainWindow.py” cho giao diện “MainWindow.ui“. Cách Generate code đã được học kỹ ở các bài đầu tiên
Bước 6: Viết mã lệnh “MainWindowEx.py“, mã lệnh trong này kế thừa từ lớp được Generate trong bước trước để xử lý sự kiện người dùng và nó giúp ta không bị ảnh hưởng khi trong tương lai Generate lại python code.
Constructor của lớp này Tui định nghĩa 2 biến đối tượng như dưới đây:
from PyQt6.QtWidgets import QFileDialog, QMessageBox
from Employee import Employee
from EmployeeModel import EmployeeModel
from FileFactory import FileFactory
from MainWindow import Ui_MainWindow
class MainWindowEx(Ui_MainWindow):
def __init__(self):
self.employees=[]
self.selectedEmployee=None
self.fileFactory=FileFactory()
Biến employees để lưu danh sách đối tượng Employee
Biến selectedEmployee để lưu Employee hiện tại đang lựa chọn trên giao diện QListView, nó được dùng để xử lý lưu mới hay lưu cập nhật Employee
Biến fileFactory là đối tượng để Serialize và Deserialize danh sách Employee với định dạng JSON ARRAY
Tiếp theo là hàm setupUi() được override để xử lý nạp giao diện cũng như xử lý signal mà người dùng tương tác:
Xử lý sự kiện người dùng lựa chọn trên QListView (Bao gồm cả click chuột và di chuyển phím) ta dùng singal selectionChanged nằm trong selectionModel()
Xử lý sự kiện người dùng lựa chọn QAction ta dùng singal triggered
Hàm processNew() sẽ xóa các dữ liệu trên QLineEdit và focus vào ô ID để giúp người dùng nhập liệu nhanh chóng, đồng thời gán selectedEmployee=None để đánh dấu đây là khởi đầu cho thao tác lưu mới một Employee.
Hàm Save sẽ có 2 chức năng là lưu mới và lưu cập nhật Employee.
Nếu selectedEmployee = None thì chương trình lưu mới, còn khác None thì chương trình lưu cập nhật.
Sau khi dữ liệu được cập nhật trong biến employees, lúc này ta sẽ nói ModelView cập nhật lại giao diện bằng hàm layoutChanged.emit()
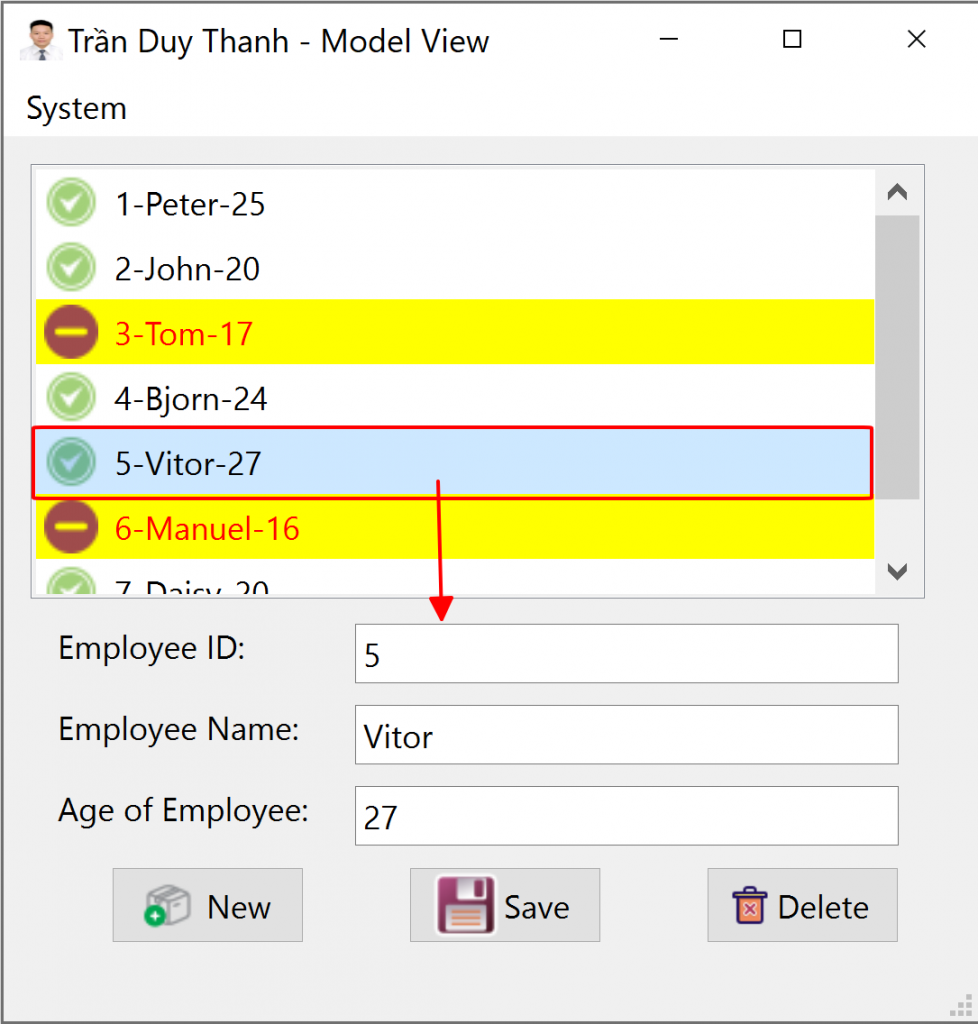
Tiếp theo là hàm processSelection(). Hàm này sẽ lấy dòng dữ liệu mà người dùng chọn trên QListView bằng hàm selectedIndexes(). Hàm selectedIndexes() trả về danh sách các QIndex được lựa chọn, ở đây ta chỉ xử lý chọn 1 dòng dữ liệu, do đó ta có indexes[0].row() là trả về vị trí kiểu integer để lấy chính xác đối tượng Employee tại vị trí đang chọn:
Sau khi có đối tượng Employee đang chọn, ta hiển thị lên các QLineEdit đồng thời gán biến selectedEmployee cho biến đối tượng này, mục đích để hỗ trợ cho thao tác lưu cập nhật, ví dụ dưới đây là người dùng chọn Vitor:
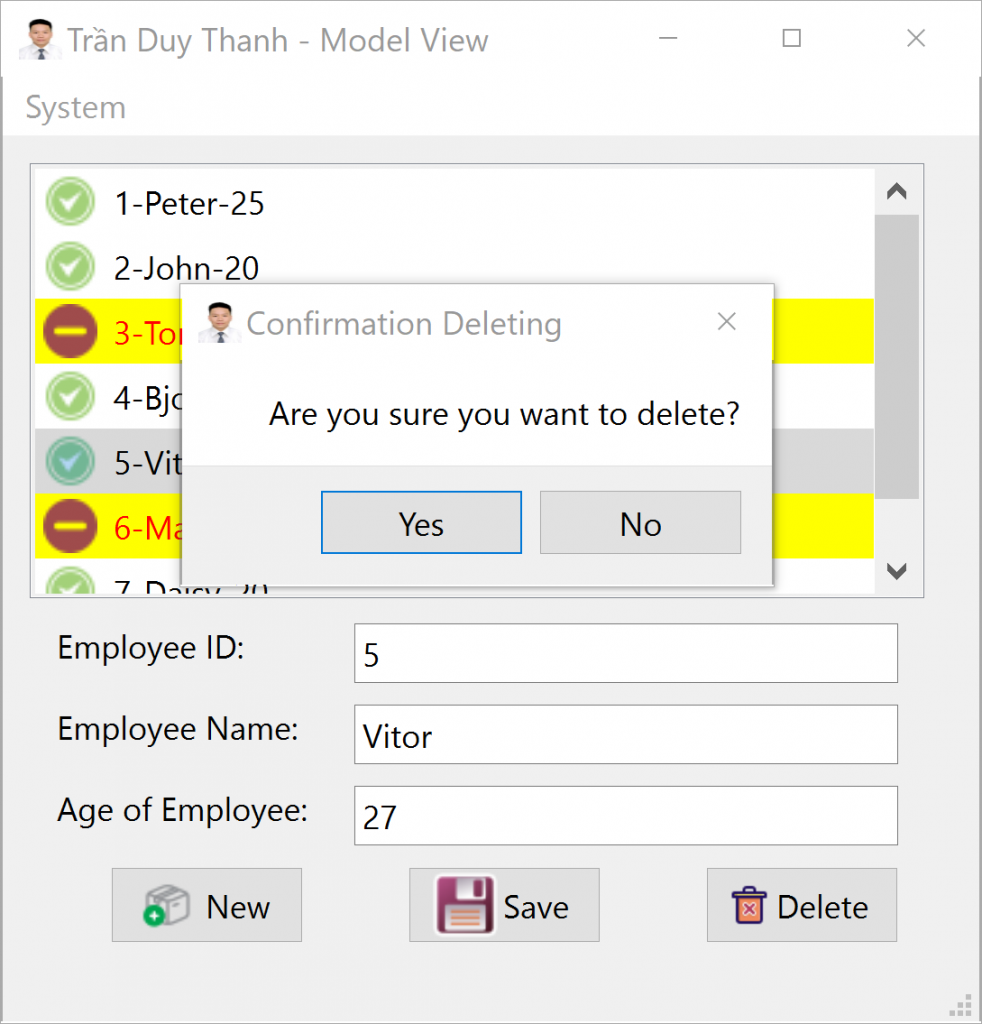
Tiếp tới nữa là hàm “processDelete()“, hàm này tiến hành xóa Employee đang chọn trên QListView:
def processDelete(self):
dlg = QMessageBox(self.MainWindow)
if self.selectedEmployee == None:
dlg.setWindowTitle("Deleteing error")
dlg.setIcon(QMessageBox.Icon.Critical)
dlg.setText("You have to select a Product to delete")
dlg.exec()
return
dlg.setWindowTitle("Confirmation Deleting")
dlg.setText("Are you sure you want to delete?")
buttons = QMessageBox.StandardButton.Yes | QMessageBox.StandardButton.No
dlg.setStandardButtons(buttons)
button = dlg.exec()
if button == QMessageBox.StandardButton.Yes:
self.employees.remove(self.selectedEmployee)
self.model.layoutChanged.emit()
self.selectedEmployee = None
self.processNew()
Lệnh trên Tui tiếp tục dùng QMessage dialog để xác thực xem người dùng có thực sự muốn xóa hay không, chọn Yes thì xóa:
tương tự như thao tác lưu mới hay cập nhật, thì thao tác xóa cũng gọi hàm emit() để model view cập nhật lại giao diện.
Để Serialize và Deserialize dữ liệu ra JSON ARRAY ta có 2 hàm được Tui viết dưới đây.
Thứ nhất là hàm processExportJson() dùng để xuất toàn bộ dữ liệu Employee ra JSON ARRAY:
Cuối cùng là hàm “processImportJson()” dùng để đọc dữ liệu từ JSON và phục hồi lên bộ nhớ đồng thời đưa về mô hình hóa hướng đối tượng và hiển thị lên QListView:
def processImportJson(self):
# setup for QFileDialog
filters = "Dataset (*.json);;All files(*)"
filename, selected_filter = QFileDialog.getOpenFileName(
self.MainWindow,
filter=filters,
)
arr=self.fileFactory.readData(filename,Employee)
self.employees.clear()
for i in range(len(arr)):
self.employees.append(arr[i])
self.model.layoutChanged.emit()
Mã lệnh ở trên sẽ dùng QFileDialog.getOpenFileName để mở cửa sổ File Dialog, cho người dùng lựa chọn file dữ liệu để nạp lên giao diện.
Sau khi nạp xong dữ liệu lên bộ nhớ, ta gọi hàm self.model.layoutChanged.emit() để hiển thị dữ liệu lên giao diện:
Từ giao diện trống, ta chọn “Import from JSon”, sau đó chọn file “database.json” rồi bấm “Open”, ta sẽ có kết quả như mong muốn, các Emloyee được nạp lên QListView.
Dưới đây là mã lệnh đầy đủ của “MainWindowEx.py”:
from PyQt6.QtWidgets import QFileDialog, QMessageBox
from Employee import Employee
from EmployeeModel import EmployeeModel
from FileFactory import FileFactory
from MainWindow import Ui_MainWindow
class MainWindowEx(Ui_MainWindow):
def __init__(self):
self.employees=[]
self.selectedEmployee=None
self.fileFactory=FileFactory()
def setupUi(self, MainWindow):
super().setupUi(MainWindow)
self.MainWindow=MainWindow
self.model=EmployeeModel(self.employees)
self.listViewEmployee.setModel(self.model)
self.pushButtonNew.clicked.connect(self.processNew)
self.pushButtonSave.clicked.connect(self.processSave)
#self.listViewEmployee.clicked.connect(self.processClicked)
self.listViewEmployee.selectionModel().selectionChanged.connect(self.processSelection)
self.pushButtonDelete.clicked.connect(self.processDelete)
self.actionExport_to_JSon.triggered.connect(self.processExportJson)
self.actionImport_from_JSon.triggered.connect(self.processImportJson)
def processNew(self):
self.lineEditId.setText("")
self.lineEditName.setText("")
self.lineEditAge.setText("")
self.lineEditId.setFocus()
self.selectedEmployee=None
def processSave(self):
id=self.lineEditId.text()
name=self.lineEditName.text()
age=int(self.lineEditAge.text())
emp=Employee(id,name,age)
if self.selectedEmployee==None:
self.employees.append(emp)
self.selectedEmployee=emp
else:
index=self.employees.index(self.selectedEmployee)
self.selectedEmployee=emp
self.employees[index]=self.selectedEmployee
self.model.layoutChanged.emit()
def processSelection(self):
indexes=self.listViewEmployee.selectedIndexes()
if indexes:
row=indexes[0].row()
emp=self.employees[row]
self.lineEditId.setText(str(emp.id))
self.lineEditName.setText(emp.name)
self.lineEditAge.setText(str(emp.age))
self.selectedEmployee=emp
def processDelete(self):
dlg = QMessageBox(self.MainWindow)
if self.selectedEmployee == None:
dlg.setWindowTitle("Deleteing error")
dlg.setIcon(QMessageBox.Icon.Critical)
dlg.setText("You have to select a Product to delete")
dlg.exec()
return
dlg.setWindowTitle("Confirmation Deleting")
dlg.setText("Are you sure you want to delete?")
buttons = QMessageBox.StandardButton.Yes | QMessageBox.StandardButton.No
dlg.setStandardButtons(buttons)
button = dlg.exec()
if button == QMessageBox.StandardButton.Yes:
self.employees.remove(self.selectedEmployee)
self.model.layoutChanged.emit()
self.selectedEmployee = None
self.processNew()
def processExportJson(self):
# setup for QFileDialog
filters = "Dataset (*.json);;All files(*)"
filename, selected_filter = QFileDialog.getSaveFileName(
self.MainWindow,
filter=filters,
)
self.fileFactory.writeData(filename,self.employees)
def processImportJson(self):
# setup for QFileDialog
filters = "Dataset (*.json);;All files(*)"
filename, selected_filter = QFileDialog.getOpenFileName(
self.MainWindow,
filter=filters,
)
arr=self.fileFactory.readData(filename,Employee)
self.employees.clear()
for i in range(len(arr)):
self.employees.append(arr[i])
self.model.layoutChanged.emit()
def show(self):
self.MainWindow.show()
Bước 7: Cuối cùng ta viết mã lệnh “MyApp.py” để thực thi chương trình:
from PyQt6.QtWidgets import QApplication, QMainWindow

from MainWindowEx import MainWindowEx

app=QApplication([])
myWindow=MainWindowEx()
myWindow.setupUi(QMainWindow())
myWindow.show()
app.exec()
Thực thi chương trình ta có kết quả như mong muốn:
Như vậy Tui đã trình bày chi tiết và kỹ lưỡng xong phần ứng dụng kiến trúc Model View để xử lý dữ liệu với QListView. Hướng dẫn các bạn cách dùng QMenuBar, QMenu, QAction cũng như các signal triggered tương ứng, đã minh họa đầy đủ và chi tiết các chức năng xem, thêm, sửa, xóa dữ liệu. Các bạn chú ý lập trình lại bài này nhiều lần để ứng dụng vào triển khai dự án trong thực tế.
Bài học sau Tui sẽ tiếp tục trình bày ứng dụng Model View vào QTableView để hiển thị và tương tác dữ liệu dạng bảng, một trong những kỹ thuật rất quan trọng và hữu ích. Các bạn chú ý theo dõi
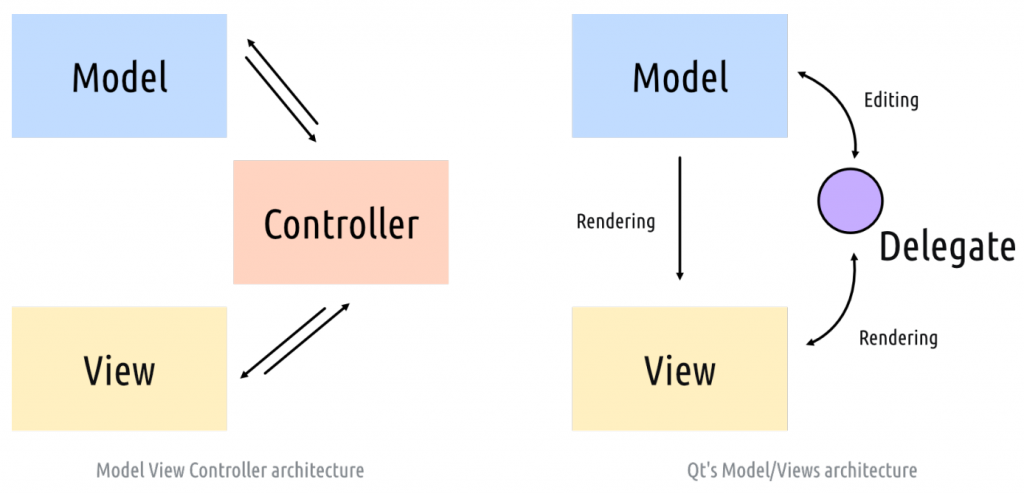
Trong lập trình xử lý tương tác dữ liệu có rất nhiều kỹ thuật, các bài học trước ta dùng các kỹ thuật thông thường và trực tiếp tương tác các đối tượng trên các Widget. Ngoài ra các kỹ sư đã phát triển kiến trúc liên quan tới Model View Controller, hay thường được gọi tắt là mô hình MVC để việc tương tác giao diện người dùng với dữ liệu cũng như các xử lý nghiệp vụ được dễ dàng hơn, dễ tái sử dụng hơn. PyQt6 cũng tích hợp mô hình MVC này và nó được gọi là Qt’s Model/Views Architecture. Chúng ta cùng điểm qua mô hình này:
Các bạn có thể hiểu nôm na mô hình Model View Controller nó hoạt động như sau:
Model: Nắm giữ cấu trúc dữ liệu trong ứng dụng mà nó đang làm việc. Ví dụ danh sách dữ liệu hướng đối tượng Product, Employee, Customer, Order, Provider… Khi người sử dụng thao tác trên View thì nó sẽ thông qua Controller để truy suất tới các Model tương ứng, các Model này sẽ hiển thị lên View thông qua Controller, có thể hiểu Controller là trung gian. Ví dụ trên Giao diện bạn muốn xem Danh sách PRODUCT, thì nó sẽ truyền tín hiện cho Controller PRODUCT, và controller này sẽ chọn đúng mô hình đối tượng PRODUCT, Model sẽ tạo ra danh sách Product và trả về cho Controller, sau đó Controller đẩy danh sách Product này lên View.
View: Là thành phần để hiển thị giao diện người dùng, nó cũng có nhiệm vụ nhận tương tác của người dùng và gọi Controller tương ứng. Nhiều View khác nhau có thể cùng hiển thị một loại dữ liệu, ví dụ bạn có 1 QTableWidget, 1 QListWidget, 1 QComboBox…các Widgets này có thể cùng hiển thị 1 danh sách model Product. Do đó ở đây bạn thấy tính tái sử dụng model rất cao.
Controller: Là thành phần trung gian, nó sẽ nhận các tương tác người dùng trên View, sau đó truyền đổi các tương tác này thành các lệnh để tương tác với Model để nhận các model tương ứng rồi nó sẽ hiển thị kết quả lên View hoặc tương tác với Model khác.
Với PyQt thì các kỹ sư có sự cải biên một xíu, đặc biệt là sự phân biệt giữa Model và View đôi khi nó khá mờ nhạt, khó nhận ra. Đồng thời View và Controller được hợp nhất lại với nhau để tao ra kiến trúc Model/ViewController hay nói tắt là ModelView. PyQt chấp nhận các sự kiện từ người dùng thông qua hệ đều hành và ủy quyền những sự kiện này cho các widget để xử lý. Cái hay của Model View đó là giảm bớt sự cồng kềnh:
Model nắm giữ dữ liệu hoặc tham chiếu dữ liệu và trả về đối tượng đơn hoặc danh sách đối tượng. Khi model được thanh đổi dữ liệu nó sẽ ngay lập tức cập nhật lên giao diện
View sẽ yêu cầu dữ liệu từ Model và hiển thị lên các Widget tương ứng
Cơ chế Delegate giúp chương trình cập nhật dữ liệu mô hình tương ứng lên View một cách tự động.
Bài minh họa dưới đây, Chúng Ta sẽ làm một dự án hiển thị danh sách Employee đơn giản lên QListView sử dụng kiến trúc Model View của PyQt:
Ở hình trên Tui có minh họa là Chúng ta tạo một mô hình lớp Employee, và dùng kiến trúc Model View để hiển thị danh sách Employee lên QListView.
Ta thực hiện từng bước như sau:
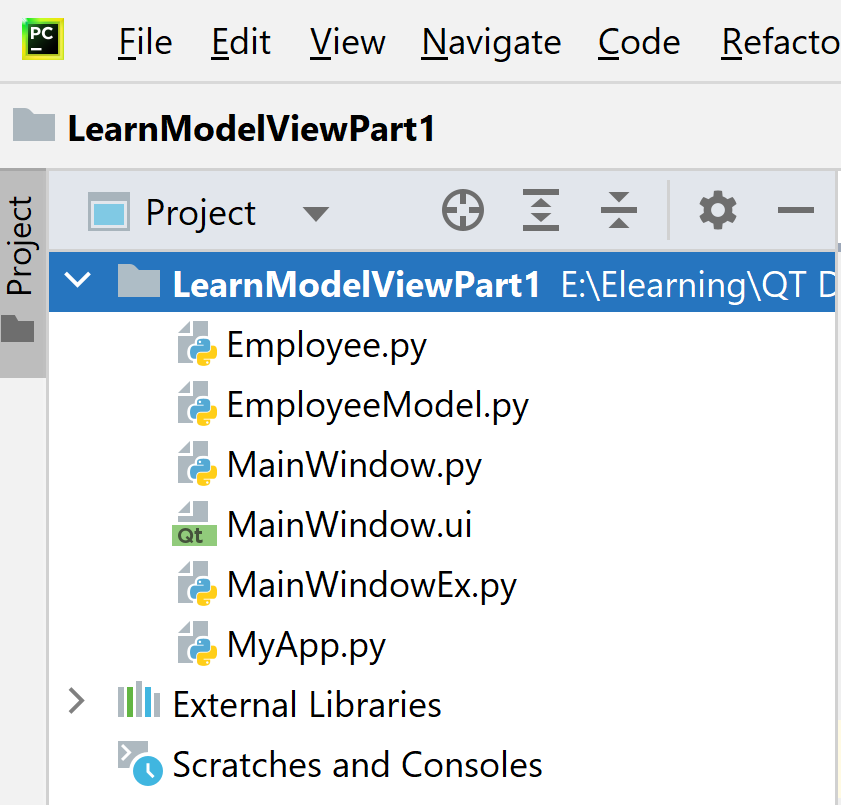
Bước 1: Tạo dự án “LearnModelViewPart1” trong Pycharm có cấu trúc như hình dưới đây:
Employee.py là mô hình lớp hướng đối tượng định nghĩa cấu trúc dữ liệu cho Employee gồm id, name, age
EmployeeModel.py là lớp model view cho Employee, nó kế thừa từ “QAbstractListModel” lớp này sẽ lưu trữ danh sách dữ liệu mô hình Employee và hiển thị lên QListView
MainWindow.ui là màn hình giao diện được thiết kế bằng Qt Designer
MainWindow.py là lớp Generate Python của MainWindow.ui
MainWindowEx.py là lớp mã lệnh xử lý sự kiện người dùng cũng như lắp ráp dữ liệu trong mô hình Model View
MyApp.py là lớp thực thi chương trình
Bước 2: Tạo lớp Employee.py có mã lệnh như dưới đây:
Lớp Employee có constructor nhận các đối số id, name, age và nó là các thuộc tính của Employee.
đồng thời hàm __str__ Tui thiết kế để nó tự động hiển thị lên giao diện như mong muốn, bạn có thể sửa lại.
Bước 3: Tạo lớp mô hình “EmployeeModel.py” và có mã lệnh như dưới đây:
from PyQt6.QtCore import QAbstractListModel, Qt
class EmployeeModel(QAbstractListModel):
def __init__(self,employees=None):
super().__init__()
self.employees=employees
def data(self, index, role):
if role == Qt.ItemDataRole.DisplayRole:
emp = self.employees[index.row()]
return str(emp)
def rowCount(self, index):
return len(self.employees)
Lớp EmployeeModel sẽ kế thừa từ lớp QAbstractListModel, chúng ta cần overridfe 3 hàm (bắt buộc):
hàm __init__ để khởi tạo các biến ban đầu cho model, ở đây Tui thiết kế cho nó nhận vào một danh sách Employee
hàm data có 2 đối số chính, đối số index (Có kiểu QIndex) là vị trí của dòng dữ liệu sẽ hiển thị lên QListView, do đó ra sẽ lấy index.row() để trả về integer để truy suất chính xác vị trí của dữ liệu trong danh sách employees. Ở đây chúng ta sử dụng Enum Qt.ItemDataRole để điều hướng cách thức hiển thị dữ liệu, Tui sẽ nó chi tiết ở bài học tiếp theo, trong bài này Chúng ta quan tâm tới DisplayRole có nghĩa là enum dùng để hiển thị dữ liệu. Hàm này dùng str(emp) để nó tự động gọi hàm __str__ mà ta thiết kế trong lớp Employee.py
hàm rowCount trả về số phần tử trong danh sách, bắt buộc chúng ta phải Override hàm này.
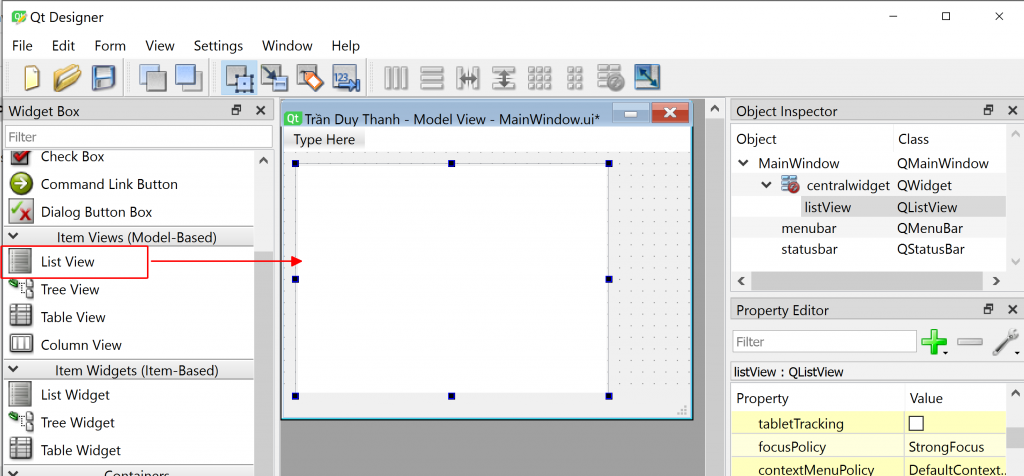
Bước 4: Thiết kế giao diện MainWindow.ui bằng Qt Designer
Ta chỉ cần kéo thả ListView trong nhóm Model-Based vào giao diện là xong.
Bước 5: Generate Python code cho MainWindow.ui
# Form implementation generated from reading ui file 'MainWindow.ui'
#
# Created by: PyQt6 UI code generator 6.5.2
#
# WARNING: Any manual changes made to this file will be lost when pyuic6 is
# run again. Do not edit this file unless you know what you are doing.
from PyQt6 import QtCore, QtGui, QtWidgets
class Ui_MainWindow(object):
def setupUi(self, MainWindow):
MainWindow.setObjectName("MainWindow")
MainWindow.resize(351, 251)
self.centralwidget = QtWidgets.QWidget(parent=MainWindow)
self.centralwidget.setObjectName("centralwidget")
self.listView = QtWidgets.QListView(parent=self.centralwidget)
self.listView.setGeometry(QtCore.QRect(10, 10, 311, 201))
self.listView.setObjectName("listView")
MainWindow.setCentralWidget(self.centralwidget)
self.menubar = QtWidgets.QMenuBar(parent=MainWindow)
self.menubar.setGeometry(QtCore.QRect(0, 0, 351, 22))
self.menubar.setObjectName("menubar")
MainWindow.setMenuBar(self.menubar)
self.statusbar = QtWidgets.QStatusBar(parent=MainWindow)
self.statusbar.setObjectName("statusbar")
MainWindow.setStatusBar(self.statusbar)
self.retranslateUi(MainWindow)
QtCore.QMetaObject.connectSlotsByName(MainWindow)
def retranslateUi(self, MainWindow):
_translate = QtCore.QCoreApplication.translate
MainWindow.setWindowTitle(_translate("MainWindow", "Trần Duy Thanh - Model View"))
Bước 6: Tạo MainWindowEx để xử lý sự kiện, gán model cho widget
from Employee import Employee
from EmployeeModel import EmployeeModel
from MainWindow import Ui_MainWindow
class MainWindowEx(Ui_MainWindow):
def __init__(self):
pass
def setupUi(self, MainWindow):
super().setupUi(MainWindow)
self.MainWindow=MainWindow
employees=[]
employees.append(Employee(1,"John",37))
employees.append(Employee(2, "Peter", 24))
employees.append(Employee(3, "Tom", 25))
self.model=EmployeeModel(employees)
self.listView.setModel(self.model)
def show(self):
self.MainWindow.show()
Ta thấy trong hàm override setupUi, Tui tạo ra 3 đối tượng employee và lưu trữ vào danh sách employees, sau đó nó được đưa vào EmployeeModel(employees)
cuối cùng ta gán model này cho QListVIew bằng hàm: setModel(model)
Bước 7: Viết MyApp.py để thực thi chương trình
from PyQt6.QtWidgets import QApplication, QMainWindow

from MainWindowEx import MainWindowEx

app=QApplication([])
myWindow=MainWindowEx()
myWindow.setupUi(QMainWindow())
myWindow.show()
app.exec()
Thực thi MyApp.py ta có kết quả như mong muốn.
Như vậy là tới đây Tui đã trình bày xong mô hình MVC, Qt Model/ViewController. Các bạn biết được lợi ích của mô hình và đặc biệt triển khai được một ví dụ minh họa cụ thể bằng Model View Architecture để hiển thị danh sách Employee lên QListView.
Sourcode đầy đủ của bài Model View này các bạn tải ở đây:
Bài học sau Tui tiếp tục trình bày chi tiết và chuyên sâu về model trong QListView, cung cấp thêm các chức năng: Thêm, Sửa, Xóa trên model. Các bạn chú ý theo dõi
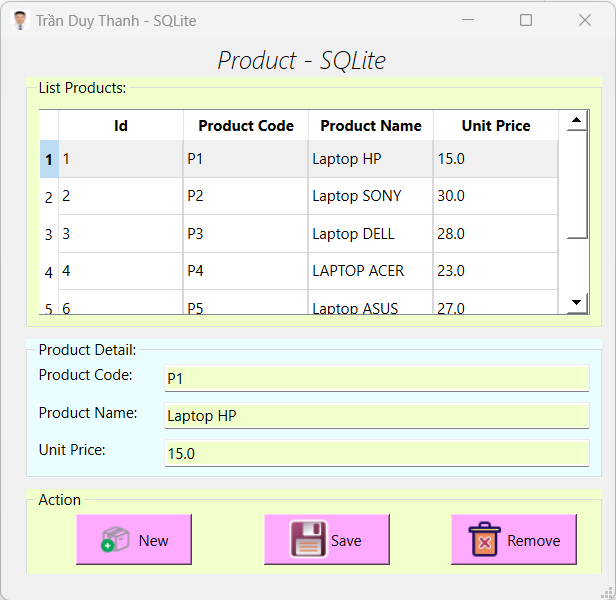
Trong bài này Tui sẽ tiếp tục trình bày chi tiết về SQLite database trong Python với framework PyQt6. Các bạn sẽ tự tay tạo ra một cơ sở dữ liệu SQLite database bằng DB Browswer, rồi từ PyQt6 viết các mã lệnh Python để: Xem, thêm, sửa, xóa dữ liệu. Giao diện phần mềm của bài này mà chúng ta xây dựng sẽ như dưới đây:
Tạo Cơ sở dữ liệu SQLite bằng DB Browser, thiết kế các bảng dữ liệu có cột Id Primary Key là Auto Increment.
Viết chức năng đọc toàn bộ dữ liệu trong CSDL SQLite lên giao diện QTableWidget trong mục List Products
Xử lý sự kiện người dùng chọn các dòng dữ liệu trên QTableWidget và hiển thị thông tin chi tiết xuống phần Product Details
Chức năng “New” sẽ xóa dữ liệu đang nhập ở các ô QLineEdit và focus tới ô Product code
Chức năng “Save”, viết mã lệnh để chương trình tự xử lý 2 trường hợp là lưu mới dữ liệu xuống SQLite hoặc là lưu cập nhập xuống SQLite
Chức năng “Remove”, viết mã lệnh để xóa dòng dữ liệu đang chọn, cho người dùng xác thực trước khi xóa.
Chúng ta thực hiện chi tiết từng bước như dưới đây:
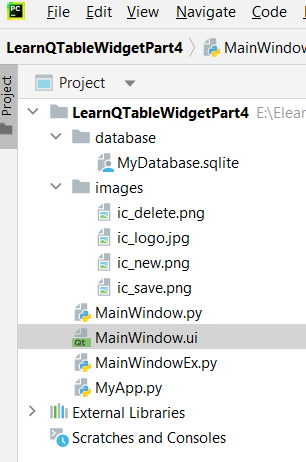
Bước 1: Tạo một dự án tên “LearnQTableWidgetPart4“
Thư mục “database” sẽ lưu trữ SQLite “MyDatabase.sqlite” mà ta sẽ làm chi tiết ở bước sau.
Thư mục “images” lưu trữ các hình ảnh, icon của phần mềm
File “MainWindow.ui” là file giao diện thiết kế bằng Qt Designer
File “MainWindow.py” là file Generate Python code
File “MainWindowEx.py” là file mã lệnh kế thừa từ MainWindow.py để xử lý các nghiệp vụ phần mềm mà không lệ thuộc vào giao diện có thay đổi hay không trong tương lai
File “MyApp.py” là file thực thi phần mềm
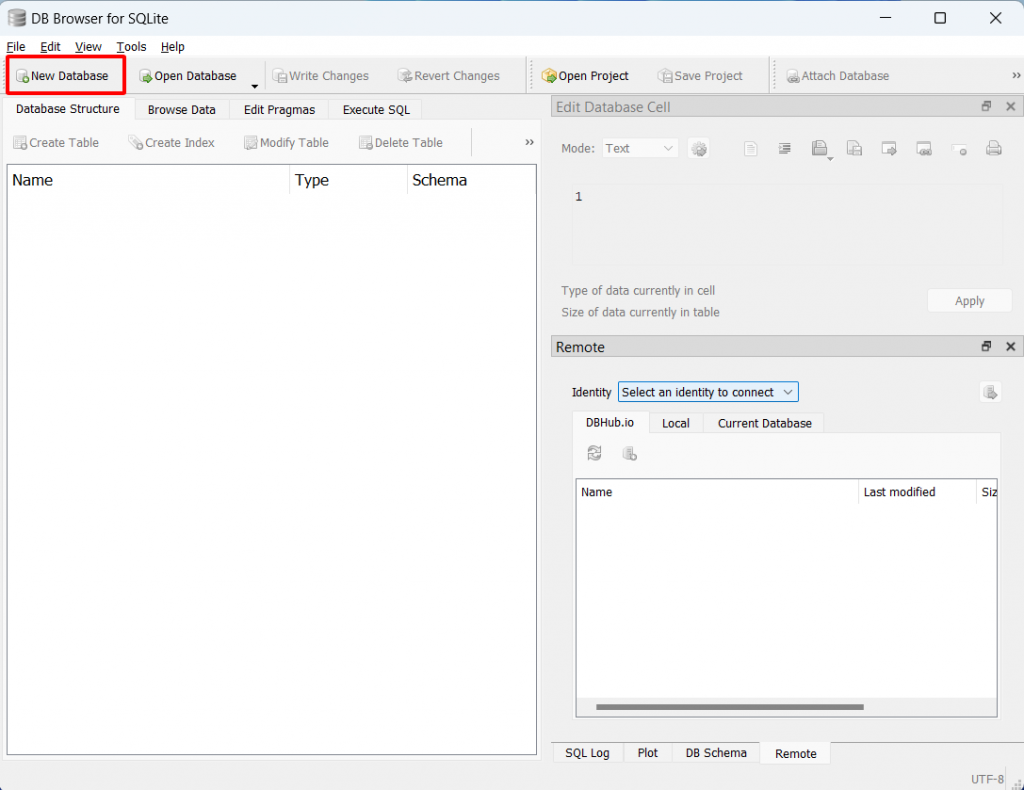
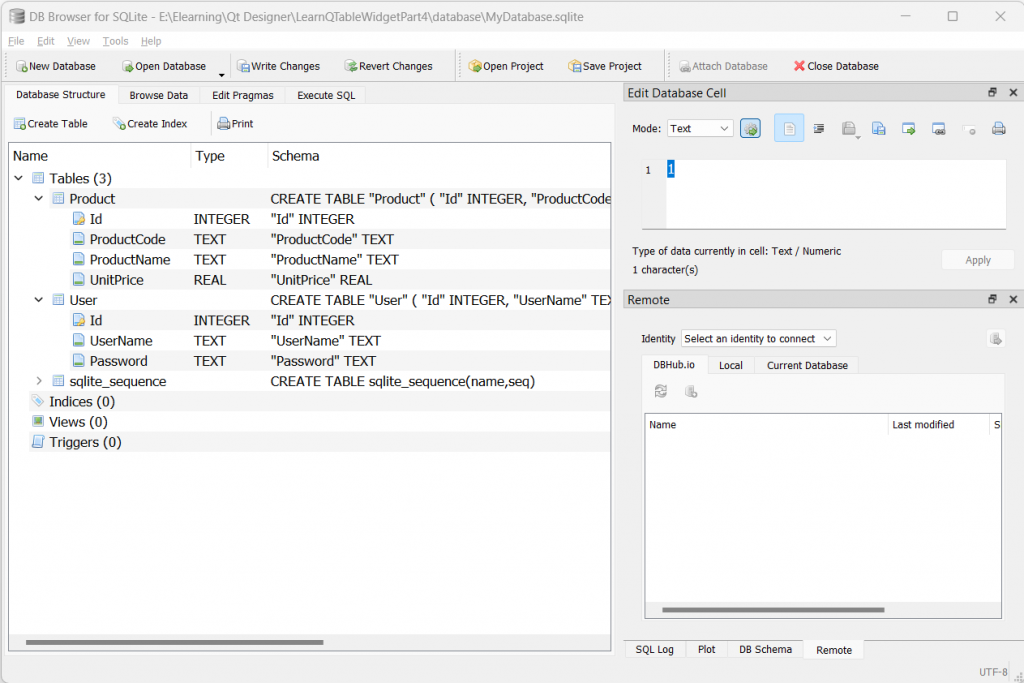
Bước 2: Thiết kế cơ sở dữ liệu SQLite, đặt tên “MyDatabase.sqlite”
Từ phần mềm DB Browser (đã học ở bài 24), Các bạn chọn “New Database“
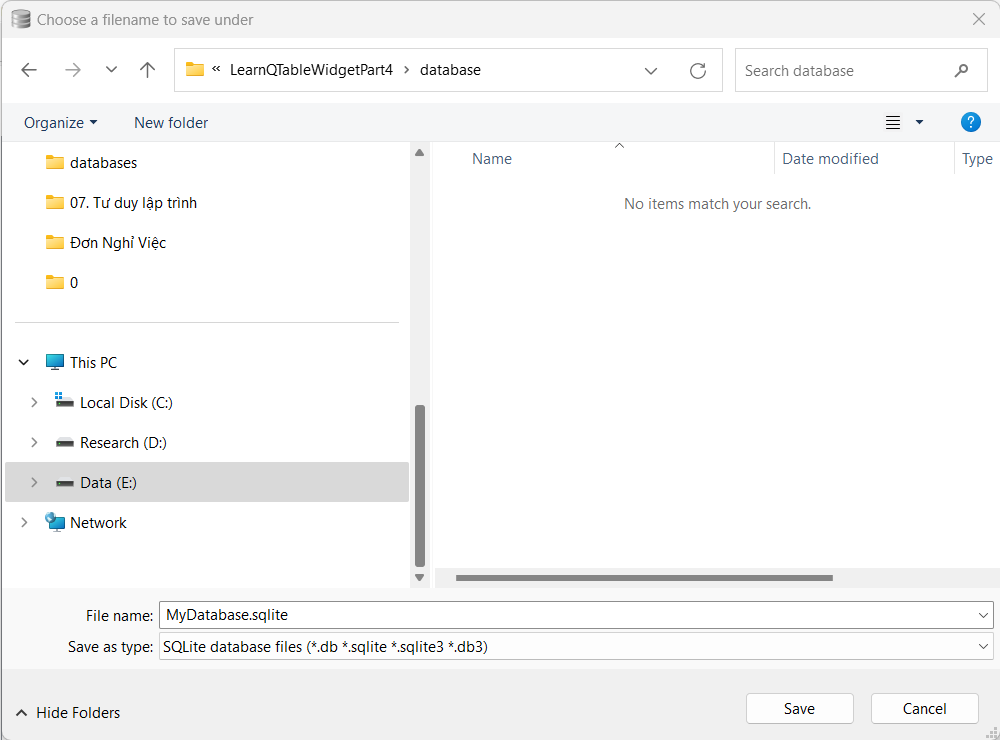
Sau đó chọn nơi lưu trữ, ta lưu vào thư mục “database” trong bước 1.
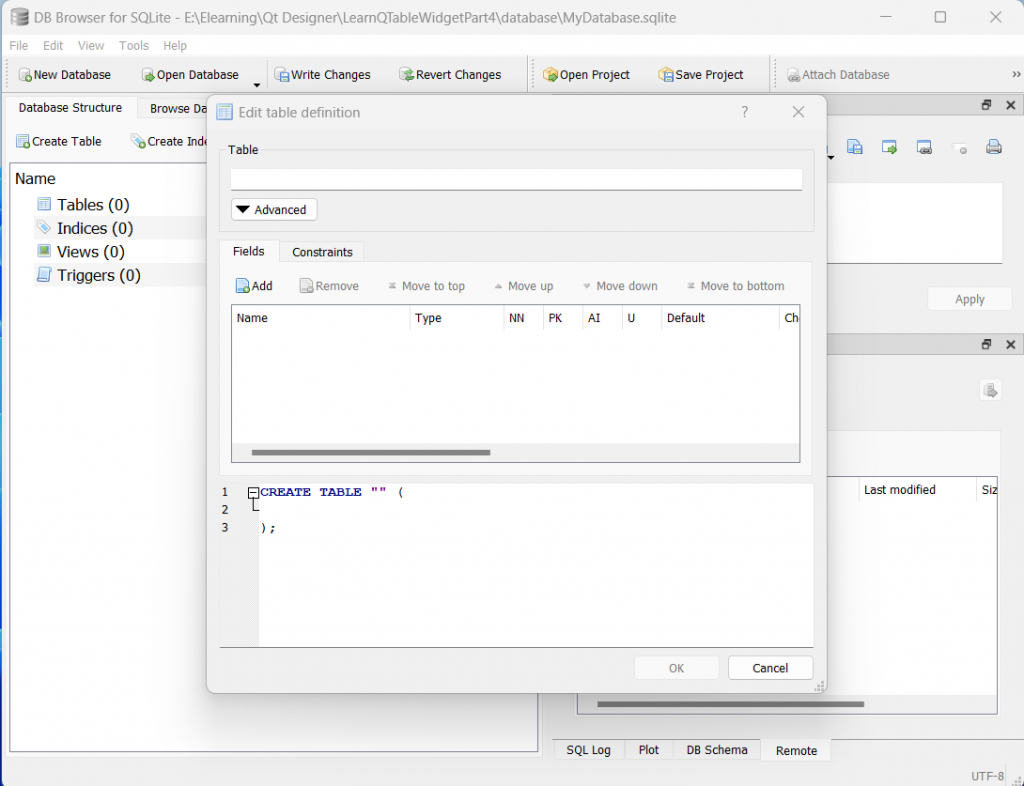
Đặt tên “MyDatabase.sqlite” rồi bấm “Save” lúc này màn hình tạo Table sẽ hiển thị ra như dưới đây:
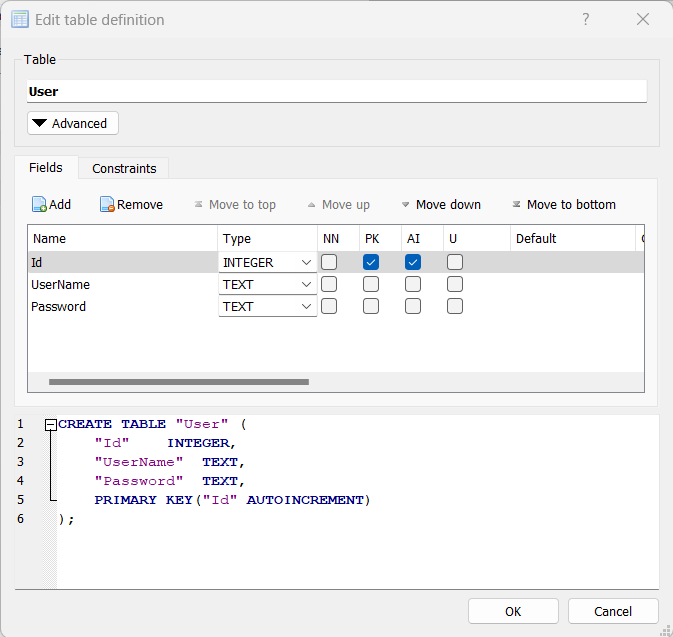
Trong mục Table ta đặt tên, rồi nhấn vào nút “Add” để thêm các thuộc tính. Ví dụ ta tạo bảng User như dưới đây:
Mỗi thuộc tính nó sẽ có kiểu dữ liệu tương ứng, ở trên ta thấy thuộc tính Id Tui chọn Type là INTEGER và tick vào PK(Primary Key) và AI (Auto Increment) là khóa chính tự động tăng.
Thuộc tính UserName, Password có type là TEXT
Sau khi tạo xong các thuộc tính ta nhấn nút OK và xem kết quả:
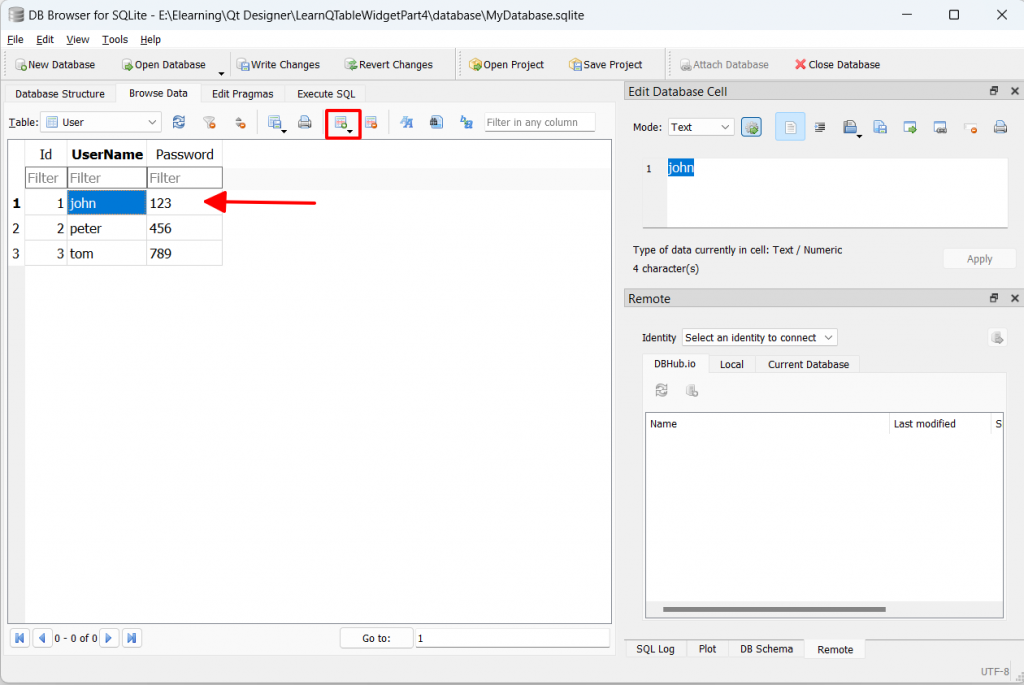
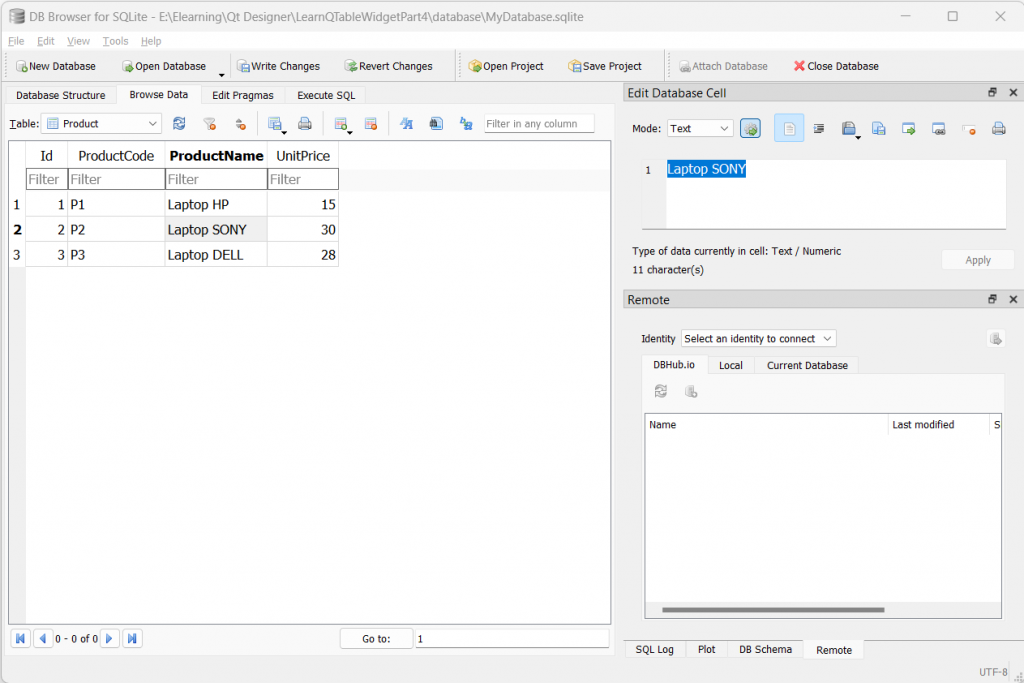
Tiếp theo ta nhập một vài dữ liệu mẫu cho bảng User này bằng cách nhấn vào thẻ “Browse Data”:
Để thêm dữ liệu cho bảng thì bấm vào biểu tượng New Record mà Tui tô khung đỏ ở trên, sau đó nhập dữ liệu và các dòng và cột tương ứng ở chỗ mũi tên màu đỏ.
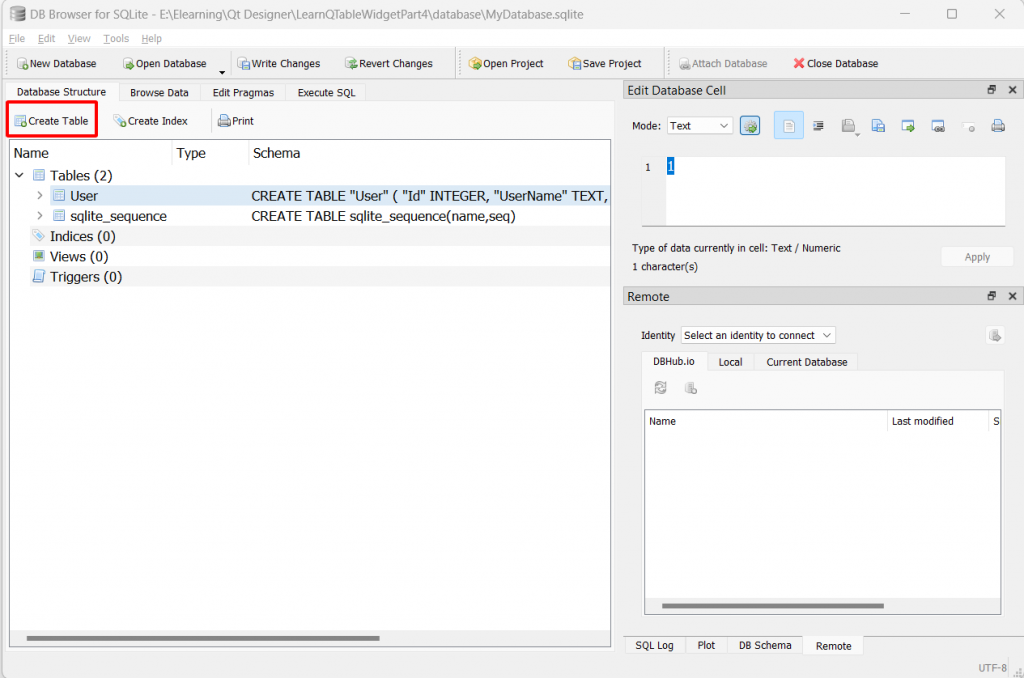
Tương tự như thế, ta tạo bảng tiếp theo có tên “Product” bằng cách bấm vào biểu tượng “Create Table” trong thẻ “Database Structure”:
Ta thiết kế bảng Product như dưới đây:
Tương tự như bảng User, bảng Product Tui cũng cấu hình Id là cột khóa chính (PK) và tự động tăng (AI – Auto Increment)
cột ProductCode để lưu mã Product có kiểu TEXT
cột productName để lưu tên Product có kiểu TEXT
và cuối cùng là cột UnitPrice để lưu giá Product có kểu REAL
sau khi cấu hình xong thì bấm OK , ta có kết quả:
Tương tự như bảng User ta nhập một số dữ liệu mẫu ban đầu cho Product:
Ta nhấn CTRL+S để lưu sự thay đổi của SQLITE mà ta mới cấu hình.
Bảng User Tui sẽ không hướng dẫn code truy vấn. Bài này là bài tập các bạn cần thiết kết màn hình đăng nhập, nếu đăng nhập thành công thì vào màn hình quản lý sản phẩm
Bảng Product Tui sẽ hướng dẫn chi tiết để quản lý sản phẩm: Xem, thêm, sửa, xóa….
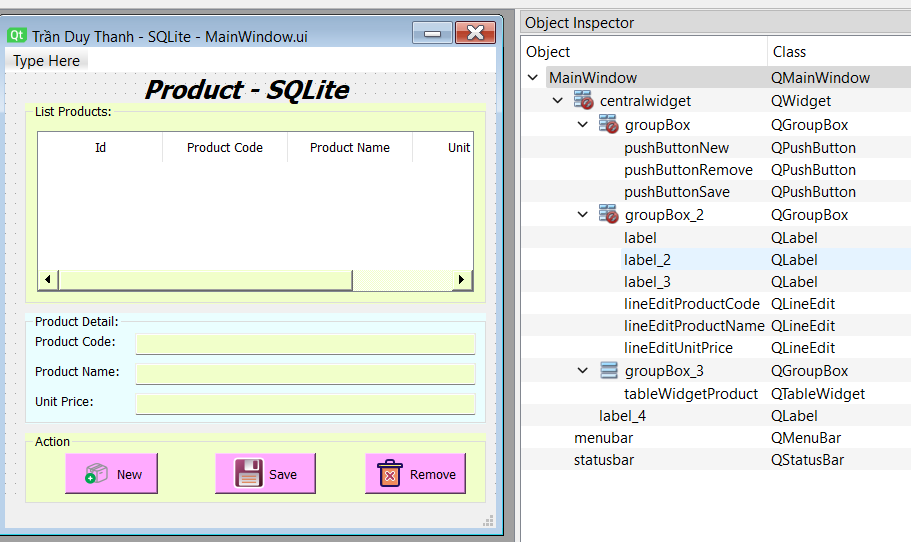
Bước 3: Thiết kế giao diện “MainWindow.ui” bằng Qt Designer được tích hợp trong Pycharm mà Tui đã hướng dẫn ở những bài đầu tiên của chuỗi bài học.
Các bạn kéo thả các Widget và cấu hình cũng như đặt tên cho các Widget như hình trên.
Bước 4: Generate Python code cho file “MainWindow.ui”, lúc này file mã lệnh “MainWindow.py” tự động được tạo ra như dưới đây:
Bước 5: Viết file mã lệnh “MainWindowEx.py” kế thừa từ “MainWindow.py” để xử lý sự kiện người dùng, cũng như không bị lệ thuộc vào giao diện trong tương lai thay đổi mà phải generate lại mã nguồn giao diện.
from PyQt6.QtSql import QSqlDatabase, QSqlTableModel, QSqlRecord
from PyQt6.QtWidgets import QTableWidgetItem, QMessageBox
from MainWindow import Ui_MainWindow
class MainWindowEx(Ui_MainWindow):
def __init__(self):
self.databasePath="database/MyDatabase.sqlite"
self.selectedRecord=None
self.selectedRow=None
Trong MainWindowEx, Tui định nghĩa 3 biến:
databasePath để lưu trữ đường dẫn tới SQLite mà ta thiết kế
selectedRecord là biến lưu trữ đối tượng QSqlRecord đang chọn để hỗ trợ cho việc Lưu mới hay cập nhật dữ liệu tiện lợi nhất
selectedRow là biến lưu trữ dòng hiện tại đang chọn (index) để hỗ trợ cho việc Lưu mới hay cập nhật dữ liệu tiện lợi nhất
Hàm setupUi được override để định mặc định gọi các kết nối và hiển thị dữ liệu danh sách Product lên QTableWidget, cũng như gán các signal để xử lý sử kiện người dùng:
Hàm connectDatabase sẽ gọi các kết nối tới cơ sở dữ liệu SQLite:
def connectDatabase(self):
# create QSqlDatabase object
self.db = QSqlDatabase("QSQLITE")
# set the database selected path
self.db.setDatabaseName(self.databasePath)
# Open the SQLite database
self.db.open()
# Create QSqlTableModel object, and self.db is assigned
self.model = QSqlTableModel(db=self.db)
Đối tượng QSqlitableModel được kích hoạt và được giao cho biến model quản lý
biến model này sẽ trỏ tới bất kỳ bảng dữ liệu nào mà ta mong muốn truy suất.
Hàm loadProduct để truy vấn toàn bộ dữ liệu trong bảng Product và hiển thị lên QTableWidget:
def loadProduct(self):
# select table name to invoke data
tableName = "Product"
self.model.setTable(tableName)
# active for selecting data
self.model.select()
# reset QTableWidget to 0 row
self.tableWidgetProduct.setRowCount(0)
# loop for insert new row:
for i in range(self.model.rowCount()):
# insert new row:
self.tableWidgetProduct.insertRow(i)
# get a record with i index:
record = self.model.record(i)
itemId = QTableWidgetItem(str(record.value(0)))
itemProductCode = QTableWidgetItem(str(record.value(1)))
itemProductName = QTableWidgetItem(str(record.value(2)))
itemUnitPrice = QTableWidgetItem(str(record.value(3)))
self.tableWidgetProduct.setItem(i, 0, itemId)
self.tableWidgetProduct.setItem(i, 1, itemProductCode)
self.tableWidgetProduct.setItem(i, 2, itemProductName)
self.tableWidgetProduct.setItem(i, 3, itemUnitPrice)
hàm processNew để xóa toàn bộ dữ liệu trong QLineEdit và focus tới ô Code để hỗ trợ nhập liệu nhanh chóng. Đồng thời các biến selectedRecord và selectedRow cũng được reset về None để đánh dấu rằng khi nhấn “Save” là lưu mới 1 record:
Hàm processItemSelection sẽ xử lý sự kiện người dùng chọn từng dòng trên QTableWidget, nó truy vấn dữ liệu trong model và hiển thị lên phần Product Details:
def processItemSelection(self):
#Get current row index on the QTableWidget
self.selectedRow=self.tableWidgetProduct.currentRow()
if self.selectedRow==-1:
return
#call record(index) method from model
self.selectedRecord=self.model.record(self.selectedRow)
#Get detail information from QSqlRecord
#id=self.selectedRecord.value(0)
productCode=self.selectedRecord.value(1)
productName=self.selectedRecord.value(2)
unitPrice=self.selectedRecord.value(3)
# show detail information into the QLineEdit
self.lineEditProductCode.setText(productCode)
self.lineEditProductName.setText(productName)
self.lineEditUnitPrice.setText(str(unitPrice))
Hàm processSave sẽ thực hiện 2 tác vụ: Lưu mới và lưu cập nhật, nếu selectedRecord là None thì lưu mới, còn selectedRecord là khác None thì lưu cập nhật:
def processSave(self):
#Get lasted row
row = self.model.rowCount()
if self.selectedRecord==None:#if new product
#Get the QSqlRecord from record(row)
record=self.model.record(row)
#assign the value for QSqlRecord
#record.setValue(0, None)
record.setValue(1,self.lineEditProductCode.text())
record.setValue(2, self.lineEditProductName.text())
record.setValue(3, float(self.lineEditUnitPrice.text()))
#call the insertRecord for storing a new record into SQLite
result=self.model.insertRecord(row,record)
#if saving successful then result =True
if result==True:
#save the lasted record and reload products
self.selectedRecord=record
self.selectedRow=row
self.loadProduct()
else:#if updating the QSqlRecord
# assign the value for QSqlRecord
self.selectedRecord.setValue(1, self.lineEditProductCode.text())
self.selectedRecord.setValue(2, self.lineEditProductName.text())
self.selectedRecord.setValue(3, float(self.lineEditUnitPrice.text()))
# call the updateRowInTable for updating selected record into SQLite
result=self.model.updateRowInTable(self.selectedRow,self.selectedRecord)
# if saving successful then result =True
if result == True:
#reload products
self.loadProduct()
hàm insertRecord(row,record) để lưu mới, nếu lưu thành công thì nó trả kết quả về là True
hàm updateRowInTable(row,record) để lưu cập nhật, nếu lưu thành công thì nó trả kết quả về là True
Khi lưu thành công thì chương trình sẽ nạp lại dữ liệu lên QTableWidget.
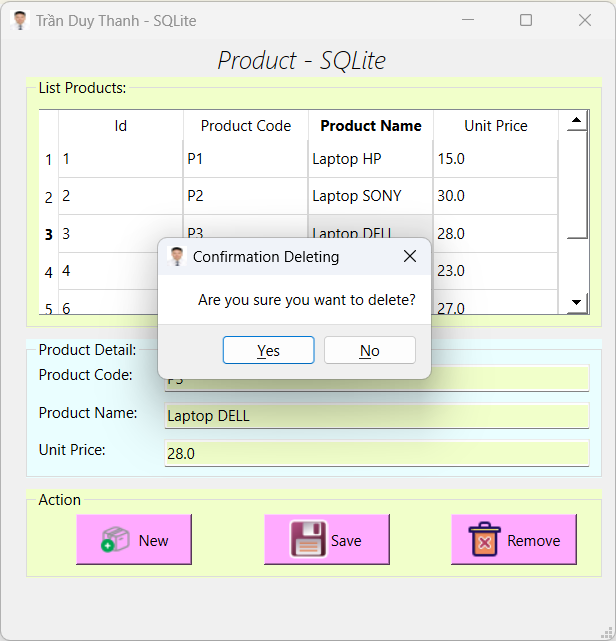
Hàm processRemove dùng để xóa QSqlRecord đang chọn trên QTableWidget:
def processRemove(self):
dlg = QMessageBox(self.MainWindow)
if self.selectedRecord == None:
dlg.setWindowTitle("Deleteing error")
dlg.setIcon(QMessageBox.Icon.Critical)
dlg.setText("You have to select a Product to delete")
dlg.exec()
return
dlg.setWindowTitle("Confirmation Deleting")
dlg.setText("Are you sure you want to delete?")
buttons = QMessageBox.StandardButton.Yes | QMessageBox.StandardButton.No
dlg.setStandardButtons(buttons)
button = dlg.exec()
if button == QMessageBox.StandardButton.Yes:
#call removeRow method to remove QSqlRecord from the SQLite
result=self.model.removeRow(self.selectedRow)
# if saving successful then result =True
if result == True:
# save the lasted record and reload products
self.loadProduct()
self.processNew()
Tui coding dùng QMessageBox để hiển thị cửa sổ xác nhận có muốn xóa hay không
Hàm removeRow(row) dùng để xóa dòng dữ liệu đang chọn ra khỏi bảng. Nếu xóa thành công thì kết quả trả về là True, lúc này ta nạp lại dữ liệu lên giao diện QTableWidget, đồng thời gọi hàm processNew để xóa dữ liệu trong QLineEdit đi
Dưới đây là coding đầy đủ của chương trình:
from PyQt6.QtSql import QSqlDatabase, QSqlTableModel, QSqlRecord
from PyQt6.QtWidgets import QTableWidgetItem, QMessageBox
from MainWindow import Ui_MainWindow
class MainWindowEx(Ui_MainWindow):
def __init__(self):
self.databasePath="database/MyDatabase.sqlite"
self.selectedRecord=None
self.selectedRow=None
def setupUi(self, MainWindow):
super().setupUi(MainWindow)
self.MainWindow=MainWindow
self.connectDatabase()
self.loadProduct()
self.pushButtonNew.clicked.connect(self.processNew)
self.tableWidgetProduct.itemSelectionChanged.connect(self.processItemSelection)
self.pushButtonSave.clicked.connect(self.processSave)
self.pushButtonRemove.clicked.connect(self.processRemove)
def connectDatabase(self):
# create QSqlDatabase object
self.db = QSqlDatabase("QSQLITE")
# set the database selected path
self.db.setDatabaseName(self.databasePath)
# Open the SQLite database
self.db.open()
# Create QSqlTableModel object, and self.db is assigned
self.model = QSqlTableModel(db=self.db)
def loadProduct(self):
# select table name to invoke data
tableName = "Product"
self.model.setTable(tableName)
# active for selecting data
self.model.select()
# reset QTableWidget to 0 row
self.tableWidgetProduct.setRowCount(0)
# loop for insert new row:
for i in range(self.model.rowCount()):
# insert new row:
self.tableWidgetProduct.insertRow(i)
# get a record with i index:
record = self.model.record(i)
itemId = QTableWidgetItem(str(record.value(0)))
itemProductCode = QTableWidgetItem(str(record.value(1)))
itemProductName = QTableWidgetItem(str(record.value(2)))
itemUnitPrice = QTableWidgetItem(str(record.value(3)))
self.tableWidgetProduct.setItem(i, 0, itemId)
self.tableWidgetProduct.setItem(i, 1, itemProductCode)
self.tableWidgetProduct.setItem(i, 2, itemProductName)
self.tableWidgetProduct.setItem(i, 3, itemUnitPrice)
def processNew(self):
self.lineEditProductCode.setText("")
self.lineEditProductName.setText("")
self.lineEditUnitPrice.setText("")
self.lineEditProductCode.setFocus()
self.selectedRecord=None
self.selectedRow=None
def processItemSelection(self):
#Get current row index on the QTableWidget
self.selectedRow=self.tableWidgetProduct.currentRow()
if self.selectedRow==-1:
return
#call record(index) method from model
self.selectedRecord=self.model.record(self.selectedRow)
#Get detail information from QSqlRecord
#id=self.selectedRecord.value(0)
productCode=self.selectedRecord.value(1)
productName=self.selectedRecord.value(2)
unitPrice=self.selectedRecord.value(3)
# show detail information into the QLineEdit
self.lineEditProductCode.setText(productCode)
self.lineEditProductName.setText(productName)
self.lineEditUnitPrice.setText(str(unitPrice))
def processSave(self):
#Get lasted row
row = self.model.rowCount()
if self.selectedRecord==None:#if new product
#Get the QSqlRecord from record(row)
record=self.model.record(row)
#assign the value for QSqlRecord
#record.setValue(0, None)
record.setValue(1,self.lineEditProductCode.text())
record.setValue(2, self.lineEditProductName.text())
record.setValue(3, float(self.lineEditUnitPrice.text()))
#call the insertRecord for storing a new record into SQLite
result=self.model.insertRecord(row,record)
#if saving successful then result =True
if result==True:
#save the lasted record and reload products
self.selectedRecord=record
self.selectedRow=row
self.loadProduct()
else:#if updating the QSqlRecord
# assign the value for QSqlRecord
self.selectedRecord.setValue(1, self.lineEditProductCode.text())
self.selectedRecord.setValue(2, self.lineEditProductName.text())
self.selectedRecord.setValue(3, float(self.lineEditUnitPrice.text()))
# call the updateRowInTable for updating selected record into SQLite
result=self.model.updateRowInTable(self.selectedRow,self.selectedRecord)
# if saving successful then result =True
if result == True:
#reload products
self.loadProduct()
def processRemove(self):
dlg = QMessageBox(self.MainWindow)
if self.selectedRecord == None:
dlg.setWindowTitle("Deleteing error")
dlg.setIcon(QMessageBox.Icon.Critical)
dlg.setText("You have to select a Product to delete")
dlg.exec()
return
dlg.setWindowTitle("Confirmation Deleting")
dlg.setText("Are you sure you want to delete?")
buttons = QMessageBox.StandardButton.Yes | QMessageBox.StandardButton.No
dlg.setStandardButtons(buttons)
button = dlg.exec()
if button == QMessageBox.StandardButton.Yes:
#call removeRow method to remove QSqlRecord from the SQLite
result=self.model.removeRow(self.selectedRow)
# if saving successful then result =True
if result == True:
# save the lasted record and reload products
self.loadProduct()
self.processNew()
def show(self):
self.MainWindow.show()
Bước 6: Cuối cùng ta tạo “MyApp.py” để thực thi chương trình:
from PyQt6.QtWidgets import QApplication, QMainWindow

from MainWindowEx import MainWindowEx

app=QApplication([])
myWindow=MainWindowEx()
myWindow.setupUi(QMainWindow())
myWindow.show()
app.exec()
Chạy chương trình ta có kết quả như mong muốn:
Như vậy là tới đây các Bạn đã biết cách xây dựng một phần mềm hoàn chỉnh có tương tác SQLite từ khâu: Xem, thêm, sửa xóa. Cũng như ôn tập lại các signal, xử lý sự kiện QMessageBox…
Các bạn có thể áp dụng bài này vào các bài quản lý khác như quản lý Nhân viên, quản lý kho….
Trong bài 23 chúng ta đã thực hiện chi tiết các tác vụ trên QTableWidget như: Xem, thêm, sửa, xóa, mô hình hóa dữ liệu, serialize và deserialize dữ liệu với JSON ARRAY. Tuy nhiên, về vấn đề lưu trữ dữ liệu thường nó phức tạp, nó đòi hỏi rất nhiều bảng dữ liệu, mỗi bảng có rất nhiều trường dữ liệu và chúng thường có mối quan hệ khá chặt chẽ. Ví dụ như bạn muốn phát triển một phần mềm quản lý bán hàng thì nó cần các bảng dữ liệu có mối quan hệ như: Danh mục sản phẩm, sản phẩm, hóa đơn, chi tiết hóa đơn, khách hàng, nhân viên, nhà cung cấp, nhà vận chuyển… Do đó khi phát triển phần mềm thường chúng ta nghĩ tới cơ sở dữ liệu có thể đáp ứng nhu cầu lưu trữ phức tạp này. Chẳng hạn như Microsoft SQL Server, MY SQL, MongoDB, SQLite…
Trong bài này Tui sẽ hướng dẫn cách sử dụng SQLite để lưu trữ và xử dữ liệu, cũng như trình bày một số kỹ thuật để kết nối và truy vấn dữ liệu từ SQLite lên QTableWidget. Tui sẽ cung cấp một số cơ sở dữ liệu SQLite mẫu, và viết các mã lệnh để tự động kết nối các cơ sở dữ liệu này cũng như tự động đọc danh sách các bảng trong cơ sở dữ liệu và truy vấn danh sách dữ liệu trong bảng lên giao diện QTableWidget. Bài học kế tiếp Tui sẽ trình bày các thao tác Thêm, Sửa, Xóa vào SQLite Database.
Các chức năng chính của phần mềm bao gồm:
Cho người dùng lựa chọn một cơ sở dữ liệu SQLite bất kỳ để kết nối
Chương trình sẽ tự động đọc danh sách các Bảng dữ liệu nằm bên trong SQLite
Người dùng chọn Bảng dữ liệu nào thì chương trình sẽ truy vấn các dữ liệu ở bên trong Bảng này lên giao diện QTableWidget
Cung cấp chức năng Fetch More để tiếp tục đọc các dữ liệu trong Bảng trong trường hợp bảng có nhiều dòng dữ liệu (Ví dụ lớn hơn 256 dòng dữ liệu)
Ta tiến hành thực hiện chương trình nhé:
Bước 1: Tạo dự án “LearnQTableWidgetPart3” có cấu trúc như dưới đây
Thư mục “databases” chứa một số SQLite mẫu, người sử dụng sẽ lựa chọn tùy ý các SQLite để hiển thị lên QTableWidget
Thư mục “images” chưa hình ảnh, icon
“MainWindow.ui” là file giao diện thiết kế sử dụng Qt Designer
“MainWindow.py” là file generate python code từ giao diện MainWindow.ui
“MyApp.py” là file mã lệnh để thực thi chương trình
Bước 2: Làm quen với cơ sở dữ liệu SQLite.
Trong dự án có thư mục “databases”, Tui upload ở đây các bạn tải về sử dụng:
Trong thư mục này có nhiều cơ sở dữ liệu mẫu, các bạn có thể ứng dụng để triển khai các phần mềm như: Karaoke, từ điển Anh Việt, quản lý bán hàng âm nhạc….
Có nhiều công cụ để mở các Cơ sở dữ liệu SQLite để thao tác, trong đó có SQLite DB Browser, các bạn tải ở link https://sqlitebrowser.org/dl/
Sau khi cài đặt DB Browser thành công, các bạn chạy phần mềm này lên và mở một cơ sở dữ liệu SQLite bất kỳ, ví dụ “Chinook_Sqlite.sqlite”:
Trong phần mềm DB Browser, bạn bấm chọn “Open Database” và trỏ tới cơ sở dữ liệu “Chinook_Sqlite.sqlite”.
Thẻ “Database Structure” sẽ hiển thị danh sách các bản trong cơ sở dữ liệu, ví dụ trong trường hợp này ta thấy có 11 bảng bao gồm: Album, Artist, Customer, Employee, Genre, Invoice, InvoiceLine, MediaType, Playlist, PlaylistTrack, Track
Bạn có thể bấm vào từng bảng để xem cấu trúc chi tiết:
Thẻ “Browse Data” để xem dữ liệu của từng bảng:
Trong thẻ “Browse Data” có combobox Table, ta có thể nhấn vào để chọn các Bảng để xem dữ liệu tương ứng của nó.
Bước 3: Thiết kế giao diện “MainWindow.ui” bằng Qt Designer, dĩ nhiên các bước này Tui đã trình bày rất kỹ lưỡng ở những bài học trước do đó Tui không có trình bày lại, mà các bạn cần phải học tuần tự để có khả năng tự thiết kế giao diện theo mục đích sử dụng riêng của mình:
Bạn kéo thả các Widget vào giao diện như hình minh họa, rồi đặt tên cho các Widget tương ứng như trong màn hình Object Inspector.
Sau đó lưu giao diện này lại vào dự án “LearnQTableWidgetPart3” với tên MainWindow.ui.
Bước 4: Dùng chức năng Generate Python code cho giao diện MainWindow.ui để tạo file mã nguồn “MainWindow.py”:
# Form implementation generated from reading ui file 'MainWindow.ui'
#
# Created by: PyQt6 UI code generator 6.4.2
#
# WARNING: Any manual changes made to this file will be lost when pyuic6 is
# run again.  Do not edit this file unless you know what you are doing.


from PyQt6 import QtCore, QtGui, QtWidgets


class Ui_MainWindow(object):
    def setupUi(self, MainWindow):
        MainWindow.setObjectName("MainWindow")
        MainWindow.resize(560, 511)
        icon = QtGui.QIcon()
        icon.addPixmap(QtGui.QPixmap("images/ic_logo.jpg"), QtGui.QIcon.Mode.Normal, QtGui.QIcon.State.Off)
        MainWindow.setWindowIcon(icon)
        self.centralwidget = QtWidgets.QWidget(parent=MainWindow)
        self.centralwidget.setObjectName("centralwidget")
        self.label = QtWidgets.QLabel(parent=self.centralwidget)
        self.label.setGeometry(QtCore.QRect(30, 20, 101, 21))
        self.label.setObjectName("label")
        self.lineEditSQLite = QtWidgets.QLineEdit(parent=self.centralwidget)
        self.lineEditSQLite.setGeometry(QtCore.QRect(140, 20, 301, 22))
        self.lineEditSQLite.setObjectName("lineEditSQLite")
        self.pushButtonPickSQLite = QtWidgets.QPushButton(parent=self.centralwidget)
        self.pushButtonPickSQLite.setGeometry(QtCore.QRect(450, 20, 93, 28))
        icon1 = QtGui.QIcon()
        icon1.addPixmap(QtGui.QPixmap("images/ic_pickdatabase.png"), QtGui.QIcon.Mode.Normal, QtGui.QIcon.State.Off)
        self.pushButtonPickSQLite.setIcon(icon1)
        self.pushButtonPickSQLite.setObjectName("pushButtonPickSQLite")
        self.label_2 = QtWidgets.QLabel(parent=self.centralwidget)
        self.label_2.setGeometry(QtCore.QRect(30, 60, 101, 21))
        self.label_2.setObjectName("label_2")
        self.cboTable = QtWidgets.QComboBox(parent=self.centralwidget)
        self.cboTable.setGeometry(QtCore.QRect(140, 60, 301, 22))
        self.cboTable.setObjectName("cboTable")
        self.pushButtonFetchMore = QtWidgets.QPushButton(parent=self.centralwidget)
        self.pushButtonFetchMore.setGeometry(QtCore.QRect(30, 430, 111, 31))
        icon2 = QtGui.QIcon()
        icon2.addPixmap(QtGui.QPixmap("images/ic_fetchmore.png"), QtGui.QIcon.Mode.Normal, QtGui.QIcon.State.Off)
        self.pushButtonFetchMore.setIcon(icon2)
        self.pushButtonFetchMore.setObjectName("pushButtonFetchMore")
        self.tableWidget = QtWidgets.QTableWidget(parent=self.centralwidget)
        self.tableWidget.setGeometry(QtCore.QRect(30, 100, 511, 311))
        self.tableWidget.setObjectName("tableWidget")
        self.tableWidget.setColumnCount(0)
        self.tableWidget.setRowCount(0)
        MainWindow.setCentralWidget(self.centralwidget)
        self.menubar = QtWidgets.QMenuBar(parent=MainWindow)
        self.menubar.setGeometry(QtCore.QRect(0, 0, 560, 26))
        self.menubar.setObjectName("menubar")
        MainWindow.setMenuBar(self.menubar)
        self.statusbar = QtWidgets.QStatusBar(parent=MainWindow)
        self.statusbar.setObjectName("statusbar")
        MainWindow.setStatusBar(self.statusbar)

        self.retranslateUi(MainWindow)
        QtCore.QMetaObject.connectSlotsByName(MainWindow)

    def retranslateUi(self, MainWindow):
        _translate = QtCore.QCoreApplication.translate
        MainWindow.setWindowTitle(_translate("MainWindow", "Trần Duy Thanh - QTableWidget - SQLite"))
        self.label.setText(_translate("MainWindow", "Choose SQLite:"))
        self.pushButtonPickSQLite.setText(_translate("MainWindow", "..."))
        self.label_2.setText(_translate("MainWindow", "Choose table:"))
        self.pushButtonFetchMore.setText(_translate("MainWindow", "Fetch More"))
Bước 5: Tạo file mã nguồn “MainWindowEx.py”, lớp này kế thừa từ lớp được Generate Python Code ở bước trước để xử lý các sự kiện người dùng, cũng như không bị ảnh hưởng mã lệnh khi trong tương lai giao diện thay đổi.
import os.path

from PyQt6.QtSql import QSqlDatabase, QSqlTableModel
from PyQt6.QtWidgets import QFileDialog, QTableWidgetItem, QMessageBox
from MainWindow import Ui_MainWindow

class MainWindowEx(Ui_MainWindow):
    def setupUi(self, MainWindow):
        super().setupUi(MainWindow)
        self.MainWindow=MainWindow
        self.pushButtonPickSQLite.clicked.connect(self.processPickSQLite)
        self.cboTable.activated.connect(self.processSelectedTable)
        self.pushButtonFetchMore.clicked.connect(self.processFetchMore)
Hàm setupUi được override, và Ta tiến hành gán 3 signal tương ứng cho 3 Widget trên giao diện:
Signal “clicked” cho widget pushButtonPickSQLite với slot là “processPickSQLite” để chọn một cơ sở dữ liệu SQLite bất kỳ và hiển thị toàn bộ tên Bảng trong SQLite vừa chọn lên QComboBox.
Signal “activated” cho widget cboTable để chọn một bảng bất kỳ trong cơ sở dữ liệu và nạp dữ liệu của bảng lên QTableWidget
Signal “clicked” cho widget pushButtonFetchMore để đọc tiếp các dữ liệu còn trong Table (nếu dữ liệu nhiều hơn 256 dòng)
Dưới đây là chi tiết của từng slot(HÀM):
Hàm “processPickSQLite” hàm này sẽ hiển thị QFileDialog để người dùng chọn lựa Cơ sở dữ liệu SQLite bất kỳ:
def processPickSQLite(self):
    #setup for QFileDialog
    filters = "SQLite database (*.sqlite);;All files(*)"
    filename, selected_filter = QFileDialog.getOpenFileName(
        self.MainWindow,
        filter=filters,
    )
    #get selected file name and showing on the QLineEdit
    self.lineEditSQLite.setText(filename)
    #create base dir
    baseDir = os.path.dirname(__file__)
    #set the database path
    databasePath = os.path.join(baseDir, filename)
    #create QSqlDatabase object
    self.db = QSqlDatabase("QSQLITE")
    #set the database selected path
    self.db.setDatabaseName(databasePath)
    #Open the SQLite database
    self.db.open()
    #get all tables in the selected SQLite
    tables= self.db.tables()
    self.cboTable.clear()
    #show all the table names into the QCombobox:
    for i in range(len(tables)):
        tableName=tables[i]
        self.cboTable.addItem(tableName)
Sau khi kết nối cơ sở dữ liệu thành công, Tui có viết mã lệnh vòng lặp ở bên dưới cuối của hàm để nạp toàn bộ các tên bảng của cơ sở dữ liệu vừa chọn lựa lên QComboBox. Cách viết mã lệnh ở trên thì chương trình sẽ tự động đọc được các bảng của 1 cơ sở dữ liệu SQLite bất kỳ nên rất linh động.
Hàm “processSelectedTable” sẽ lắng nghe xem người sử dụng chọn Table nào trong QComboBox và sau đó chương trình sẽ nạp dữ liệu của Table này lên QTableWidget:
def processSelectedTable(self):
    #Get the current Table Name in QCombobox
    tableName=self.cboTable.currentText()
    #Create QSqlTableModel object, and self.db is assigned
    self.model = QSqlTableModel(db=self.db)
    #select table name to invoke data
    self.model.setTable(tableName)
    #active for selecting data
    self.model.select()
    #reset QTableWidget to 0 row
    self.tableWidget.setRowCount(0)
    #get the column count for selected Table as automatic
    self.columns=self.model.record().count()
    #set columns count for QTableWidget
    self.tableWidget.setColumnCount(self.columns)
    #create labels array for Columns Headers
    labels=[]
    for i in range(self.columns):
        #get column name:
        fieldName=self.model.record().fieldName(i)
        #store the column name
        labels.append(fieldName)
    #set the columns header with labels
    self.tableWidget.setHorizontalHeaderLabels(labels)
    #loop for insert new row:
    for i in range(self.model.rowCount()):
        #insert new row:
        self.tableWidget.insertRow(i)
        #get a record with i index:
        record=self.model.record(i)
        #loop column to get value for each cell:
        for j in range(self.columns):
            #create QTableWidgetItem object
            item=QTableWidgetItem(str(record.value(j)))
            #set value for each CELL:
            self.tableWidget.setItem(i,j,item)
Chương trình sẽ tự động đọc tất cả các Columns (attributes) của Bảng vừa chọn và tiến hành tạo các Columns Header cho QTableWidget. Sau đó nó sẽ đọc dữ liệu và nạp vào QTableWidget tương ứng với các cột mà nó đã khởi tạo.
Mã lệnh của hàm này hơi phức tạp, các bạn cố gắng đọc các comment mà Tui đã viết cho từng dòng lệnh ở trên.
Mặc định thì nó sẽ tải 256 dòng trước, vì vậy Tui bổ sung thêm hàm Fetch More để đọc tiếp các batch 256 tiếp theo:
Hàm “processFetchMore”:
def processFetchMore(self):
    #check if the model can fetch more:
    if self.model.canFetchMore():
        #set the i index for last rowcount:
        i=self.model.rowCount()
        #call fetchmore method:
        self.model.fetchMore()
        #loop for new batch data:
        for i in range(i,self.model.rowCount()):
            # insert new row:
            self.tableWidget.insertRow(i)
            # get a record with i index:
            record = self.model.record(i)
            # loop column to get value for each cell:
            for j in range(self.columns):
                # create QTableWidgetItem object
                item = QTableWidgetItem(str(record.value(j)))
                # set value for each CELL:
                self.tableWidget.setItem(i, j, item)
    else:
        msg=QMessageBox()
        msg.setText("No more records to fetch")
        msg.exec()
Mã lệnh trên Tui sẽ kiểm tra nếu còn dữ liệu trong model thì tiếp tục Fetch, fetch tới khi nào hết thì sẽ dùng QMessageBox để thông báo “No more recors to fetch”.
Dưới đây là mã lệnh đầy đủ của “MainWindowEx.py”:
import os.path

from PyQt6.QtSql import QSqlDatabase, QSqlTableModel
from PyQt6.QtWidgets import QFileDialog, QTableWidgetItem, QMessageBox
from MainWindow import Ui_MainWindow

class MainWindowEx(Ui_MainWindow):
    def setupUi(self, MainWindow):
        super().setupUi(MainWindow)
        self.MainWindow=MainWindow
        self.pushButtonPickSQLite.clicked.connect(self.processPickSQLite)
        self.cboTable.activated.connect(self.processSelectedTable)
        self.pushButtonFetchMore.clicked.connect(self.processFetchMore)
    def processPickSQLite(self):
        #setup for QFileDialog
        filters = "SQLite database (*.sqlite);;All files(*)"
        filename, selected_filter = QFileDialog.getOpenFileName(
            self.MainWindow,
            filter=filters,
        )
        #get selected file name and showing on the QLineEdit
        self.lineEditSQLite.setText(filename)
        #create base dir
        baseDir = os.path.dirname(__file__)
        #set the database path
        databasePath = os.path.join(baseDir, filename)
        #create QSqlDatabase object
        self.db = QSqlDatabase("QSQLITE")
        #set the database selected path
        self.db.setDatabaseName(databasePath)
        #Open the SQLite database
        self.db.open()
        #get all tables in the selected SQLite
        tables= self.db.tables()
        self.cboTable.clear()
        #show all the table names into the QCombobox:
        for i in range(len(tables)):
            tableName=tables[i]
            self.cboTable.addItem(tableName)
    def processSelectedTable(self):
        #Get the current Table Name in QCombobox
        tableName=self.cboTable.currentText()
        #Create QSqlTableModel object, and self.db is assigned
        self.model = QSqlTableModel(db=self.db)
        #select table name to invoke data
        self.model.setTable(tableName)
        #active for selecting data
        self.model.select()
        #reset QTableWidget to 0 row
        self.tableWidget.setRowCount(0)
        #get the column count for selected Table as automatic
        self.columns=self.model.record().count()
        #set columns count for QTableWidget
        self.tableWidget.setColumnCount(self.columns)
        #create labels array for Columns Headers
        labels=[]
        for i in range(self.columns):
            #get column name:
            fieldName=self.model.record().fieldName(i)
            #store the column name
            labels.append(fieldName)
        #set the columns header with labels
        self.tableWidget.setHorizontalHeaderLabels(labels)
        #loop for insert new row:
        for i in range(self.model.rowCount()):
            #insert new row:
            self.tableWidget.insertRow(i)
            #get a record with i index:
            record=self.model.record(i)
            #loop column to get value for each cell:
            for j in range(self.columns):
                #create QTableWidgetItem object
                item=QTableWidgetItem(str(record.value(j)))
                #set value for each CELL:
                self.tableWidget.setItem(i,j,item)
    def processFetchMore(self):
        #check if the model can fetch more:
        if self.model.canFetchMore():
            #set the i index for last rowcount:
            i=self.model.rowCount()
            #call fetchmore method:
            self.model.fetchMore()
            #loop for new batch data:
            for i in range(i,self.model.rowCount()):
                # insert new row:
                self.tableWidget.insertRow(i)
                # get a record with i index:
                record = self.model.record(i)
                # loop column to get value for each cell:
                for j in range(self.columns):
                    # create QTableWidgetItem object
                    item = QTableWidgetItem(str(record.value(j)))
                    # set value for each CELL:
                    self.tableWidget.setItem(i, j, item)
        else:
            msg=QMessageBox()
            msg.setText("No more records to fetch")
            msg.exec()
    def show(self):
        self.MainWindow.show()
Bước 6: Tạo “MyApp.py” để thực thi chương trình
from PyQt6.QtWidgets import QApplication, QMainWindow

from MainWindowEx import MainWindowEx

app=QApplication([])
myWindow= MainWindowEx()
myWindow.setupUi(QMainWindow())
myWindow.show()
app.exec()
Ta chạy “MyApp.py” để thực thi chương trình như đã thiết kế:
Bước 1: Chọn Cơ sở dữ liệu SQLite tùy ý, lúc này toàn bộ bảng của CSDL sẽ được nạp vào QComboBox một cách tự động
Bước 2: Chọn tên bảng bất kỳ trong QComboBox, lúc này dữ liệu của bảng sẽ được nạp vào QTableWidget
Bước 3: Bấm Fetch More để nạp tiếp dữ liệu cho tới hết, mỗi lần nạp lấy thêm 256 records.
Như vậy tới đây Tui đã trình bày xong chi tiết cách sử dụng SQLite, DB Browser, cách dùng các thư viện để nạp dữ liệu từ SQLite lên QTableWidget, QComboBox, cũng như cách Fetch More. Các bạn cố gắng thực hành lại nhiều lần để rành hơn về kỹ thuật xử lý, cũng như áp dụng nó vào các bài toán trong thực tế của mình.
Mã lệnh đầy đủ cùng với các material của dự án các bạn tải ở đây: